2015 HONDA CROSSTOUR rear view mirror
[x] Cancel search: rear view mirrorPage 7 of 573

Visual Index
6
Quick Reference Guide
❙Power Door Lock Master Switch (P 100)
❙Power Window Switches (P 110)
❙Rearview Mirror (P 130)
❙Hood Release Handle (P 471)
❙Shift Lever
Automatic Transmission
(P 425, 426, 428)
❙Glove Box (P 144)
❙Driver’s Front Airbag (P 42)
❙Door Mirror Controls (P 131)
❙Passenger’s Front Airbag
(P 42)
❙Accessory Power Socket
(P 147)
❙Interior Fuse Box
(Passenger’s side)
(P 539)
❙Interior Fuse Box (Driver’s side) (P 539)
❙Parking Brake (P 449)
15 CROSSTOUR-31TP66500.book 6 ページ 2014年7月31日 木曜日 午後3時23分
Page 9 of 573

Visual Index
8
Quick Reference Guide
❙Windshield Wipers (P 123, 493)
❙Maintenance Under the Hood (P 469)
❙Fog Lights (P 122, 486)
❙Front Turn Signal/Parking Lights (P 119, 489)
❙Side Marker Lights (P 119, 488)
❙Tires (P 497, 517)
❙How to Refuel (P 457)
❙Opening/Closing the Tailgate (P 105)
❙Rear Wiper (P 124, 495)
❙Back-Up Lights (P 490)
❙Brake/Taillights (P 490)
❙Rear Turn Signal Lights (P 490)
❙Rear Side Marker Lights (P 490)
❙Multi-View Rear Camera (P 455)
❙Rearview Camera (P 454)
❙Rear License Plate Lights (P 492)
❙Headlights (P 119, 484)
❙Power Door Mirrors (P 131)
❙Door Lock/Unlock Control (P 94)
❙High-Mount Brake Light (P 492)
❙Tailgate Release Button (P 106)
15 CROSSTOUR-31TP66500.book 8 ページ 2014年7月31日 木曜日 午後3時23分
Page 88 of 573

87
Controls
This chapter explains how to operate the various controls necessary for driving.
Setting the Clock................................ 88
Locking and Unlocking the Doors Key Types and Functions .................... 91
Low Smart Entry Remote Signal Strength*.. 93Locking/Unlocking the Doors from the Outside ............................................ 94
Locking/Unlocking the Doors from the
Inside ............................................... 99
Childproof Door Locks ..................... 100
Auto Door Locking/Unlocking .......... 101
Opening and Closing the Tailgate ... 105
Security System ................................ 107
Immobilizer System .......................... 107
Security System Alarm ...................... 107
Opening and Closing the Windows ..... 110
Opening and Closing the Moonroof.. 113Operating the Switches Around the
Steering Wheel
Ignition Switch
*............................... 114
ENGINE START/STOP Button*........... 115
Ignition Switch and Power Mode Comparison ................................... 118
Turn Signals ..................................... 119
Light Switches.................................. 119
Fog Lights ........................................ 122
Daytime Running Lights ................... 122
Wipers and Washers ........................ 123
Brightness Control ........................... 125
Rear Defogger/Heated Door Mirror Button.. 126Driving Position Memory System*.... 127 Adjusting the Steering Wheel .......... 129
Adjusting the Mirrors ....................... 130
Interior Rearview Mirror ................... 130
Power Door Mirrors ......................... 131
Adjusting the Seats .......................... 133
Adjusting the Seat Positions ............. 133
Interior Lights/Interior Convenience Items ................................................ 142
Interior Lights .................................. 142
Interior Convenience Items .............. 144
Heating and Cooling System
*......... 154
Using Vents, Heating and A/C.......... 154
Climate Control System
*.................. 157
Using Automatic Climate Control .... 157
Automatic Climate Control Sensors ... 162
* Not available on all models
15 CROSSTOUR-31TP66500.book 87 ページ 2014年7月31日 木曜日 午後3時23分
Page 131 of 573
130
Controls
Adjusting the Mirrors
Interior Rearview Mirror
Adjust the angle of the rearview mirror when you are sitting in the correct driving
position.
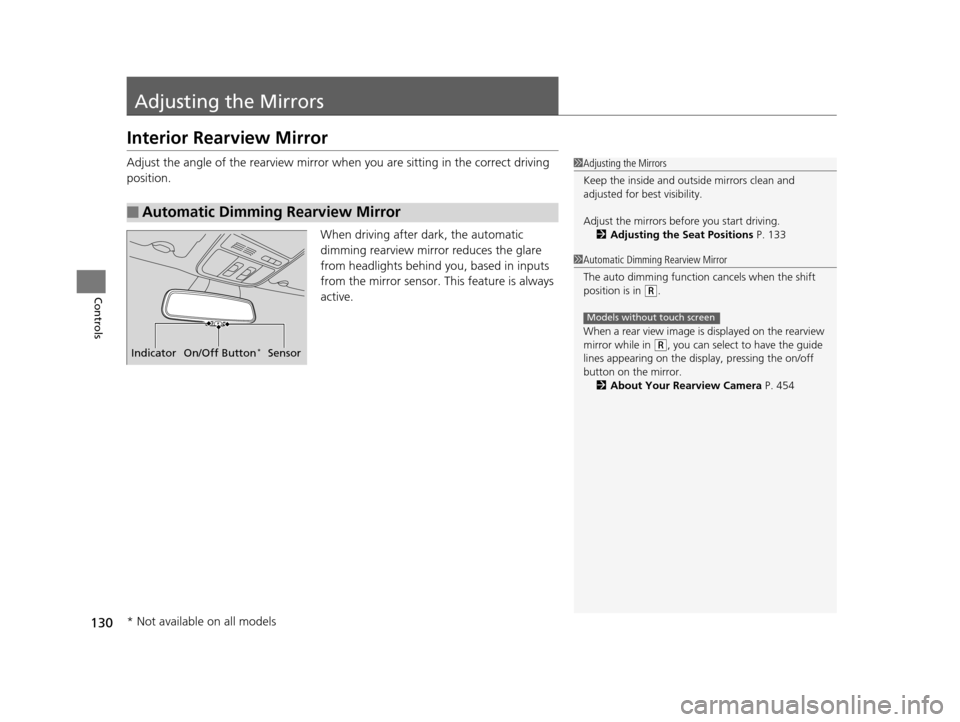
When driving after dark, the automatic
dimming rearview mirror reduces the glare
from headlights behind you, based in inputs
from the mirror sensor. This feature is always
active.
■Automatic Dimming Rearview Mirror
1Adjusting the Mirrors
Keep the inside and out side mirrors clean and
adjusted for best visibility.
Adjust the mirrors befo re you start driving.
2 Adjusting the Seat Positions P. 133
Indicator On/Off Button*Sensor
1Automatic Dimming Rearview Mirror
The auto dimming function cancels when the shift
position is in
(R.
When a rear view image is displayed on the rearview
mirror while in
( R, you can select to have the guide
lines appearing on the display, pressing the on/off
button on the mirror.
2 About Your Rearview Camera P. 454
Models without touch screen
* Not available on all models
15 CROSSTOUR-31TP66500.book 130 ページ 2014年7月31日 木曜日 午後3時23分
Page 437 of 573
uuWhen Driving uForward Collision Warning (FCW)*
436
Driving
1Forward Collision Warning (FCW)*
Never apply a film or attach any objects to the
windshield that could obs truct the FCW camera’s
field of vision.
Scratches, nicks, and othe r damage to the windshield
within the FCW camera’s fi eld of vision can cause the
system to operate abnormall y. If this occurs, we
recommend that you replac e the windshield with a
genuine Honda replacem ent windshield. Making
even minor repairs within th e camera’s field of vision
or installing an aftermarket replacement windshield
may also cause the system to operate abnormally.
After replacing the winds hield, have a dealer
recalibrate the camera. Prop er calibration of the FCW
camera is necessary for the system to operate
properly.
Beep
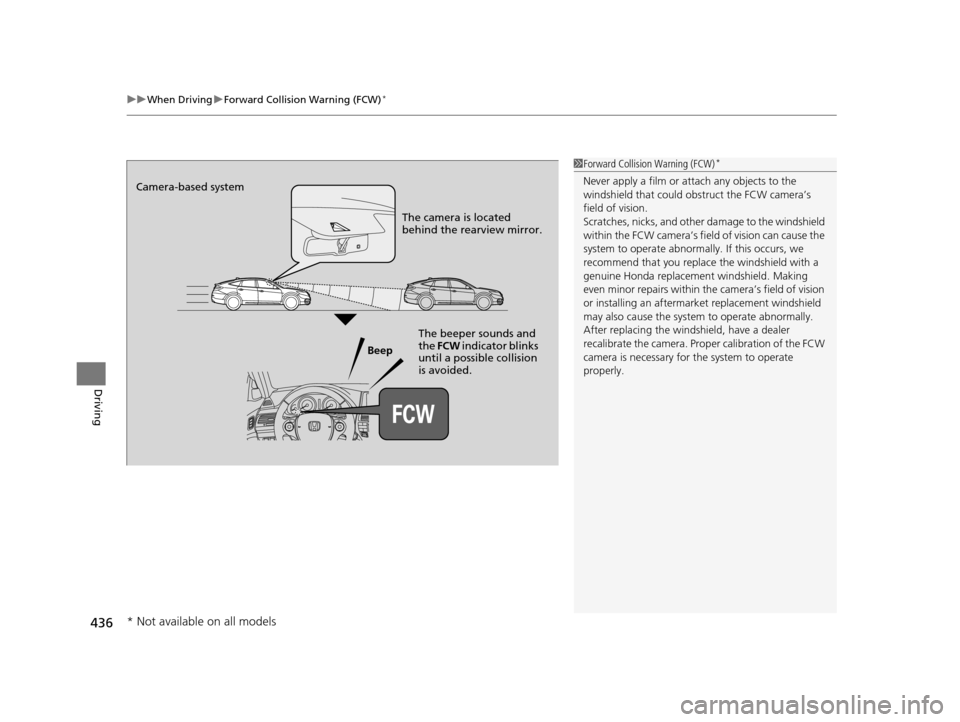
Camera-based system
The camera is located
behind the rearview mirror.
The beeper sounds and
the FCW indicator blinks
until a possible collision
is avoided.
* Not available on all models
15 CROSSTOUR-31TP66500.book 436 ページ 2014年7月31日 木曜日 午後3時23分
Page 441 of 573
uuWhen Driving uLane Departure Warning (LDW)*
440
Driving
The system begins to search for lane marki ngs when all the following conditions are met:
• The vehicle is traveling between 40 and 90 mph (64 and 145 km/h).
• The vehicle is on a straight or slightly curved road.
• The turn signals are off.
• The brake pedal is not depressed.
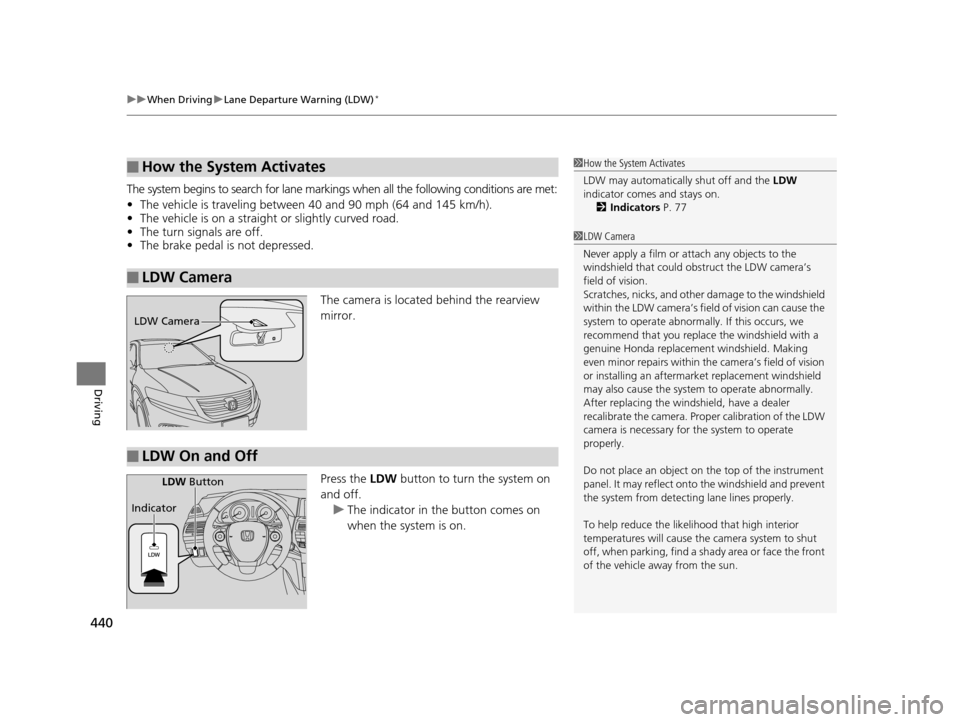
The camera is located behind the rearview
mirror.
Press the LDW button to turn the system on
and off.
u The indicator in the button comes on
when the system is on.
■How the System Activates
■LDW Camera
1How the System Activates
LDW may automaticall y shut off and the LDW
indicator comes and stays on.
2 Indicators P. 77
1LDW Camera
Never apply a film or attach any objects to the
windshield that could obs truct the LDW camera’s
field of vision.
Scratches, nicks, and othe r damage to the windshield
within the LDW camera’s fi eld of vision can cause the
system to operate abnormall y. If this occurs, we
recommend that you replac e the windshield with a
genuine Honda replacem ent windshield. Making
even minor repairs within th e camera’s field of vision
or installing an aftermarket replacement windshield
may also cause the system to operate abnormally.
After replacing the winds hield, have a dealer
recalibrate the camera. Prop er calibration of the LDW
camera is necessary for the system to operate
properly.
Do not place an object on the top of the instrument
panel. It may reflect onto the windshield and prevent
the system from detecting lane lines properly.
To help reduce the likel ihood that high interior
temperatures will cause the camera system to shut
off, when parking, find a sh ady area or face the front
of the vehicle away from the sun.
LDW Camera
■LDW On and Off
LDW Button
Indicator
15 CROSSTOUR-31TP66500.book 440 ページ 2014年7月31日 木曜日 午後3時23分
Page 445 of 573
444
uuWhen Driving uLaneWatchTM*
Driving
LaneWatchTM*
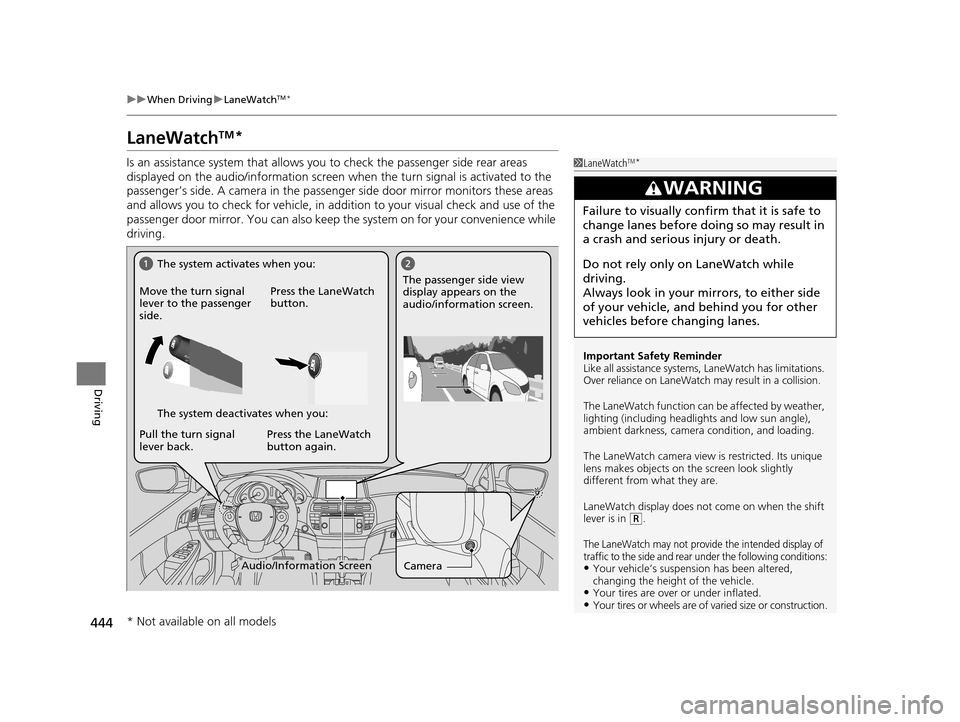
Is an assistance system that allows y ou to check the passenger side rear areas
displayed on the audio/information screen when the turn signal is activated to the
passenger’s side. A camera in the passenger side door mirror monitors these areas
and allows you to check for ve hicle, in addition to your visual check and use of the
passenger door mirror. You can also keep th e system on for your convenience while
driving.1 LaneWatchTM*
Important Safety Reminder
Like all assistance systems, LaneWatch has limitations.
Over reliance on LaneWatch may result in a collision.
The LaneWatch func tion can be affected by weather,
lighting (including headli ghts and low sun angle),
ambient darkness, camera condition, and loading.
The LaneWatch camera view is restricted. Its unique
lens makes objects on the screen look slightly
different from what they are.
LaneWatch display does not come on when the shift
lever is in
( R.
The LaneWatch may not provide the intended display of
traffic to the side and rear under the following conditions:
•Your vehicle’s suspension has been altered,
changing the height of the vehicle.
•Your tires are over or under inflated.•Your tires or wheels are of varied size or construction.
3WARNING
Failure to visually confirm that it is safe to
change lanes before doing so may result in
a crash and serious injury or death.
Do not rely only on LaneWatch while
driving.
Always look in your mi rrors, to either side
of your vehicle, and behind you for other
vehicles before changing lanes.
CameraAudio/Information Screen
Move the turn signal
lever to the passenger
side.
Press the LaneWatch
button.
Pull the turn signal
lever back. Press the LaneWatch
button again. The passenger side view
display appears on the
audio/information screen.
The system activates when you:
The system deactivates when you:
* Not available on all models
15 CROSSTOUR-31TP66500.book 444 ページ 2014年7月31日 木曜日 午後3時23分
Page 455 of 573
454
Driving
Rearview Camera
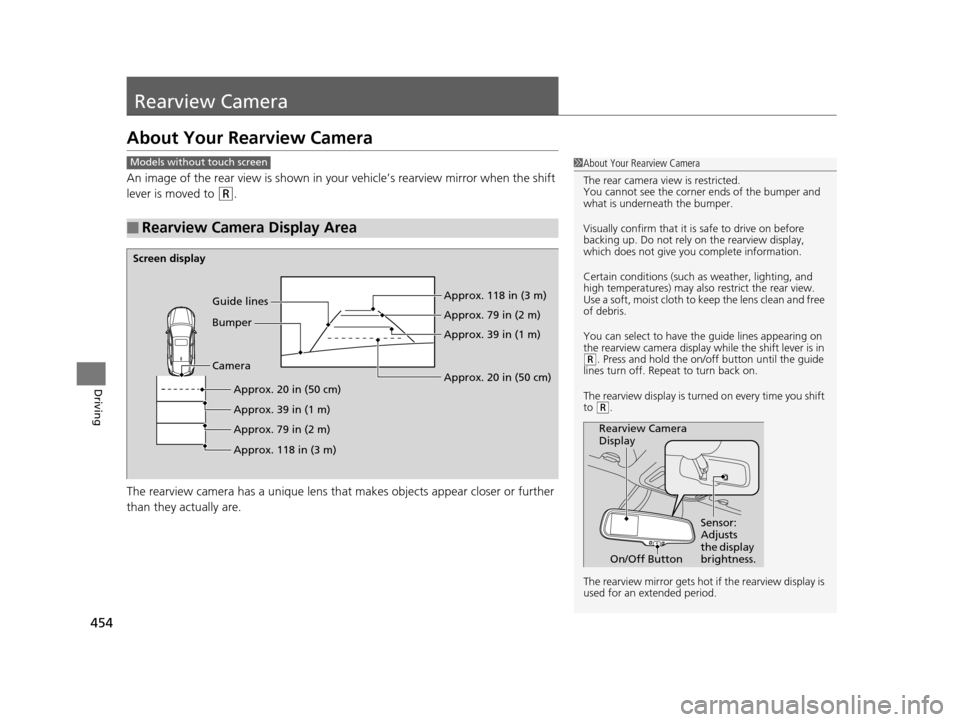
About Your Rearview Camera
An image of the rear view is shown in your vehicle’s rearview mirror when the shift
lever is moved to
(R.
The rearview camera has a unique lens that makes objects appear closer or further
than they actually are.
■Rearview Camera Display Area
1 About Your Rearview Camera
The rear camera view is restricted.
You cannot see the corner ends of the bumper and
what is underneath the bumper.
Visually confirm that it is safe to drive on before
backing up. Do not rely on the rearview display,
which does not give you complete information.
Certain conditions (such as weather, lighting, and
high temperatures) may also restrict the rear view.
Use a soft, moist cloth to keep the lens clean and free
of debris.
You can select to have th e guide lines appearing on
the rearview camera display while the shift lever is in
( R. Press and hold the on/off button until the guide
lines turn off. Repeat to turn back on.
The rearview display is turned on every time you shift
to
( R.
The rearview mirror gets hot if the rearview display is
used for an extended period.
Rearview Camera
Display Sensor:
Adjusts
the display
brightness.
On/Off Button
Models without touch screen
Screen display
CameraApprox. 20 in (50 cm)
Approx. 39 in (1 m)
Approx. 79 in (2 m)
Approx. 118 in (3 m) Approx. 118 in (3 m)
Approx. 79 in (2 m)
Approx. 39 in (1 m)
Bumper Guide lines
Approx. 20 in (50 cm)
15 CROSSTOUR-31TP66500.book 454 ページ 2014年7月31日 木曜日 午後3時23分