2015 HONDA CROSSTOUR ECO mode
[x] Cancel search: ECO modePage 427 of 573
426
uuWhen Driving uShifting
Driving
Shifting
Change the shift position in accordance with your driving needs.
■Shift lever positions
Automatic transmission models without paddle shifters
1Shifting
You cannot turn the ignition switch to LOCK
(0 and
remove the key unless the shift lever is in
( P.
The vehicle may move forward very slightly even in
(N while the engine is cold.
Depress the brake pe dal firmly and, when necessary,
apply the parking brake.
The engine may cut in and out in
( R or depending on
the road condition, even when the engine speed is
lower than the tachometer’s red zone. This is the
engine’s computer wo rking to protect the
transmission.
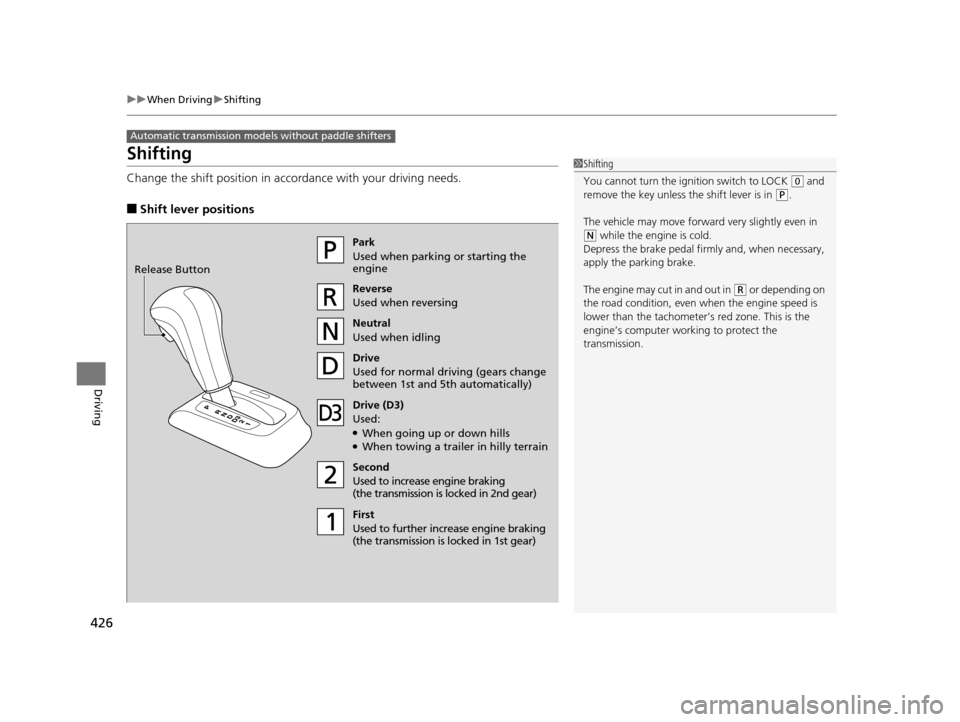
Park
Used when parking or starting the
engine
Reverse
Used when reversing
Neutral
Used when idling
Drive
Used for normal driving (gears change
between 1st and 5th automatically)
Drive (D3)
Used:
●When going up or down hills●When towing a trailer in hilly terrain
Second
Used to increase engine braking
(the transmission is locked in 2nd gear)
First
Used to further increase engine braking
(the transmission is locked in 1st gear)
Release Button
15 CROSSTOUR-31TP66500.book 426 ページ 2014年7月31日 木曜日 午後3時23分
Page 431 of 573
430
uuWhen Driving uShifting
Driving
Use the paddle shifters to change between 1st and 6th gears without removing your
hands from the steering wheel. The transmissio n will switch to the sequential shift
mode.
■When the shift lever is in (D:
The vehicle will go into the sequential shi ft mode momentarily, and the gear position
indicator will come on.
Once you start traveling at a constant speed, the sequential shift mode will
automatically switch off, and the gear position indicator will go off.
Hold the
(+ paddle shifter for two seconds to return to normal drive.
■When the shift lever is in (S:
The vehicle will go into the sequential shift mode, and the M (sequential shift mode)
indicator and gear position indicator will come on. At speeds of 6 mph (10 km/h) or
less, the vehicle automatically shifts down into 1st gear. It will not automatically shift
up, even if vehicle speed increases.
You can only pull away in 1st or 2nd gear.
When switching out of th e sequential shift mode, move the shift lever from
(S to
(D. When the sequential shif t mode is canceled, the M indicator and gear position
indicator go off.
■Sequential Shift Mode
15 CROSSTOUR-31TP66500.book 430 ページ 2014年7月31日 木曜日 午後3時23分
Page 432 of 573
431
uuWhen Driving uShifting
Driving
■Second gear lock mode
If you pull the
(+ paddle shifter while stopped or dr iving at 6 mph (10 km/h) or less,
the gear position will be lo cked in 2nd gear. This makes it easier to pull away on
slippery surfaces such as snow covered roads.
To cancel the 2nd gear lock mode, pull the
(- paddle shifter, or move the shift lever
from
(S to ( D.
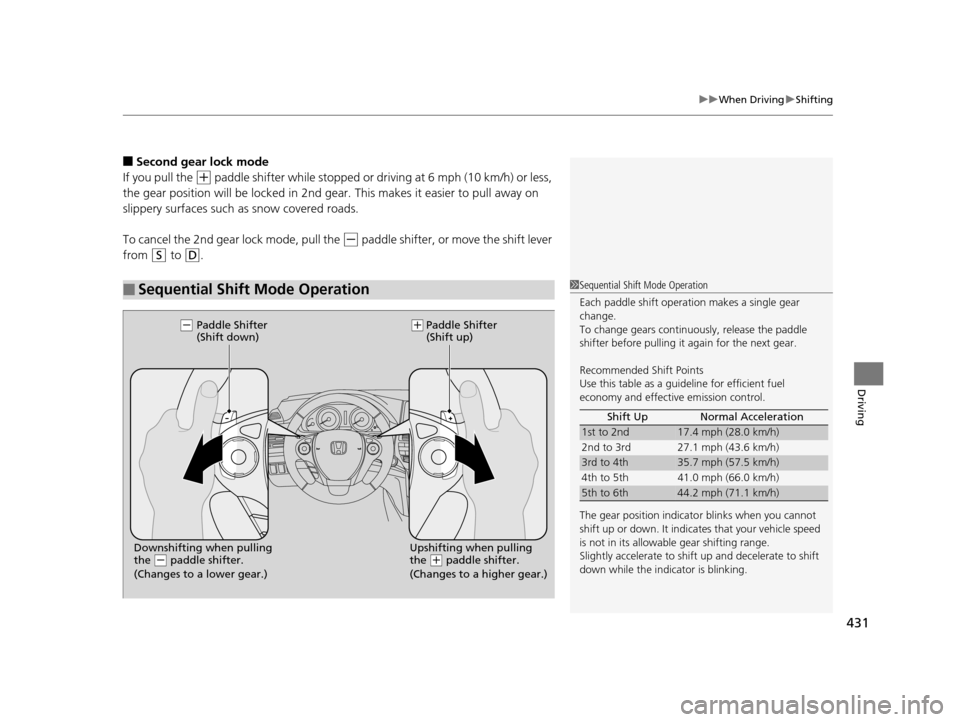
■Sequential Shift Mode Operation1 Sequential Shift Mode Operation
Each paddle shift operation makes a single gear
change.
To change gears continuously, release the paddle
shifter before pulling it again for the next gear.
Recommended Shift Points
Use this table as a guideline for efficient fuel
economy and effectiv e emission control.
The gear position indicato r blinks when you cannot
shift up or down. It indicate s that your vehicle speed
is not in its allowabl e gear shifting range.
Slightly accelerate to shift up and decelerate to shift
down while the indi cator is blinking.
Shift Up Normal Acceleration
1st to 2nd17.4 mph (28.0 km/h)
2nd to 3rd 27.1 mph (43.6 km/h)
3rd to 4th35.7 mph (57.5 km/h)
4th to 5th 41.0 mph (66.0 km/h)
5th to 6th44.2 mph (71.1 km/h)
Paddle Shifter
(Shift down) Paddle Shifter
(Shift up)
Downshifting when pulling
the
( - paddle shifter. Upshifting when pulling
the (
+ paddle shifter.
(- (+
(Changes to a lower gear.) (Changes to a higher gear.)
15 CROSSTOUR-31TP66500.book 431 ページ 2014年7月31日 木曜日 午後3時23分
Page 437 of 573
uuWhen Driving uForward Collision Warning (FCW)*
436
Driving
1Forward Collision Warning (FCW)*
Never apply a film or attach any objects to the
windshield that could obs truct the FCW camera’s
field of vision.
Scratches, nicks, and othe r damage to the windshield
within the FCW camera’s fi eld of vision can cause the
system to operate abnormall y. If this occurs, we
recommend that you replac e the windshield with a
genuine Honda replacem ent windshield. Making
even minor repairs within th e camera’s field of vision
or installing an aftermarket replacement windshield
may also cause the system to operate abnormally.
After replacing the winds hield, have a dealer
recalibrate the camera. Prop er calibration of the FCW
camera is necessary for the system to operate
properly.
Beep
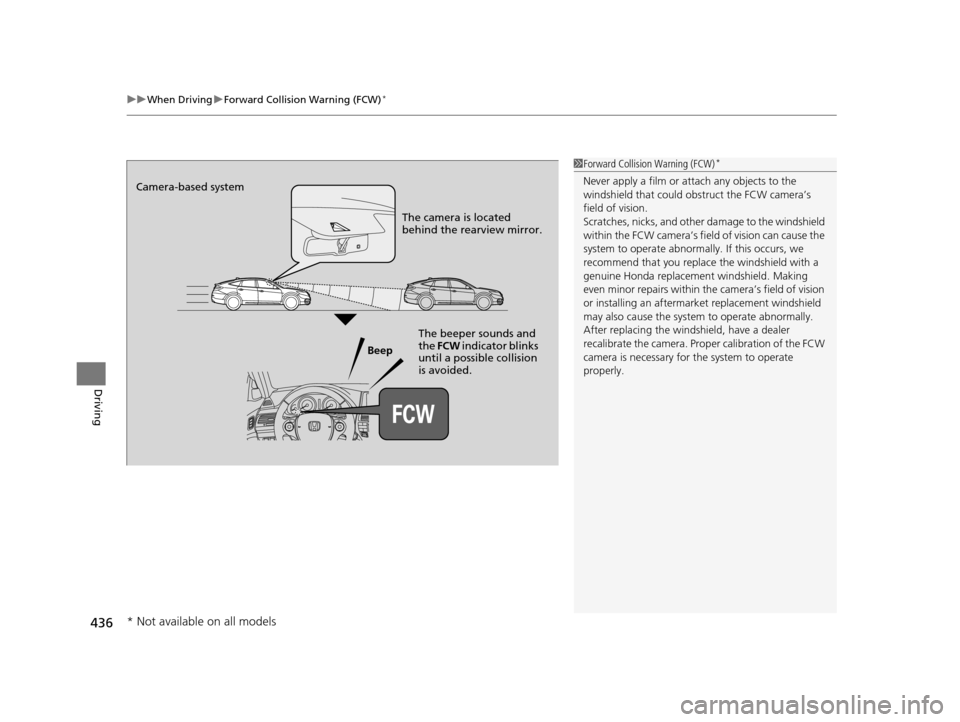
Camera-based system
The camera is located
behind the rearview mirror.
The beeper sounds and
the FCW indicator blinks
until a possible collision
is avoided.
* Not available on all models
15 CROSSTOUR-31TP66500.book 436 ページ 2014年7月31日 木曜日 午後3時23分
Page 442 of 573
441
uuWhen Driving uLane Departure Warning (LDW)*
Driving
LDW may not activate or may not recognize lanes, and may activate even when
keeping in the middle of a lane under the following conditions.
■LDW Limitations
Condition
●When you drive in bad weather (rain, fog, etc.).●A heavy load in the rear or modificati ons to the suspension tilts your vehicle.●An abnormal tire condition is detected (wrong tire size, flat tire, etc.).●When the windshield is blocked by dirt, mud, leaves, wet snow, etc.●When the temperature inside the system is high.●A sudden change between light and dark such as an entrance or exit of a tunnel.●You drive into the sunlight (e.g. at dawn or dusk).●When the windshield is dirty or cloudy.●When you drive in the shadows of trees, buildings, etc.●When your vehicle is towing a trailer.●When you drive on a wet road su rface following another vehicle.
uThe camera may perceive the tire tracks in the water as lane lines.●When there is snow or wheel tracks on the side of the road.●When the road has many repaired area or an erased lane line.●When the vehicle is running over pa inted signs or crosswalk markings.●When you drive in a lane with worn-out lane markings.
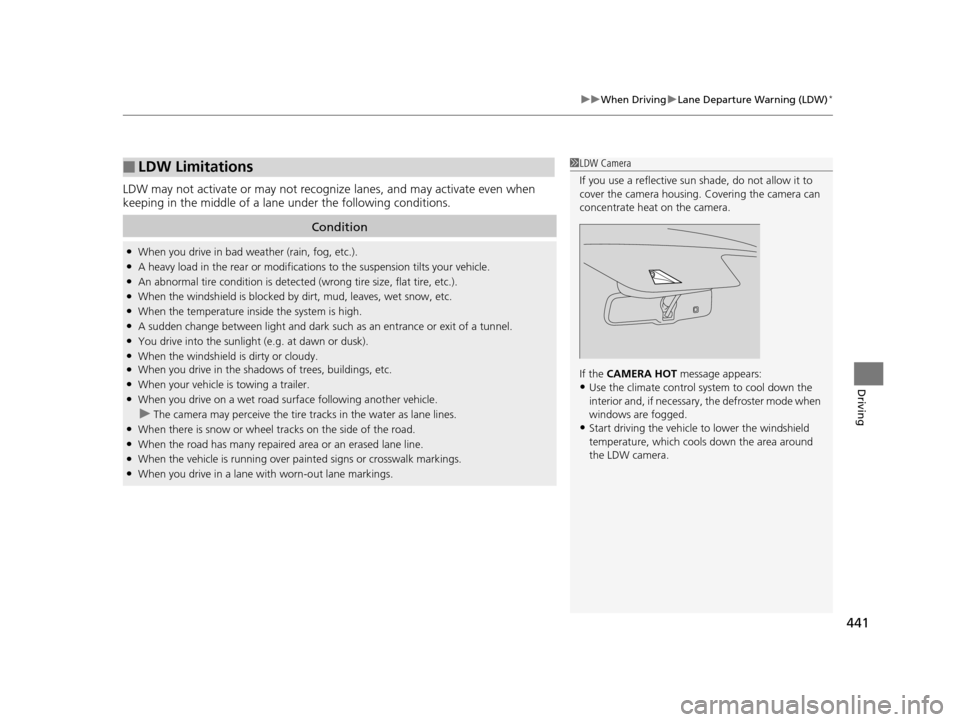
1LDW Camera
If you use a reflective sun shade, do not allow it to
cover the camera housing. Covering the camera can
concentrate heat on the camera.
If the CAMERA HOT message appears:
•Use the climate control system to cool down the
interior and, if necessary , the defroster mode when
windows are fogged.
•Start driving the vehicle to lower the windshield
temperature, which cool s down the area around
the LDW camera.
15 CROSSTOUR-31TP66500.book 441 ページ 2014年7月31日 木曜日 午後3時23分
Page 448 of 573
447
uuWhen Driving uTire Pressure Monitoring System (TPMS) - Required Federal Explanation
Continued
Driving
Tire Pressure Monitoring System (TPMS) - Required
Federal Explanation
Each tire, including the spare (if provided), should be checked
monthly when cold and inflated to the inflation pressure
recommended by the vehicle manufa cturer on the vehicle placard
or tire inflation pressure label.
(If your vehicle has tires of a diff erent size than the size indicated
on the vehicle placard or tire inflation pressure label, you should
determine the proper tire inflat ion pressure for those tires.)
As an added safety feature, your vehicle has been equipped with
a tire pressure monitoring system (TPMS) that illuminates a low
tire pressure telltale
when one or more of your tires is significantly under-inflated.
Accordingly, when the low tire pressure telltale illuminates, you
should stop and check your tires as soon as possible, and inflate
them to the proper pressure.
Driving on a significantly under-inf lated tire causes the tire to
overheat and can lead to tire fail ure. Under-inflation also reduces
fuel efficiency and tire tread life, and may affect the vehicle’s
handling and stopping ability.
U.S. models
15 CROSSTOUR-31TP66500.book 447 ページ 2014年7月31日 木曜日 午後3時23分
Page 462 of 573

461
Maintenance
This chapter discusses basic maintenance.
Before Performing MaintenanceInspection and Maintenance ............ 462
Safety When Performing Maintenance..... 463Parts and Fluids Used in Maintenance Service ........................................... 464
Maintenance Minder
TM..................... 465
Maintenance Under the Hood
Maintenance Items Under the Hood ..... 469Opening the Hood ........................... 471
Recommended Engine Oil ................ 472
Oil Check ......................................... 473
Adding Engine Oil ............................ 475
Changing the Engine Oil and Oil Filter ....476
Engine Coolant ................................ 478
Transmission Fluid ............................ 480
Brake Fluid ....................................... 481
Power Steering Fluid Check
*............ 482
Refilling Window Washer Fluid......... 483
Replacing Light Bulbs ....................... 484
Checking and Maintaining Wiper Blades... 493Checking and Maintaining Tires
Checking Tires ................................. 497
Tire and Loading Information Label ...... 498Tire Labeling .................................... 498DOT Tire Quality Grading (U.S. Vehicles)....... 500Wear Indicators................................ 502 Tire Service Life ................................ 502
Tire and Wheel Replacement ........... 503
Tire Rotation .................................... 504
Winter Tires ..................................... 505
Battery ............................................... 506
Remote Transmitter Care ................. 507
Replacing the Button Battery ........... 507
Heating and Cooling System
*/Climate
Control System* Maintenance ....... 509
Cleaning
Interior Care .................................... 510
Exterior Care.................................... 512
* Not available on all models
15 CROSSTOUR-31TP66500.book 461 ページ 2014年7月31日 木曜日 午後3時23分
Page 463 of 573
462
Maintenance
Before Performing Maintenance
Inspection and Maintenance
For your safety, perform all listed inspections and maintenance to keep your vehicle
in good condition. If you become aware of any abnormality (noise, smell, insufficient
brake fluid, oil residue on the ground, etc.), have your vehicle inspected by a dealer.
(Note, however, that service at a dealer is not mandatory to keep your warranties in
effect.) Refer to the separate maintena nce booklet for detailed maintenance and
inspection information.
■Daily inspections
Perform inspections before long distance trips, when washing the vehicle, or when
refueling.
■Periodic inspections
• Check the brake fluid level monthly.
2 Checking the Brake Fluid P. 481
•Check the tire pressure monthly. Examin e the tread for wear and foreign objects.
2Checking and Maintaining Tires P. 497
•Check the operation of the exterior lights monthly.
2 Replacing Light Bulbs P. 484
•Check the condition of the wiper bl ades at least every six months.
2Checking and Maintaining Wiper Blades P. 493
■Types of Inspection and Maintenance
1Inspection and Maintenance
Maintenance, replacement, or repair of
emissions control devices and systems may be
done by any automotive repair establishment or
individuals using parts that are “certified” to
EPA standards.
According to state and fede ral regulations, failure to
perform maintenance on the maintenance main
items marked with # will not void your emissions
warranties. However, all ma intenance services should
be performed in accordan ce with the intervals
indicated by the information display.
2 Maintenance Service Items P. 467
If you want to perform complex maintenance tasks
that require more skills a nd tools, you can purchase a
subscription to the Service Express website at
www.techinfo.honda.com .
2 Authorized Manuals P. 557
If you want to perform ma intenance yourself, make
sure that you have the necessary tools and skills first.
After performing ma intenance, update the records in
the separate maintenance booklet.
U.S. models
15 CROSSTOUR-31TP66500.book 462 ページ 2014年7月31日 木曜日 午後3時23分