2015 HONDA CIVIC COUPE change time
[x] Cancel search: change timePage 316 of 441

315
uuWhen Driving uCruise Control
Continued
Driving
Cruise ControlMaintains a constant vehicle speed without having to keep your foot on the
accelerator pedal. Use cruise control on freeways or open roads where you can
travel at a constant speed with little acceleration or deceleration.
1Cruise Control
It may not be possible to maintain a constant speed
when driving uphill or downhill.
When not using cruise control:
Turn off cruise control by pressing the CRUISE
button.
While in the ECON mode, it may take relatively more
time to accelera te to maintain the set speed.
When the engine speed slows down, try to
downshift.
You can maintain the set speed if you change gear
within five seconds.
3
WARNING
Improper use of the cruise control can lead
to a crash.
Use the cruise control only when traveling
on open highways in good weather.1.8 ℓ engine modelsManual transmission models
When to use■Shift positions for cruise control:
In ( D or
(S Always keep sufficient distance
between you and the vehicle in
front of you.
Continuously variable transmission models■Vehicle speed for cruise control:
Desired speed in a range above
roughly 25 mph (40 km/h) ~
How to use
CRUISE MAIN
is on in the
instrument panel.Cruise control is ready to use.
■Press the
CRUISE
button on
the steering wheel.
Page 322 of 441

321
uuWhen Driving uLaneWatch
TM*
Driving
■Customizing the LaneWatch settings
You can customize the following items using the audio/information screen.
• Show with Turn Signal : Selects whether LaneWatch monitor comes on when
you operate the turn signal light lever.
• Display Time after Turn Signal Off : Changes the length of time the LaneWatch
display stays on after you pull the turn signal lever back.
• Reference Lines : Selects whether the reference lines appear on the LaneWatch
monitor.
• Next Maneuver Pop up
*: Selects whether a turn direction screen of the
navigation system interrupts the LaneWatch display.
• Display : Allows for display adjustments of items, such as brightness, and tint.
This setting is part of the Audio setup group.
2Customized Features
* P. 220
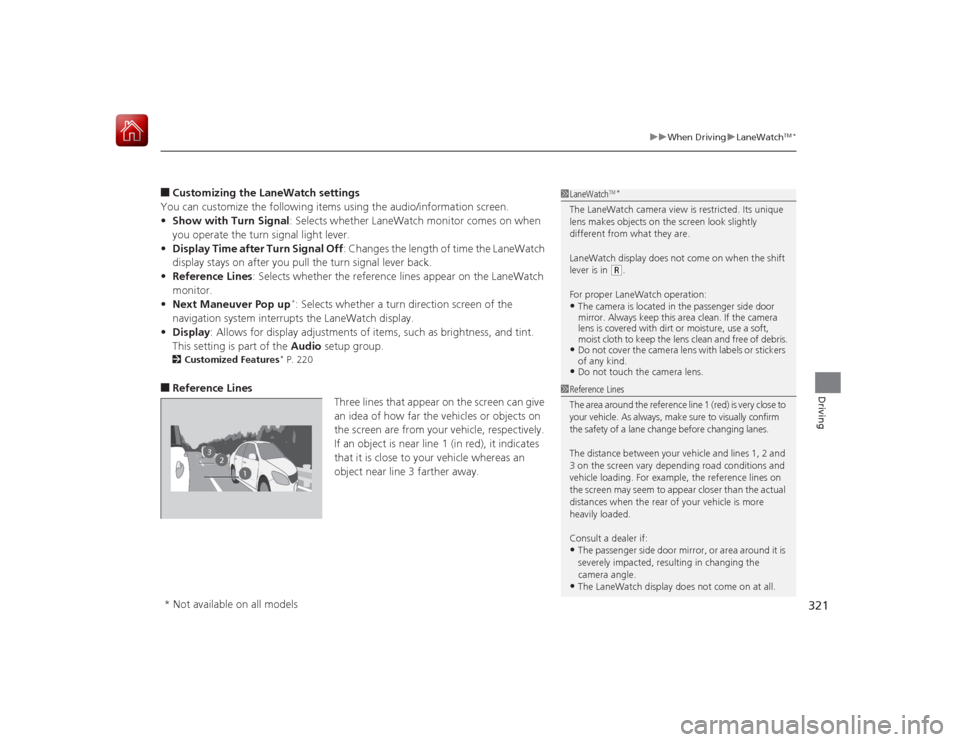
■Reference Lines
Three lines that appear on the screen can give
an idea of how far the vehicles or objects on
the screen are from your vehicle, respectively.
If an object is near line 1 (in red), it indicates
that it is close to your vehicle whereas an
object near line 3 farther away.
1 LaneWatch
TM*
The LaneWatch camera view is restricted. Its unique
lens makes objects on the screen look slightly
different from what they are.
LaneWatch display does not come on when the shift
lever is in
(R.
For proper LaneWatch operation:
•The camera is located in the passenger side door
mirror. Always keep this area clean. If the camera
lens is covered with dirt or moisture, use a soft,
moist cloth to keep the lens clean and free of debris.•Do not cover the camera lens with labels or stickers
of any kind.•Do not touch the camera lens.
2
3
1
1 Reference Lines
The area around the reference line 1 (red) is very close to
your vehicle. As always, make sure to visually confirm
the safety of a lane change before changing lanes.
The distance between your vehicle and lines 1, 2 and
3 on the screen vary depending road conditions and
vehicle loading. For example, the reference lines on
the screen may seem to appear closer than the actual
distances when the rear of your vehicle is more
heavily loaded.
Consult a dealer if:•The passenger side door mirror, or area around it is
severely impacted, resulting in changing the
camera angle.•The LaneWatch display does not come on at all.
* Not available on all models
Page 323 of 441

322
uuWhen Driving uTire Pressure Monitoring System (TPMS)
Driving
Tire Pressure Monitoring System (TPMS)Instead of directly measuring the pressure in each tire, the TPMS on this vehicle
monitors and compares the rolling radius and rotational characteristics of each
wheel and tire while you are driving to determine if one or more tires are
significantly under-inflated. This will cause the low tire pressure/TPMS indicator to
come on and a message to appear on the i-MID.
You must start TPMS calibration every time you:
• Adjust the pressure in one or more tires.
• Rotate the tires.
• Replace one or more tires.
Before calibrating the TPMS:
• Set the cold tire pressure in all four tires.
2 Checking Tires P. 372
Make sure:
•The vehicle is at a complete stop.
• The shift lever is in
(N
.
• The shift lever is in
(P
.
• The ignition switch is in ON
(w
*1.
*1: Models with the smart entry system have an ENGINE START/STOP button instead of an
ignition switch.■
TPMS CalibrationU.S. models
1 Tire Pressure Monitoring System (TPMS)
The system does not monitor the tires when driving
at low speed.
Conditions such as low ambient temperature and
altitude change directly affect tire pressure and can
trigger the low tire pressure/TPMS indicator to come on.
Tire pressure checked and inflated in:•Warm weather can become under-inflated in
colder weather.•Cold weather can become over-inflated in warmer
weather.
The low tire pressure i ndicator will not come on as a
result of over inflation.
The TPMS may not function properly if tire type and
size are mixed. Make sure to use the same size and
type of tire. 2 Checking and Maintaining Tires P. 372
The low tire pressure/TP MS indicator may come on
with a delay or may not come on at all when:•You rapidly accele rate, decelerate, or turn the
steering wheel.•You drive on snowy or slippery roads.•Snow chains are used.
The low tire pressure/TP MS indicator may come on
under the following conditions:•A compact spare tire is used.•There is a heavier and uneven load on the tires,
such as when towing a trailer, than the condition at
calibration.•Snow chains are used.
Manual transmission modelsContinuously variable transmission modelsAll models
Page 342 of 441

341
Continued
Maintenance
Maintenance Minder
TM
If the engine oil life is less than 15%, you will see the Maintenance Minder messages
appear on the i-MID every time you turn the ignition switch to ON
(w
*1. The
messages notify you when to change the engine oil, or when to bring your vehicle
to a dealer for indicated maintenance services.
To Use Maintenance Minder
TM
Maintenance items, which should be serviced at the same time that you replace the
engine oil, appear on the i-MID.
You can view them on the Maintenance info screen at any time.
1. Turn the ignition switch to ON
(w
*1.
2. Press the MENU button to go to the Vehicle Menu screen.
3. Select Vehicle Information with the (+
button, then press the SOURCE button.
4. Press the SOURCE button again to go to the Maintenance info screen. The
engine oil life appears on the i-MID.
*1: Models with the smart entry system have an ENGINE START/STOP button instead of an
ignition switch.■
Displaying the Engine Oil Life and Maintenance Items
1 Displaying the Engine Oil Life and Maintenance Items
Based on the engine operating conditions, the
remaining engine oil life is calculated and displayed
as a percentage.
There is a list of maintenance main and sub items you
can view on the i-MID.
2 Maintenance Service Items P. 343
Displayed Engine Oil
Life (%)
Calculated Engine Oil Life (%)
100 100 to 91
90
90 to 81
80 80 to 71
70
70 to 61
60 60 to 51
50
50 to 41
40 40 to 31
30
30 to 21
20 20 to 16
15
15 to 11
10 10 to 6
5
5 to 1
0 0
MENU
SOURCE
50
Engine oilAir filters
2345
MENU Button(+ Button
Sub ItemEngine Oil Life
Main Item
SOURCE Button
Page 356 of 441

355
uuMaintenance Under the Hood uEngine Coolant
Continued
Maintenance
Engine CoolantThis coolant is premixed with 50% antifreeze and 50% water. Do not add any
straight antifreeze or water.
We recommend you check the engine coolant level every time you refuel. Check the
reserve tank first. If it is completely empty, also check the coolant level in the
radiator. Add the engine coolant accordingly.
1.Check the amount of coolant in the reserve
tank.
2. If the coolant level is below the MIN mark,
add the specified coolant until it reaches
the MAX mark.
3. Inspect the cooling system for leaks.Specified coolant: Honda Long Life Antifreeze/Coolant Type 2■
Reserve Tank
1Engine CoolantNOTICEIf temperatures consistently below −22°F (−30°C) are
expected, the coolant mixture should be changed to
a higher concentration. Consult a dealer for more
information.
If Honda antifreeze/coolant is not available, you may
use another major brand non-silicate coolant as a
temporary replacement. Check that it is a high quality
coolant recommended for aluminum engines.
Continued use of any non-Honda coolant can result
in corrosion, causing the cooling system to
malfunction or fail. Have the cooling system flushed
and refilled with Honda antifreeze/coolant as soon as
possible.
Do not add rust inhibitors or other additives to your
vehicle's cooling system. They may not be compatible
with the coolant or with the engine components.
Reserve
Tank
MAX
MIN
Page 403 of 441

402
uuEngine Does Not Start uEmergency Engine Stop
Handling the Unexpected
Emergency Engine StopThe ENGINE START/STOP button may be used to stop the engine due to an
emergency situation even while driving. If you mus t stop the engine, do either of the
following operations:
• Press and hold the ENGINE START/STOP button for about two seconds.
• Firmly press the ENGINE START/STOP button twice.
The steering wheel will not lock. However, because turning off the engine disables
the power assist the engine provides to the steering and braking systems, it will
require significantly more physical effort and time to steer and slow the vehicle. Use
both feet on the brake pedal to slow down the vehicle and stop immediately in a
safe place. With manual transmission models you can also downshift the
transmission to utilize engine braking.
The power mode is in ACCESSORY when the engine is stopped.
To change the mode to VEHICLE OFF, move the shift lever to
(P
after the vehicle
comes to a complete stop.
Then press the ENGINE START/STOP button twice without depressing the brake
pedal.
The power mode changes to VEHICLE OFF.
Models with smart entry system
1 Emergency Engine Stop
Do not press the button while driving unless it is
absolutely necessary for the engine to be switched
off.
Continuously variable transmission modelsCanadian continuously variable transmission modelsManual transmission models