Page 9 of 24
1415
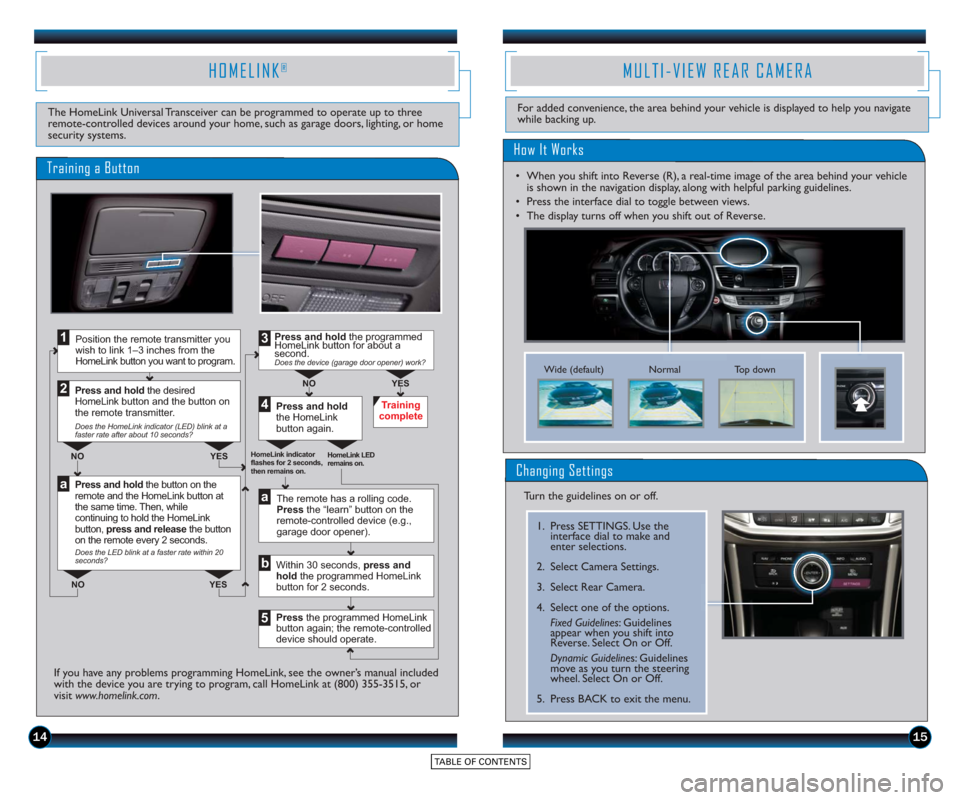
MULTI-VIEW REAR CAMERA
For added convenience, the area behind your vehicle is displayed to help you navigate
while backing up.
NormalTop down
Wide (default)
How It Works
• When you shift into Reverse (R), a real-time image of the area behind your vehicle
is shown in the navigation display, along with helpful parking guidelines.
• Press the interface dial to toggle between views.
• The display turns off when you shift out of Reverse.
Changing Settings
Turn the guidelines on or off.
1. Press SETTINGS. Use the interface dial to make and
enter selections.
2. Select Camera Settings.
3. Select Rear Camera.
4. Select one of the options. Fixed Guidelines: Guidelines
appear when you shift into
Reverse. Select On or Off.
Dynamic Guideline s: Guidelines
move as you turn the steering
wheel. Select On or Off.
5. Press BACK to exit the menu.
HOMELINK®
The HomeLink Universal Transceiver can be programmed to operate up to three
remote-controlled devices around your home, such as garage doors, lighting, or home
security systems.
Press and hold the button on the
remote and the HomeLink button at
the same time. Then, while
continuing to hold the HomeLink
button, press and release the button
on the remote every 2 seconds.
Does the LED blink at a faster rate within 20
seconds?
Press and hold
the HomeLink
button again. Training
complete
YES
NO
HomeLink indicator
flashes for 2 seconds,
then remains on. HomeLink LED
remains on.YES
NO YES
NO
Position the remote transmitter you
wish to link 1–3 inches from the
HomeLink button you want to program.1
Press and hold the desired
HomeLink b utton and the button on
the remote transmitter.
Does the HomeLink indicator (LED) blink at a
faster rate after about 10 seconds?
2
a
The remote has a rolling code.
Press the “learn” button on the
remote-controlled device (e.g.,
garage door opener).
Press the programmed HomeLink
button again; the remote-controlled
device should operate. Within 30 seconds, press and
hold the programmed HomeLink
button for 2 seconds.a
Press and hold the programmed
HomeLink button for about a
second.
Does the device (garage door opener) work?
3
b
4
5
Training a Button
If you have any problems programming HomeLink, see the owner’s manual included
with the device you are trying to program, call HomeLink at (800) 355-3515, or
visit www.homelink.com .
Page 10 of 24
How It Works
Turning LDW On or Off
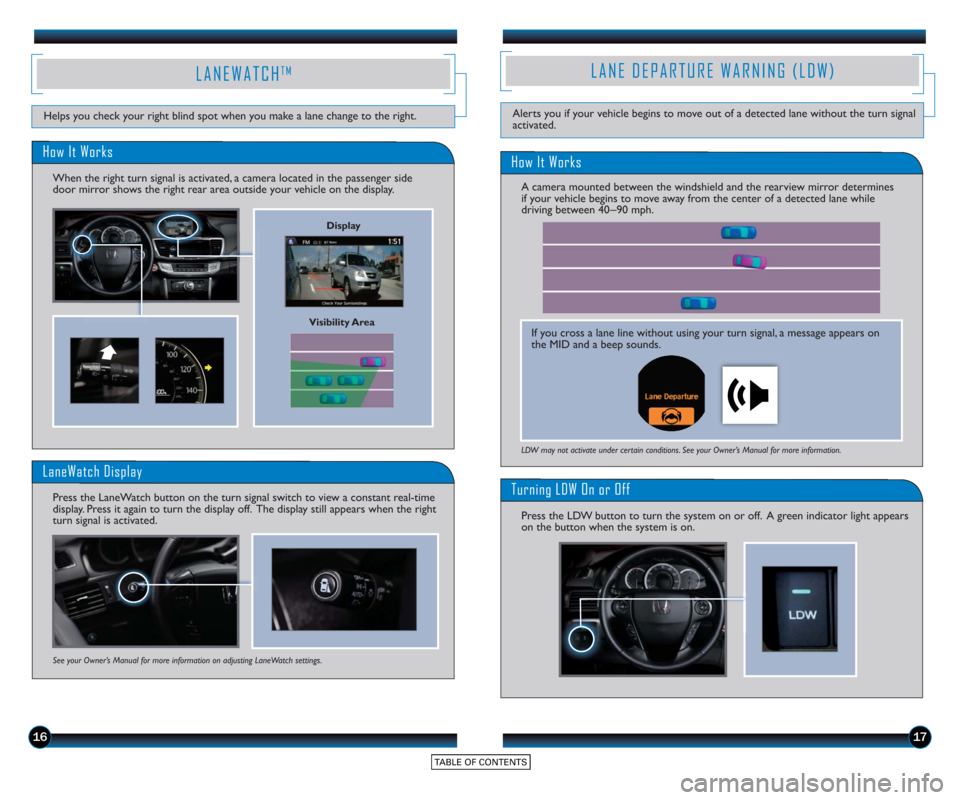
Press the LDW button to turn the system on or off. A green indicator light appears
on the button when the system is on.
LDW may not activate under certain conditions. See your Owner’s Manual for more information.
LANE DEPARTURE WARNING (LDW)
Helps you check your right blind spot when you make a lane change to the right.Alerts you if your vehicle begins to move out of a detected lane without the turn signal
activated.
1617
LANEWATCHTM
Visibility Area
How It Works
When the right turn signal is activated, a camera located in the passenger side
door mirror shows the right rear area outside your vehicle on the display.
LaneWatch Display
Press the LaneWatch button on the turn signal switch to view a constant real-time
display. Press it again to turn the display off. The display still appears when the right
turn signal is activated.
See your Owner’s Manual for more information on adjusting LaneWatch settings.
Display
If you cross a lane line without using your turn signal, a message appears on
the MID and a beep sounds.
A camera mounted between the windshield and the rearview mirror determines
if your vehicle begins to move away from the center of a detected lane while
driving between 40_
90 mph.
Page 11 of 24
1819
FORWARD COLLISION WARNING (FCW)
Alerts you to the possibility of a front-end collision.
Changing Settings
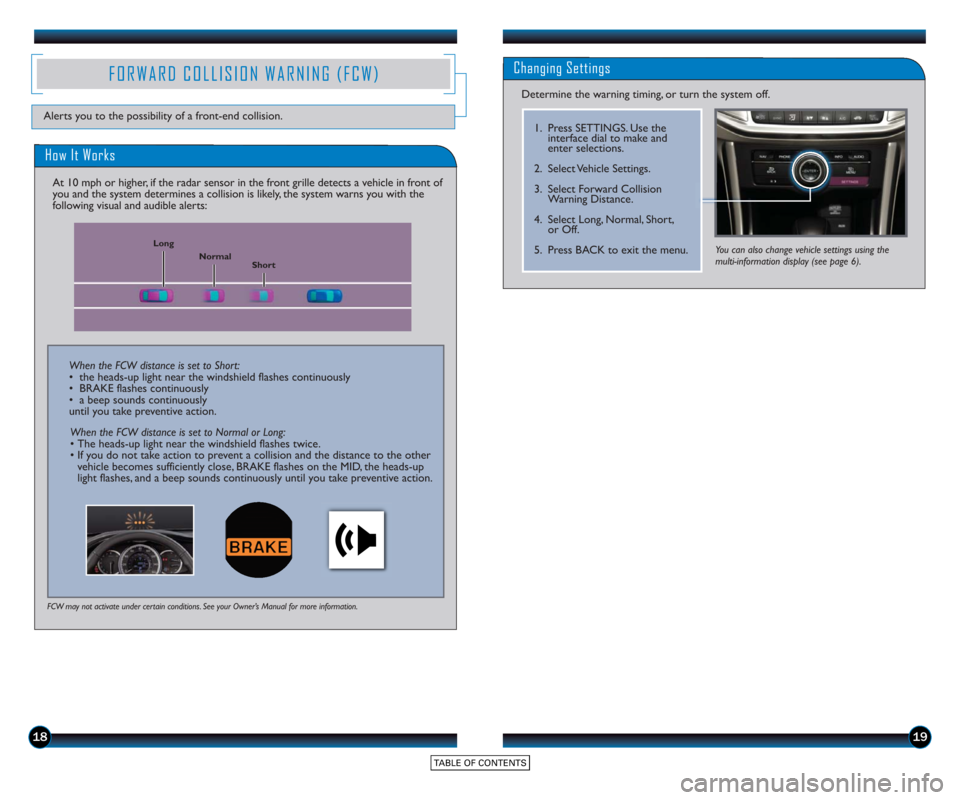
Determine the warning timing, or turn the system off.
1. Press SETTINGS. Use theinterface dial to make and
enter selections.
2. Select Vehicle Settings.
3. Select Forward Collision Warning Distance.
4. Select Long, Normal, Short, or Off.
5. Press BACK to exit the menu.
How It Works
At 10 mph or higher, if the radar sensor in the front grille detects a vehicle in front of
you and the system determines a collision is likely, the system warns you with the
following visual and audible alerts:
FCW may not activate under certain conditions. See your Owner’s Manual for more information.
Short
Normal
Long
When the FCW distance is set to Short:
• the heads-up light near the windshield flashes continuously
• BRAKE flashes continuously
• a beep sounds continuously
until you take preventive action.
When the FCW distance is set to Normal or Long:
• The heads-up light near the windshield flashes twice.
• If you do not take action to prevent a collision and the distance to the other vehicle becomes sufficiently close, BRAKE flashes on the MID, the heads-up
light flashes, and a beep sounds continuously until you take preventive action.
You can also change vehicle settings using the
multi-information display (see page 6).
Page 12 of 24
2021
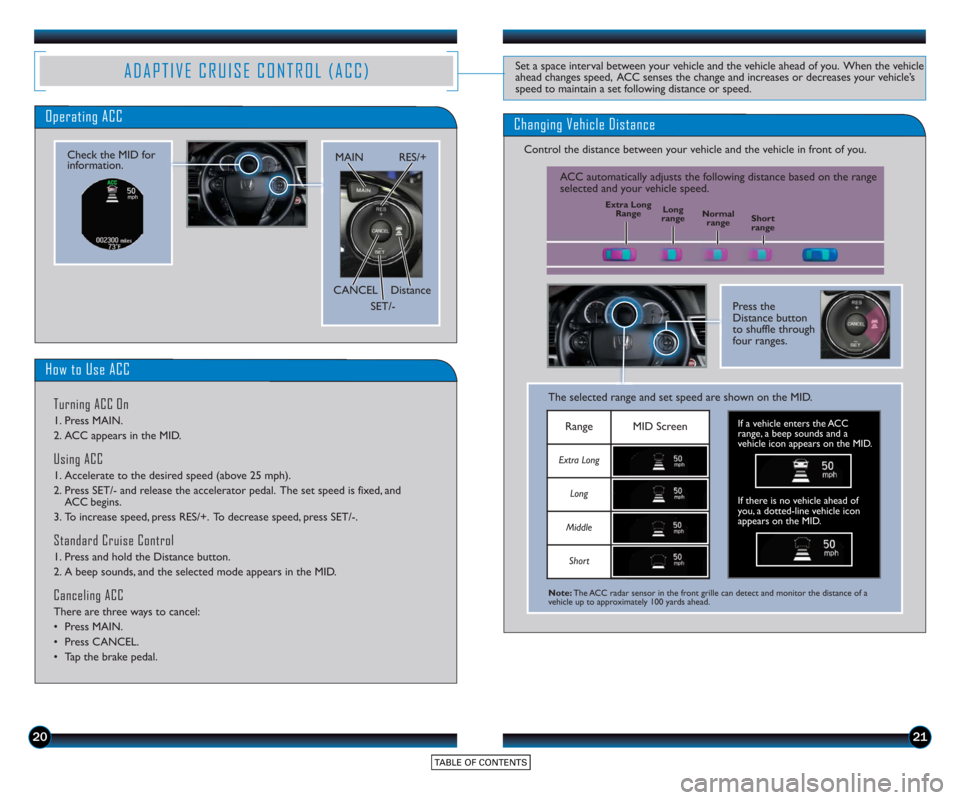
ADAPTIVE CRUISE CONTROL (ACC)Set a space interval between your vehicle and the vehicle ahead of you. When the vehicle
ahead changes speed, ACC senses the change and increases or decreases your vehicle’s
speed to maintain a set following distance or speed.
Operating ACC
How to Use ACC
Changing Vehicle Distance
Control the distance between your vehicle and the vehicle in front of you.
Press the
Distance button
to shuffle through
four ranges.
The selected range and set speed are shown on the MID.
RangeMID Screen
Extra Long
Long
Middle
Short
If there is no vehicle ahead of
you, a dotted-line vehicle icon
appears on the MID.
Note: The ACC radar sensor in the front grille can detect and monitor the distance of a
vehicle up to approximately 100 yards ahead.
If a vehicle enters the ACC
range, a beep sounds and a
vehicle icon appears on the MID.
Check the MID for
information.
Turning ACC On
1. Press MAIN.
2. ACC appears in the MID.
Using ACC
1. Accelerate to the desired speed (above 25 mph).
2. Press SET/- and release the accelerator pedal. The set speed is fixed, and ACC begins.
3. To increase speed, press RES/+. To decrease speed, press SET/-.
Standard Cruise Control
1. Press and hold the Distance button.
2. A beep sounds, and the selected mode appears in the MID.
Canceling ACC
There are three ways to cancel:
• Press MAIN.
• Press CANCEL.
• Tap the brake pedal.
MAIN
Distance
CANCEL RES/+
SET/-
Short range
Normal
range
Long
range
Extra Long
Range
ACC automatically adjusts the following distance based on the range
selected and your vehicle speed.
Page 13 of 24
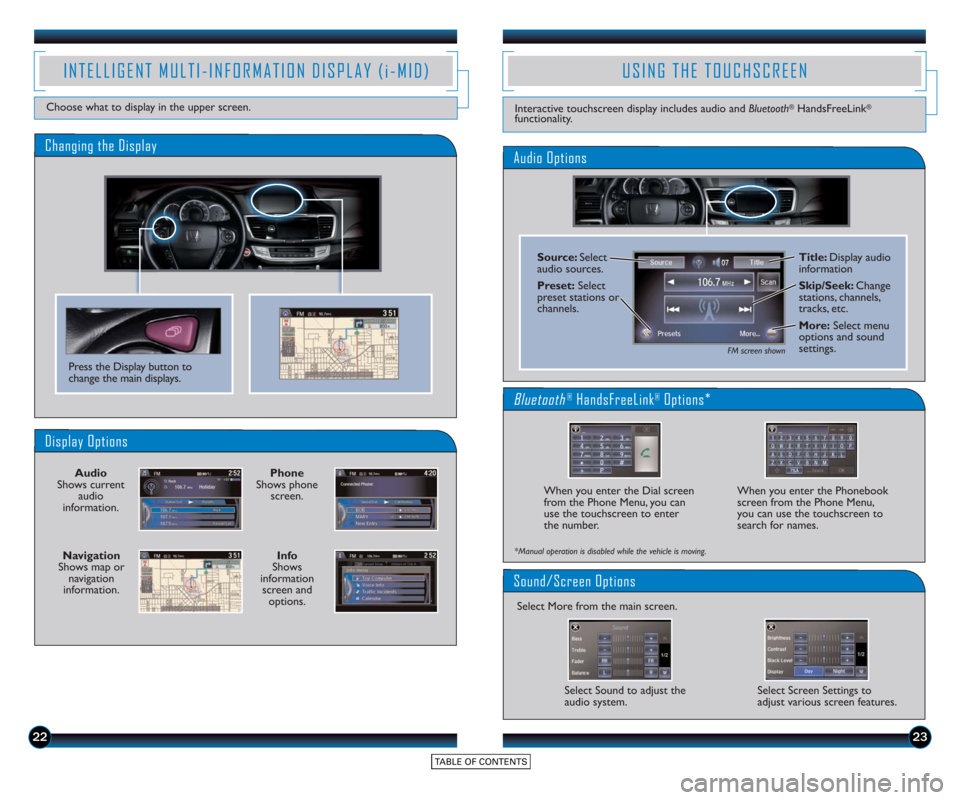
Display Options
Press the Display button to
change the main displays.
Phone
Shows phone screen.
Info
Shows
information screen and options.
Navigation
Shows map or navigation
information. Audio
Shows current audio
information.
2223
INTELLIGENT MULTI-INFORMATION DISPLAY (i-MID)
Choose what to display in the upper screen.
Changing the Display
USING THE TOUCHSCREEN
Interactive touchscreen display includes audio and Bluetooth®HandsFreeLink®
functionality.
Audio Options
FM screen shown
Source: Select
audio sources.
Preset:Select
preset stations or
channels. Title: Display audio
information
Skip/Seek:
Change
stations, channels,
tracks, etc.
More: Select menu
options and sound
settings.
Bluetooth®HandsFreeLink®Options*
Sound/Screen Options
When you enter the Dial screen
from the Phone Menu, you can
use the touchscreen to enter
the number.
*Manual operation is disabled while the vehicle is moving.
Select Sound to adjust the
audio system. Select Screen Settings to
adjust various screen features.
Select More from the main screen. When you enter the Phonebook
screen from the Phone Menu,
you can use the touchscreen to
search for names.
Page 14 of 24
2425
VOICE RECOGNITION
How It Works
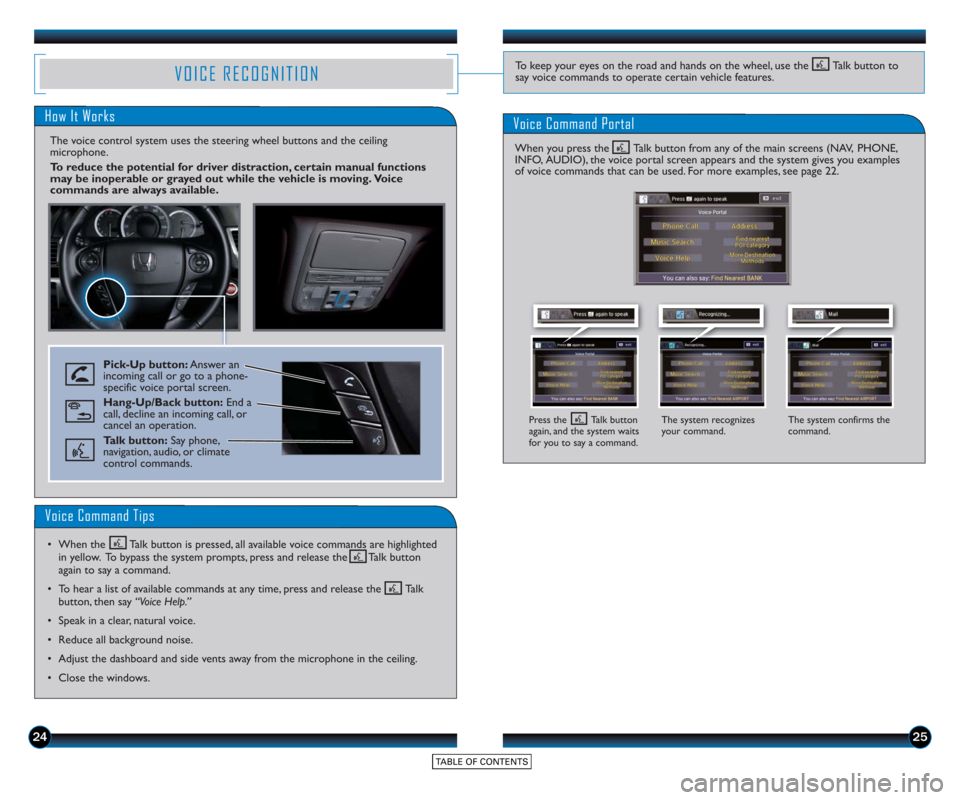
The voice control system uses the steering wheel buttons and the ceiling
microphone.
To reduce the potential for driver distraction, certain manual functions
may be inoperable or grayed out while the vehicle is moving. Voice
commands are always available.
Voice Command Portal
Pick-Up button:Answer an
incoming call or go to a phone-
specific voice portal screen.
Hang-Up/Back button: End a
call, decline an incoming call, or
cancel an operation.
Talk button: Say phone,
navigation, audio, or climate
control commands.
The system recognizes
your command. The system confirms the
command.
Voice Command Tips
• When the Talk button is pressed, all available voice commands are highlighted
in yellow. To bypass the system prompts, press and release the Talk button
again to say a command.
• To hear a list of available commands at any time, press and release the Talk button, then say “Voice Help.”
• Speak in a clear, natural voice.
• Reduce all background noise.
• Adjust the dashboard and side vents away from the microphone in the ceiling.
• Close the windows.
To keep your eyes on the road and hands on the wheel, use the Talk button to
say voice commands to operate certain vehicle features.
When you press the Talk button from any of the main screens (NAV, PHONE,
INFO, AUDIO), the voice portal screen appears and the system gives you examples
of voice commands that can be used. For more examples, see page 22.
Press the Talk button
again, and the system waits
for you to say a command.
Page 15 of 24
2627
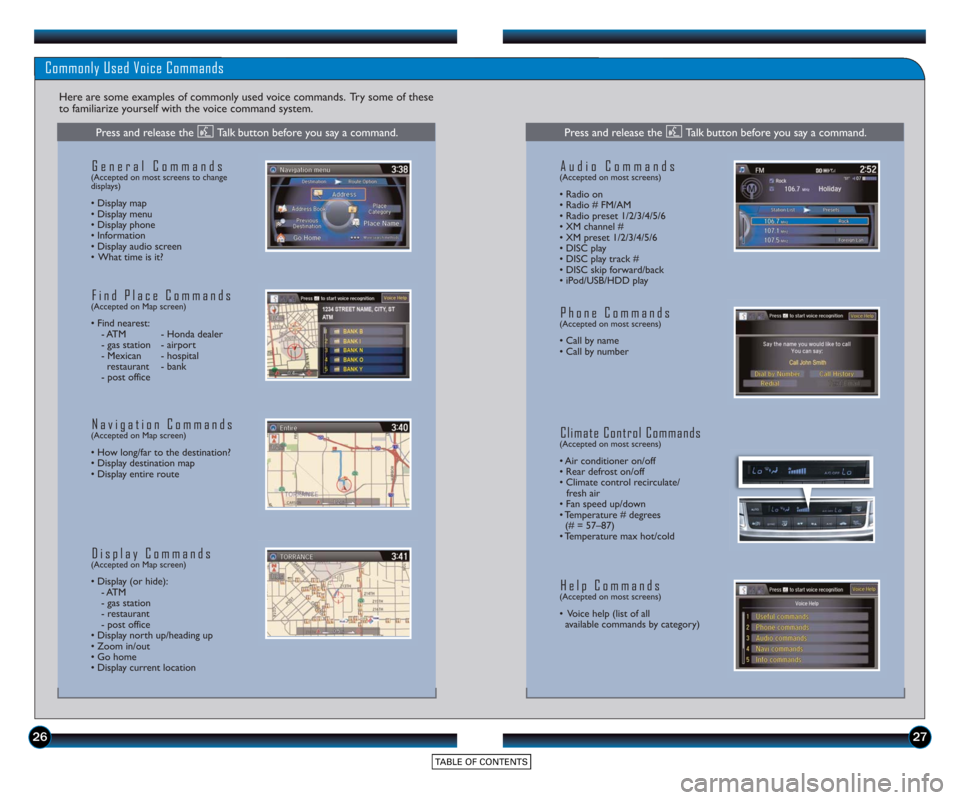
Commonly Used Voice Commands
Here are some examples of commonly used voice commands. Try some of these
to familiarize yourself with the voice command system.
General Commands(Accepted on most screens to change
displays)
• Display map
• Display menu
• Display phone
• Information
• Display audio screen
• What time is it?
Find Place Commands(Accepted on Map screen)
• Find nearest: - ATM - Honda dealer
- gas station - airport
- Mexican - hospital restaurant - bank
- post office
Navigation Commands(Accepted on Map screen)
• How long/far to the destination?
• Display destination map
• Display entire route
Display Commands(Accepted on Map screen)
• Display (or hide): - ATM
- gas station
- restaurant
- post office
• Display north up/heading up
• Zoom in/out
• Go home
• Display current location
Audio Commands(Accepted on most screens)
• Radio on
• Radio # FM/AM
• Radio pr eset 1/2/3/4/5/6
• XM channel #
• XM preset 1/2/3/4/5/6
• DISC play
• DISC play track #
• DISC skip forward/back
• iPod/USB/HDD play
Phone Commands(Accepted on most screens)
• Call by name
• Call by number
Climate Control Commands(Accepted on most screens)
• Air conditioner on/off
• Rear defrost on/off
• Climate control recirculate/ fresh air
• Fan speed up/down
• Temperature # degrees (# = 57–87)
• Temperature max hot/cold
Help Commands(Accepted on most screens)
• Voice help (list of all available commands by category)
Press and release the Talk button before you say a command.Press and release the Talk button before you say a command.
Page 16 of 24
2829
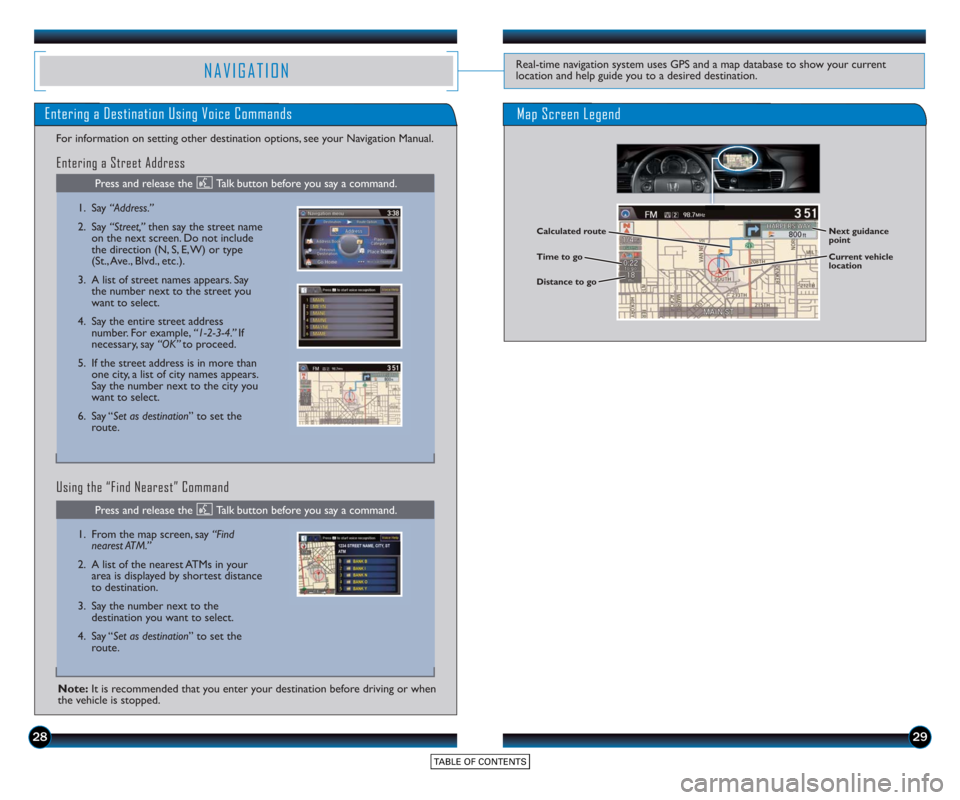
NAVIGATIONReal-time navigation system uses GPS and a map database to show your current
location and help guide you to a desired destination.
Calculated route
Time to go
Distance to goNext guidance
point
Current vehicle
location
Map Screen LegendEntering a Destination Using Voice Commands
For information on setting other destination options, see your Navigation Manual.
1. Say “Address.”
2. Say “Street,” then say the street name
on the next screen. Do not include
the direction (N, S, E, W) or type
(St., Ave., Blvd., etc.).
3. A list of street names appears. Say the number next to the street you
want to select.
4. Say the entire street address number. For example, “1-2-3-4.” If
necessary, say “OK” to proceed.
5. If the street address is in more than one city, a list of city names appears.
Say the number next to the city you
want to select.
6. Say “Set as destination” to set the route.
1. From the map screen, say “Find
nearest ATM.”
2. A list of the nearest ATMs in your area is displayed by shortest distance
to destination.
3. Say the number next to the destination you want to select.
4. Say “Set as destination” to set the route.
Using the “Find Nearest” Command Entering a Street Address
Note: It is recommended that you enter your destination before driving or when
the vehicle is stopped.
Press and release the Talk button before you say a command.
Press and release the Talk button before you say a command.