Page 187 of 401

ROADSIDE ASSISTANCE
Vehicles Sold in the United States: Getting Roadside Assistance
To fully assist you should you have a vehicle concern, Ford Motor
Company offers a complimentary Roadside Assistance program. This
program is separate from the New Vehicle Limited Warranty. The service
is available:
•24 hours a day, seven days a week.
•For the coverage period listed on the Roadside Assistance Card
included in your Owner’s Manual portfolio.
Roadside assistance covers:
•A flat tire change with a good spare, if provided with the vehicle
(except vehicles supplied with a tire inflation kit).
•Battery jump start.
•Lock-out assistance (key replacement cost is the customer’s
responsibility).
•Fuel delivery – Independent Service Contractors, if not prohibited by
state, local or municipal law, shall deliver up to 2.0 gallons (7.6 liters)
of gasoline or 5.0 gallons (18.9 liters) of diesel fuel to a disabled
vehicle. Roadside Assistance limits fuel delivery service to two
no-charge occurrences within a 12-month period.
•Winch out – available within 100 feet (30.5 meters) of a paved or
county maintained road, no recoveries.
•Towing – Independent service contractors, if not prohibited by state,
local or municipal law, shall tow Ford eligible vehicles to an authorized
dealer within 35 miles (56 kilometers) of the disablement location or
to the nearest authorized dealer. If a member requests a tow to an
authorized dealer that is more than 35 miles (56 kilometers) from the
disablement location, the member shall be responsible for any mileage
costs in excess of 35 miles (56 kilometers).
Roadside Assistance includes up to $200 for a towed trailer if the
disabled eligible vehicle requires service at the nearest authorized dealer.
If the towing vehicle is operational but the trailer is not, then the trailer
does not qualify for any roadside services.
Vehicles Sold in the United States: Using Roadside Assistance
Complete the roadside assistance identification card and place it in your
wallet for quick reference. This card is found in the owner’s manual
portfolio in the glove compartment.
186Roadside Emergencies
2015 Police(pol)
Owners Guide gf, 2nd Printing, April 2015
USA(fus)
Page 202 of 401
Fuse or relay
numberFuse amp
ratingProtected components
1 50A** Rear power point tap feed 1
2 50A** Rear power point tap feed 2
3 — Not used
4 30A** Wiper motor relay
5 50A** Anti-lock brake system pump
6 40A** Center console 6-way B+ feed 2
7 — Not used
8 20A** PTU Cooler Pump
9 — Not used
10 — PTU Cooler Pump Relay
11 — Rear window defroster relay,
Mirror relay (Sedan)
12 — Run/start relay
13 — Starter motor relay
14 — Engine cooling fan #2 high speed
relay
15 — Fuel pump relay
97
98
77969594
93 92 91 90 89
88
66
4478
56
39
26
18 1617
312 4 5 6 7 8 919 20 21 22 23 2427 28 29 30 3140 41 42 4355
57 58 59 60 61 62 63 64 6579 80 81 82 83 84 85 86 87
67
45
32
10 11 12 1333 34 3546 47 48 49 50 5168 69 70 71 72 74
73 76
75
53
37 36 54
38
25
151452
Fuses201
2015 Police(pol)
Owners Guide gf, 2nd Printing, April 2015
USA(fus)
Page 204 of 401
Fuse or relay
numberFuse amp
ratingProtected components
39 40A** Auxiliary blower motor (Utility)
40 40A** Center console 6-way B+ feed 1
41 — Not used
42 30A** Passenger seat (Sedan)
43 40A** Anti-lock brake system valves
(Utility)
20A** Anti-lock brake system valves
(Sedan)
44 — Rear washer relay (Utility)
45 — Not used
46 — Not used
47 — Not used
48 — Not used
49 — Not used
50 15A* Heated mirrors
51 — Not used
52 — Not used
53 — Left-hand trailer tow stop/turn
lamps relay (Utility)
54 — Not used
55 — Wiper relay
56 — Not used
57 — Not used
58 10A* Alternator A-line
59 10A* Brake on/off switch
60 — Not used
61 — Not used
62 10A* Air conditioner clutch relay
63 15A* Trailer tow stop/turn lamps
(Utility)
64 15A* Rear wipers (Utility)
65 30A* Fuel pump relay
Fuses203
2015 Police(pol)
Owners Guide gf, 2nd Printing, April 2015
USA(fus)
Page 206 of 401
Fuse or relay
numberFuse amp
ratingProtected components
81 20A* Spot lights
82 15A* Rear washer (Utility)
83 — Not used
84 20A* Trailer tow park lamps (Utility)
85 — Not used
86 7.5A* Powertrain control module
keep-alive power and relay,
Canister vent solenoid
87 5A* Run/start relay coil
88 — Run/start relay
89 5A* Front blower relay coil, Electrical
power assist steering module
90 10A* Powertrain control module
run/start
91 — Not used
92 10A* Anti-lock brake system module
93 5A* Rear window defroster relay,
Run/start relay, Trunk release
relay
94 30A** Passenger compartment fuse
panel run/start
95 2A* Center console start feed
96 — Not used
97 — Not used
98 — Air conditioner clutch relay
*Mini Fuses **Cartridge Fuses
Fuses205
2015 Police(pol)
Owners Guide gf, 2nd Printing, April 2015
USA(fus)
Page 208 of 401

Fuse or relay
numberFuse amp
ratingProtected components
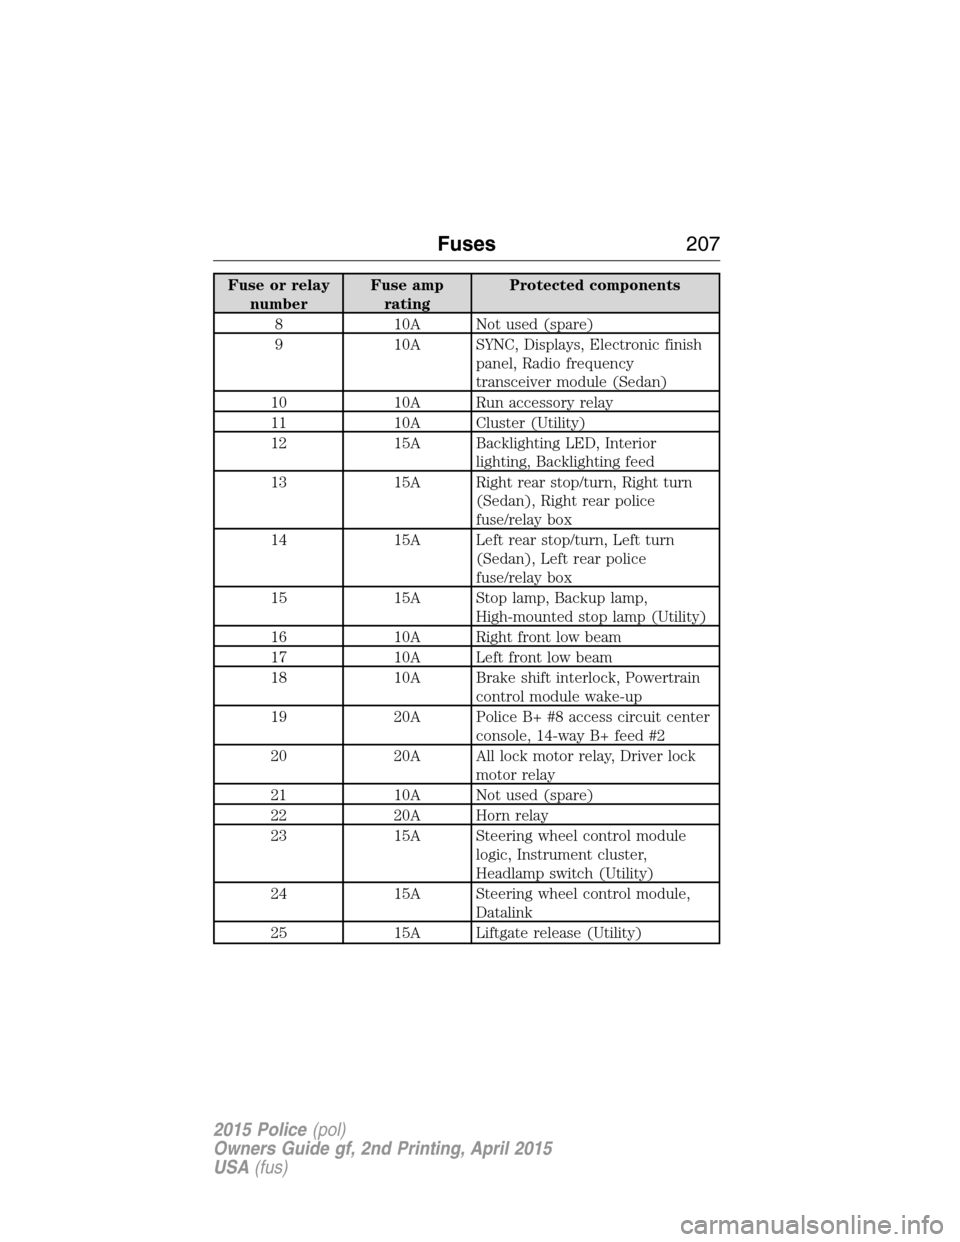
8 10A Not used (spare)
9 10A SYNC, Displays, Electronic finish
panel, Radio frequency
transceiver module (Sedan)
10 10A Run accessory relay
11 10A Cluster (Utility)
12 15A Backlighting LED, Interior
lighting, Backlighting feed
13 15A Right rear stop/turn, Right turn
(Sedan), Right rear police
fuse/relay box
14 15A Left rear stop/turn, Left turn
(Sedan), Left rear police
fuse/relay box
15 15A Stop lamp, Backup lamp,
High-mounted stop lamp (Utility)
16 10A Right front low beam
17 10A Left front low beam
18 10A Brake shift interlock, Powertrain
control module wake-up
19 20A Police B+ #8 access circuit center
console, 14-way B+ feed #2
20 20A All lock motor relay, Driver lock
motor relay
21 10A Not used (spare)
22 20A Horn relay
23 15A Steering wheel control module
logic, Instrument cluster,
Headlamp switch (Utility)
24 15A Steering wheel control module,
Datalink
25 15A Liftgate release (Utility)
Fuses207
2015 Police(pol)
Owners Guide gf, 2nd Printing, April 2015
USA(fus)
Page 209 of 401

Fuse or relay
numberFuse amp
ratingProtected components
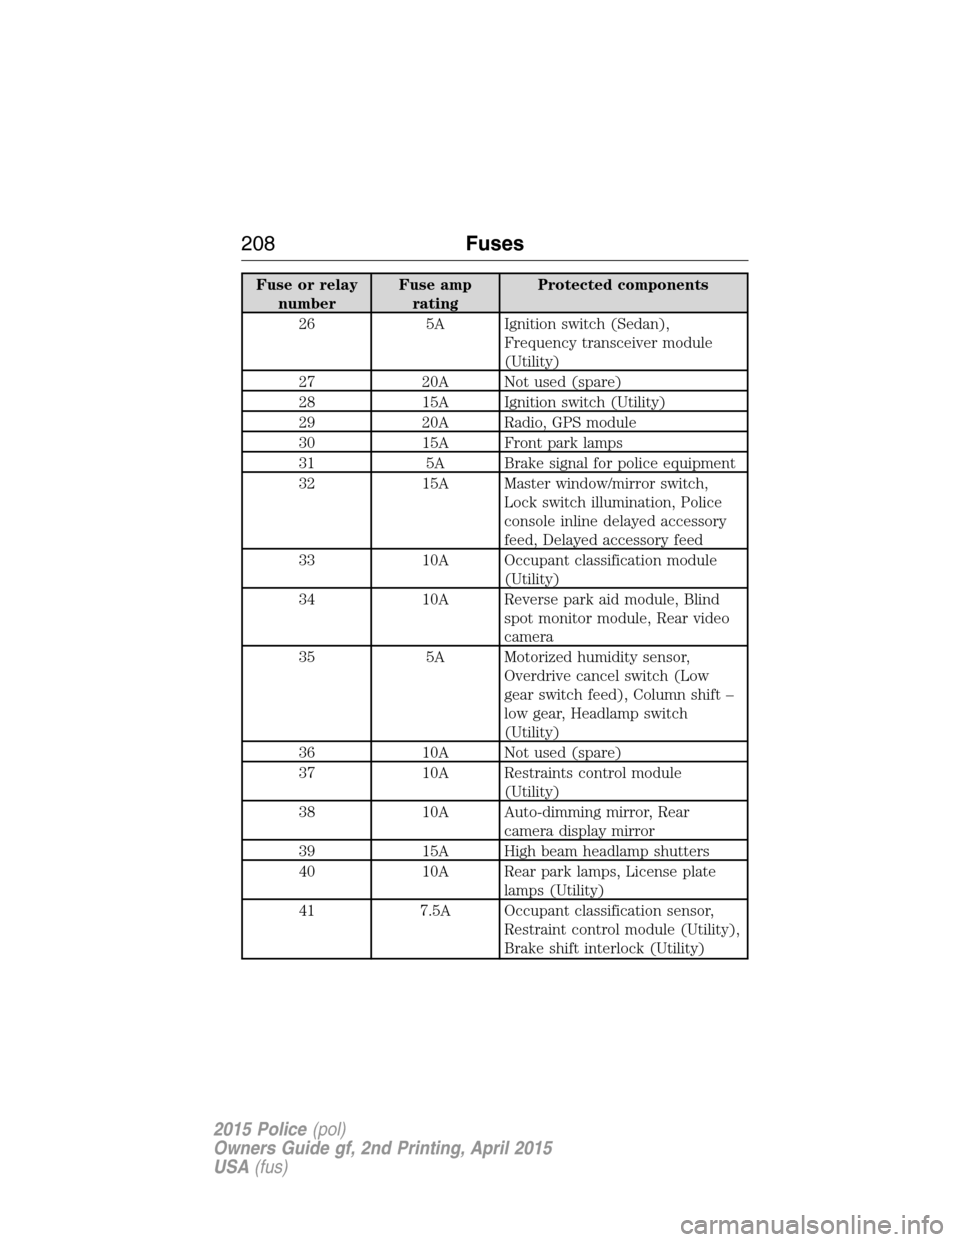
26 5A Ignition switch (Sedan),
Frequency transceiver module
(Utility)
27 20A Not used (spare)
28 15A Ignition switch (Utility)
29 20A Radio, GPS module
30 15A Front park lamps
31 5A Brake signal for police equipment
32 15A Master window/mirror switch,
Lock switch illumination, Police
console inline delayed accessory
feed, Delayed accessory feed
33 10A Occupant classification module
(Utility)
34 10A Reverse park aid module, Blind
spot monitor module, Rear video
camera
35 5A Motorized humidity sensor,
Overdrive cancel switch (Low
gear switch feed), Column shift –
low gear, Headlamp switch
(Utility)
36 10A Not used (spare)
37 10A Restraints control module
(Utility)
38 10A Auto-dimming mirror, Rear
camera display mirror
39 15A High beam headlamp shutters
40 10A Rear park lamps, License plate
lamps (Utility)
41 7.5A Occupant classification sensor,
Restraint control module (Utility),
Brake shift interlock (Utility)
208Fuses
2015 Police(pol)
Owners Guide gf, 2nd Printing, April 2015
USA(fus)
Page 211 of 401

GENERAL INFORMATION
Have your vehicle serviced regularly to help maintain its roadworthiness
and resale value. There is a large network of Ford authorized dealers
who are there to help you with their professional servicing expertise. We
believe that their specially trained technicians are best qualified to
service your vehicle properly and expertly. They are supported by a wide
range of highly specialized tools developed specifically for servicing your
vehicle.
To help you service your vehicle, we provideScheduled Maintenance
Informationwhich makes tracking routine service easy.
If your vehicle requires professional service, your authorized dealer can
provide the necessary parts and service. Check your warranty
information to find out which parts and services are covered.
Use only recommended fuels, lubricants, fluids and service parts
conforming to specifications. Motorcraft® parts are designed and built to
provide the best performance in your vehicle.
Precautions
•Do not work on a hot engine.
•Make sure that nothing gets caught in moving parts.
•Do not work on a vehicle with the engine running in an enclosed
space, unless you are sure you have enough ventilation.
•Keep all open flames and other burning material (such as cigarettes)
away from the battery and all fuel related parts.
Working with the Engine Off
1. Set the parking brake and shift toP(Park).
2. Turn off the engine and remove the key (if equipped).
3. Block the wheels.
Working with the Engine On
WARNING:To reduce the risk of vehicle damage or personal
burn injuries, do not start your engine with the air cleaner
removed and do not remove it while the engine is running.
1. Set the parking brake and shift to positionP(Park) .
2. Block the wheels.
210Maintenance
2015 Police(pol)
Owners Guide gf, 2nd Printing, April 2015
USA(fus)
Page 225 of 401

AUTOMATIC TRANSMISSION FLUID CHECK
WARNING:The dipstick cap and surrounding components may
be hot; gloves are recommended.
Note:Automatic transmission fluid expands when warmed. To obtain an
accurate fluid check, drive the vehicle until it is warmed up
(approximately 20 miles [30 km]). If your vehicle has been operated for
an extended period at high speeds, in city traffic during hot weather or
pulling a trailer, the vehicle should be turned off until normal operating
temperatures are reached to allow the fluid to cool before checking.
Depending on vehicle use, cooling times could take up to 30 minutes or
longer.
Refer to yourscheduled maintenance informationfor scheduled
intervals for fluid checks and changes. Your transmission does not
consume fluid. However, the fluid level should be checked if the
transmission is not working properly, i.e., if the transmission slips or
shifts slowly or if you notice some sign of fluid leakage.
1. Drive the vehicle 20 miles (30 km) or until it reaches normal operating
temperature.
2. Park the vehicle on a level surface and engage the parking brake.
3. With the parking brake engaged and your foot on the brake pedal,
start the engine and move the gearshift lever through all of the gear
ranges. Allow a minimum of 10 seconds for each gear to engage.
4. Latch the gearshift lever in P (Park) and leave the engine running.
5. Remove the dipstick, wiping it clean with a clean, dry lint free rag. If
necessary, refer toUnder hood overviewin this chapter for the location
of the dipstick.
6. Install the dipstick making sure it is fully seated in the filler tube by
turning it to the locked position.
7. Remove the dipstick and inspect the fluid level. The fluid should be in
the designated areas for normal operating temperature.
224Maintenance
2015 Police(pol)
Owners Guide gf, 2nd Printing, April 2015
USA(fus)