2015 FORD FOCUS clock setting
[x] Cancel search: clock settingPage 221 of 453

Note:
If a person adds electrical or
electronic accessories or components to the
vehicle, the accessories or components may
adversely affect the low voltage battery
performance and durability and may also
affect the performance of other electrical
systems in the vehicle.
For longer, trouble-free operation, keep the
top of the battery clean and dry. Also,
make certain the battery cables are always
tightly fastened to the battery terminals.
If you see any corrosion on the battery or
terminals, remove the cables from the
terminals and clean with a wire brush. You
can neutralize the acid with a solution of
baking soda and water.
When a battery replacement is required,
the battery should only be replaced with
a Ford recommended replacement battery
that matches the electrical requirements
of the vehicle.
Because your vehicle ’s engine is
electronically-controlled by a computer,
some engine control settings are
maintained by power from the low voltage
battery. Some engine computer settings,
like the idle trim and fuel trim strategy,
optimize the driveability and performance
of the engine. Some other computer
settings, like the clock and radio station
presets, are also maintained in memory by
power from the low voltage battery. When
a technician disconnects and connects the
low voltage battery, these settings are
erased. Complete the following procedure
in order to restore the settings:
1. With the vehicle at a complete stop, set the parking brake.
2. Shift the transmission into P.
3. Turn off all accessories.
4. Step on the brake pedal and start the vehicle. 5. Run the engine until it reaches normal
operating temperature. While the
engine is warming up, complete the
following: Reset the clock. See Audio
System (page 273). Reset the power
windows bounce-back feature. See
Windows and Mirrors
(page 85).
Reset the radio station presets. See
Audio System
(page 273).
6. Allow the engine to idle for at least one
minute. If the engine turns off, step on
the accelerator to start the engine.
7. While the engine is running, step on the
brake pedal and shift the transmission
to N.
8. Allow the engine to run for at least one
minute by pressing on the accelerator
pedal.
9. Drive the vehicle at least 10 miles (16 kilometers) to completely relearn the
idle and fuel trim strategy.
Note: If you do not allow the engine to
relearn the idle and fuel trim strategy, the
idle quality of your vehicle may be adversely
affected until the engine computer
eventually relearns the idle trim and fuel
trim strategy.
Note: Always dispose of automotive
batteries in a responsible manner. Follow
your local authorized standards for disposal.
Call your local authorized recycling center
to find out more about recycling automotive
batteries.
Note: It is recommended that the negative
battery cable terminal be disconnected from
the battery if you plan to store your vehicle
for an extended period of time.
218
Focus (CDH), enUSA, First Printing Maintenance
Page 279 of 453

TUNE and Play or Pause: Turn to search the frequency band in individual
increments. Press to either play or pause a track when listening to a CD.
F
PHONE:
Press this button to access the phone features of the SYNC system.
See Using SYNC™ With Your Phone (page 294).
G
MENU:
Press this button to access different audio system features. See Menu
Structure later in this chapter.
H
Clock:
Press this button to access the clock setting. Use the center arrow
controls to change the hours and minutes. You can also set the clock by pressing
the
MENU button and scrolling to Clock Settings.
I
Seek and Fast Forward:
In radio mode, select a frequency band and press
this button. The system stops at the first station up the band. Press and hold
the button to move quickly through the frequency band and advance to next
strong radio station after the button is released. In CD mode, press this button
to select the next track. Press and hold the button to move quickly forward
through the current track.
J
OK and Arrow buttons: Press the OK button to confirm menu selections. Use
the arrow buttons to navigate within menus.
K
Seek and Reverse:
In radio mode, select a frequency band and press this
button. The system stops at the first station down the band. Press and hold
the button to move quickly through the frequency band and advance to next
strong radio station after the button is released. In CD mode, press this button
to select the previous track. Press and hold the button to move quickly backward
through the current track.
L
SOUND:
Press this button to access settings for Treble, Midrange, Bass, Fade
and Balance. Use the up and down arrow buttons to select the various settings.
When you make your selection, press the left and right arrow buttons to change
the settings. Press
OK to set or press MENU to exit. Sound settings can be set
for each audio source independently.
M
RADIO:
Press this button to listen to the radio or change radio frequency bands.
N
MEDIA:
Press this button to change the active media source. To change the
SYNC-Media device (such as switching from a device plugged into the USB
port to a Bluetooth audio device), press
MENU and scroll to Select Source.
O
276
Focus (CDH), enUSA, First Printing Audio System
Page 282 of 453

TUNE and Play or Pause: Turn to search the frequency band in individual
increments. Press to either play or pause a track when listening to a CD.
F
CLOCK:
When not in Phone mode, press this button to access the clock setting.
Use the center arrow controls to change the hours and minutes. You can also
set the clock by pressing the
MENU button and scrolling to Clock Settings.
G
PHONE:
Press this button to access the phone features of the SYNC system.
See Using SYNC™ With Your Phone (page 294).
H
MENU:
Press this button to access different audio system features. See Menu
Structure later in this section.
I
SOUND:
Press this button to access settings for Treble, Midrange, Bass, Fade
and Balance. Use the up and down arrow buttons to select the various settings.
When you make your selection, press the left and right arrow buttons to change
the settings. Press
OK to set or press MENU to exit. Sound settings can be set
for each audio source independently.
J
Seek and Fast Forward:
In radio mode, select a frequency band and press
this button. The system stops at the first station up the band. Press and hold
the button to move quickly through the frequency band and advance to next
strong radio station after the button is released. In CD mode, press this button
to select the next track. Press and hold the button to move quickly forward
through the current track.
K
OK and Arrow buttons: Press the OK button to confirm menu selections. Use
the arrow buttons to navigate within menus.
L
Seek and Reverse:
In radio mode, select a frequency band and press this
button. The system stops at the first station down the band. Press and hold
the button to move quickly through the frequency band and advance to next
strong radio station after the button is released. In CD mode, press this button
to select the previous track. Press and hold the button to move quickly backward
through the current track.
M
SIRIUS:
Press this button to listen to Sirius satellite radio.
N
RADIO:
Press this button to listen to the radio or change radio frequency bands.
O
MEDIA:
Press this button to change the active media source. To change the
SYNC-Media device (such as switching from a device plugged into the USB
port to a Bluetooth audio device), press
MENU and scroll to Select Source.
P
279
Focus (CDH), enUSA, First Printing Audio System
Page 286 of 453

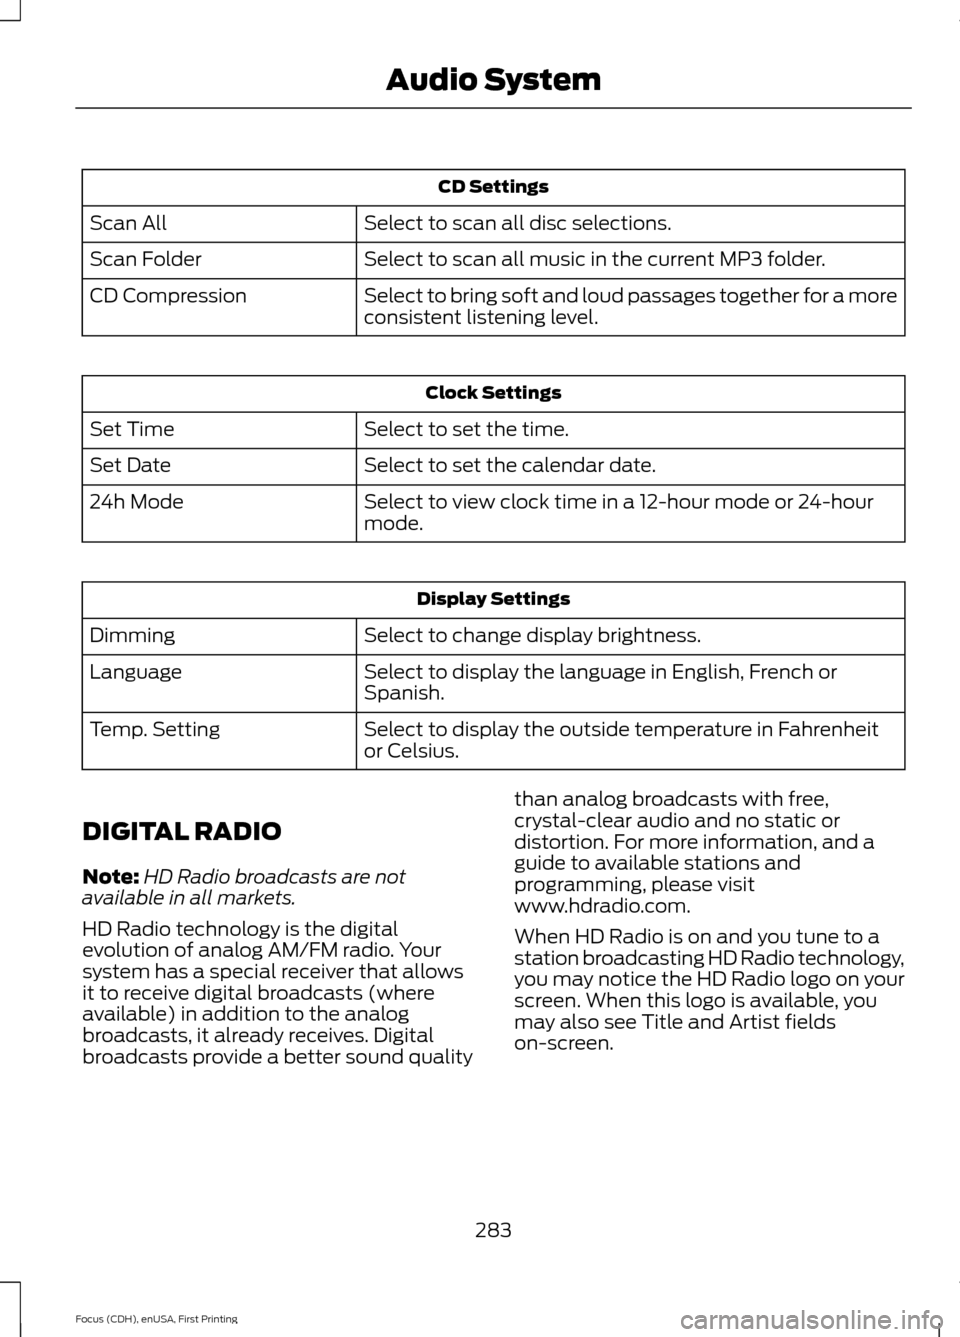
CD Settings
Select to scan all disc selections.
Scan All
Select to scan all music in the current MP3 folder.
Scan Folder
Select to bring soft and loud passages together for a more
consistent listening level.
CD Compression Clock Settings
Select to set the time.
Set Time
Select to set the calendar date.
Set Date
Select to view clock time in a 12-hour mode or 24-hour
mode.
24h Mode Display Settings
Select to change display brightness.
Dimming
Select to display the language in English, French or
Spanish.
Language
Select to display the outside temperature in Fahrenheit
or Celsius.
Temp. Setting
DIGITAL RADIO
Note: HD Radio broadcasts are not
available in all markets.
HD Radio technology is the digital
evolution of analog AM/FM radio. Your
system has a special receiver that allows
it to receive digital broadcasts (where
available) in addition to the analog
broadcasts, it already receives. Digital
broadcasts provide a better sound quality than analog broadcasts with free,
crystal-clear audio and no static or
distortion. For more information, and a
guide to available stations and
programming, please visit
www.hdradio.com.
When HD Radio is on and you tune to a
station broadcasting HD Radio technology,
you may notice the HD Radio logo on your
screen. When this logo is available, you
may also see Title and Artist fields
on-screen.
283
Focus (CDH), enUSA, First Printing Audio System
Page 331 of 453

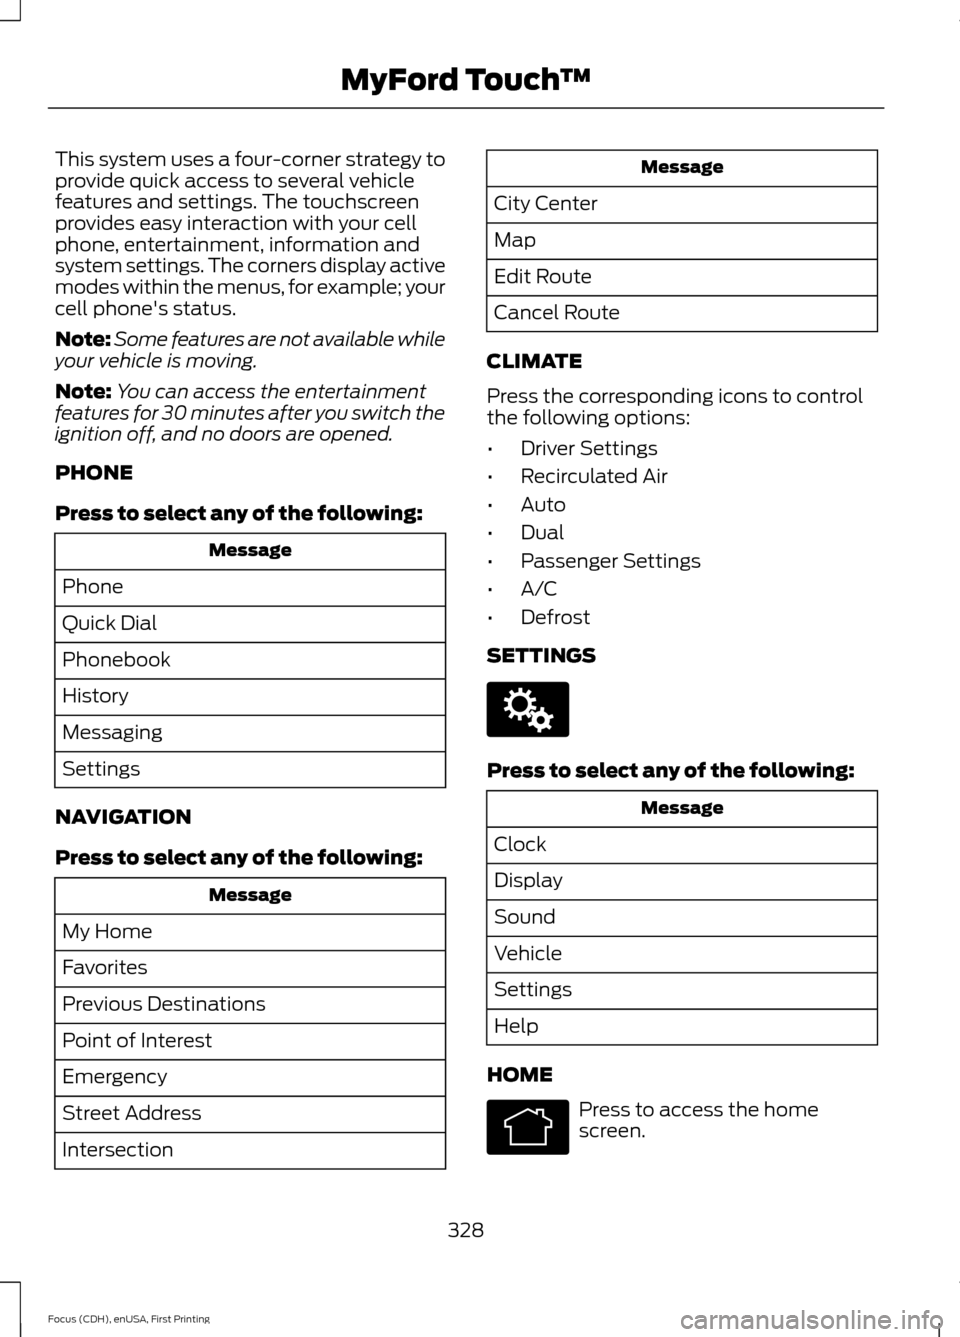
This system uses a four-corner strategy to
provide quick access to several vehicle
features and settings. The touchscreen
provides easy interaction with your cell
phone, entertainment, information and
system settings. The corners display active
modes within the menus, for example; your
cell phone's status.
Note:
Some features are not available while
your vehicle is moving.
Note: You can access the entertainment
features for 30 minutes after you switch the
ignition off, and no doors are opened.
PHONE
Press to select any of the following: Message
Phone
Quick Dial
Phonebook
History
Messaging
Settings
NAVIGATION
Press to select any of the following: Message
My Home
Favorites
Previous Destinations
Point of Interest
Emergency
Street Address
Intersection Message
City Center
Map
Edit Route
Cancel Route
CLIMATE
Press the corresponding icons to control
the following options:
• Driver Settings
• Recirculated Air
• Auto
• Dual
• Passenger Settings
• A/C
• Defrost
SETTINGS Press to select any of the following:
Message
Clock
Display
Sound
Vehicle
Settings
Help
HOME Press to access the home
screen.
328
Focus (CDH), enUSA, First Printing MyFord Touch
™E142607 E142613
Page 338 of 453

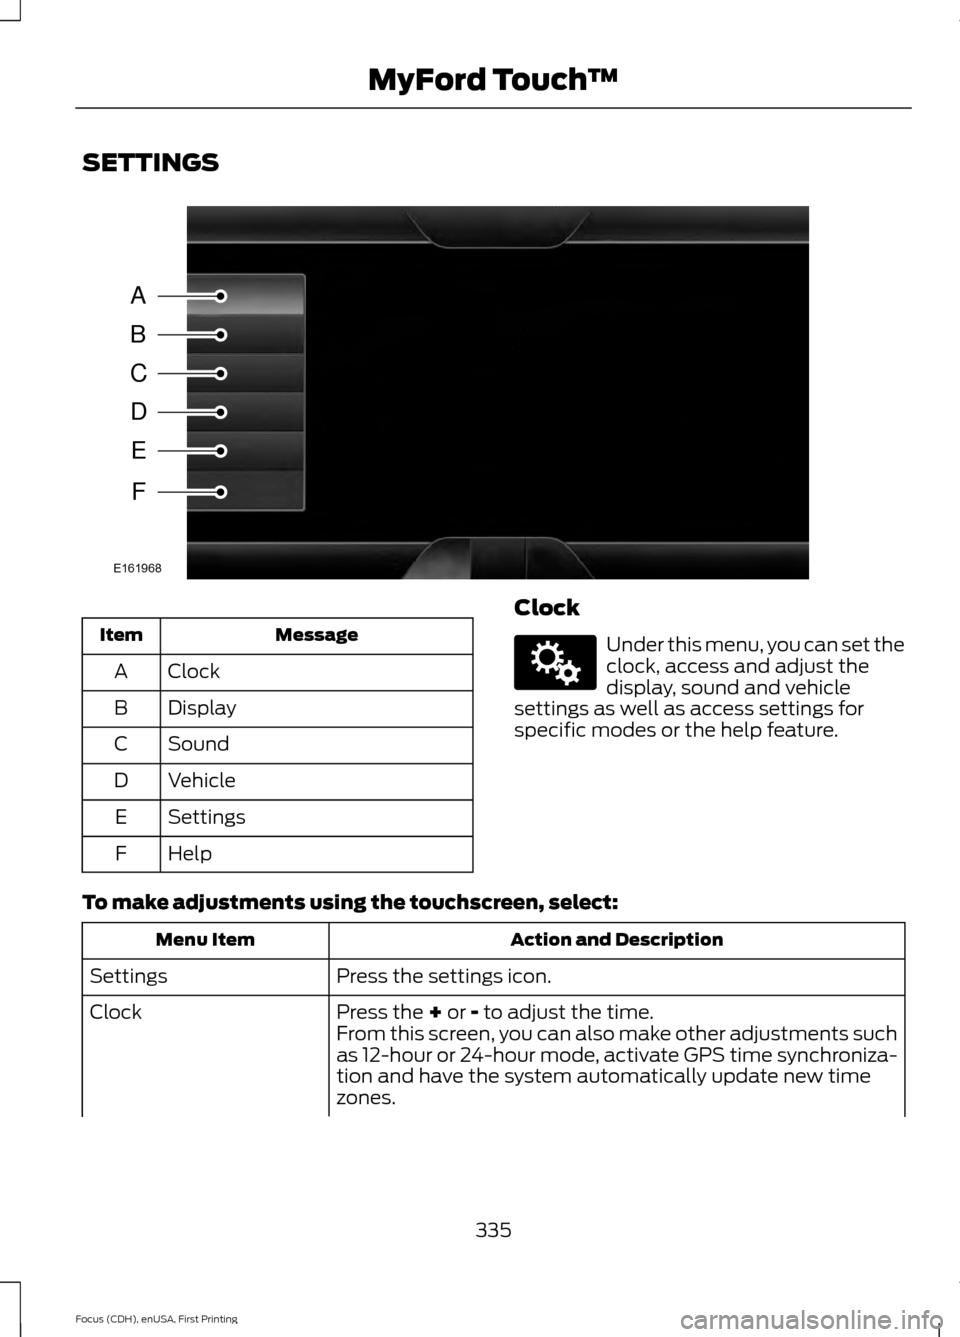
SETTINGS
Message
Item
Clock
A
Display
B
Sound
C
Vehicle
D
Settings
E
Help
F Clock Under this menu, you can set the
clock, access and adjust the
display, sound and vehicle
settings as well as access settings for
specific modes or the help feature.
To make adjustments using the touchscreen, select: Action and Description
Menu Item
Press the settings icon.
Settings
Press the + or - to adjust the time.
Clock
From this screen, you can also make other adjustments such
as 12-hour or 24-hour mode, activate GPS time synchroniza-
tion and have the system automatically update new time
zones.
335
Focus (CDH), enUSA, First Printing MyFord Touch
™A
B
C
D
E
F
E161968 E142607
Page 339 of 453

Action and Description
Menu Item
You can also switch the outside air temperature display off
and on. It appears at the top center of the touchscreen, next
to the time and date.
Note: You cannot manually set the date. Your vehicle ’s GPS does this for you.
Note: If the battery has been disconnected, your vehicle needs to acquire a GPS signal to
update the clock. Once your vehicle acquires the signal, it may take a few minutes for the
update to display the correct time.
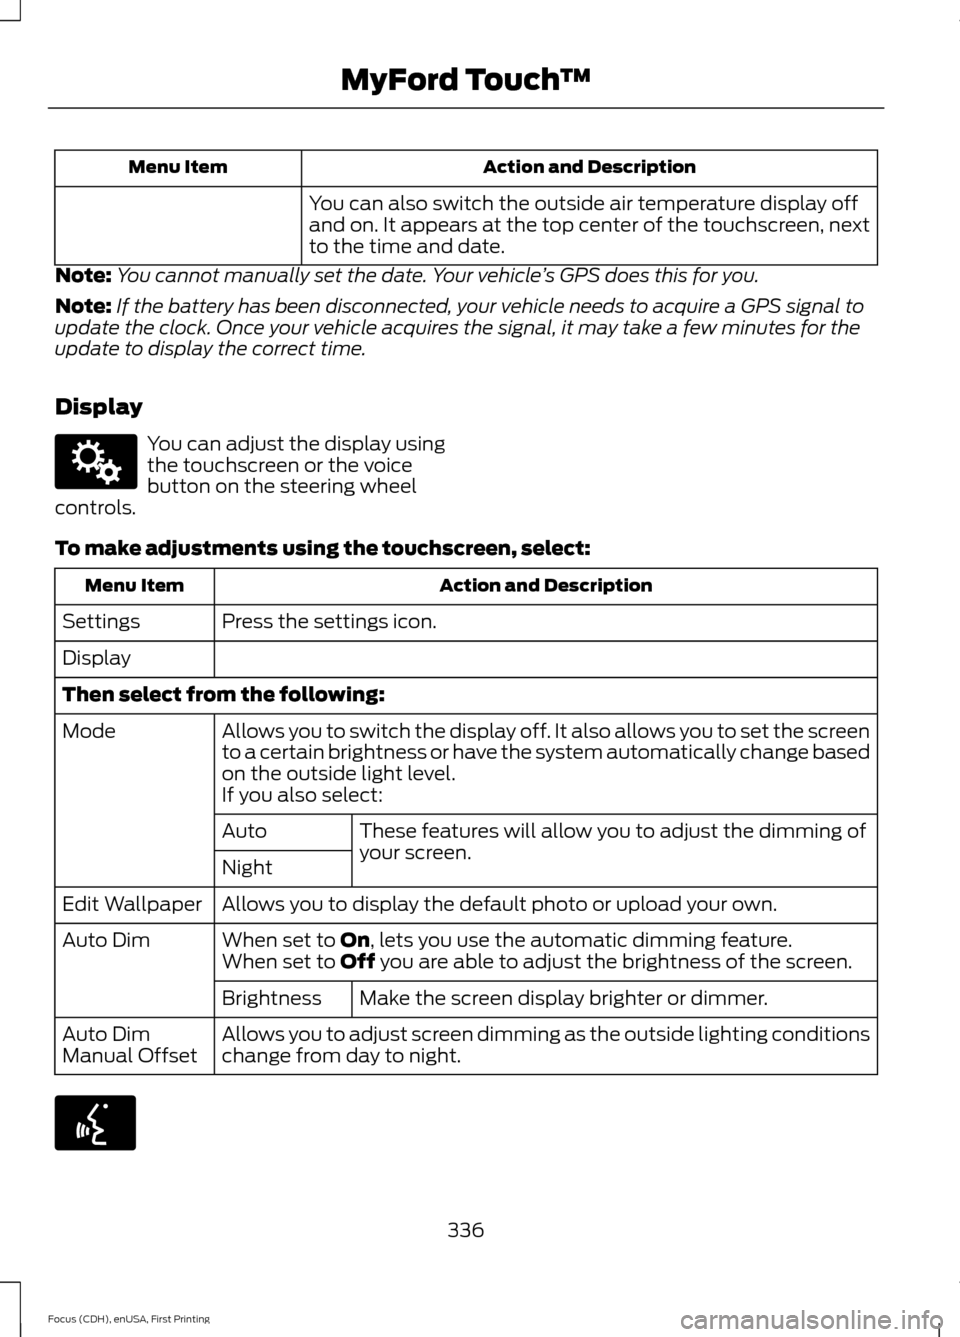
Display You can adjust the display using
the touchscreen or the voice
button on the steering wheel
controls.
To make adjustments using the touchscreen, select: Action and Description
Menu Item
Press the settings icon.
Settings
Display
Then select from the following:
Allows you to switch the display off. It also allows you to set the screen
to a certain brightness or have the system automatically change based
on the outside light level.
Mode
If you also select:These features will allow you to adjust the dimming of
your screen.
Auto
Night
Allows you to display the default photo or upload your own.
Edit Wallpaper
When set to On, lets you use the automatic dimming feature.
Auto Dim
When set to Off you are able to adjust the brightness of the screen.
Make the screen display brighter or dimmer.
Brightness
Allows you to adjust screen dimming as the outside lighting conditions
change from day to night.
Auto Dim
Manual Offset 336
Focus (CDH), enUSA, First Printing MyFord Touch
™E142607 E142599
Page 451 of 453

Roadside Assistance..................................189
Vehicles Sold in Canada: Getting Roadside
Assistance........................................................ 189
Vehicles Sold in Canada: Using Roadside Assistance........................................................ 189
Vehicles Sold in the United States: Getting Roadside Assistance.................................... 189
Vehicles Sold in the United States: Using Roadside Assistance.................................... 189
Roadside Emergencies
..............................189
Running-In See: Breaking-In.................................................. 186
Running Out of Fuel.....................................134 Adding Fuel From a Portable Fuel
Container.......................................................... 135
Filling a Portable Fuel Container.................. 135
S
Safety Belt Height Adjustment.................36
Safety Belt Minder..........................................37 Belt-Minder™......................................................... 37
Safety Belts......................................................33 Principle of Operation......................................... 33
Safety Belt Warning Lamp and Indicator Chime...............................................................37
Conditions of operation..................................... 37
Safety Precautions.......................................132
Satellite Radio
..............................................286
Satellite Radio Electronic Serial Number
(ESN)................................................................. 287
Satellite Radio Reception Factors..............286
SIRIUS® Satellite Radio Service.................286
Troubleshooting................................................. 287
Scheduled Maintenance Record...........433
Scheduled Maintenance
...........................425
Seats...................................................................114
Security................................................................71
Settings...........................................................335 Clock....................................................................... 335
Display................................................................... 336
Settings................................................................. 339
Sound..................................................................... 337
Vehicle.................................................................... 337
Side Airbags
.....................................................45
Side Curtain Airbags......................................47
Sitting in the Correct Position...................114 Snow Chains
See: Using Snow Chains................................. 252
Special Notices................................................12 New Vehicle Limited Warranty......................... 12
On-board Diagnostics (OBD-II)....................... 12
Special Instructions.............................................. 12
Special Operating Conditions Scheduled Maintenance................................................431
Exceptions............................................................ 432
Speed Control See: Cruise Control............................................ 162
Stability Control............................................152 Principle of Operation....................................... 152
Starter Switch See: Ignition Switch............................................ 122
Starting a Gasoline Engine
........................125
Automatic Engine Shutdown......................... 126
Failure to Start..................................................... 126
Guarding Against Exhaust Fumes................128
Important Ventilating Information...............128
Stopping the Engine When Your Vehicle is Moving................................................................ 127
Stopping the Engine When Your Vehicle is Stationary.......................................................... 127
Vehicles with an Ignition Key.......................... 125
Vehicles with Keyless Start............................. 125
Starting and Stopping the Engine..........122 General Information........................................... 122
Steering.............................................................172 Electric Power Steering..................................... 172
Steering Wheel
................................................74
Storage Compartments..............................121
Sunroof See: Moonroof...................................................... 88
Sun Visors.........................................................88 Illuminated Vanity Mirror................................... 88
Supplementary Restraints System..........41 Principle of Operation......................................... 41
Symbols Glossary
.............................................7
SYNC™ Applications and Services........................................................305
911 Assist............................................................... 305
SYNC Mobile Apps............................................ 307
SYNC™...........................................................290 General Information......................................... 290
SYNC™ Troubleshooting
..........................319
448
Focus (CDH), enUSA, First Printing Index