2015 FORD FOCUS ELECTRIC clock
[x] Cancel search: clockPage 31 of 369
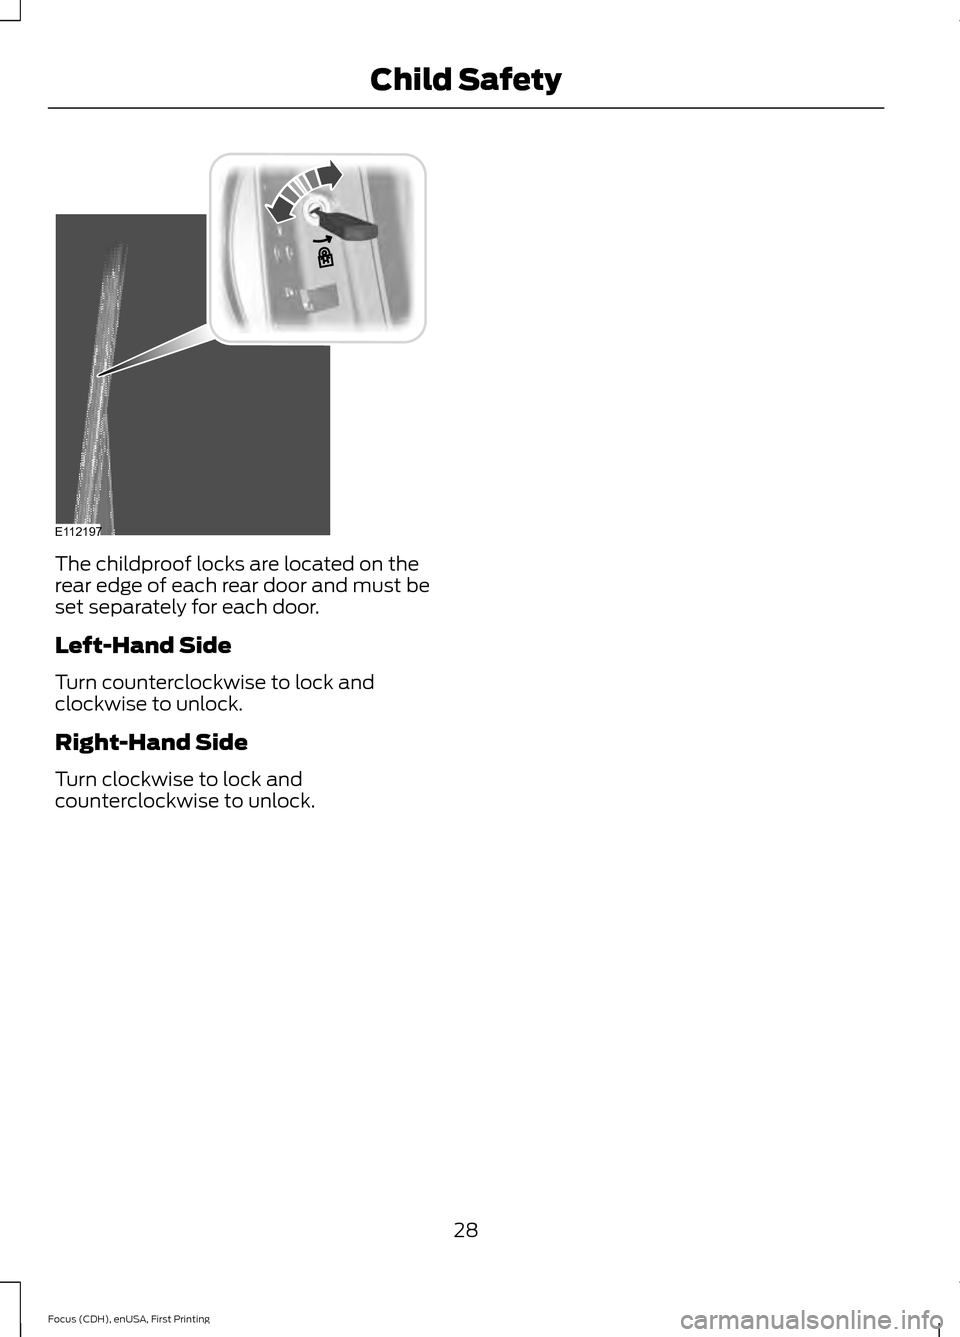
The childproof locks are located on the
rear edge of each rear door and must be
set separately for each door.
Left-Hand Side
Turn counterclockwise to lock and
clockwise to unlock.
Right-Hand Side
Turn clockwise to lock and
counterclockwise to unlock.
28
Focus (CDH), enUSA, First Printing Child SafetyE112197
Page 121 of 369
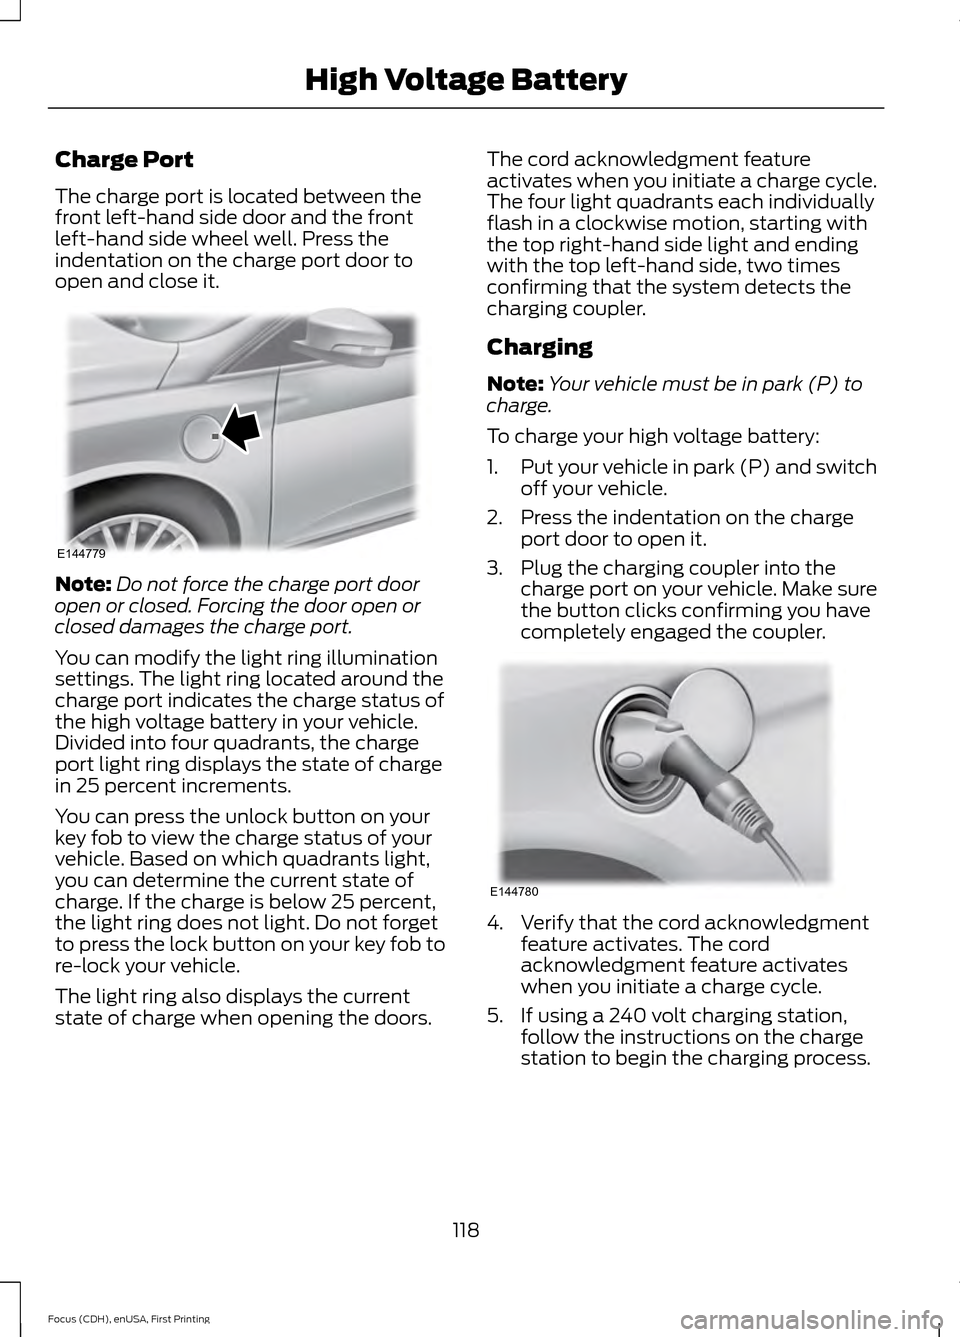
Charge Port
The charge port is located between the
front left-hand side door and the front
left-hand side wheel well. Press the
indentation on the charge port door to
open and close it.
Note:
Do not force the charge port door
open or closed. Forcing the door open or
closed damages the charge port.
You can modify the light ring illumination
settings. The light ring located around the
charge port indicates the charge status of
the high voltage battery in your vehicle.
Divided into four quadrants, the charge
port light ring displays the state of charge
in 25 percent increments.
You can press the unlock button on your
key fob to view the charge status of your
vehicle. Based on which quadrants light,
you can determine the current state of
charge. If the charge is below 25 percent,
the light ring does not light. Do not forget
to press the lock button on your key fob to
re-lock your vehicle.
The light ring also displays the current
state of charge when opening the doors. The cord acknowledgment feature
activates when you initiate a charge cycle.
The four light quadrants each individually
flash in a clockwise motion, starting with
the top right-hand side light and ending
with the top left-hand side, two times
confirming that the system detects the
charging coupler.
Charging
Note:
Your vehicle must be in park (P) to
charge.
To charge your high voltage battery:
1. Put your vehicle in park (P) and switch
off your vehicle.
2. Press the indentation on the charge port door to open it.
3. Plug the charging coupler into the charge port on your vehicle. Make sure
the button clicks confirming you have
completely engaged the coupler. 4. Verify that the cord acknowledgment
feature activates. The cord
acknowledgment feature activates
when you initiate a charge cycle.
5. If using a 240 volt charging station, follow the instructions on the charge
station to begin the charging process.
118
Focus (CDH), enUSA, First Printing High Voltage BatteryE144779 E144780
Page 123 of 369
You can modify the light ring lighting
conditions. See Charge Port Light Ring
Settings in the MyFord Touch section. See
MyFord Touch
™ (page 231).
Disconnecting the Charging
Coupler
Note: Do not pull the wall plug from the
wall while the vehicle is charging. Doing so
may damage the outlet and the cord.
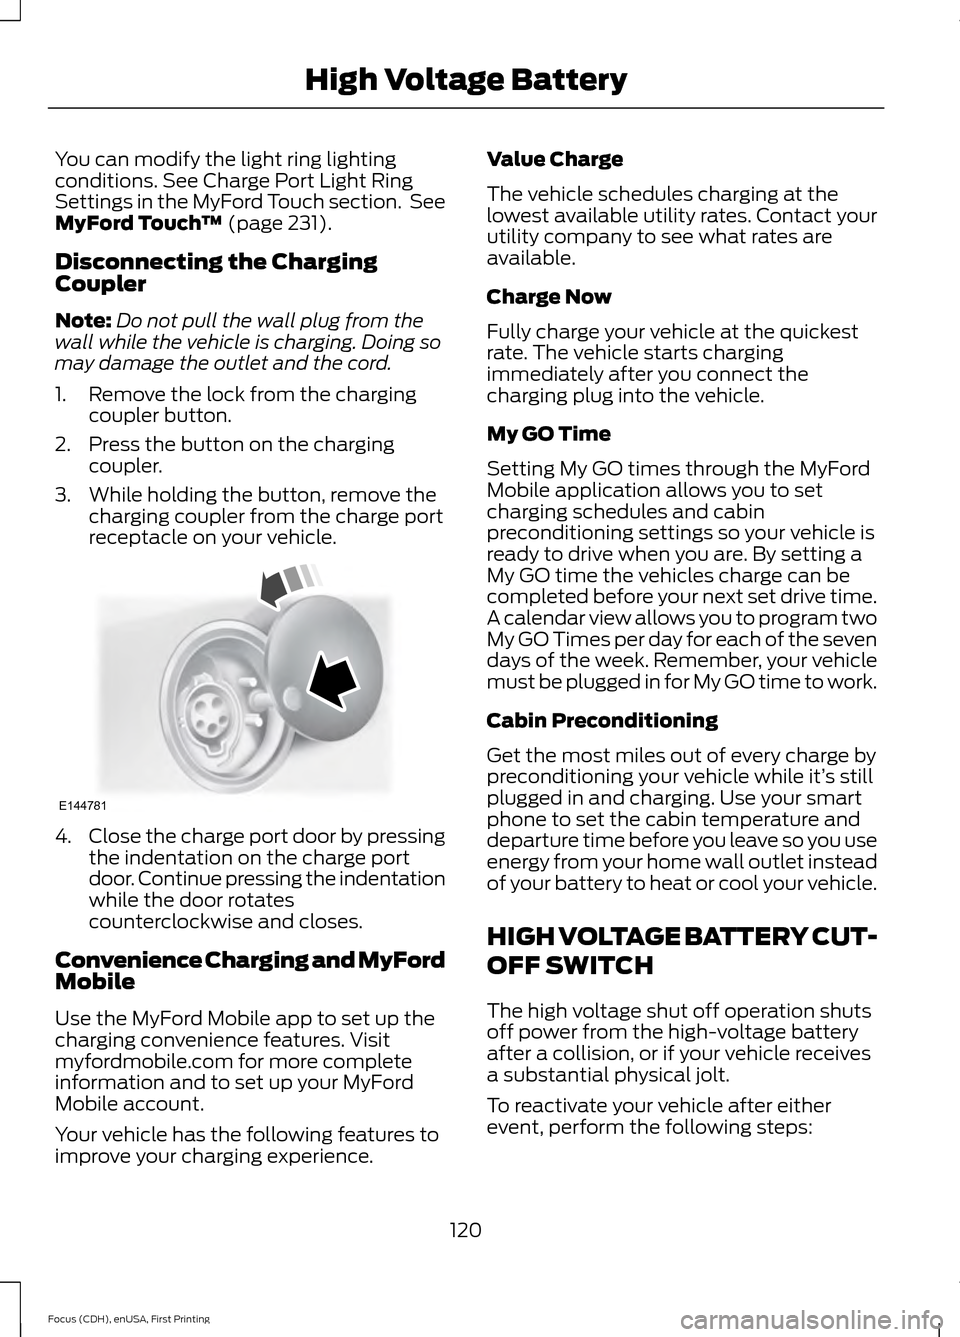
1. Remove the lock from the charging coupler button.
2. Press the button on the charging coupler.
3. While holding the button, remove the charging coupler from the charge port
receptacle on your vehicle. 4.
Close the charge port door by pressing
the indentation on the charge port
door. Continue pressing the indentation
while the door rotates
counterclockwise and closes.
Convenience Charging and MyFord
Mobile
Use the MyFord Mobile app to set up the
charging convenience features. Visit
myfordmobile.com for more complete
information and to set up your MyFord
Mobile account.
Your vehicle has the following features to
improve your charging experience. Value Charge
The vehicle schedules charging at the
lowest available utility rates. Contact your
utility company to see what rates are
available.
Charge Now
Fully charge your vehicle at the quickest
rate. The vehicle starts charging
immediately after you connect the
charging plug into the vehicle.
My GO Time
Setting My GO times through the MyFord
Mobile application allows you to set
charging schedules and cabin
preconditioning settings so your vehicle is
ready to drive when you are. By setting a
My GO time the vehicles charge can be
completed before your next set drive time.
A calendar view allows you to program two
My GO Times per day for each of the seven
days of the week. Remember, your vehicle
must be plugged in for My GO time to work.
Cabin Preconditioning
Get the most miles out of every charge by
preconditioning your vehicle while it’
s still
plugged in and charging. Use your smart
phone to set the cabin temperature and
departure time before you leave so you use
energy from your home wall outlet instead
of your battery to heat or cool your vehicle.
HIGH VOLTAGE BATTERY CUT-
OFF SWITCH
The high voltage shut off operation shuts
off power from the high-voltage battery
after a collision, or if your vehicle receives
a substantial physical jolt.
To reactivate your vehicle after either
event, perform the following steps:
120
Focus (CDH), enUSA, First Printing High Voltage BatteryE144781
Page 177 of 369
WARNINGS
Keep batteries out of reach of
children. Batteries contain sulfuric
acid. Avoid contact with skin, eyes or
clothing. Shield your eyes when working
near the battery to protect against possible
splashing of acid solution. In case of acid
contact with skin or eyes, flush
immediately with water for a minimum of
15 minutes and get prompt medical
attention. If acid is swallowed, call a
physician immediately. Battery posts, terminals and related
accessories contain lead and lead
compounds. Wash hands after
handling. Your vehicle is fitted with a Motorcraft
maintenance-free battery, which normally
does not require additional water.
Note:
After cleaning or replacing the
battery, make sure you reinstall the battery
cover or shield.
When a battery replacement is required,
you should replace the battery with a Ford
recommended replacement battery that
matches the electrical requirements of the
vehicle.
Note: Contact an authorized dealer for low
voltage battery access, testing or
replacement.
To make sure the battery management
system works correctly, do not connect an
electrical device ground connection
directly to the low voltage battery negative
post. This can cause inaccurate
measurements of the battery condition
and potential incorrect system operation.
Note: If you add electrical accessories or
components to the vehicle, it may adversely
affect the low voltage battery performance
and durability. This may also affect the
performance of other electrical systems in
the vehicle. For longer, trouble-free operation, keep the
top of the battery clean and dry.
If you see any corrosion on the battery or
terminals, remove the cables from the
terminals and clean with a wire brush. You
can neutralize the acid with a solution of
baking soda and water.
A computer electronically controls your
vehicle. The power of the low voltage
battery maintains the memory of some
settings, for example, clock setting or radio
presets. When the low voltage battery is
disconnected and then connected, these
settings erase.
To restore the settings, do the following:
1. Apply the parking brake.
2. Shift into park (P).
3. Switch off all accessories.
4. Press the brake pedal and start your
vehicle.
5. Reset the clock.
6. Reset the bounce-back feature. See Power Windows (page 77).
7. Reset the radio station presets. See Audio System
(page 227).
Make sure that you dispose of old batteries
in an environmentally friendly way. Seek
advice from your local authority about
recycling old batteries.
If storing your vehicle for more than 30
days without recharging the battery, we
recommend that you disconnect the
battery cables to maintain battery charge
for quick starting.
174
Focus (CDH), enUSA, First Printing Maintenance
Page 180 of 369
Note:
There may be an identifying mark on
the lens to help you locate the center of the
bulb.
Note: To see a clearer light pattern while
adjusting one headlamp, you may want to
block the light from the other headlamp.
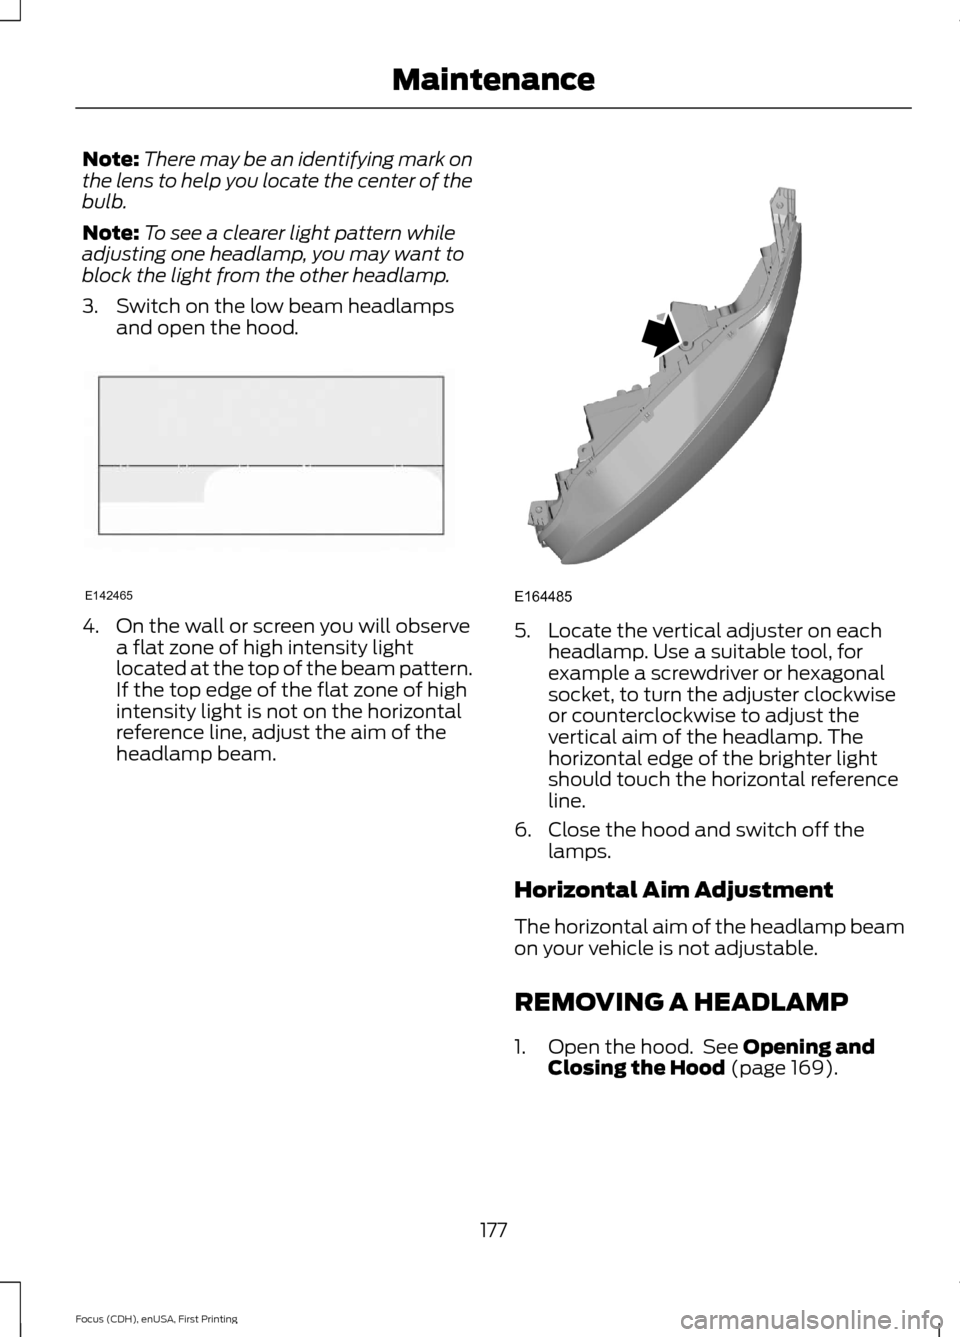
3. Switch on the low beam headlamps and open the hood. 4. On the wall or screen you will observe
a flat zone of high intensity light
located at the top of the beam pattern.
If the top edge of the flat zone of high
intensity light is not on the horizontal
reference line, adjust the aim of the
headlamp beam. 5. Locate the vertical adjuster on each
headlamp. Use a suitable tool, for
example a screwdriver or hexagonal
socket, to turn the adjuster clockwise
or counterclockwise to adjust the
vertical aim of the headlamp. The
horizontal edge of the brighter light
should touch the horizontal reference
line.
6. Close the hood and switch off the lamps.
Horizontal Aim Adjustment
The horizontal aim of the headlamp beam
on your vehicle is not adjustable.
REMOVING A HEADLAMP
1. Open the hood. See Opening and
Closing the Hood (page 169).
177
Focus (CDH), enUSA, First Printing MaintenanceE142465 E164485
Page 182 of 369
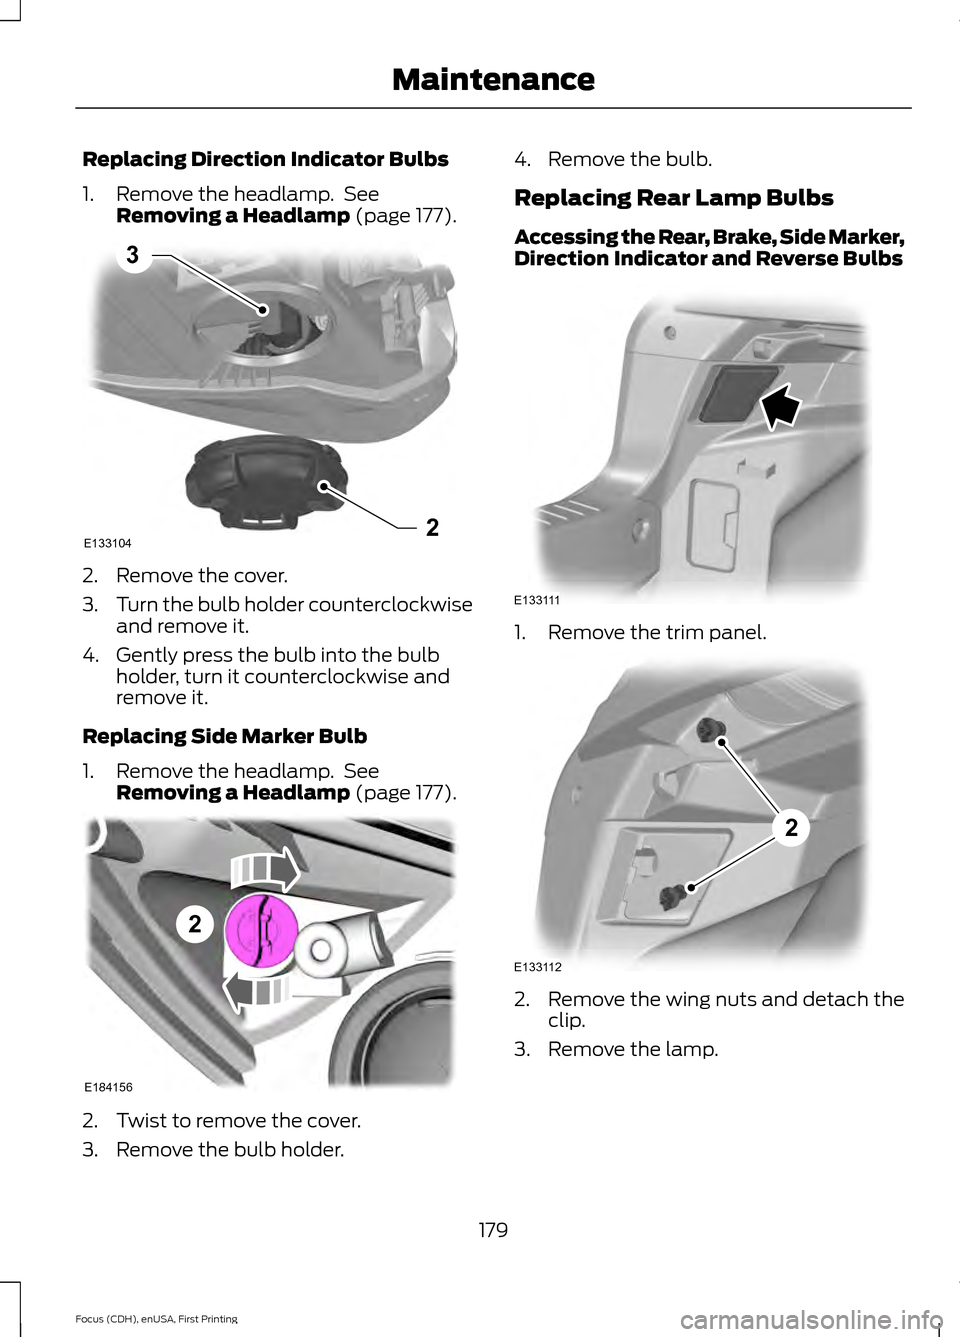
Replacing Direction Indicator Bulbs
1. Remove the headlamp. See
Removing a Headlamp (page 177). 2. Remove the cover.
3.
Turn the bulb holder counterclockwise
and remove it.
4. Gently press the bulb into the bulb holder, turn it counterclockwise and
remove it.
Replacing Side Marker Bulb
1. Remove the headlamp. See Removing a Headlamp
(page 177). 2. Twist to remove the cover.
3. Remove the bulb holder. 4. Remove the bulb.
Replacing Rear Lamp Bulbs
Accessing the Rear, Brake, Side Marker,
Direction Indicator and Reverse Bulbs
1. Remove the trim panel.
2. Remove the wing nuts and detach the
clip.
3. Remove the lamp.
179
Focus (CDH), enUSA, First Printing MaintenanceE1331042
3 2
E184156 E133111 E133112
2
Page 183 of 369
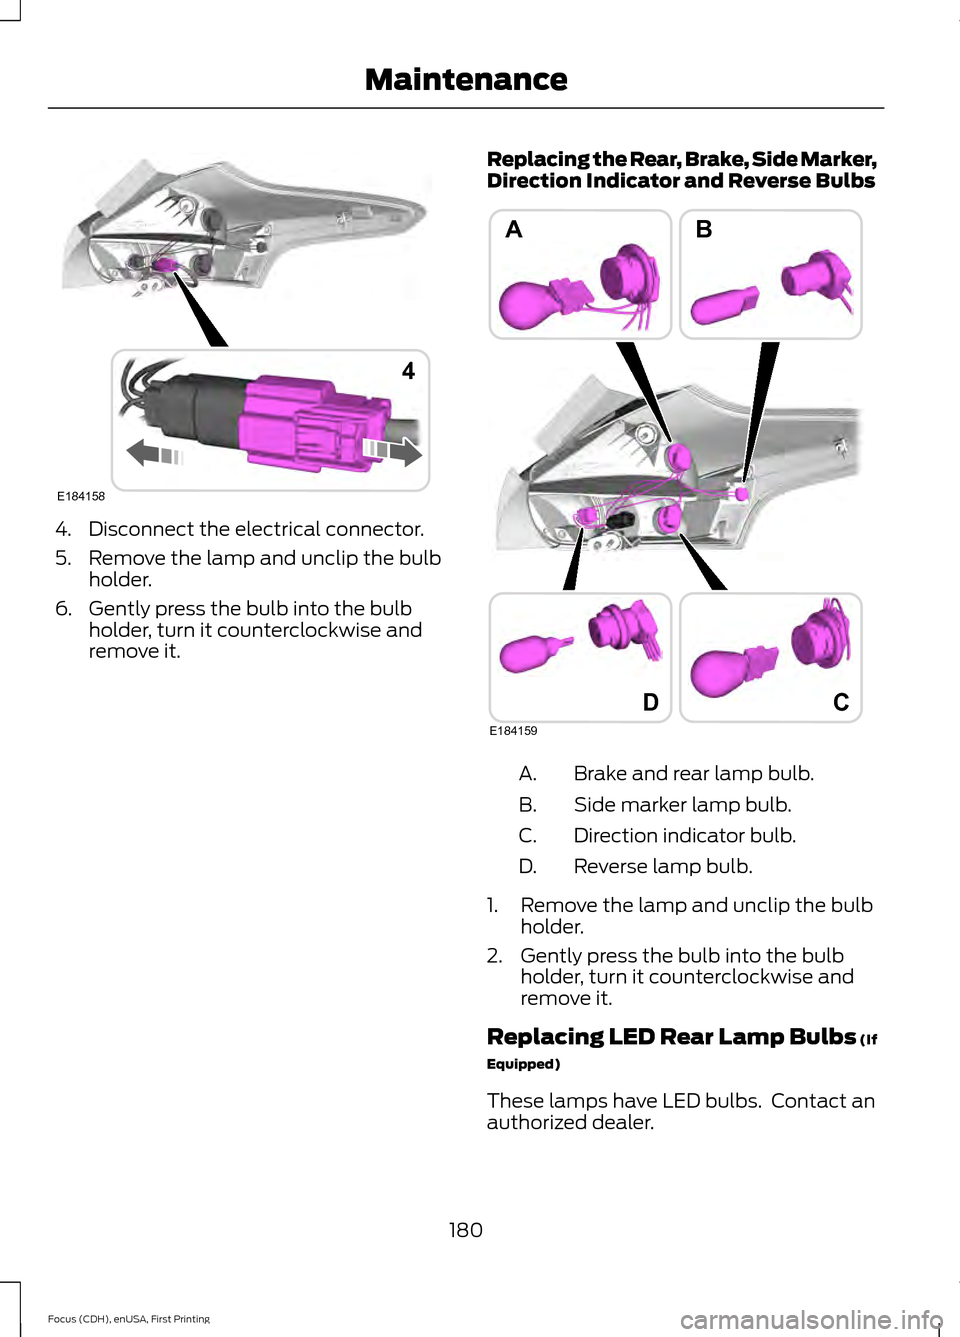
4. Disconnect the electrical connector.
5. Remove the lamp and unclip the bulb
holder.
6. Gently press the bulb into the bulb holder, turn it counterclockwise and
remove it. Replacing the Rear, Brake, Side Marker,
Direction Indicator and Reverse Bulbs Brake and rear lamp bulb.
A.
Side marker lamp bulb.
B.
Direction indicator bulb.
C.
Reverse lamp bulb.
D.
1. Remove the lamp and unclip the bulb holder.
2. Gently press the bulb into the bulb holder, turn it counterclockwise and
remove it.
Replacing LED Rear Lamp Bulbs (If
Equipped)
These lamps have LED bulbs. Contact an
authorized dealer.
180
Focus (CDH), enUSA, First Printing MaintenanceE184158
4 D
AB
E184159
C
Page 194 of 369
What to do When a Tire Is
Punctured
Repair a tire puncture within the tire's tread
area in two stages with the kit.
•
In the first stage, inflate the tire with a
sealing compound and air. After you
inflate the tire, you will need to drive
the vehicle a short distance (about 4
miles [6 kilometers]) to distribute the
sealant in the tire.
• In the second stage, check the tire
pressure and adjust, if necessary, to the
vehicle's specified tire inflation
pressure.
First Stage: Inflating the Tire with
Sealing Compound and Air WARNINGS
Do not stand directly over the kit
while inflating the tire. If you notice
any unusual bulges or deformations
in the tire's sidewall during inflation, stop
and call roadside assistance. If the tire does not inflate to the
recommended tire pressure within
15 minutes, stop and call roadside
assistance. Preparation: Park the vehicle in a safe, level
and secure area, away from moving traffic.
Switch the hazard lights on. Apply the
parking brake and switch the engine off.
Inspect the flat tire for visible damage.
WARNING
Do not run the engine during kit
operation unless the vehicle is
outdoors or in a well-ventilated area.
Sealant compound contains latex. To
avoid any allergic reactions, use the
non-latex gloves found in the accessory
box on the underside of the kit housing. Do not remove any foreign object that has
pierced the tire. If a puncture is located in
the tire sidewall, stop and call roadside
assistance.
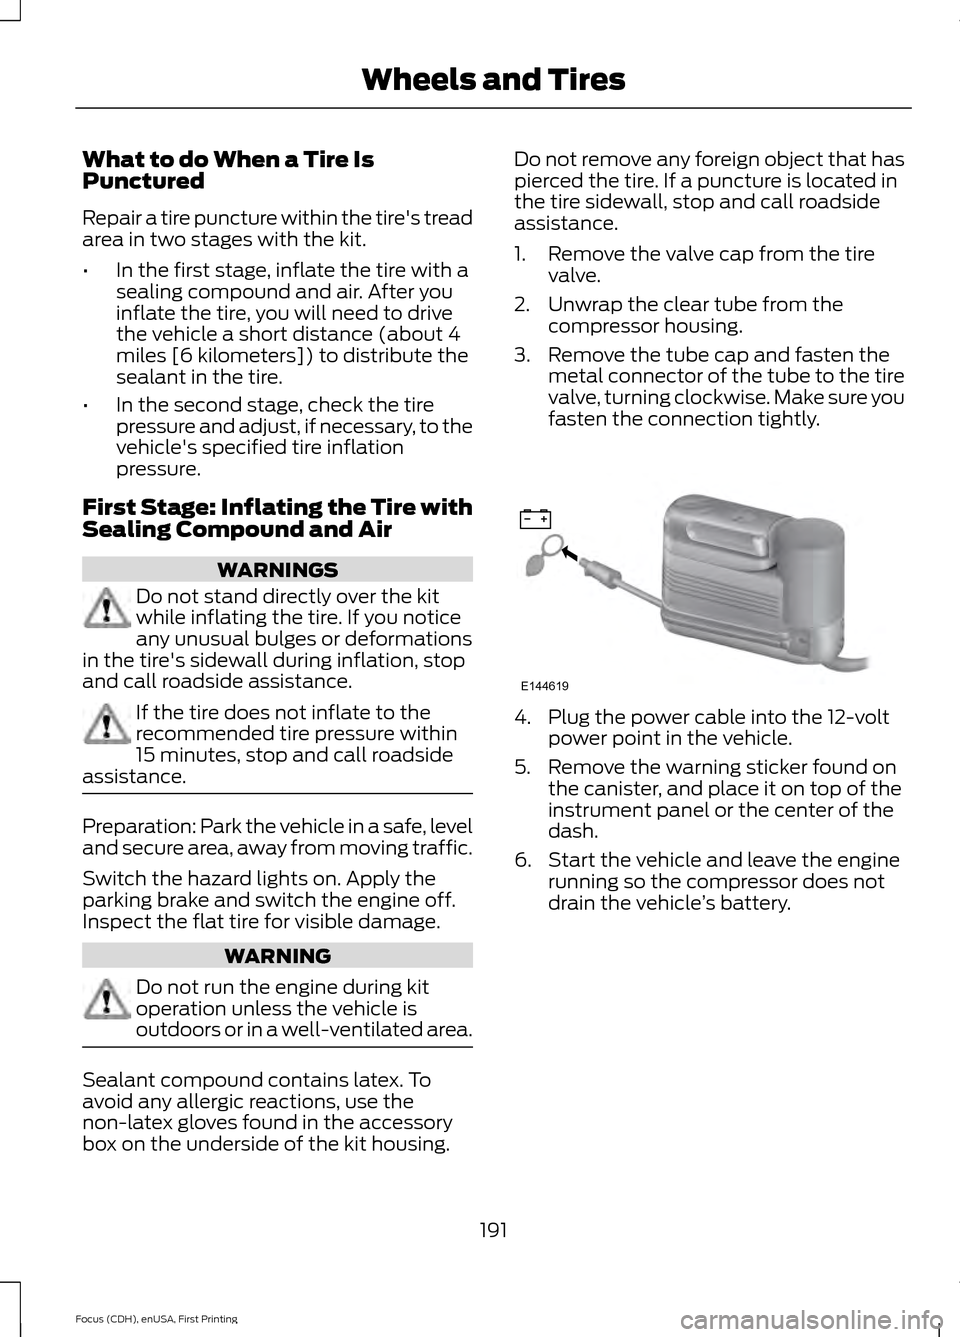
1. Remove the valve cap from the tire
valve.
2. Unwrap the clear tube from the compressor housing.
3. Remove the tube cap and fasten the metal connector of the tube to the tire
valve, turning clockwise. Make sure you
fasten the connection tightly. 4. Plug the power cable into the 12-volt
power point in the vehicle.
5. Remove the warning sticker found on the canister, and place it on top of the
instrument panel or the center of the
dash.
6. Start the vehicle and leave the engine running so the compressor does not
drain the vehicle ’s battery.
191
Focus (CDH), enUSA, First Printing Wheels and TiresE144619