2015 FORD F250 SUPER DUTY parking brake
[x] Cancel search: parking brakePage 248 of 470
Note:Electrical or electronic accessoriesor components added to the vehicle by thedealer or the owner may adversely affectbattery performance and durability.
Your vehicle is equipped with a Motorcraftmaintenance-free battery which normallydoes not require additional water duringits life of service.
For longer, trouble-free operation, keep thetop of the battery clean and dry. Also,make certain the battery cables are alwaystightly fastened to the battery terminals.
If you see any corrosion on the battery orterminals, remove the cables from theterminals and clean with a wire brush. Youcan neutralize the acid with a solution ofbaking soda and water.
It is recommended that the negativebattery cable terminal be disconnectedfrom the battery if you plan to store yourvehicle for an extended period of time.
Because your vehicle’s engine iselectronically controlled by a computer,some control conditions are maintainedby power from the battery. When thebattery is disconnected or a new batteryis installed, the engine must relearn its idleand fuel trim strategy for optimumdriveability and performance. Flexible fuelvehicles (FFV) must also relearn theethanol content of the fuel for optimumdriveability and performance. To begin thisprocess
1. With the vehicle at a complete stop,set the parking brake.
2. Put the gearshift in P, turn off allaccessories.
3. Start the engine. Run the engine untilit reaches normal operatingtemperature.
4.Allow the engine to idle for at least oneminute.
5. Turn the A/C on and allow the engineto idle for at least one minute.
6. Release the parking brake. With yourfoot on the brake pedal and with theA/C on, put the vehicle in D and allowthe engine to idle for at least oneminute.
•If you do not allow the engine torelearn its idle trim, the idle qualityof your vehicle may be adverselyaffected until the idle trim iseventually relearned.
7. Drive the vehicle to complete therelearning process
•The vehicle may need to be driven10 mi (16 km) or more to relearn theidle and fuel trim strategy alongwith the ethanol content for flexiblefuel vehicles.
•For flexible fuel vehicles, if you areoperating on E85, you mayexperience poor starts or aninability to start the engine anddriveability problems until the fueltrim and ethanol content have beenrelearned.
If the battery has been disconnected or anew battery has been installed, the clockand radio settings must be reset once thebattery is reconnected.
Always dispose of automotivebatteries in a responsible manner.Follow your local authorized standardsfor disposal. Call your local authorizedrecycling center to find out more aboutrecycling automotive batteries.
Battery Management System (IfEquipped)
The battery management system (BMS)monitors battery conditions and takesactions to extend battery life. If excessivebattery drain is detected, the system maytemporarily disable certain electricalfeatures to protect the battery. Thoseelectrical accessories affected include therear defrost, heated/cooled seats, climate
245
Super Duty (), enUSA
Maintenance
Page 264 of 470
CLEANING THE ALLOY
WHEELS (IF EQUIPPED)
Note:Do not apply a cleaning chemical towarm or hot wheel rims and covers.
Note:Some automatic car washes maycause damage to the finish on your wheelrims and covers.
Note:Industrial-strength or heavy-dutycleaners in combination with brush agitationto remove brake dust and dirt, could wearaway the clear coat finish over a period time.
Note:Do not use hydrofluoric acid-basedor high caustic-based wheel cleaners, steelwool, fuels or strong household detergents.
Note:If you intend parking your vehicle foran extended period after cleaning thewheels with a wheel cleaner, drive yourvehicle for a few minutes before doing so.This will reduce the risk of increasedcorrosion of the brake discs.
Alloy wheels and wheel covers are coatedwith a clear coat paint finish. To maintaintheir condition we recommend that you:
•Clean the wheels weekly usingMotorcraft Wheel and Tire Cleaner.Apply using manufacturer'sinstructions.
•Use a sponge to remove heavydeposits of dirt and brake dustaccumulation.
•Rinse thoroughly with a strong streamof water when you have completed thecleaning process.
•To remove tar and grease, useMotorcraft Bug and Tar Remover.
VEHICLE STORAGE
If you plan on storing your vehicle for anextended period of time (30 days or more),read the following maintenancerecommendations to make sure yourvehicle stays in good operating condition.
All motor vehicles and their componentswere engineered and tested for reliable,regular driving. Long term storage undervarious conditions may lead to componentdegradation or failure unless specificprecautions are taken to preserve thecomponents.
General
•Store all vehicles in a dry, ventilatedplace.
•Protect from sunlight, if possible.
•If vehicles are stored outside, theyrequire regular maintenance to protectagainst rust and damage.
Body
•Wash your vehicle thoroughly toremove dirt, grease, oil, tar or mud fromexterior surfaces, rear-wheel housingand underside of front fenders.
•Periodically wash your vehicle storedin exposed locations.
•Touch-up exposed or primed metal toprevent rust.
•Cover chrome and stainless steel partswith a thick coat of auto wax to preventdiscoloration. Re-wax as necessarywhen your vehicle is washed.
•Lubricate all hood, door and trunk lidhinges, and latches with a light gradeoil.
•Cover interior trim to prevent fading.
•Keep all rubber parts free from oil andsolvents.
261
Super Duty (), enUSA
Vehicle Care
Page 265 of 470
Engine
•The engine oil and filter should bechanged prior to storage, as usedengine oil contain contaminates thatmay cause engine damage.
•Start the engine every 15 days. Run atfast idle until it reaches normaloperating temperature
•With your foot on the brake, shiftthrough all the gears while the engineis running.
Fuel system
•Fill the fuel tank with high-quality fueluntil the first automatic shutoff of thefuel pump nozzle.
Cooling system
•Protect against freezing temperatures.
•When removing your vehicle fromstorage, check coolant fluid level.Confirm there are no cooling systemleaks, and fluid is at the recommendedlevel.
Battery
•Check and recharge as necessary. Keepconnections clean.
•If storing your vehicle for more than 30days without recharging the battery, itmay be advisable to disconnect thebattery cables to ensure battery chargeis maintained for quick starting.
Note:If battery cables are disconnected, itwill be necessary to reset memory features.
Brakes
•Make sure brakes and parking brakeare fully released.
Tires
•Maintain recommended air pressure.
Miscellaneous
•Make sure all linkages, cables, leversand pins under your vehicle are coveredwith grease to prevent rust.
•Move vehicles at least 25 feet (8meters) every 15 days to lubricateworking parts and prevent corrosion.
Removing Vehicle From Storage
When your vehicle is ready to come out ofstorage, do the following:
•Wash your vehicle to remove any dirtor grease film build-up on windowsurfaces.
•Check windshield wipers for anydeterioration.
•Check under the hood for any foreignmaterial that may have collectedduring storage (mice/squirrel nests).
•Check the exhaust for any foreignmaterial that may have collectedduring storage.
•Check tire pressures and set tireinflation per the Tire Label.
•Check brake pedal operation. Driveyour vehicle 15 feet (4.5 meters) backand forth to remove rust build-up.
•Check fluid levels (including coolant,oil and gas) to make sure there are noleaks, and fluids are at recommendedlevels.
•If the battery was removed, clean thebattery cable ends and inspect.
Contact your authorized dealer if you haveany concerns or issues.
262
Super Duty (), enUSA
Vehicle Care
Page 294 of 470
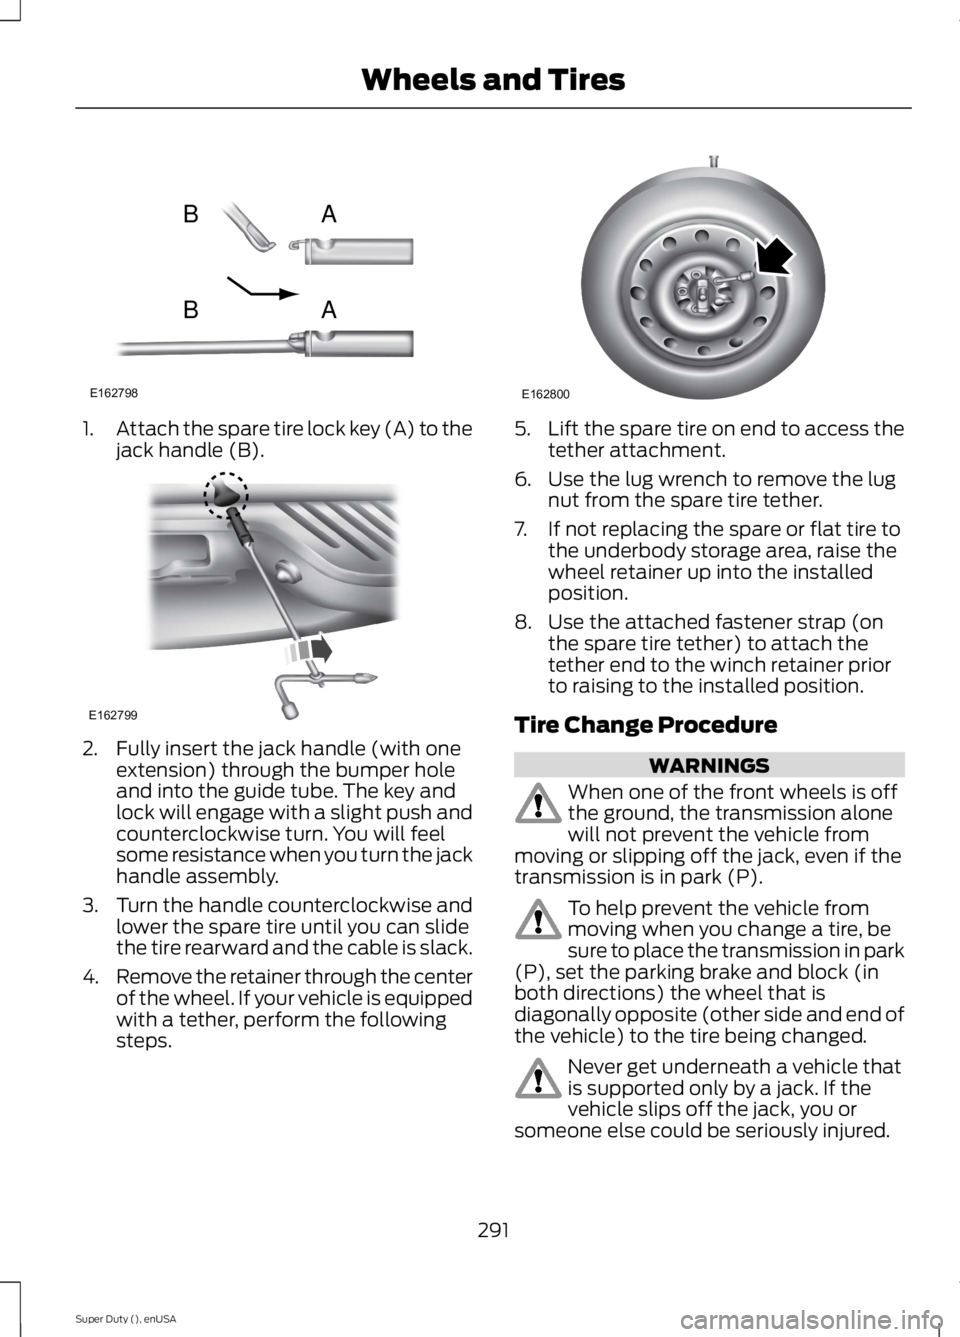
1.Attach the spare tire lock key (A) to thejack handle (B).
2. Fully insert the jack handle (with oneextension) through the bumper holeand into the guide tube. The key andlock will engage with a slight push andcounterclockwise turn. You will feelsome resistance when you turn the jackhandle assembly.
3.Turn the handle counterclockwise andlower the spare tire until you can slidethe tire rearward and the cable is slack.
4.Remove the retainer through the centerof the wheel. If your vehicle is equippedwith a tether, perform the followingsteps.
5.Lift the spare tire on end to access thetether attachment.
6. Use the lug wrench to remove the lugnut from the spare tire tether.
7. If not replacing the spare or flat tire tothe underbody storage area, raise thewheel retainer up into the installedposition.
8. Use the attached fastener strap (onthe spare tire tether) to attach thetether end to the winch retainer priorto raising to the installed position.
Tire Change Procedure
WARNINGS
When one of the front wheels is offthe ground, the transmission alonewill not prevent the vehicle frommoving or slipping off the jack, even if thetransmission is in park (P).
To help prevent the vehicle frommoving when you change a tire, besure to place the transmission in park(P), set the parking brake and block (inboth directions) the wheel that isdiagonally opposite (other side and end ofthe vehicle) to the tire being changed.
Never get underneath a vehicle thatis supported only by a jack. If thevehicle slips off the jack, you orsomeone else could be seriously injured.
291
Super Duty (), enUSA
Wheels and TiresE162798
AB
AB E162799 E162800
Page 295 of 470
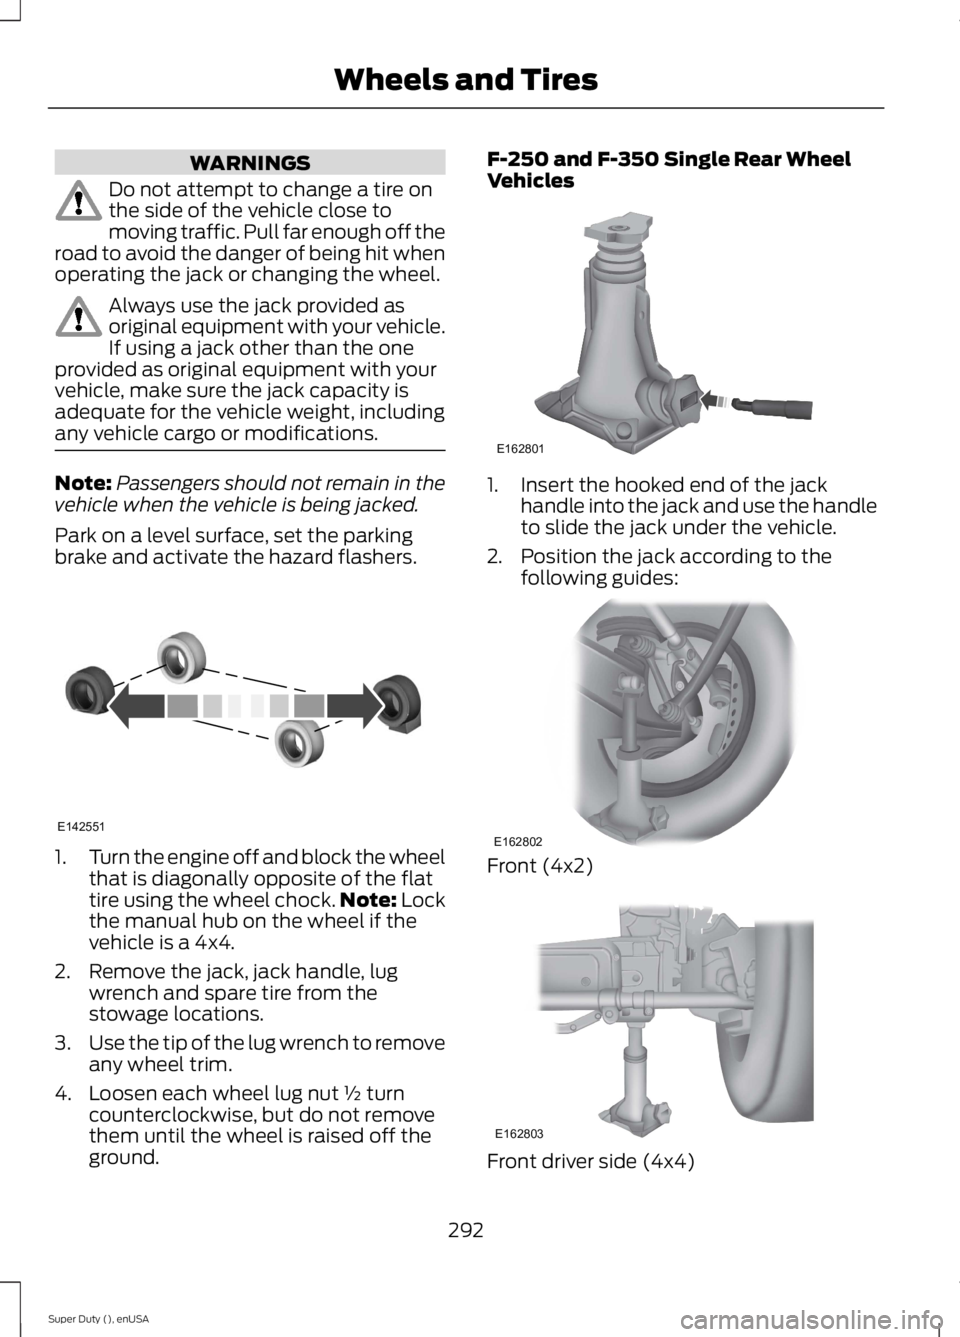
WARNINGS
Do not attempt to change a tire onthe side of the vehicle close tomoving traffic. Pull far enough off theroad to avoid the danger of being hit whenoperating the jack or changing the wheel.
Always use the jack provided asoriginal equipment with your vehicle.If using a jack other than the oneprovided as original equipment with yourvehicle, make sure the jack capacity isadequate for the vehicle weight, includingany vehicle cargo or modifications.
Note:Passengers should not remain in thevehicle when the vehicle is being jacked.
Park on a level surface, set the parkingbrake and activate the hazard flashers.
1.Turn the engine off and block the wheelthat is diagonally opposite of the flattire using the wheel chock.Note: Lockthe manual hub on the wheel if thevehicle is a 4x4.
2. Remove the jack, jack handle, lugwrench and spare tire from thestowage locations.
3.Use the tip of the lug wrench to removeany wheel trim.
4. Loosen each wheel lug nut ½ turncounterclockwise, but do not removethem until the wheel is raised off theground.
F-250 and F-350 Single Rear WheelVehicles
1. Insert the hooked end of the jackhandle into the jack and use the handleto slide the jack under the vehicle.
2. Position the jack according to thefollowing guides:
Front (4x2)
Front driver side (4x4)
292
Super Duty (), enUSA
Wheels and TiresE142551 E162801 E162802 E162803
Page 310 of 470
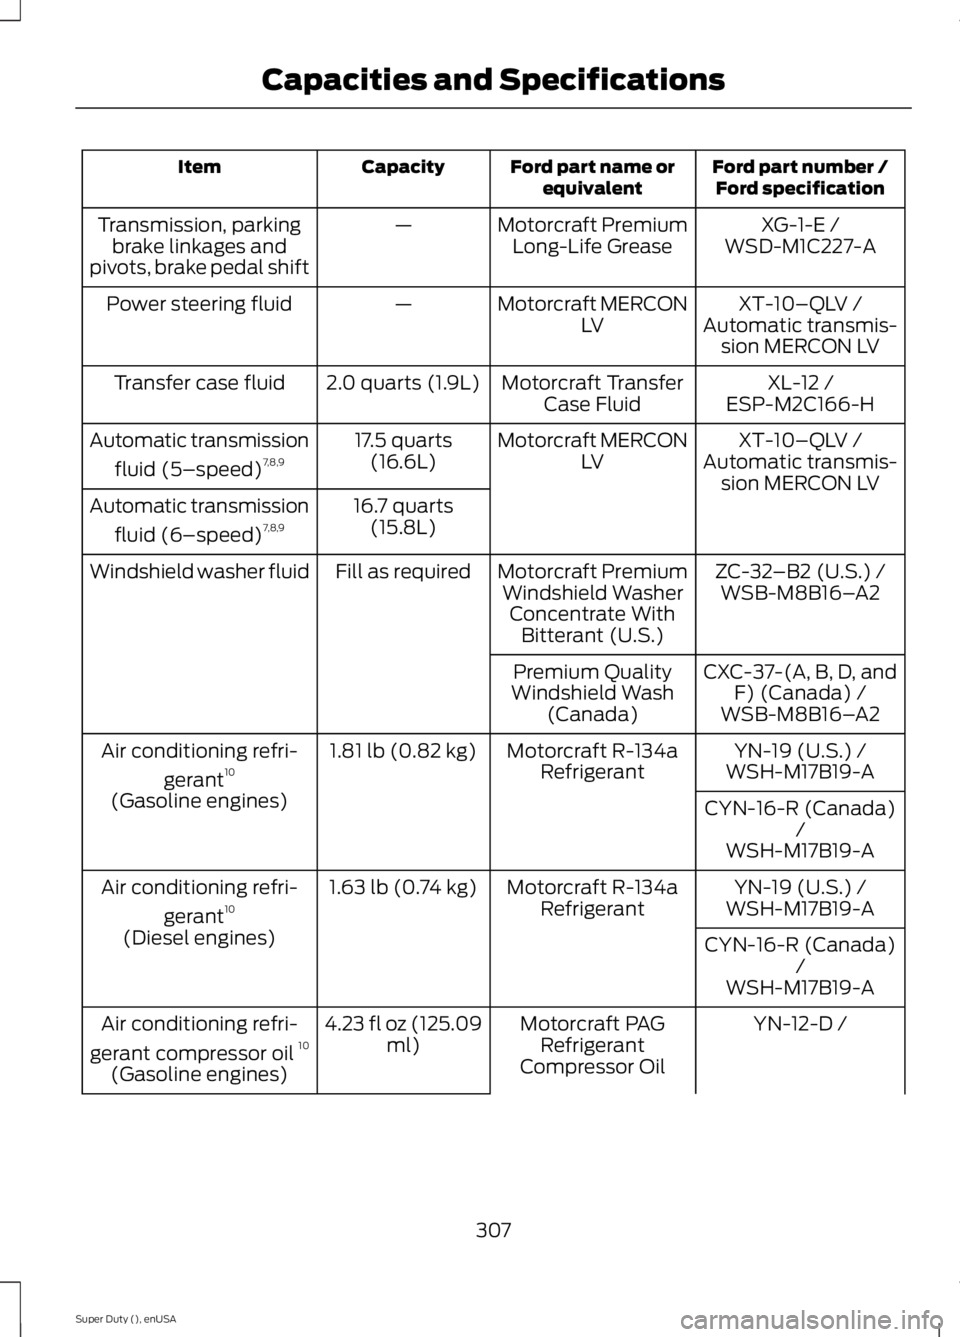
Ford part number /Ford specificationFord part name orequivalentCapacityItem
XG-1-E /Motorcraft PremiumLong-Life Grease—Transmission, parkingbrake linkages andpivots, brake pedal shiftWSD-M1C227-A
XT-10–QLV /Motorcraft MERCONLV—Power steering fluidAutomatic transmis-sion MERCON LV
XL-12 /Motorcraft TransferCase Fluid2.0 quarts (1.9L)Transfer case fluidESP-M2C166-H
XT-10–QLV /Motorcraft MERCONLV17.5 quarts(16.6L)Automatic transmission
fluid (5–speed)7,8,9Automatic transmis-sion MERCON LV16.7 quarts(15.8L)Automatic transmission
fluid (6–speed)7,8,9
ZC-32–B2 (U.S.) /Motorcraft PremiumWindshield WasherConcentrate WithBitterant (U.S.)
Fill as requiredWindshield washer fluidWSB-M8B16–A2
CXC-37-(A, B, D, andF) (Canada) /Premium QualityWindshield Wash(Canada) WSB-M8B16–A2
YN-19 (U.S.) /Motorcraft R-134aRefrigerant1.81 lb (0.82 kg)Air conditioning refri-
gerant10WSH-M17B19-A
(Gasoline engines)CYN-16-R (Canada)/WSH-M17B19-A
YN-19 (U.S.) /Motorcraft R-134aRefrigerant1.63 lb (0.74 kg)Air conditioning refri-
gerant10WSH-M17B19-A
(Diesel engines)CYN-16-R (Canada)/WSH-M17B19-A
YN-12-D /Motorcraft PAGRefrigerantCompressor Oil
4.23 fl oz (125.09ml)Air conditioning refri-
gerant compressor oil 10
(Gasoline engines)
307
Super Duty (), enUSA
Capacities and Specifications
Page 395 of 470
To access, press the lower leftcorner on the touchscreen, thenselect the BT Stereo tab.
Bluetooth Audio Voice Commands
If you are listening to a Bluetoothaudio device, press the voicebutton on the steering wheelcontrol. When prompted, say "Next song","Pause", "Play" or "Previous song".
If you are not listening to a Bluetooth audiodevice, press the voice button and, afterthe tone, say "Next song", "Pause", "Play"or "Previous song".
A/V Inputs
WARNINGS
Driving while distracted can result inloss of vehicle control, crash andinjury. We strongly recommend thatyou use extreme caution when using anydevice that may take your focus off theroad. Your primary responsibility is the safeoperation of your vehicle. We recommendagainst the use of any handheld devicewhile driving and encourage the use ofvoice-operated systems when possible.Make sure you are aware of all applicablelocal laws that may affect the use ofelectronic devices while driving.
For safety reasons, do not connector adjust the settings on yourportable music player while yourvehicle is moving.
Store the portable music player in asecure location, such as the centerconsole or the glove box, when yourvehicle is moving. Hard objects maybecome projectiles in a crash or suddenstop, which may increase the risk of seriousinjury. The audio extension cable must belong enough to allow the portable musicplayer to be safely stored while yourvehicle is moving.
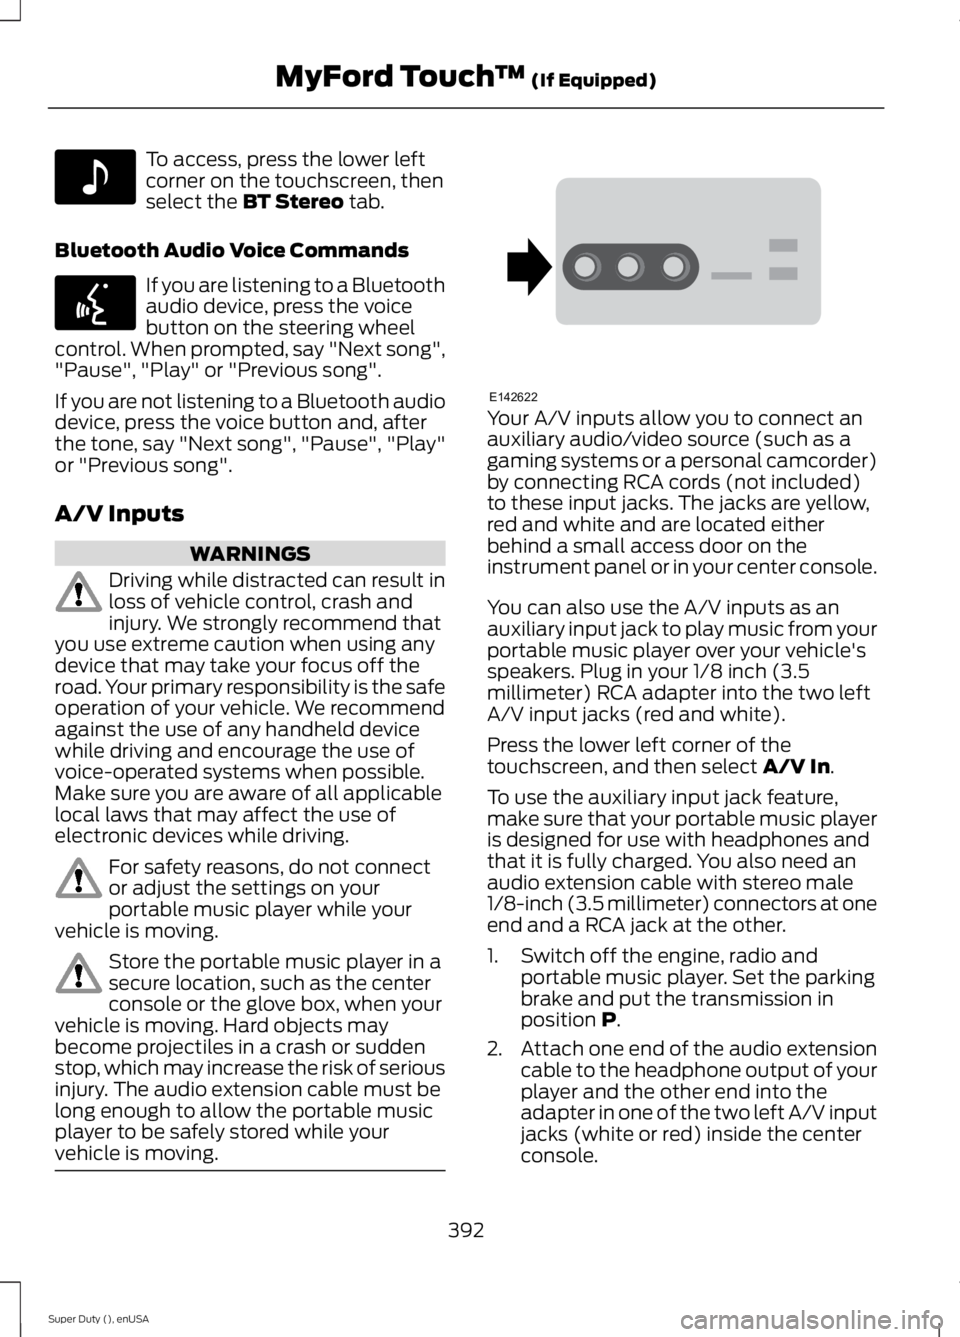
Your A/V inputs allow you to connect anauxiliary audio/video source (such as agaming systems or a personal camcorder)by connecting RCA cords (not included)to these input jacks. The jacks are yellow,red and white and are located eitherbehind a small access door on theinstrument panel or in your center console.
You can also use the A/V inputs as anauxiliary input jack to play music from yourportable music player over your vehicle'sspeakers. Plug in your 1/8 inch (3.5millimeter) RCA adapter into the two leftA/V input jacks (red and white).
Press the lower left corner of thetouchscreen, and then select A/V In.
To use the auxiliary input jack feature,make sure that your portable music playeris designed for use with headphones andthat it is fully charged. You also need anaudio extension cable with stereo male1/8-inch (3.5 millimeter) connectors at oneend and a RCA jack at the other.
1. Switch off the engine, radio andportable music player. Set the parkingbrake and put the transmission inposition P.
2.Attach one end of the audio extensioncable to the headphone output of yourplayer and the other end into theadapter in one of the two left A/V inputjacks (white or red) inside the centerconsole.
392
Super Duty (), enUSA
MyFord Touch™ (If Equipped)E142611 E142599 E142622
Page 445 of 470
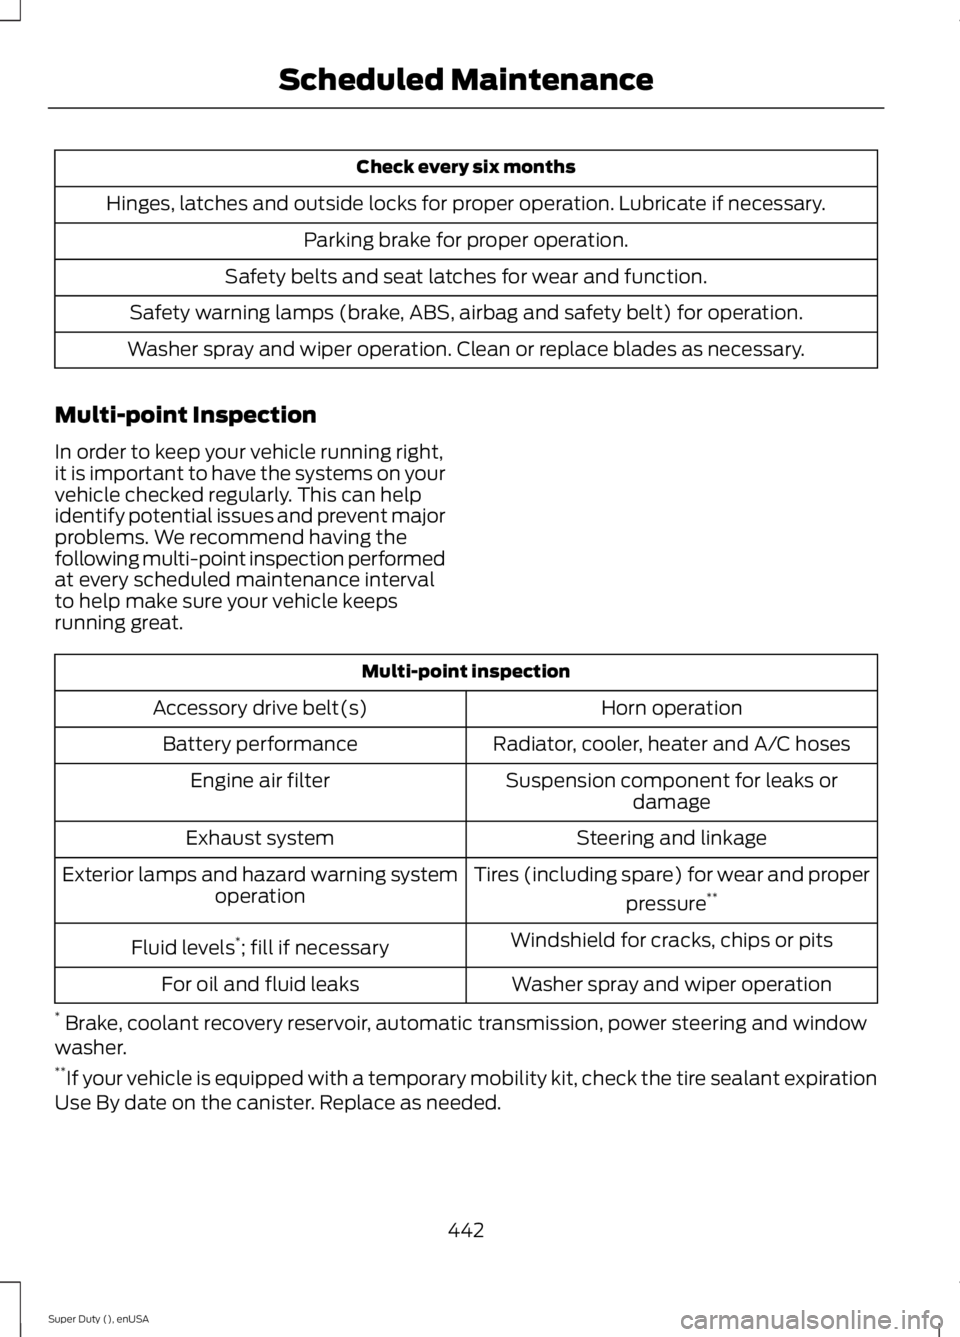
Check every six months
Hinges, latches and outside locks for proper operation. Lubricate if necessary.
Parking brake for proper operation.
Safety belts and seat latches for wear and function.
Safety warning lamps (brake, ABS, airbag and safety belt) for operation.
Washer spray and wiper operation. Clean or replace blades as necessary.
Multi-point Inspection
In order to keep your vehicle running right,it is important to have the systems on yourvehicle checked regularly. This can helpidentify potential issues and prevent majorproblems. We recommend having thefollowing multi-point inspection performedat every scheduled maintenance intervalto help make sure your vehicle keepsrunning great.
Multi-point inspection
Horn operationAccessory drive belt(s)
Radiator, cooler, heater and A/C hosesBattery performance
Suspension component for leaks ordamageEngine air filter
Steering and linkageExhaust system
Tires (including spare) for wear and proper
pressure**Exterior lamps and hazard warning systemoperation
Windshield for cracks, chips or pitsFluid levels*; fill if necessary
Washer spray and wiper operationFor oil and fluid leaks
* Brake, coolant recovery reservoir, automatic transmission, power steering and windowwasher.**If your vehicle is equipped with a temporary mobility kit, check the tire sealant expirationUse By date on the canister. Replace as needed.
442
Super Duty (), enUSA
Scheduled Maintenance