2015 FORD F250 SUPER DUTY height
[x] Cancel search: heightPage 199 of 470
Do not use a hitch that eitherclamps onto the bumper orattaches to the axle. You mustdistribute the load in your trailerso that 10-15% for conventionaltowing or 15-25% for fifth wheeltowing of the total weight of thetrailer is on the tongue.
Weight-distributing Hitches
WARNING
Do not adjust aweight-distributing hitch toany position where the rearbumper of the vehicle is higherthan it was before attaching thetrailer. Doing so will defeat thefunction of the weight-distributinghitch, which may causeunpredictable handling, and could
result in serious personal injury.
When hooking-up a trailer using aweight-distributing hitch, alwaysuse the following procedure:
1. Park the loaded vehicle,without the trailer, on a levelsurface.
2.Measure the height to the topof your vehicle's front wheelopening on the fender. This isH1.
3.Attach the loaded trailer toyour vehicle without theweight-distributing barsconnected.
4.Measure the height to the topof your vehicle's front wheelopening on the fender a secondtime. This is H2.
5.Install and adjust the tensionin the weight-distributing barsso that the height of yourvehicle's front wheel openingon the fender is approximatelyhalfway between H1 and H2.
6.Check that the trailer is level orslightly nose down toward yourvehicle. If not, adjust the ballheight accordingly and repeatSteps 2-6.
Once the trailer is level or slightlynose down toward the vehicle:
•Lock the bar tension adjusterin place.
•Check that the trailer tonguesecurely attaches and locksonto the hitch.
•Install safety chains, lighting,and trailer brake controls asrequired by law or the trailermanufacturer.
Fifth-wheel Trailer Hitch (IfEquipped)
WARNINGS
The mounting pads in the bedare specifically designed forcertain fifth-wheel trailer hitchesand gooseneck ball hitches. Donot use these mounting pads forother purposes. Doing so couldresult in vehicle structural
196
Super Duty (), enUSA
Towing
Page 250 of 470
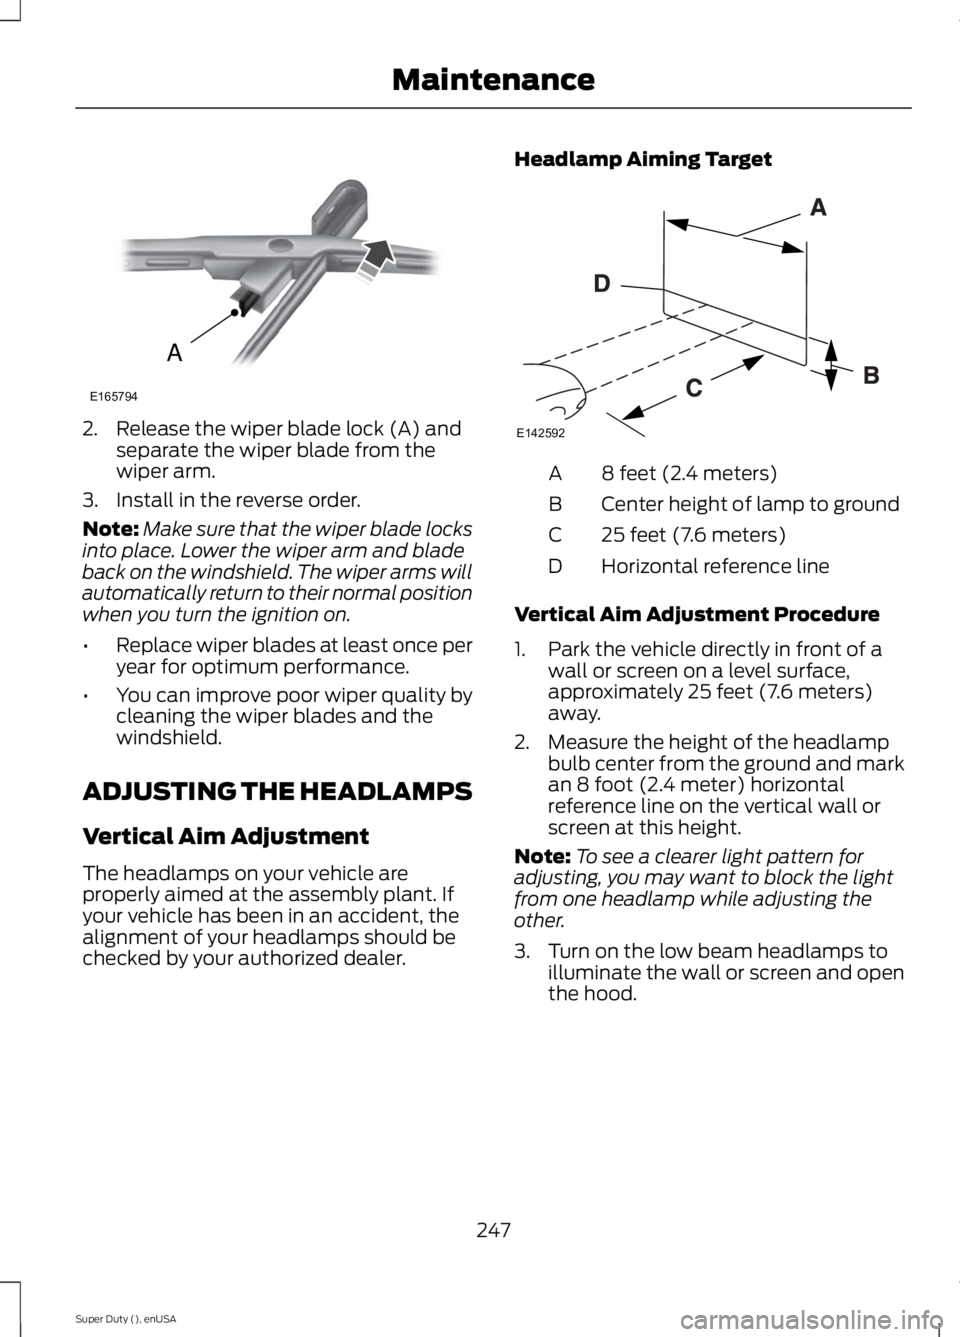
2. Release the wiper blade lock (A) andseparate the wiper blade from thewiper arm.
3. Install in the reverse order.
Note:Make sure that the wiper blade locksinto place. Lower the wiper arm and bladeback on the windshield. The wiper arms willautomatically return to their normal positionwhen you turn the ignition on.
•Replace wiper blades at least once peryear for optimum performance.
•You can improve poor wiper quality bycleaning the wiper blades and thewindshield.
ADJUSTING THE HEADLAMPS
Vertical Aim Adjustment
The headlamps on your vehicle areproperly aimed at the assembly plant. Ifyour vehicle has been in an accident, thealignment of your headlamps should bechecked by your authorized dealer.
Headlamp Aiming Target
8 feet (2.4 meters)A
Center height of lamp to groundB
25 feet (7.6 meters)C
Horizontal reference lineD
Vertical Aim Adjustment Procedure
1. Park the vehicle directly in front of awall or screen on a level surface,approximately 25 feet (7.6 meters)away.
2. Measure the height of the headlampbulb center from the ground and markan 8 foot (2.4 meter) horizontalreference line on the vertical wall orscreen at this height.
Note:To see a clearer light pattern foradjusting, you may want to block the lightfrom one headlamp while adjusting theother.
3. Turn on the low beam headlamps toilluminate the wall or screen and openthe hood.
247
Super Duty (), enUSA
MaintenanceA
E165794 E142592
Page 271 of 470
A.P: Indicates a tire, designatedby the Tire and Rim Association,that may be used for service oncars, sport utility vehicles,minivans and light trucks.Note: Ifyour tire size does not begin witha letter this may mean it isdesignated by either the EuropeanTire and Rim TechnicalOrganization or the Japan TireManufacturing Association.
B.215: Indicates the nominalwidth of the tire in millimetersfrom sidewall edge to sidewalledge. In general, the larger thenumber, the wider the tire.
C.65: Indicates the aspect ratiowhich gives the tire's ratio ofheight to width.
D.R: Indicates a radial type tire.
E.15: Indicates the wheel or rimdiameter in inches. If you changeyour wheel size, you will have topurchase new tires to match thenew wheel diameter.
F.95: Indicates the tire's loadindex. It is an index that relates tohow much weight a tire can carry.You may find this information inyour owner’s manual. If not,contact a local tire dealer.
Note:You may not find thisinformation on all tires because itis not required by federal law.
G.H: Indicates the tire's speedrating. The speed rating denotesthe speed at which a tire isdesigned to be driven for extendedperiods of time under a standardcondition of load and inflationpressure. The tires on your vehiclemay operate at differentconditions for load and inflationpressure. These speed ratings mayneed to be adjusted for thedifference in conditions. Theratings range from 81 mph (130km/h) to 186 mph (299 km/h).These ratings are listed in thefollowing chart.
Note:You may not find thisinformation on all tires because itis not required by federal law.
mph ( km/h)Letterrating
81 mph (130 km/h)M
87 mph (140 km/h)N
99 mph (159 km/h)Q
106 mph (171 km/h)R
112 mph (180 km/h)S
118 mph (190 km/h)T
124 mph (200 km/h)U
130 mph (210 km/h)H
149 mph (240 km/h)V
268
Super Duty (), enUSA
Wheels and Tires
Page 274 of 470
D.Maximum Load Single lb(kg) at psi (kPa) cold: Indicatesthe maximum load and tirepressure when the tire is used asa single; defined as two tires(total) on the rear axle.
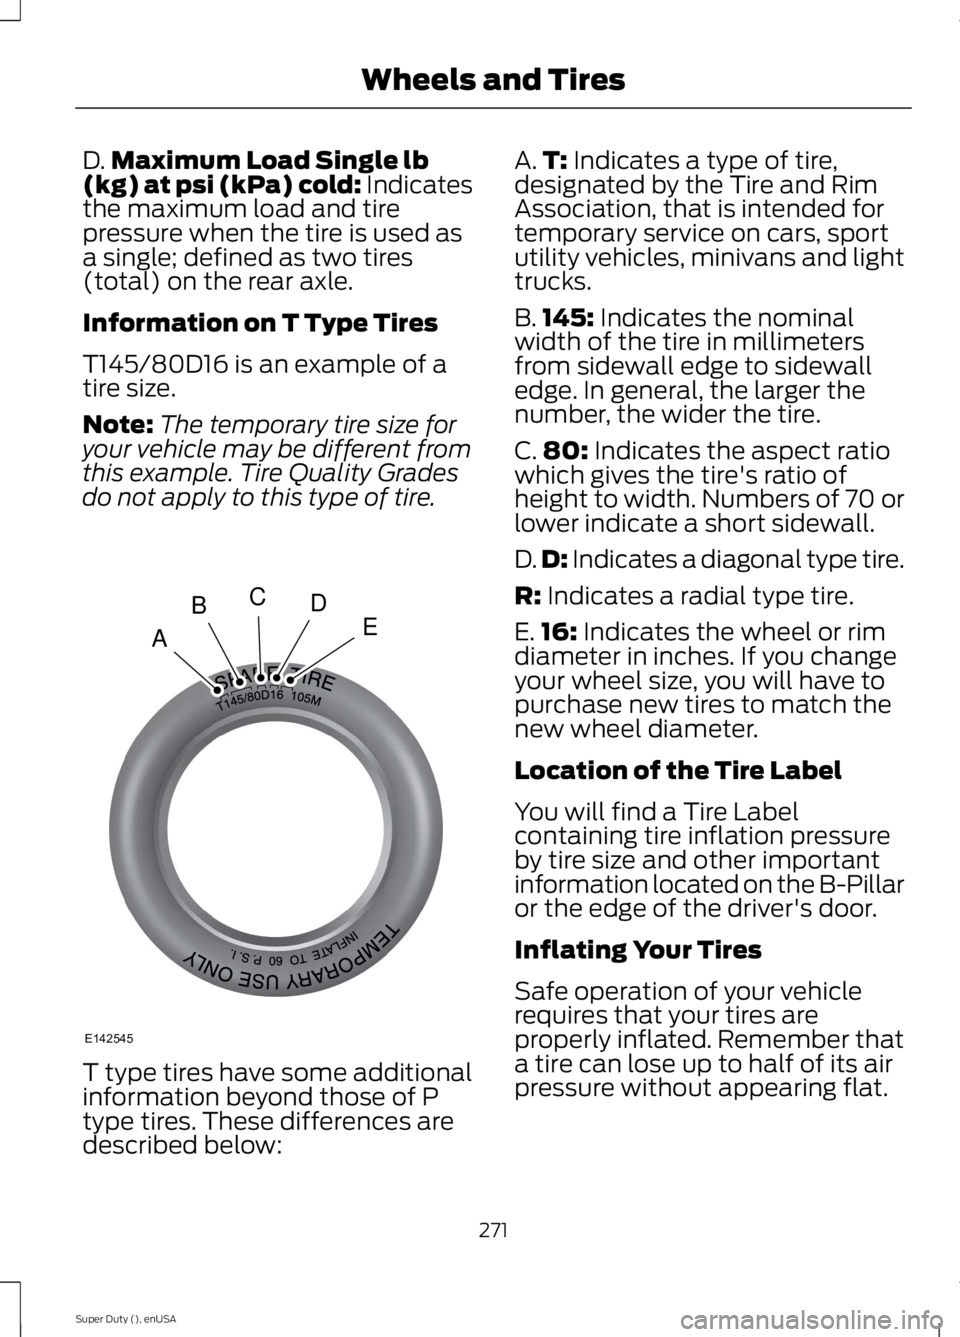
Information on T Type Tires
T145/80D16 is an example of atire size.
Note:The temporary tire size foryour vehicle may be different fromthis example. Tire Quality Gradesdo not apply to this type of tire.
T type tires have some additionalinformation beyond those of P
type tires. These differences aredescribed below:
A.T: Indicates a type of tire,designated by the Tire and RimAssociation, that is intended fortemporary service on cars, sportutility vehicles, minivans and lighttrucks.
B.145: Indicates the nominalwidth of the tire in millimetersfrom sidewall edge to sidewalledge. In general, the larger thenumber, the wider the tire.
C.80: Indicates the aspect ratiowhich gives the tire's ratio ofheight to width. Numbers of 70 orlower indicate a short sidewall.
D.D: Indicates a diagonal type tire.
R: Indicates a radial type tire.
E.16: Indicates the wheel or rimdiameter in inches. If you changeyour wheel size, you will have topurchase new tires to match thenew wheel diameter.
Location of the Tire Label
You will find a Tire Labelcontaining tire inflation pressureby tire size and other importantinformation located on the B-Pillaror the edge of the driver's door.
Inflating Your Tires
Safe operation of your vehiclerequires that your tires areproperly inflated. Remember thata tire can lose up to half of its airpressure without appearing flat.
271
Super Duty (), enUSA
Wheels and TiresA
BCDE
E142545
Page 280 of 470
Tire Wear
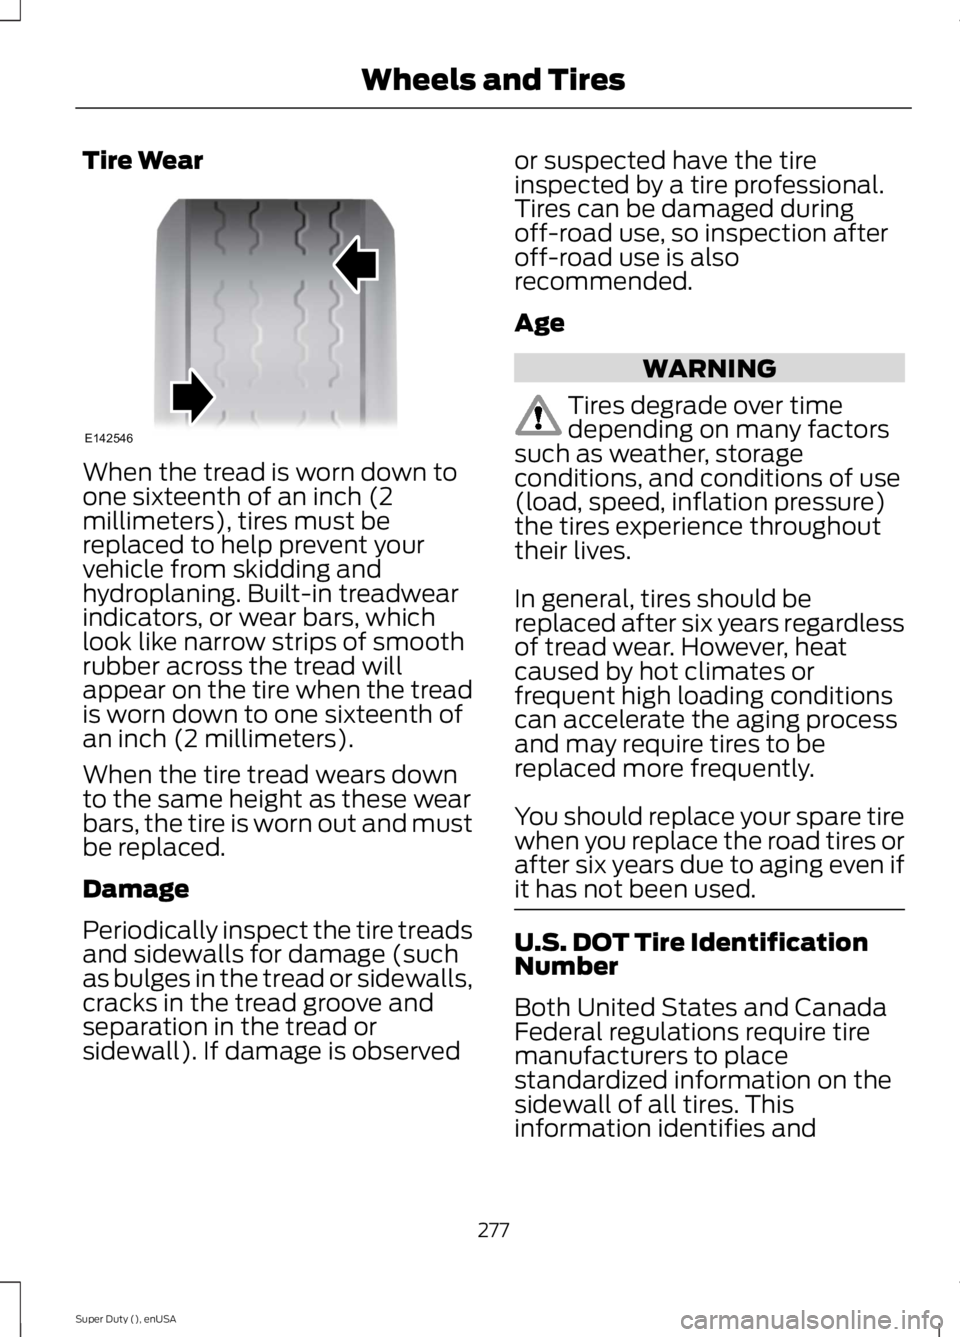
When the tread is worn down toone sixteenth of an inch (2millimeters), tires must bereplaced to help prevent yourvehicle from skidding andhydroplaning. Built-in treadwearindicators, or wear bars, whichlook like narrow strips of smoothrubber across the tread willappear on the tire when the treadis worn down to one sixteenth ofan inch (2 millimeters).
When the tire tread wears downto the same height as these wearbars, the tire is worn out and mustbe replaced.
Damage
Periodically inspect the tire treadsand sidewalls for damage (suchas bulges in the tread or sidewalls,cracks in the tread groove andseparation in the tread orsidewall). If damage is observed
or suspected have the tireinspected by a tire professional.Tires can be damaged duringoff-road use, so inspection afteroff-road use is alsorecommended.
Age
WARNING
Tires degrade over timedepending on many factorssuch as weather, storageconditions, and conditions of use(load, speed, inflation pressure)the tires experience throughouttheir lives.
In general, tires should bereplaced after six years regardlessof tread wear. However, heat
caused by hot climates orfrequent high loading conditionscan accelerate the aging processand may require tires to bereplaced more frequently.
You should replace your spare tirewhen you replace the road tires orafter six years due to aging even ifit has not been used.
U.S. DOT Tire IdentificationNumber
Both United States and CanadaFederal regulations require tiremanufacturers to placestandardized information on thesidewall of all tires. Thisinformation identifies and
277
Super Duty (), enUSA
Wheels and TiresE142546
Page 466 of 470
Rear Seats........................................................114Folding the Rear Seat Back (Crew Cab)...............................................................................115Folding up the Rear Seat Cushion.................115Rear Under Seat Storage (Crew Cab).........116Returning the Seat to the SeatingPosition...............................................................115Rear View Camera........................................173Using the Rear View Camera System..........174Rear View CameraSee: Rear View Camera....................................173Recommended Towing Weights............190Calculating the Maximum Loaded TrailerWeight for Your Vehicle...............................193Refueling..........................................................138Fuel Filler Cap......................................................139Remote Control..............................................46Car Finder................................................................47Integrated Keyhead Transmitters .................46Memory Feature....................................................47Remote Start ........................................................48Replacing the Battery.........................................46Sounding a Panic Alarm....................................48Remote Start.................................................109Automatic Settings...........................................109Removing a Headlamp.............................248Repairing Minor Paint Damage..............260Replacement PartsRecommendation........................................12Collision Repairs....................................................12Scheduled Maintenance and MechanicalRepairs..................................................................12Warranty on Replacement Parts.....................12Replacing a Lost Key or RemoteControl............................................................49Reporting Safety Defects (CanadaOnly)..............................................................222Reporting Safety Defects (U.S.Only)...............................................................221Roadside Assistance...................................212Vehicles Sold In Canada : Getting RoadsideAssistance.........................................................212Vehicles Sold In Canada : Using RoadsideAssistance.........................................................212Vehicles Sold In The U.S.: Getting RoadsideAssistance.........................................................212Vehicles Sold In The U.S. : Using RoadsideAssistance.........................................................212
Roadside Emergencies...............................212Running-InSee: Breaking-In................................................208Running Out of Fuel....................................138Refilling With a Portable FuelContainer..........................................................138
S
Safety Belt Height Adjustment.................32Safety Belt Minder.........................................33Belt-Minder™........................................................33Safety Belts......................................................28Principle of Operation........................................28Safety Belt Warning Lamp and IndicatorChime...............................................................32Conditions of operation.....................................33Safety Canopy™............................................43Safety Precautions......................................136Satellite Radio...............................................318Satellite Radio Electronic Serial Number(ESN).................................................................319Satellite Radio Reception Factors...............319SIRIUS® Satellite Radio Service...................319Troubleshooting.................................................320Scheduled Maintenance Record...........449Scheduled Maintenance..........................440Seats..................................................................110Security..............................................................58Settings...........................................................366Clock.......................................................................367Display....................................................................367Settings.................................................................369Sound....................................................................368Vehicle...................................................................368Side Airbags.....................................................42Sitting in the Correct Position...................110Snow ChainsSee: Using Snow Chains.................................282Snowplowing.................................................210Engine temperature while plowing...............211Installing the Snowplow..................................210Operating the Vehicle with the SnowplowAttached...........................................................210Snowplowing with your Airbag EquippedVehicle.................................................................211Transmission operation whileplowing...............................................................211
463
Super Duty (), enUSA
Index