2015 FORD F250 SUPER DUTY warning
[x] Cancel search: warningPage 178 of 470
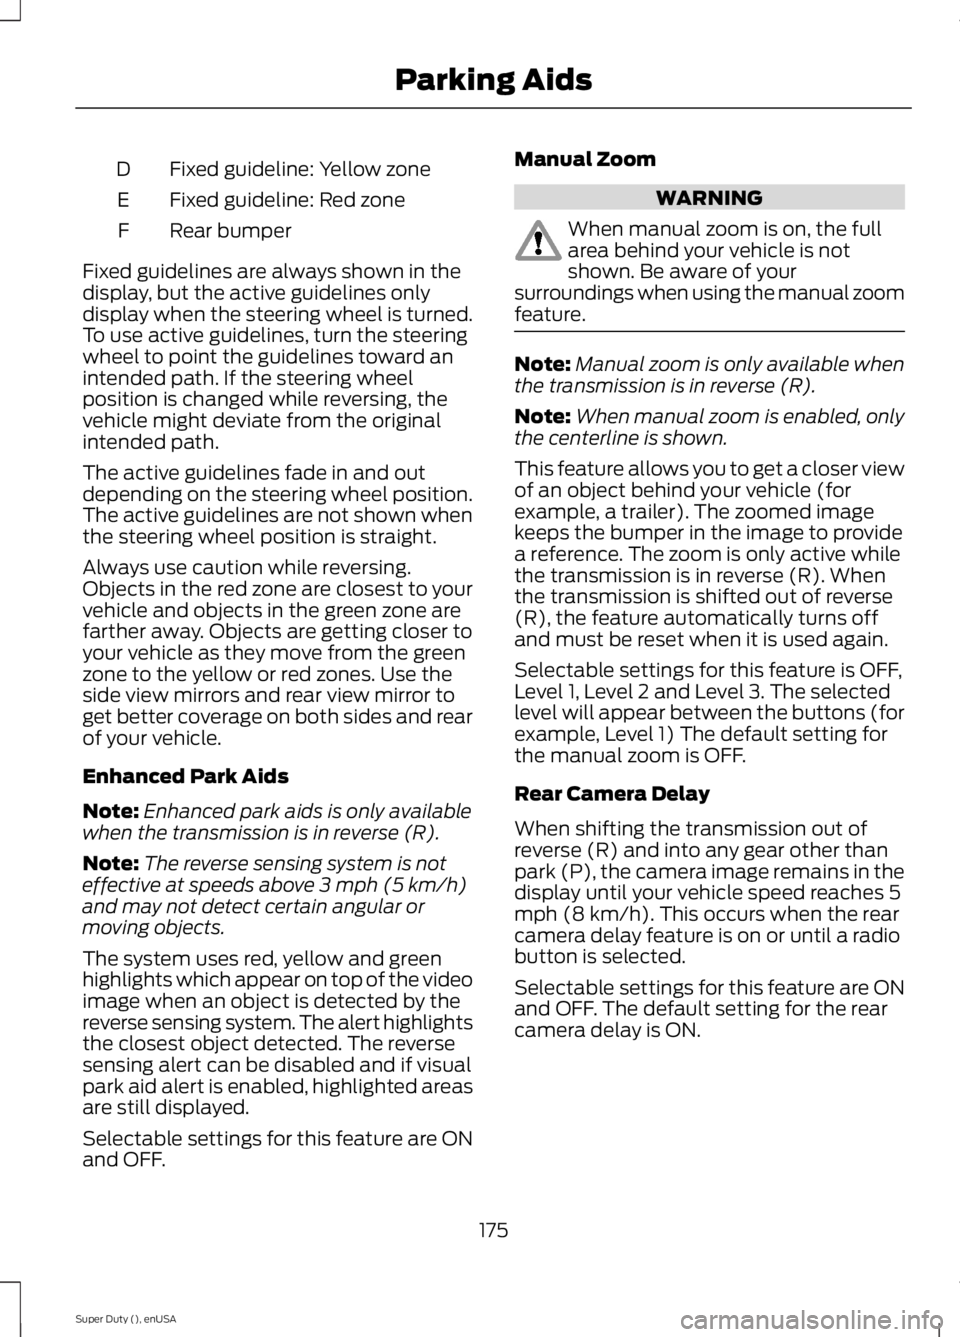
Fixed guideline: Yellow zoneD
Fixed guideline: Red zoneE
Rear bumperF
Fixed guidelines are always shown in thedisplay, but the active guidelines onlydisplay when the steering wheel is turned.To use active guidelines, turn the steeringwheel to point the guidelines toward anintended path. If the steering wheelposition is changed while reversing, thevehicle might deviate from the originalintended path.
The active guidelines fade in and outdepending on the steering wheel position.The active guidelines are not shown whenthe steering wheel position is straight.
Always use caution while reversing.Objects in the red zone are closest to yourvehicle and objects in the green zone arefarther away. Objects are getting closer toyour vehicle as they move from the greenzone to the yellow or red zones. Use theside view mirrors and rear view mirror toget better coverage on both sides and rearof your vehicle.
Enhanced Park Aids
Note:Enhanced park aids is only availablewhen the transmission is in reverse (R).
Note:The reverse sensing system is noteffective at speeds above 3 mph (5 km/h)and may not detect certain angular ormoving objects.
The system uses red, yellow and greenhighlights which appear on top of the videoimage when an object is detected by thereverse sensing system. The alert highlightsthe closest object detected. The reversesensing alert can be disabled and if visualpark aid alert is enabled, highlighted areasare still displayed.
Selectable settings for this feature are ONand OFF.
Manual Zoom
WARNING
When manual zoom is on, the fullarea behind your vehicle is notshown. Be aware of yoursurroundings when using the manual zoomfeature.
Note:Manual zoom is only available whenthe transmission is in reverse (R).
Note:When manual zoom is enabled, onlythe centerline is shown.
This feature allows you to get a closer viewof an object behind your vehicle (forexample, a trailer). The zoomed imagekeeps the bumper in the image to providea reference. The zoom is only active whilethe transmission is in reverse (R). Whenthe transmission is shifted out of reverse(R), the feature automatically turns offand must be reset when it is used again.
Selectable settings for this feature is OFF,Level 1, Level 2 and Level 3. The selectedlevel will appear between the buttons (forexample, Level 1) The default setting forthe manual zoom is OFF.
Rear Camera Delay
When shifting the transmission out ofreverse (R) and into any gear other thanpark (P), the camera image remains in thedisplay until your vehicle speed reaches 5mph (8 km/h). This occurs when the rearcamera delay feature is on or until a radiobutton is selected.
Selectable settings for this feature are ONand OFF. The default setting for the rearcamera delay is ON.
175
Super Duty (), enUSA
Parking Aids
Page 179 of 470
PRINCIPLE OF OPERATION
Cruise control lets you maintain a setspeed without keeping your foot on theaccelerator pedal. You can use cruisecontrol when your vehicle speed is greaterthan 20 mph (30 km/h).
USING CRUISE CONTROL
WARNINGS
Do not use cruise control in heavytraffic, on winding roads or when theroad surface is slippery. This couldresult in loss of vehicle control, seriousinjury or death.
When you are going downhill, yourvehicle speed may increase abovethe set speed. The system will notapply the brakes. Change down a gear toassist the system in maintaining the setspeed. Failure to do so could result in lossof vehicle control, serious injury or death.
Note:Cruise control will disengage if thevehicle speed decreases more than 10 mph(16 km/h) below your set speed whiledriving uphill.
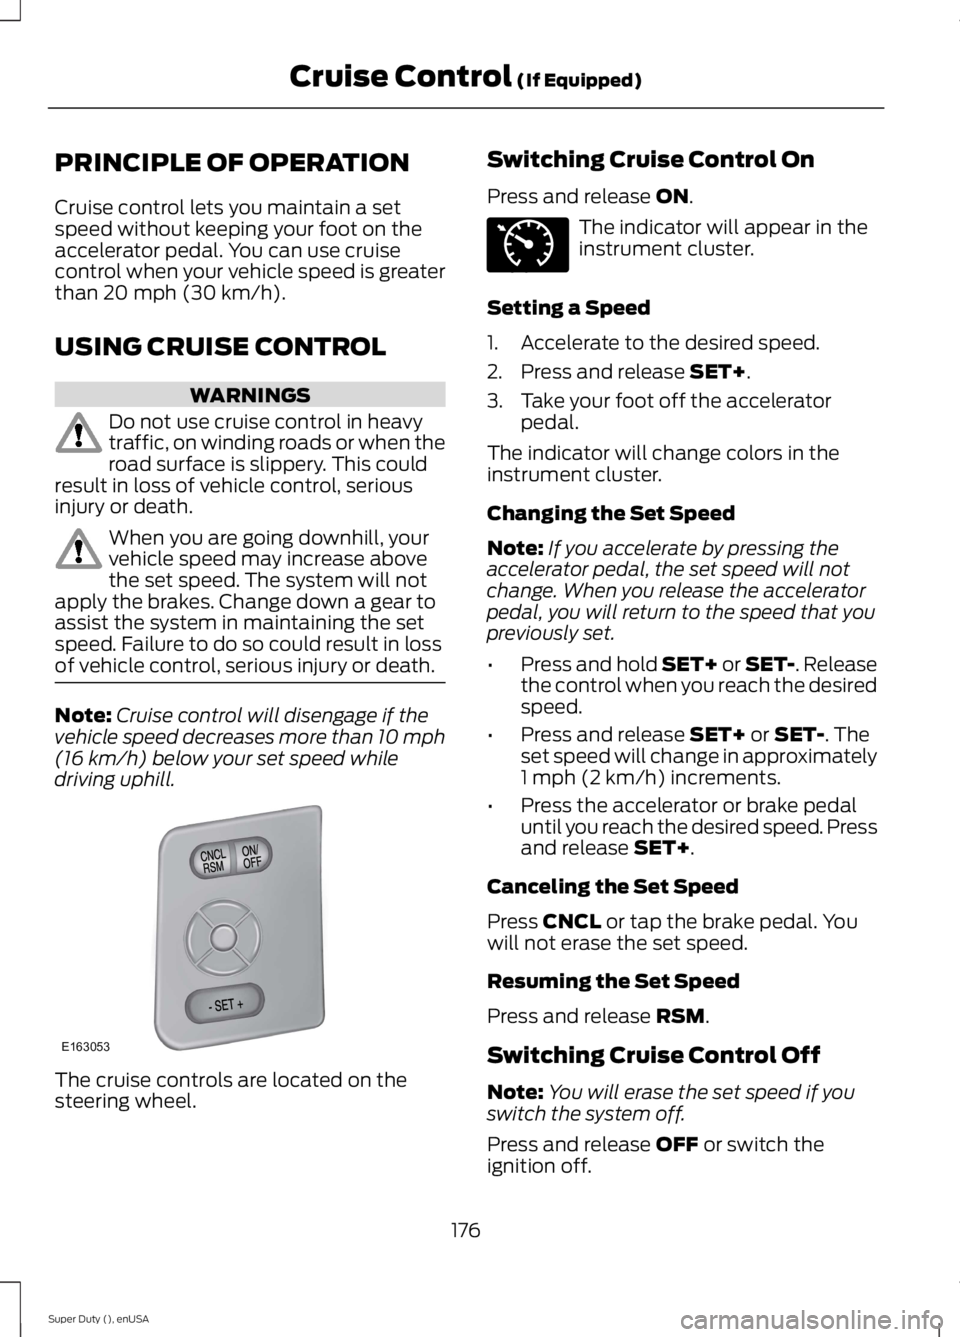
The cruise controls are located on thesteering wheel.
Switching Cruise Control On
Press and release ON.
The indicator will appear in theinstrument cluster.
Setting a Speed
1. Accelerate to the desired speed.
2. Press and release SET+.
3. Take your foot off the acceleratorpedal.
The indicator will change colors in theinstrument cluster.
Changing the Set Speed
Note:If you accelerate by pressing theaccelerator pedal, the set speed will notchange. When you release the acceleratorpedal, you will return to the speed that youpreviously set.
•Press and hold SET+ or SET-. Releasethe control when you reach the desiredspeed.
•Press and release SET+ or SET-. Theset speed will change in approximately1 mph (2 km/h) increments.
•Press the accelerator or brake pedaluntil you reach the desired speed. Pressand release SET+.
Canceling the Set Speed
Press CNCL or tap the brake pedal. Youwill not erase the set speed.
Resuming the Set Speed
Press and release RSM.
Switching Cruise Control Off
Note:You will erase the set speed if youswitch the system off.
Press and release OFF or switch theignition off.
176
Super Duty (), enUSA
Cruise Control (If Equipped)E163053 E71340
Page 182 of 470
WARNING
The appropriate loadingcapacity of your vehicle canbe limited either by volumecapacity (how much space isavailable) or by payload capacity(how much weight the vehicleshould carry). Once you havereached the maximum payload ofyour vehicle, do not add morecargo, even if there is spaceavailable. Overloading orimproperly loading your vehiclecan contribute to loss of vehiclecontrol and vehicle rollover.
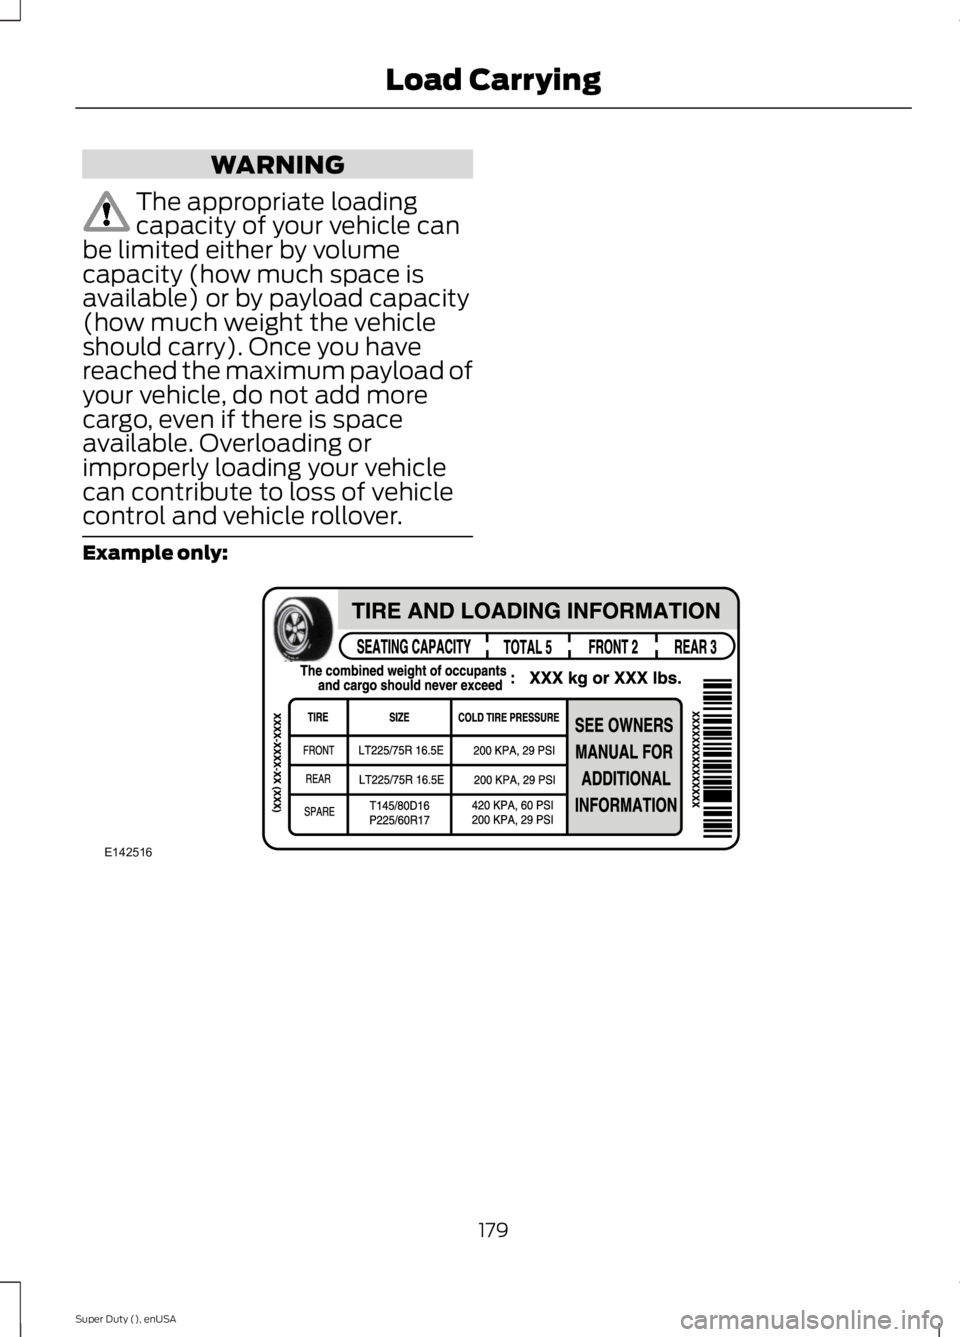
Example only:
179
Super Duty (), enUSA
Load CarryingE142516
Page 185 of 470
WARNING
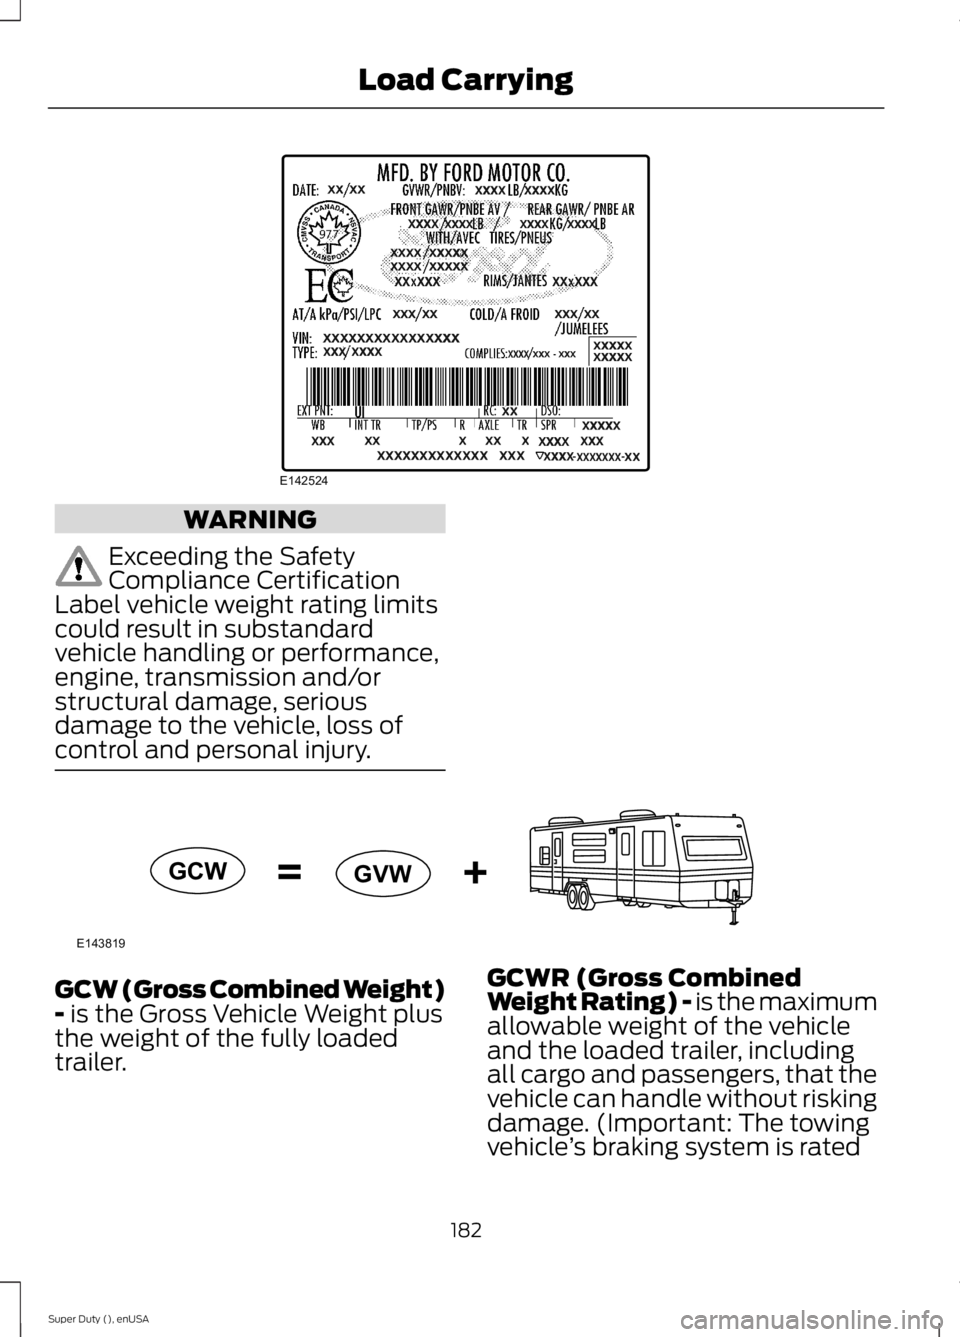
Exceeding the SafetyCompliance CertificationLabel vehicle weight rating limitscould result in substandardvehicle handling or performance,engine, transmission and/orstructural damage, seriousdamage to the vehicle, loss ofcontrol and personal injury.
GCW (Gross Combined Weight)- is the Gross Vehicle Weight plusthe weight of the fully loadedtrailer.
GCWR (Gross CombinedWeight Rating) - is the maximumallowable weight of the vehicleand the loaded trailer, includingall cargo and passengers, that thevehicle can handle without riskingdamage. (Important: The towingvehicle’s braking system is rated
182
Super Duty (), enUSA
Load CarryingE142524 E143819GCW
GVW
Page 186 of 470
for operation at Gross VehicleWeight Rating, not at GrossCombined Weight Rating.)Separate functional brakes shouldbe used for safe control of towedvehicles and for trailers where theGross Combined Weight of thetowing vehicle plus the trailerexceed the Gross Vehicle WeightRating of the towing vehicle.TheGross Combined Weight mustnever exceed the GrossCombined Weight Rating.
Maximum Loaded TrailerWeight - is the highest possibleweight of a fully loaded trailer thevehicle can tow. It assumes avehicle with mandatory options,driver and front passenger weight(150 pounds [68 kilograms]each), no cargo weight (internalor external) and a tongue load of10–15% (conventional trailer) orking pin weight of 15–25% (fifthwheel trailer). Consult anauthorized dealer (or the RV andTrailer Towing Guide available atan authorized dealer) for moredetailed information.
Tongue Load or Fifth WheelKing Pin Weight - refers to theamount of the weight that a trailerpushes down on a trailer hitch.
Examples: For a 5000 pound(2268 kilogram) conventionaltrailer, multiply 5000 by 0.10 and0.15 to obtain a proper tongueload range of 500 to 750 pounds(227 to 340 kilograms). For an11500 pound (5216 kilogram) fifthwheel trailer, multiply by 0.15 and0.25 to obtain a proper king pinload range of 1725 to 2875 pounds(782 to 1304 kilograms).
WARNINGS
Do not exceed the GVWR orthe GAWR specified on theSafety Compliance CertificationLabel.
Do not use replacement tireswith lower load carryingcapacities than the original tiresbecause they may lower thevehicle’s GVWR and GAWRlimitations. Replacement tireswith a higher limit than the originaltires do not increase the GVWRand GAWR limitations.
Exceeding any vehicle weightrating limitation could resultin serious damage to the vehicleand/or personal injury.
Steps for determining thecorrect load limit:
1. Locate the statement "Thecombined weight of occupantsand cargo should never exceedXXX kg or XXX lb." on yourvehicle’s placard.
183
Super Duty (), enUSA
Load Carrying
Page 188 of 470
be: 635 kilograms - (2 x 99kilograms) - (12 x 45 kilograms) =635 - 198 - 540 = -103 kilograms.You will need to reduce the loadweight by at least 240 pounds(104 kilograms). If you removethree 100-pound (45-kilogram)cement bags, then the loadcalculation would be:1400 - (2 x220) - (9 x 100) = 1400 - 440 -900 = 60 pounds. Now you havethe load capacity to transport thecement and your friend home. Inmetric units, the calculation wouldbe: 635 kilograms - (2 x 99kilograms) - (9 x 45 kilograms) =635 - 198 - 405 = 32 kilograms.
The above calculations alsoassume that the loads arepositioned in your vehicle in amanner that does not overloadthe Front or the Rear Gross AxleWeight Rating specified for yourvehicle on the Safety ComplianceCertification Label. The label shallbe affixed to either the door hingepillar, door-latch post, or the dooredge that meets the door-latchpost, next to the driver's seatingposition.
Special Loading Instructionsfor Owners of Pick-up Trucksand Utility-type Vehicles
WARNING
Loaded vehicles may handledifferently than unloadedvehicles. Extra precautions, suchas slower speeds and increasedstopping distance, should betaken when driving a heavilyloaded vehicle.
Your vehicle can haul more cargoand people than most passengercars. Depending upon the typeand placement of the load,hauling cargo and people mayraise the center of gravity of thevehicle.
TAILGATE
Tailgate Lock
The tailgate lock can help prevent theft ofthe tailgate.
Insert the ignition key into the tailgate lock.Turn it to the right to lock the tailgate. Turnit to the left to unlock the tailgate.
185
Super Duty (), enUSA
Load CarryingE163087
Page 189 of 470
Tailgate Removal
WARNING
Always properly secure cargo toprevent shifting cargo or cargo fallingfrom vehicle, which could result incompromised vehicle stability and seriouspersonal injury to vehicle occupants orothers.
You can remove the tailgate for moreloading room.
Note:Skip to Step 4 if your vehicle doesnot have a rearview camera.
1. Locate and disconnect the rearviewcamera in-line connector. It is underthe pickup box on the right-hand sideof the vehicle near the spare tire.
2. There is a tethered cap on the wireassembly. Install it on the in-lineconnector that remains under thepickup box.
3. Partially lower the tailgate. Carefullyfeed the tailgate harness up throughthe gap between the pickup box andthe bumper and place it out of the wayunder the pickup box.
4. Lower the tailgate.
5. Use a screwdriver to gently pry thespring clip on each connector past thehead of the support screw. Disconnectthe cable.
6. Disconnect the other cable.
7. Lift the tailgate to a 45-degree anglefrom horizontal.
8. Lift the right side off its hinge.
9.Lift the tailgate to an 80-degree anglefrom horizontal.
10.Remove the tailgate from the left sidehinge by sliding it to the right.
Reverse the steps to reinstall the tailgate.
Tailgate Step (If Equipped)
Use the step to make entering the truckbed easier.
To reduce the risk of falling:
•Only operate the step when yourvehicle is on a level surface.
•Only operate the step in areas withsufficient lighting.
•Always open the step panel to widenthe step.
•Always use the grab handle whenclimbing on the step.
•Do not use the step with bare feet.
•Make sure the step is clean before use.
•Keep the step load, you plus the load,below 350 pounds (159 kilograms).
186
Super Duty (), enUSA
Load CarryingE163090 E163092
Page 192 of 470
TOWING A TRAILER
WARNINGS
Do not exceed the GVWR orthe GAWR specified on thecertification label.
Towing trailers beyond themaximum recommendedgross trailer weight exceeds thelimit of the vehicle and couldresult in engine damage,transmission damage, structuraldamage, loss of vehicle control,vehicle rollover and personalinjury.
Your vehicle may have electricalitems, such as fuses or relays,related to towing. See the Fuseschapter.
Your vehicle's load capacitydesignation is by weight, not byvolume, so you cannot necessarilyuse all available space whenloading a vehicle.
Towing a trailer places an extraload on your vehicle's engine,transmission, axle, brakes, tiresand suspension. Inspect thesecomponents periodically during,and after, any towing operation.
Load Placement
To help minimize how trailermovement affects your vehiclewhen driving:
•Load the heaviest items closestto the trailer floor.
•Load the heaviest itemscentered between the left andright side trailer tires.
•Load the heaviest items abovethe trailer axles or just slightlyforward toward the trailertongue. Do not allow the finaltrailer tongue weight to goabove or below 10-15% of theloaded trailer weight.
•Select a tow bar with thecorrect rise or drop. When boththe loaded vehicle and trailerare connected, the trailer frameshould be level, or slightlyangled down toward yourvehicle, when viewed from theside.
When driving with a trailer orpayload, a slight takeoff vibrationor shudder may be present due tothe increased payload weight.Additional information regardingproper trailer loading and settingyour vehicle up for towing islocated in another chapter of thismanual. See Load Limit (page178). You can also find theinformation in the RV & TrailerTowing Guide, available at anauthorized dealer.
189
Super Duty (), enUSA
Towing