Page 279 of 470
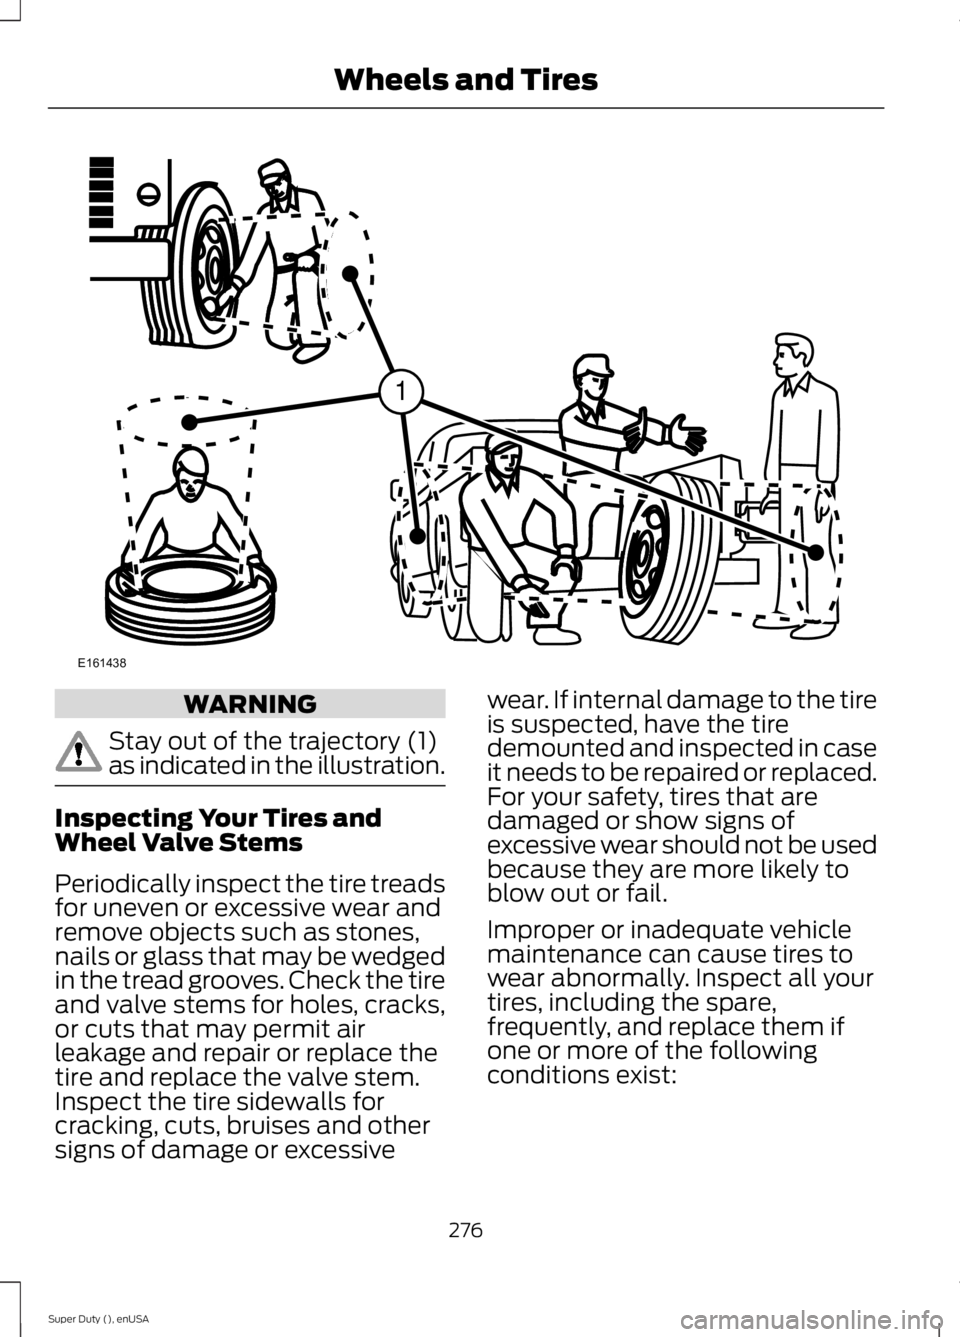
WARNING
Stay out of the trajectory (1)as indicated in the illustration.
Inspecting Your Tires andWheel Valve Stems
Periodically inspect the tire treadsfor uneven or excessive wear andremove objects such as stones,nails or glass that may be wedgedin the tread grooves. Check the tireand valve stems for holes, cracks,or cuts that may permit airleakage and repair or replace thetire and replace the valve stem.Inspect the tire sidewalls for
cracking, cuts, bruises and othersigns of damage or excessive
wear. If internal damage to the tireis suspected, have the tiredemounted and inspected in caseit needs to be repaired or replaced.For your safety, tires that aredamaged or show signs ofexcessive wear should not be usedbecause they are more likely toblow out or fail.
Improper or inadequate vehiclemaintenance can cause tires towear abnormally. Inspect all yourtires, including the spare,frequently, and replace them ifone or more of the followingconditions exist:
276
Super Duty (), enUSA
Wheels and TiresE161438
1
Page 283 of 470

*Avoid fast starts, stops and turns
*Avoid potholes and objects onthe road
*Do not run over curbs or hit thetire against a curb when parking
Highway Hazards
No matter how carefully you drivethere’s always the possibility thatyou may eventually have a flat tireon the highway. Drive slowly to theclosest safe area out of traffic.This may further damage the flattire, but your safety is moreimportant.
If you feel a sudden vibration orride disturbance while driving, oryou suspect your tire or vehiclehas been damaged, immediately
reduce your speed. Drive withcaution until you can safely pulloff the road. Stop and inspect thetires for damage. If a tire isunder-inflated or damaged,deflate it, remove wheel andreplace it with your spare tire andwheel. If you cannot detect acause, have the vehicle towed tothe nearest repair facility or tiredealer to have the vehicleinspected.
Tire and Wheel Alignment
A bad jolt from hitting a curb orpothole can cause the front endof your vehicle to becomemisaligned or cause damage toyour tires. If your vehicle seems topull to one side when you’redriving, the wheels may be out ofalignment. Have an authorizeddealer check the wheel alignmentperiodically.
Wheel misalignment in the frontor the rear can cause uneven andrapid treadwear of your tires andshould be corrected by anauthorized dealer. Front-wheeldrive vehicles and those with anindependent rear suspension mayrequire alignment of all fourwheels.
The tires should also be balancedperiodically. An unbalanced tireand wheel assembly may result inirregular tire wear.
Tire Rotation
WARNING
If the tire label showsdifferent tire pressures for thefront and rear tires and the vehicleis equipped with a tire pressuremonitoring system, then thesettings for the system sensorsneed to be updated. Alwaysperform the system resetprocedure after tire rotation. If thesystem is not reset, it may notprovide a low tire pressurewarning when necessary.
280
Super Duty (), enUSA
Wheels and Tires
Page 292 of 470
•Exceed 50 mph (80 km/h)
•Load the vehicle beyond maximumvehicle load rating listed on the SafetyCompliance Label.
•Tow a trailer.
•Use snow chains on the end of thevehicle with the dissimilar spare tire.
•Use more than one dissimilar spare tireat a time.
•Use commercial car washingequipment.
•Try to repair the dissimilar spare tire.
Use of one of the dissimilar spare tireslisted above at any one wheel location canlead to impairment of the following:
•Handling, stability and brakingperformance.
•Comfort and noise.
•Ground clearance and parking at curbs.
•Winter weather driving capability.
•Wet weather driving capability.
•All-wheel driving capability
3.Full-size dissimilar spare withoutlabel on wheel
When driving with the full-size dissimilarspare wheel and tire assembly, do not:
•Exceed 70 mph (113 km/h).
•Use more than one dissimilar sparewheel and tire assembly at a time.
•Use commercial car washingequipment.
•Use snow chains on the end of thevehicle with the dissimilar spare wheeland tire assembly.
The usage of a full-size dissimilar sparewheel and tire assembly can lead toimpairment of the following:
•Handling, stability and brakingperformance.
•Comfort and noise.
•Ground clearance and parking at curbs.
•Winter weather driving capability.
•Wet weather driving capability.
•All-wheel driving capability
When driving with the full-size dissimilarspare wheel and tire assembly additionalcaution should be given to:
•Towing a trailer.
•Driving vehicles equipped with acamper body.
•Driving vehicles with a load on thecargo rack.
Drive cautiously when using a full-sizedissimilar spare wheel and tire assemblyand seek service as soon as possible.
Location of the Spare Tire andTools
If your vehicle is equipped with a spare tire,jack and associated tools, see thefollowing table for their locations:
LocationTool
Under the vehicle, just forward of the rearbumperSpare tire (pick-up trucks only)
Regular cab and Crew Cab: Fastened tofloor pan behind rearmost seat onpassenger side
Jack
289
Super Duty (), enUSA
Wheels and Tires
Page 295 of 470
WARNINGS
Do not attempt to change a tire onthe side of the vehicle close tomoving traffic. Pull far enough off theroad to avoid the danger of being hit whenoperating the jack or changing the wheel.
Always use the jack provided asoriginal equipment with your vehicle.If using a jack other than the oneprovided as original equipment with yourvehicle, make sure the jack capacity isadequate for the vehicle weight, includingany vehicle cargo or modifications.
Note:Passengers should not remain in thevehicle when the vehicle is being jacked.
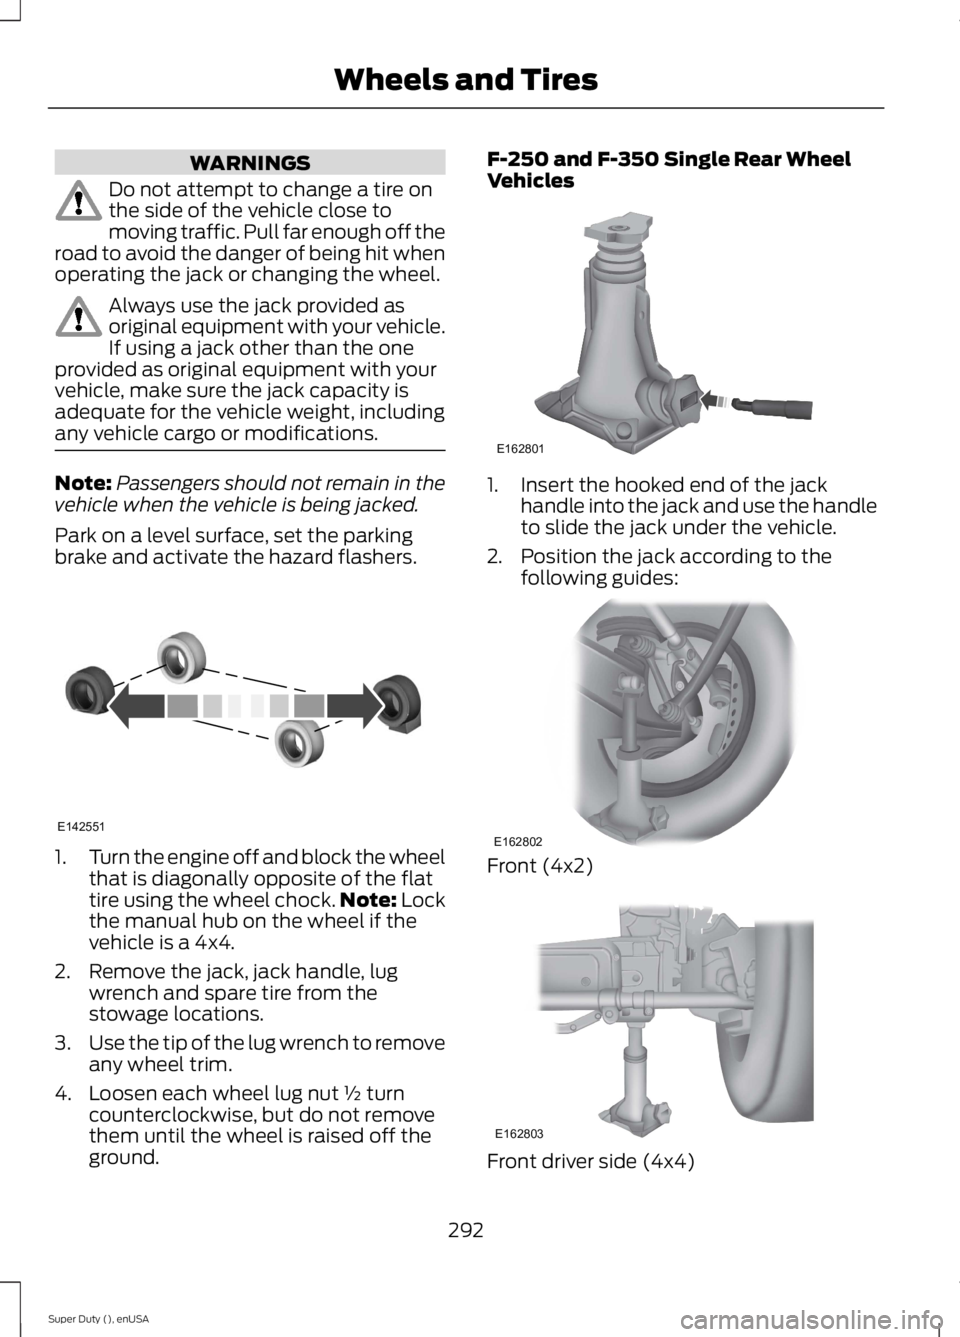
Park on a level surface, set the parkingbrake and activate the hazard flashers.
1.Turn the engine off and block the wheelthat is diagonally opposite of the flattire using the wheel chock.Note: Lockthe manual hub on the wheel if thevehicle is a 4x4.
2. Remove the jack, jack handle, lugwrench and spare tire from thestowage locations.
3.Use the tip of the lug wrench to removeany wheel trim.
4. Loosen each wheel lug nut ½ turncounterclockwise, but do not removethem until the wheel is raised off theground.
F-250 and F-350 Single Rear WheelVehicles
1. Insert the hooked end of the jackhandle into the jack and use the handleto slide the jack under the vehicle.
2. Position the jack according to thefollowing guides:
Front (4x2)
Front driver side (4x4)
292
Super Duty (), enUSA
Wheels and TiresE142551 E162801 E162802 E162803
Page 296 of 470

Note:Make sure the jack fits onto the flatarea on the outboard side of the differential.
Front passenger side (4x4)
Note:View shown from the rear of thevehicle to clearly identify the jack point.Place the jack directly under the axle.
Rear
Note:Jack at the specified locations toavoid damage to the vehicle.
Jacking the Vehicle
1. Turn the jack handle clockwise untilthe wheel is completely off the groundand high enough to install the sparetire.
2. Remove the lug nuts with the lugwrench.
3.Replace the flat tire with the spare tire,making sure the valve stem is facingoutward for all front wheels and singlerear wheel vehicles. If you are replacingan inboard rear tire on dual rear wheelvehicles, the valve stem must be facingoutward. If you are replacing theoutboard wheel, the valve stem mustbe facing inward. Reinstall the lug nutsuntil the wheel is snug against the hub.Do not fully tighten the lug nuts untilthe wheel has been lowered.
4. Lower the wheel by turning the jackhandle counterclockwise.
5. Remove the jack and fully tighten thelug nuts in the order shown. SeeTechnical Specifications (page 299).
6. Stow the flat tire. See Stowing the flator spare tire if the vehicle is equippedwith a spare tire carrier.
7. Stow the jack, jack handle and lugwrench. Make sure the jack is securelyfastened so it does not rattle whendriving.
8. Unblock the wheels.
293
Super Duty (), enUSA
Wheels and TiresE162804 E162805 E162811
Page 297 of 470
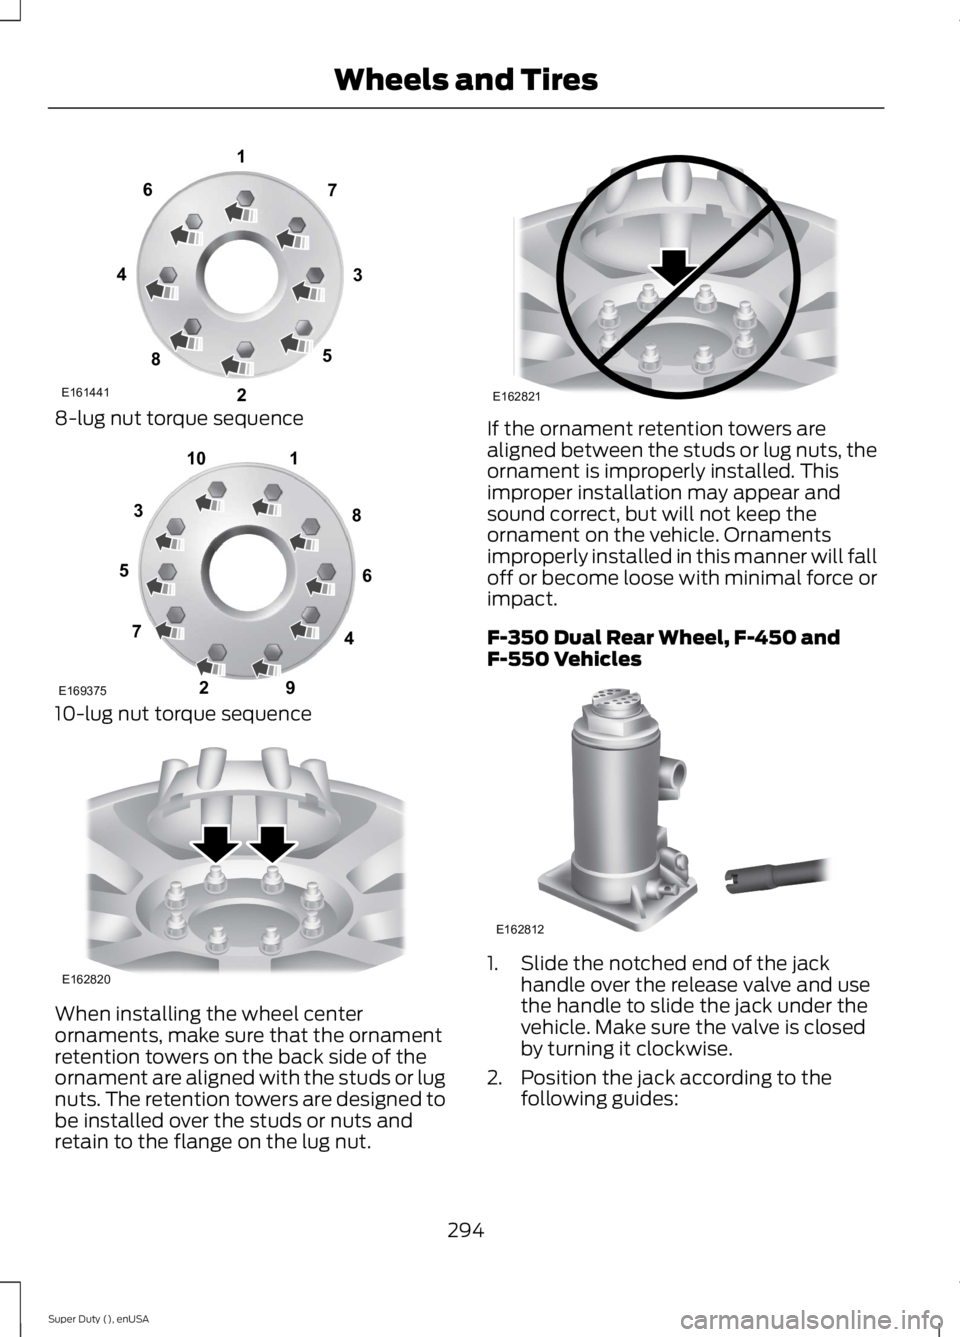
8-lug nut torque sequence
10-lug nut torque sequence
When installing the wheel centerornaments, make sure that the ornamentretention towers on the back side of theornament are aligned with the studs or lugnuts. The retention towers are designed tobe installed over the studs or nuts andretain to the flange on the lug nut.
If the ornament retention towers arealigned between the studs or lug nuts, theornament is improperly installed. Thisimproper installation may appear andsound correct, but will not keep theornament on the vehicle. Ornamentsimproperly installed in this manner will falloff or become loose with minimal force orimpact.
F-350 Dual Rear Wheel, F-450 andF-550 Vehicles
1. Slide the notched end of the jackhandle over the release valve and usethe handle to slide the jack under thevehicle. Make sure the valve is closedby turning it clockwise.
2. Position the jack according to thefollowing guides:
294
Super Duty (), enUSA
Wheels and TiresE161441
13
4
27
6
5
8 1
2
3
4
5
6
7 8
9
10
E169375 E162820 E162821 E162812
Page 299 of 470
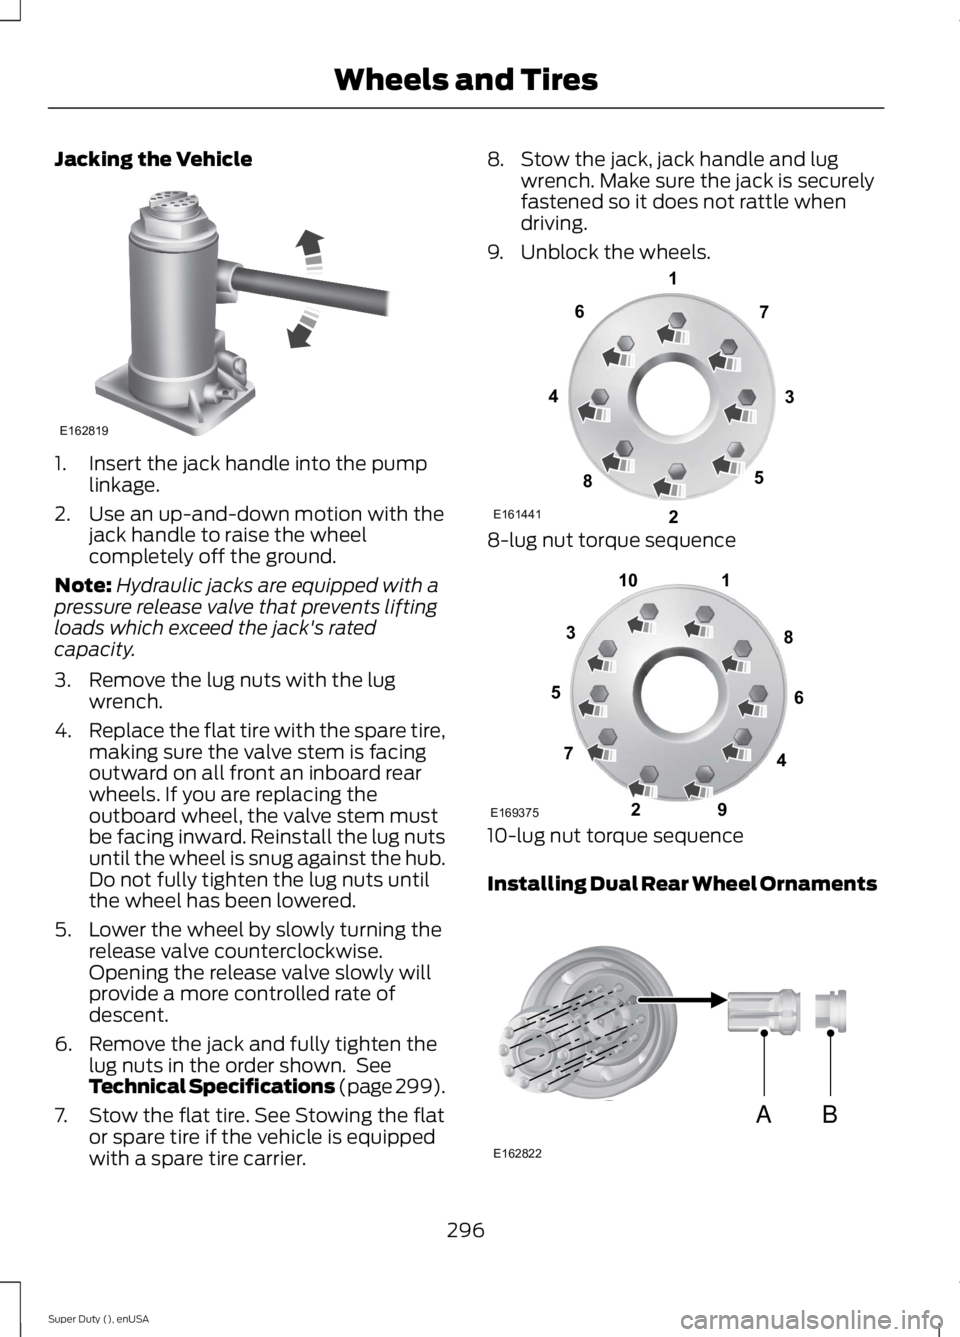
Jacking the Vehicle
1. Insert the jack handle into the pumplinkage.
2. Use an up-and-down motion with thejack handle to raise the wheelcompletely off the ground.
Note:Hydraulic jacks are equipped with apressure release valve that prevents liftingloads which exceed the jack's ratedcapacity.
3. Remove the lug nuts with the lugwrench.
4.Replace the flat tire with the spare tire,making sure the valve stem is facingoutward on all front an inboard rearwheels. If you are replacing theoutboard wheel, the valve stem mustbe facing inward. Reinstall the lug nutsuntil the wheel is snug against the hub.Do not fully tighten the lug nuts untilthe wheel has been lowered.
5. Lower the wheel by slowly turning therelease valve counterclockwise.Opening the release valve slowly willprovide a more controlled rate ofdescent.
6. Remove the jack and fully tighten thelug nuts in the order shown. SeeTechnical Specifications (page 299).
7. Stow the flat tire. See Stowing the flator spare tire if the vehicle is equippedwith a spare tire carrier.
8. Stow the jack, jack handle and lugwrench. Make sure the jack is securelyfastened so it does not rattle whendriving.
9. Unblock the wheels.
8-lug nut torque sequence
10-lug nut torque sequence
Installing Dual Rear Wheel Ornaments
296
Super Duty (), enUSA
Wheels and TiresE162819 E161441
13
4
27
6
5
8 1
2
3
4
5
6
7 8
9
10
E169375 AB
E162822
Page 300 of 470
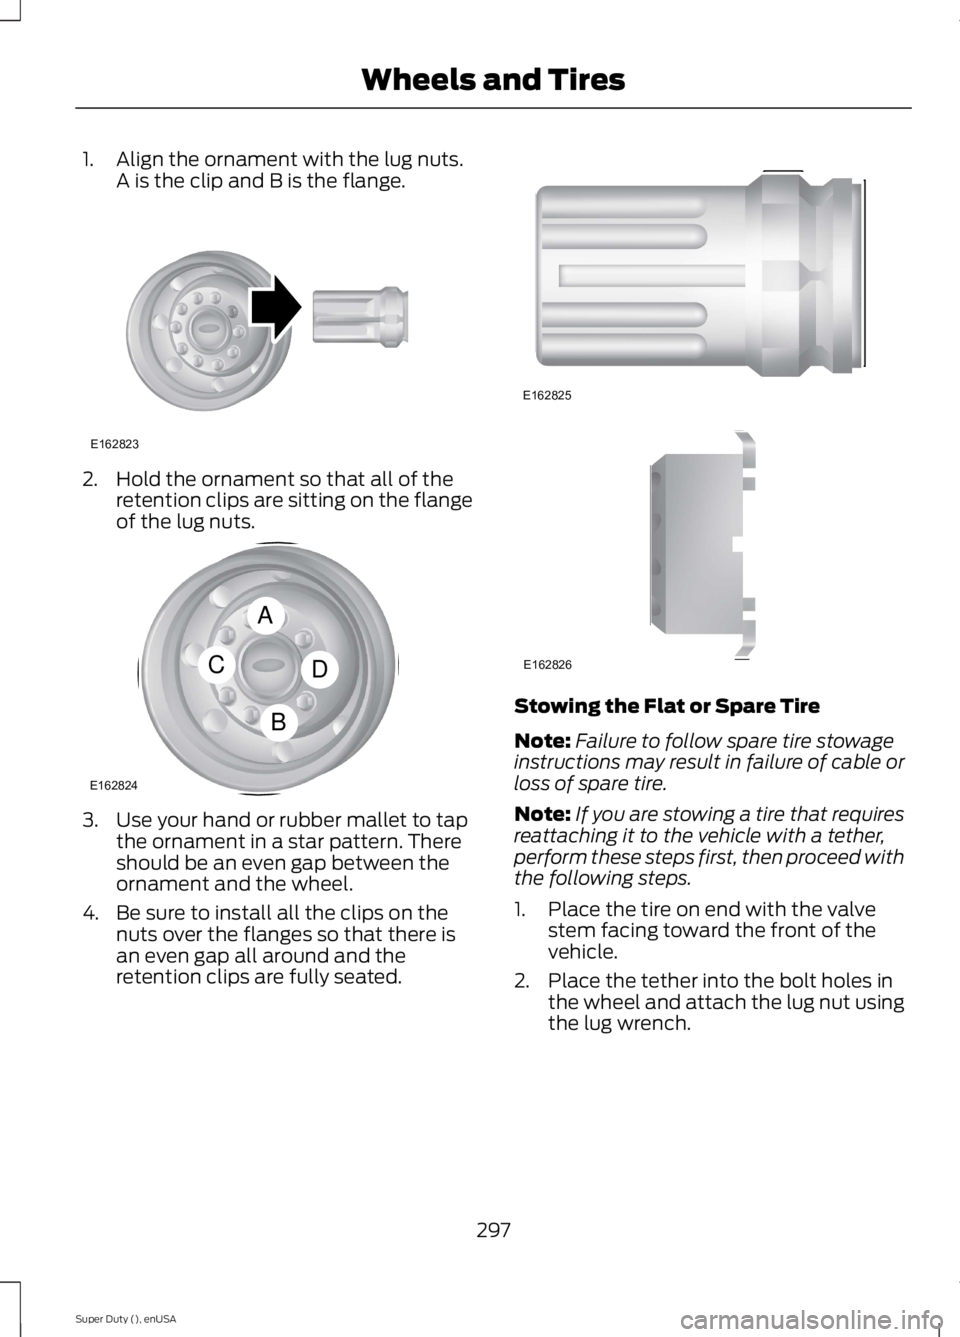
1. Align the ornament with the lug nuts.A is the clip and B is the flange.
2. Hold the ornament so that all of theretention clips are sitting on the flangeof the lug nuts.
3. Use your hand or rubber mallet to tapthe ornament in a star pattern. Thereshould be an even gap between theornament and the wheel.
4. Be sure to install all the clips on thenuts over the flanges so that there isan even gap all around and theretention clips are fully seated.
Stowing the Flat or Spare Tire
Note:Failure to follow spare tire stowageinstructions may result in failure of cable orloss of spare tire.
Note:If you are stowing a tire that requiresreattaching it to the vehicle with a tether,perform these steps first, then proceed withthe following steps.
1. Place the tire on end with the valvestem facing toward the front of thevehicle.
2. Place the tether into the bolt holes inthe wheel and attach the lug nut usingthe lug wrench.
297
Super Duty (), enUSA
Wheels and TiresE162823 A
C
B
D
E162824 E162825 E162826