2015 FORD F250 SUPER DUTY tow
[x] Cancel search: towPage 231 of 470
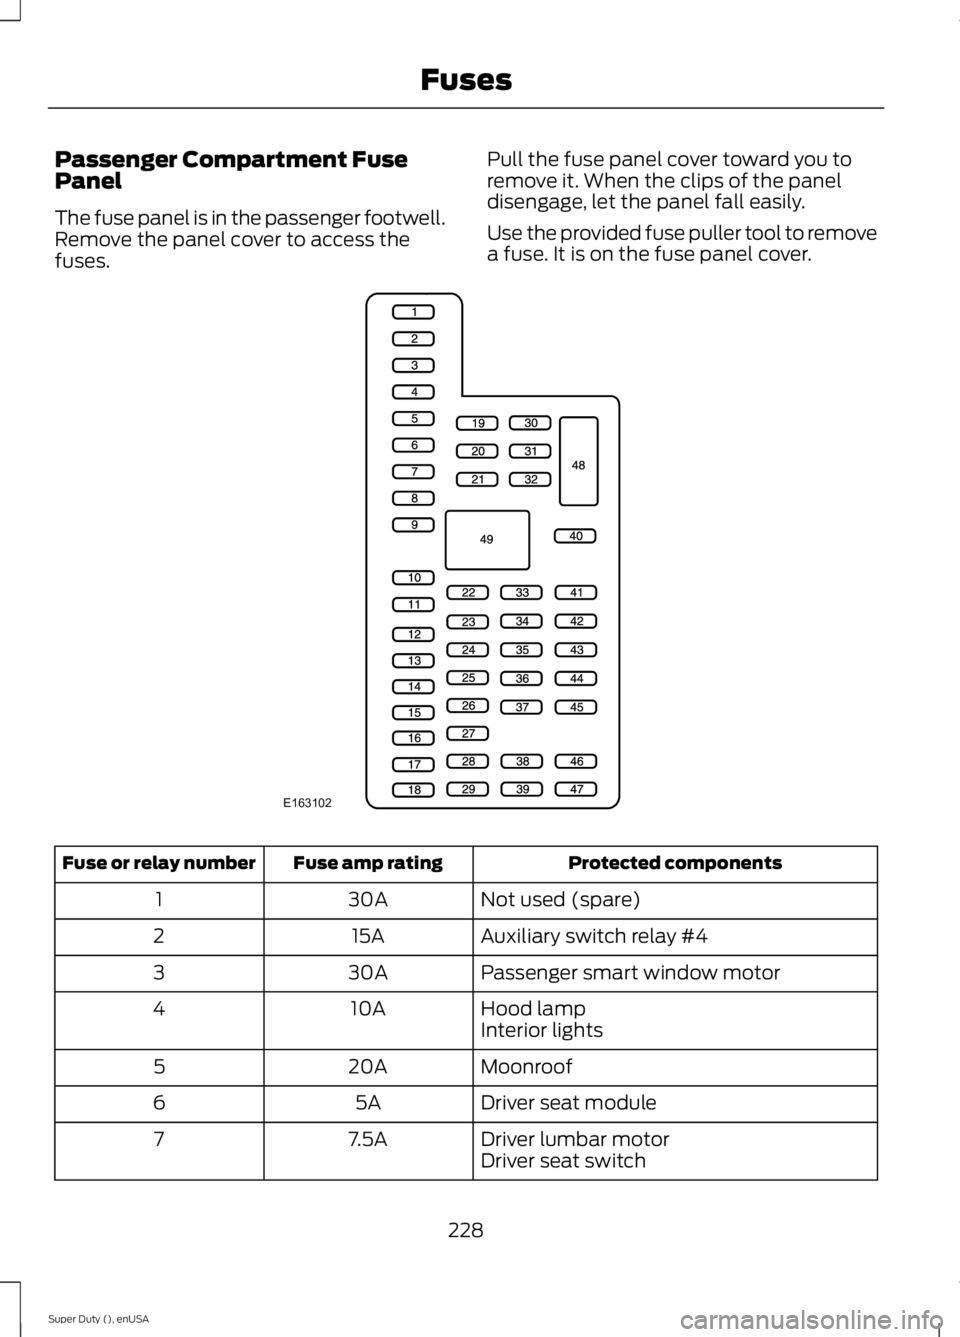
Passenger Compartment FusePanel
The fuse panel is in the passenger footwell.Remove the panel cover to access thefuses.
Pull the fuse panel cover toward you toremove it. When the clips of the paneldisengage, let the panel fall easily.
Use the provided fuse puller tool to removea fuse. It is on the fuse panel cover.
Protected componentsFuse amp ratingFuse or relay number
Not used (spare)30A1
Auxiliary switch relay #415A2
Passenger smart window motor30A3
Hood lamp10A4Interior lights
Moonroof20A5
Driver seat module5A6
Driver lumbar motor7.5A7Driver seat switch
228
Super Duty (), enUSA
FusesE163102
Page 232 of 470
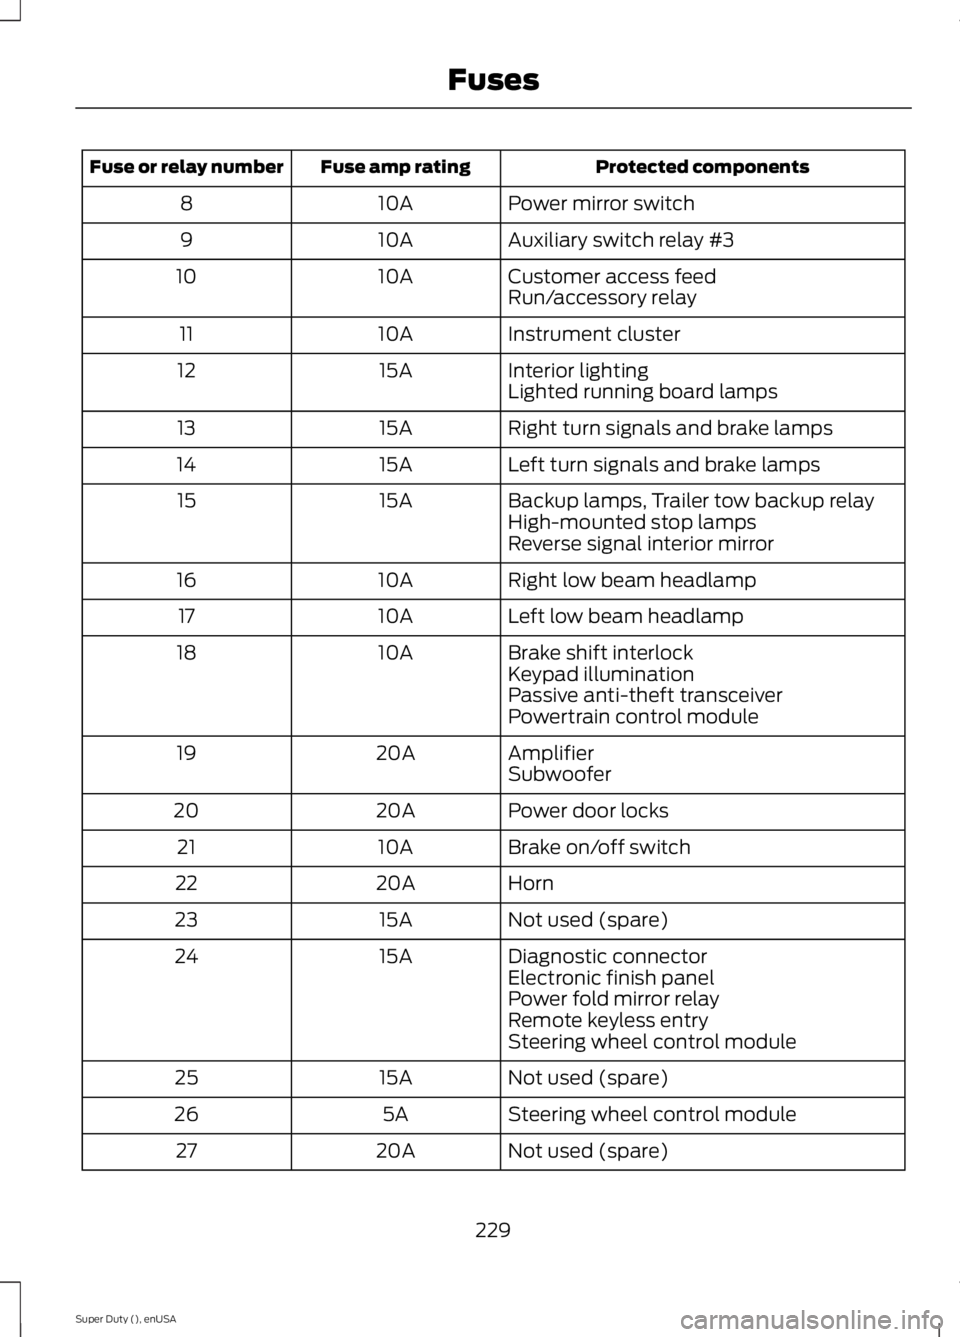
Protected componentsFuse amp ratingFuse or relay number
Power mirror switch10A8
Auxiliary switch relay #310A9
Customer access feed10A10Run/accessory relay
Instrument cluster10A11
Interior lighting15A12Lighted running board lamps
Right turn signals and brake lamps15A13
Left turn signals and brake lamps15A14
Backup lamps, Trailer tow backup relay15A15High-mounted stop lampsReverse signal interior mirror
Right low beam headlamp10A16
Left low beam headlamp10A17
Brake shift interlock10A18Keypad illuminationPassive anti-theft transceiverPowertrain control module
Amplifier20A19Subwoofer
Power door locks20A20
Brake on/off switch10A21
Horn20A22
Not used (spare)15A23
Diagnostic connector15A24Electronic finish panelPower fold mirror relayRemote keyless entrySteering wheel control module
Not used (spare)15A25
Steering wheel control module5A26
Not used (spare)20A27
229
Super Duty (), enUSA
Fuses
Page 233 of 470
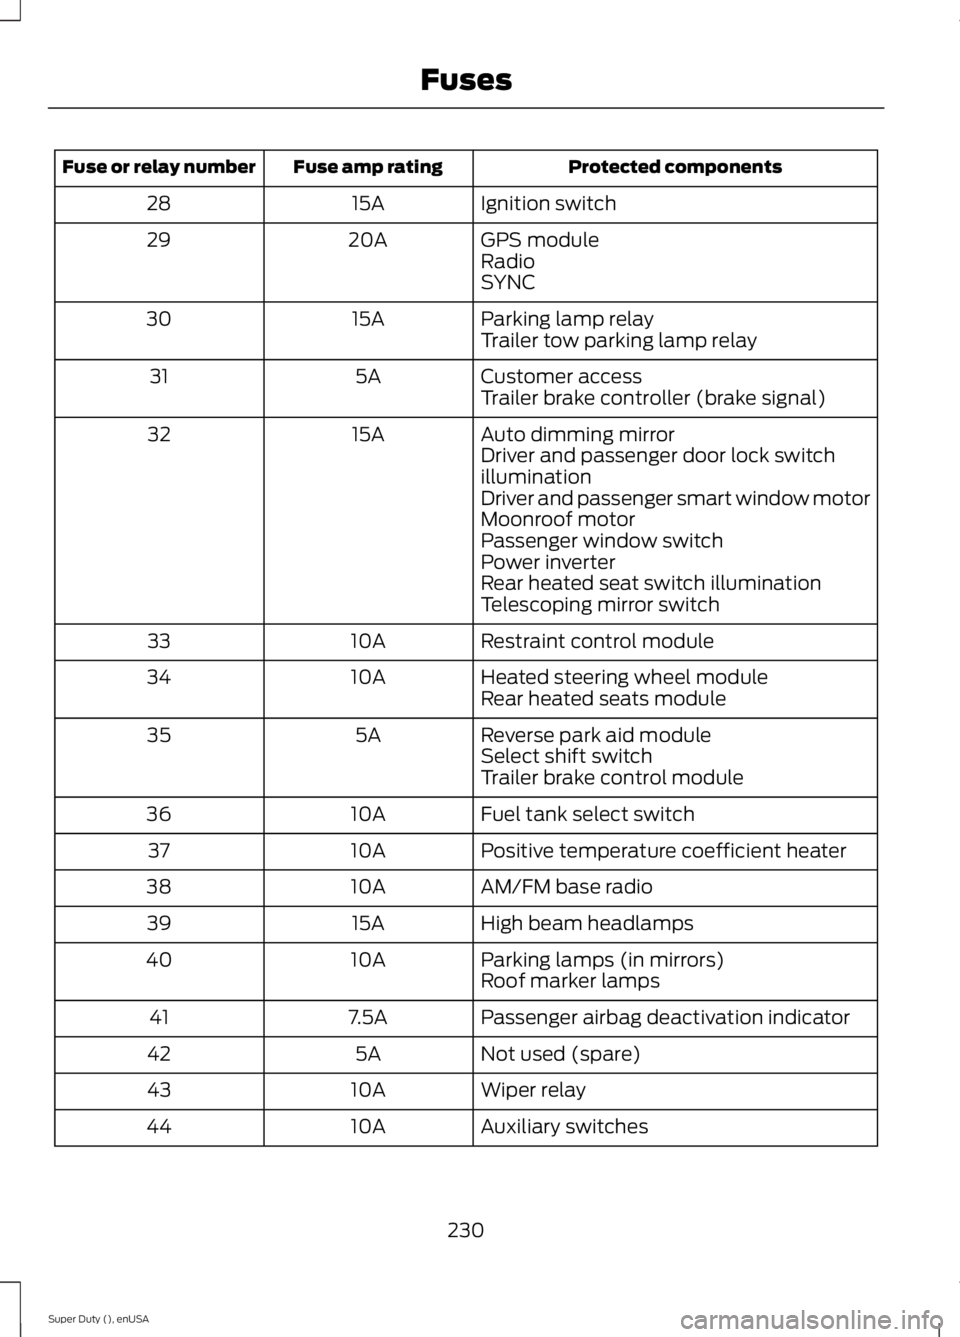
Protected componentsFuse amp ratingFuse or relay number
Ignition switch15A28
GPS module20A29RadioSYNC
Parking lamp relay15A30Trailer tow parking lamp relay
Customer access5A31Trailer brake controller (brake signal)
Auto dimming mirror15A32Driver and passenger door lock switchilluminationDriver and passenger smart window motorMoonroof motorPassenger window switchPower inverterRear heated seat switch illuminationTelescoping mirror switch
Restraint control module10A33
Heated steering wheel module10A34Rear heated seats module
Reverse park aid module5A35Select shift switchTrailer brake control module
Fuel tank select switch10A36
Positive temperature coefficient heater10A37
AM/FM base radio10A38
High beam headlamps15A39
Parking lamps (in mirrors)10A40Roof marker lamps
Passenger airbag deactivation indicator7.5A41
Not used (spare)5A42
Wiper relay10A43
Auxiliary switches10A44
230
Super Duty (), enUSA
Fuses
Page 236 of 470
2. Go to the front of the vehicle andlocate the secondary release lever,which is located under the front of thehood, to your right of the center of thevehicle (driver's side), toward theheadlight.
3. Release the hood latch by pushing thesecondary release lever to your left,toward the center of the vehicle.
4. Raise the hood.
5.To close the hood, lower the hood andallow it to drop the last 8 to 11 inches(20 to 30 centimeters).
Note:Make sure that the hood is closedproperly.
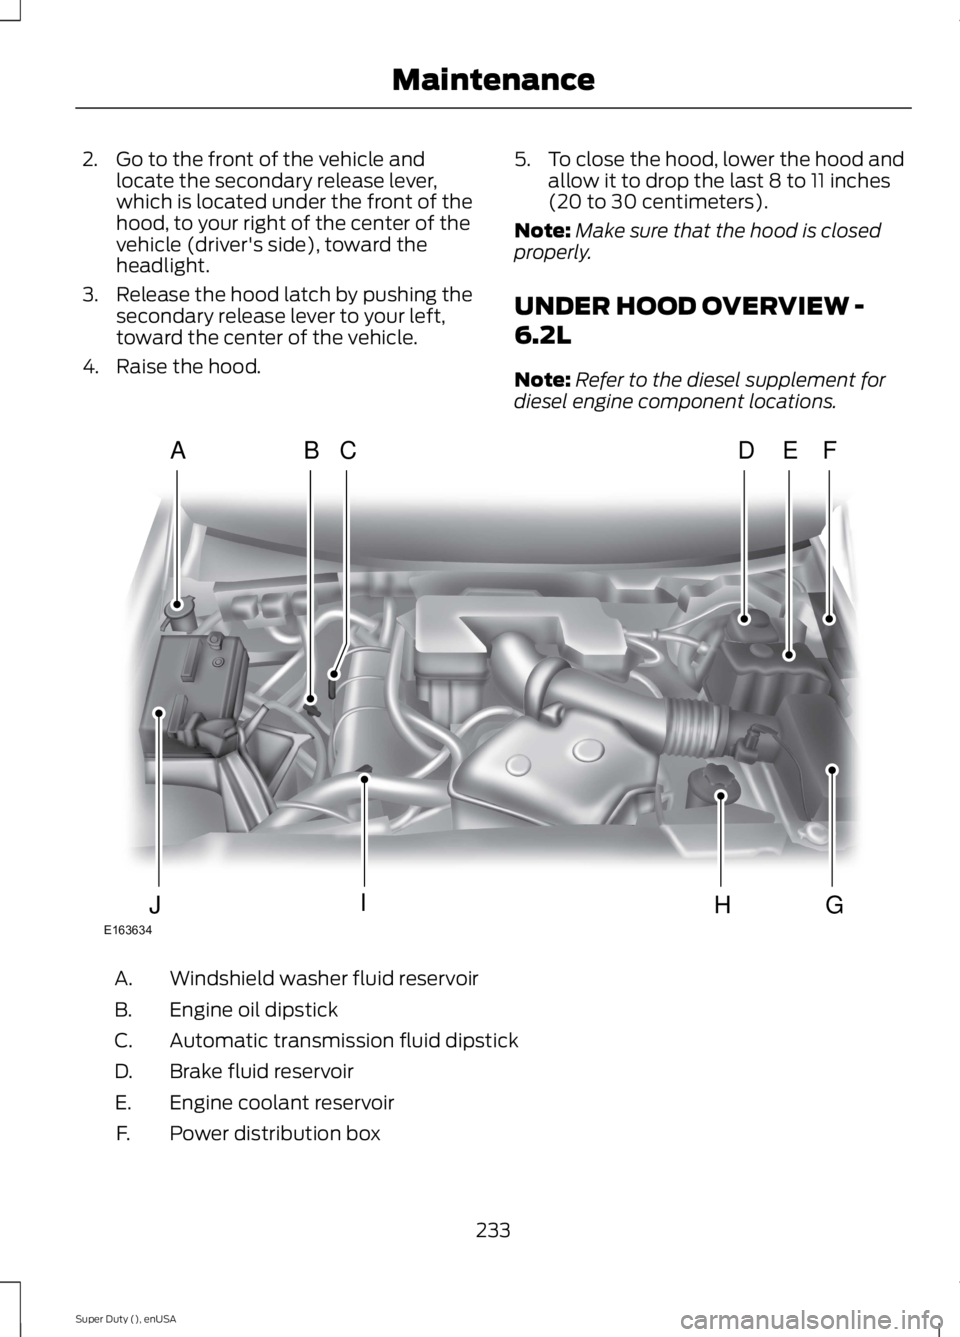
UNDER HOOD OVERVIEW -
6.2L
Note:Refer to the diesel supplement fordiesel engine component locations.
Windshield washer fluid reservoirA.
Engine oil dipstickB.
Automatic transmission fluid dipstickC.
Brake fluid reservoirD.
Engine coolant reservoirE.
Power distribution boxF.
233
Super Duty (), enUSA
MaintenanceE163634
ADFEBC
GHIJ
Page 242 of 470
When Fail-Safe Mode Is Activated
WARNINGS
Fail-safe mode is for use duringemergencies only. Operate thevehicle in fail-safe mode only as longas necessary to bring the vehicle to rest ina safe location and seek immediate repairs.When in fail-safe mode, the vehicle willhave limited power, will not be able tomaintain high-speed operation, and maycompletely shut down without warning,potentially losing engine power, powersteering assist, and power brake assist,which may increase the possibility of acrash resulting in serious injury.
Never remove the coolant reservoircap while the engine is running or hot.
You have limited engine power when in thefail-safe mode, so drive the vehicle withcaution. The vehicle will not be able tomaintain high-speed operation and theengine will run rough. Remember that theengine is capable of completely shuttingdown automatically to prevent enginedamage, therefore:
1. Pull off the road as soon as safelypossible and turn off the engine.
2. Arrange for the vehicle to be taken toan authorized dealer.
3. If this is not possible, wait a shortperiod for the engine to cool.
4. Check the coolant level and replenishif low.
5. Re-start the engine and take yourvehicle to an authorized dealer.
Note:Driving the vehicle without repairingthe engine problem increases the chance ofengine damage. Take your vehicle to anauthorized dealer as soon as possible.
Engine Fluid TemperatureManagement (If Equipped)
WARNING
To reduce the risk of collision andinjury, be prepared that the vehiclespeed may reduce and the vehiclemay not be able to accelerate with fullpower until the fluid temperatures reduce.
Your vehicle has been designed to pull atrailer, but because of the added load, thevehicle’s engine may temporarily reachhigher temperatures during severeoperating conditions such as ascending along or steep grade while pulling a trailerin hot ambient temperatures.
At this time, you may notice your enginecoolant temperature gauge needle movetoward the H and the POWER REDUCEDTO LOWER TEMP message may appearin the information display.
You may notice a reduction in the vehicle’sspeed caused by reduced engine power.Your vehicle has been designed to enterthis mode if certain high temperature/highload conditions take place in order tomanage the engine’s fluid temperatures.The amount of speed reduction willdepend on the vehicle loading, towing,grade, ambient temperature, and otherfactors. If this occurs, there is no need topull off the road. The vehicle can continueto be driven while this message is active
The air conditioning may also cycle on andoff during severe operating conditions toprotect overheating of the engine. Whenthe engine coolant temperature decreasesto a more normal operating temperature,the air conditioning will turn on once again.If you notice any of the following:
239
Super Duty (), enUSA
Maintenance
Page 258 of 470
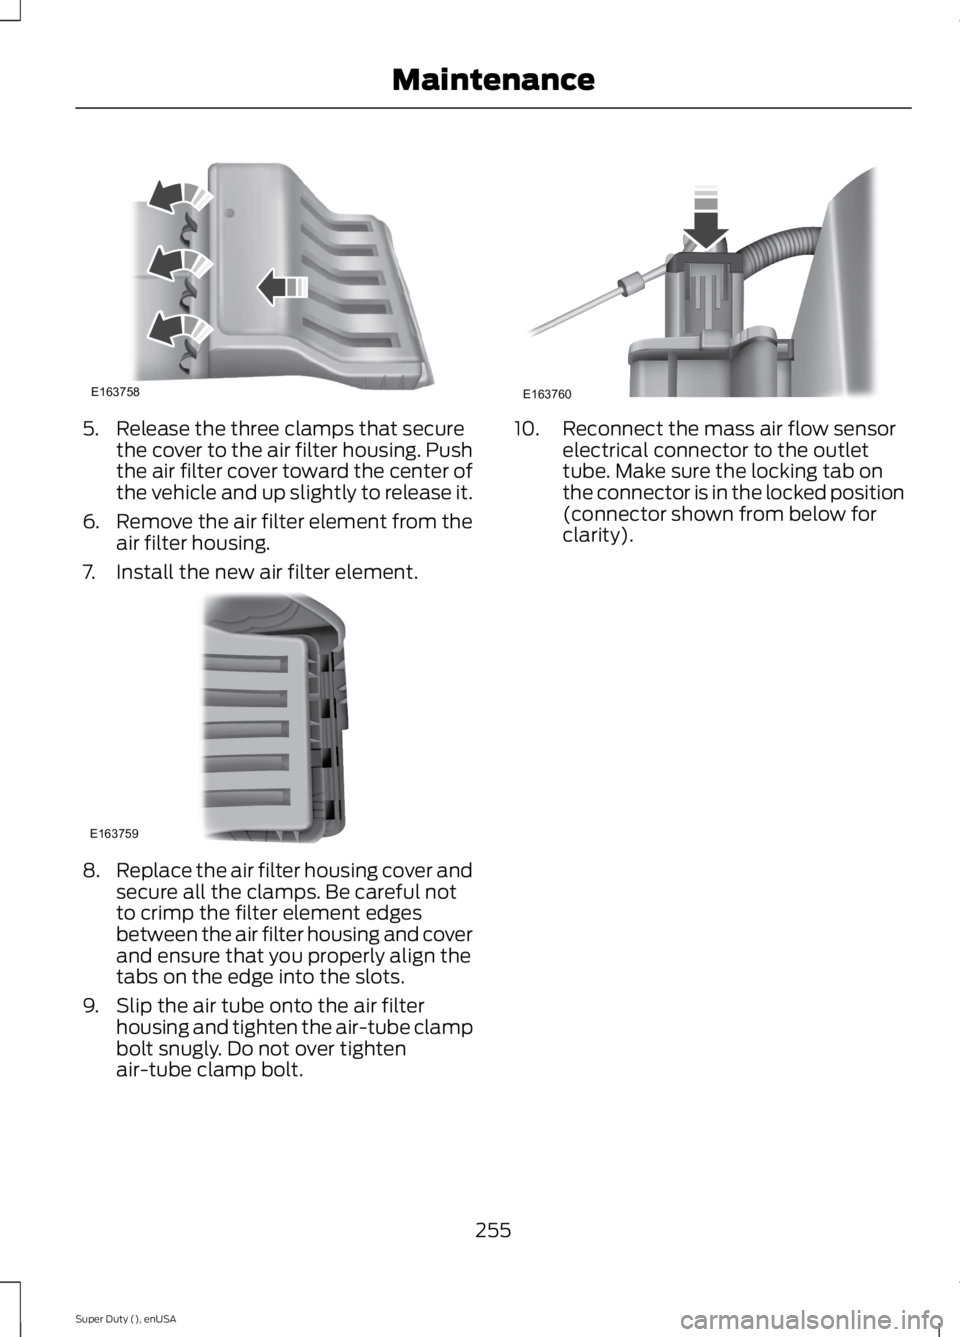
5. Release the three clamps that securethe cover to the air filter housing. Pushthe air filter cover toward the center ofthe vehicle and up slightly to release it.
6.Remove the air filter element from theair filter housing.
7. Install the new air filter element.
8.Replace the air filter housing cover andsecure all the clamps. Be careful notto crimp the filter element edgesbetween the air filter housing and coverand ensure that you properly align thetabs on the edge into the slots.
9. Slip the air tube onto the air filterhousing and tighten the air-tube clampbolt snugly. Do not over tightenair-tube clamp bolt.
10. Reconnect the mass air flow sensorelectrical connector to the outlettube. Make sure the locking tab onthe connector is in the locked position(connector shown from below forclarity).
255
Super Duty (), enUSA
MaintenanceE163758 E163759 E163760
Page 259 of 470
GENERAL INFORMATION
Your Ford or Lincoln authorized dealer hasmany quality products available to cleanyour vehicle and protect its finishes.
CLEANING PRODUCTS
For best results, use the following productsor products of equivalent quality:
•Motorcraft Bug and Tar Remover(ZC-42)
•Motorcraft Custom Bright MetalCleaner (ZC-15)
•Motorcraft Detail Wash (ZC-3-A)
•Motorcraft Dusting Cloth (ZC-24)
•Motorcraft Engine Shampoo andDegreaser (U.S. only) (ZC-20)
•Motorcraft Engine Shampoo (Canadaonly) (CXC-66-A)
•Motorcraft Multi-Purpose Cleaner(Canada only) (CXC-101)
•Motorcraft Premium Glass Cleaner(Canada only) (CXC-100)
•Motorcraft Premium QualityWindshield Washer Fluid (Canadaonly) [CXC-37-(A, B, D or F)]
•Motorcraft Premium Windshield WashConcentrate with Bitterant (U.S. only)(ZC-32-B2)
•Motorcraft Professional StrengthCarpet & Upholstery Cleaner (ZC-54)
•Motorcraft Spot and Stain Remover(U.S. only) (ZC-14)
•Motorcraft Ultra-Clear Spray GlassCleaner (ZC-23)
•Motorcraft Wheel and Tire Cleaner(ZC-37-A)
CLEANING THE EXTERIOR
Wash your vehicle regularly with cool orlukewarm water and a neutral pHshampoo, such as Motorcraft Detail Wash.
•Never use strong household detergentsor soap, such as dish washing orlaundry liquid. These products candiscolor and spot painted surfaces.
•Never wash a vehicle that is “hot to thetouch” or during exposure to strong,direct sunlight.
•Dry your vehicle with a chamois or softterry cloth towel in order to eliminatewater spotting.
•Immediately remove items such asgasoline, diesel fuel, bird droppings andinsect deposits because they can causedamage to your vehicle’s paintworkand trim over time. Use Motorcraft Bugand Tar Remover.
•Remove any exterior accessories, suchas antennas, before entering a carwash.
Note:Suntan lotions and insect repellentscan damage any painted surface; if thesesubstances come in contact with yourvehicle, wash off as soon as possible.
Stripes or Graphics (if equipped)
Do not use a commercial or high-pressuresprayer on the surface or edge of stripesand graphics. This can cause damage tothe film and cause the edge of the film topeel away from the vehicle surface.
Exterior Chrome
Note:Never use abrasive materials such assteel wool or plastic pads as they canscratch the chrome surface.
Note:Do not use chrome cleaner, metalcleaner or polish on wheels and wheelcovers
256
Super Duty (), enUSA
Vehicle Care
Page 264 of 470
CLEANING THE ALLOY
WHEELS (IF EQUIPPED)
Note:Do not apply a cleaning chemical towarm or hot wheel rims and covers.
Note:Some automatic car washes maycause damage to the finish on your wheelrims and covers.
Note:Industrial-strength or heavy-dutycleaners in combination with brush agitationto remove brake dust and dirt, could wearaway the clear coat finish over a period time.
Note:Do not use hydrofluoric acid-basedor high caustic-based wheel cleaners, steelwool, fuels or strong household detergents.
Note:If you intend parking your vehicle foran extended period after cleaning thewheels with a wheel cleaner, drive yourvehicle for a few minutes before doing so.This will reduce the risk of increasedcorrosion of the brake discs.
Alloy wheels and wheel covers are coatedwith a clear coat paint finish. To maintaintheir condition we recommend that you:
•Clean the wheels weekly usingMotorcraft Wheel and Tire Cleaner.Apply using manufacturer'sinstructions.
•Use a sponge to remove heavydeposits of dirt and brake dustaccumulation.
•Rinse thoroughly with a strong streamof water when you have completed thecleaning process.
•To remove tar and grease, useMotorcraft Bug and Tar Remover.
VEHICLE STORAGE
If you plan on storing your vehicle for anextended period of time (30 days or more),read the following maintenancerecommendations to make sure yourvehicle stays in good operating condition.
All motor vehicles and their componentswere engineered and tested for reliable,regular driving. Long term storage undervarious conditions may lead to componentdegradation or failure unless specificprecautions are taken to preserve thecomponents.
General
•Store all vehicles in a dry, ventilatedplace.
•Protect from sunlight, if possible.
•If vehicles are stored outside, theyrequire regular maintenance to protectagainst rust and damage.
Body
•Wash your vehicle thoroughly toremove dirt, grease, oil, tar or mud fromexterior surfaces, rear-wheel housingand underside of front fenders.
•Periodically wash your vehicle storedin exposed locations.
•Touch-up exposed or primed metal toprevent rust.
•Cover chrome and stainless steel partswith a thick coat of auto wax to preventdiscoloration. Re-wax as necessarywhen your vehicle is washed.
•Lubricate all hood, door and trunk lidhinges, and latches with a light gradeoil.
•Cover interior trim to prevent fading.
•Keep all rubber parts free from oil andsolvents.
261
Super Duty (), enUSA
Vehicle Care