Page 1 of 12

WARNING
Driving while distracted can result in loss of vehicle control, crash and injury. We strongly recommend that you use extreme caution
when using any device that may take your focus off the road. Your primary responsibility is the safe operation of your vehicle. We
recommend against the use of any hand-held device while driving and encourage the use of voice-operated systems when possible.
Make sure you are aware of all applicable local laws that may affect the use of electronic devices while driving.
October 2014First Printing
Quick Reference Guide F-150
Litho in U.S.A.
FL3J 19G217 AA
LEARN MORE ABOUT
YOUR NEW VEHICLE
Scan the country-appropriate QR code with your smartphone (make
sure you have a scanner app installed) and you can access even more
information about your vehicle.
Ford.caFordOwner.com
This Quick Reference Guide is not intended to replace your vehicle Owner’s Manual which contains more detailed information concerning the features of your
vehicle, as well as important safety warnings designed to help reduce the risk of injury to you and your passengers. Please read your entire Owner’s Manual
carefully as you begin learning about your new vehicle and refer to the appropriate chapters when questions arise. All information contained in this Quick
Reference Guide was accurate at the time of duplication. We reserve the right to change features, operation and/or functionality of any vehicle specification at any
time. Your Ford dealer is the best source for the most current information. For detailed operating and safety information, please consult your Owner’s Manual.2015
F-150 QUICK REFERENCE GUIDE
United States
Ford Customer
Relationship Center
1-800-392-3673 (FORD)
(TDD for the hearing
impaired: 1-800-232-5952)
fordowner.com
@FordService
Canada
Ford Customer
Relationship Centre
1-800-565-3673 (FORD)
ford.ca
@FordServiceCA
Page 2 of 12

BASIC COMMANDS
• What can I say?• List of commands• Main menu• Previous page• Next page• Go back• Exit• Help
ENTERTAINMENT
• Audio list of commands:
You can also get detailed lists of
commands for radio, USB, Bluetooth
®
audio, SiriusXM and SD card*
• Radio -
- FM <87.9-107.9>
- FM preset <#>
• CD- Play track <1-512>
- Shuffle
• USB - Play song
- Play album
• SiriusXM-
- Preset <#>
PHONE
• Phone list of commands• Dial• Call on cell/at home/
at work
• Call voicemail• Do not disturb• Listen to text messages
(phone-dependent feature)
CLIMATE**
• Climate control list of commands• Climate • Climate my temperature• Climate automatic
NAVIGATION**
• Navigation list of commands• Destination street address
• Destination home• Voice guidance • Navigation voice volume
• Repeat instruction• Show
heading-up/3-D>
• Destination
intersection>
• Where am I?• Zoom • Detour
*if equipped
**available only with MyFord Touch
Table of Contents
Commonly Used Voice Commands
SYNC.® Say the Word. Press the voice button and then say:
4 – 9 INSTRUMENT PANEL
10 – 11 SYNC
12 – 16 SYNC WITH MYFORD TOUCH
17 CONVENIENCE
18 COMFORT
19 – 21 FUNCTION
22 – 23 ESSENTIAL INFORMATION
Some services may not be available in your area. Refer to your Owner’s Manual, visit the website
or call the toll-free number.
FOR U.S. CUSTOMERS:
Visit SyncMyRide.com or call 1-800-392-3673 (select Option 1 or 2 for language, then Option 3).
FOR CANADIAN CUSTOMERS:
Visit SyncMyRide.ca or call 1-800-565-3673 (select Option 1 or 2 for language, then Option 3).
Page 3 of 12

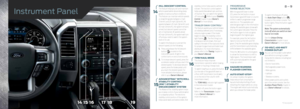
3
15
6
7
8
7
566
8
4231
4
POWERSCOPE®
POWER-FOLDING,
POWER-ADJUSTABLE
TELESCOPING MIRRORS*
To telescope your mirrors, make sure you
switch your vehicle on (with the ignition
in accessory mode or the engine
running) and then:
1. Press and release the
or control.
2. Press the adjustment control to
position the mirrors.
• Press the left arrow
to extend
the mirrors out. Press the right
arrow
to retract the mirrors in.
• Press the up or down arrow
to fold the mirrors toward
the window glass. Press the up
or down arrow
to fold the
mirrors out.
Note: Once you press the control to
use the power telescoping mirrors
feature, you lock out other mirror
functions for a short time. Press the
control again to unlock other power
mirror features, or wait until the lock
out times out.
LED SIDE-MIRROR
SPOTLIGHTS CONTROL*
The spot lamps are on the forward-
facing side of the exterior mirrors.
With the lighting control switch in the
parking lamps, headlamps or autolamps
position, press the buttons located
above the lighting control switch to
activate the left-hand or right-hand side
spot lamps. Once switched on, the spot lamps light the area in front of
and to the side of your vehicle. Adjust
the aim of the spot lamps by moving
the exterior mirrors' positions.
LIGHTING CONTROL
Headlamps off. Parking lamps on.
Headlamps on.
Autolamps on. Automatically
switches the exterior lamps on or
off based on available daylight.
Fog lamps on. Press the control
to switch the fog lamps on or off.
You can switch the fog lamps on
when the lighting control is in any
position except off and the high
beams are not on.
ELECTRIC
PARKING BRAKE*
On certain models, the electric parking
brake replaces the conventional foot
brake. The operating switch is on the
instrument panel, to the left of the
steering column.
To apply the electric parking brake,
make sure the transmission is locked
into park (P), and then pull the
switch up. The brake system lamp then
lights to confirm that the parking brake
is applied.
To release the electric parking brake,
switch the ignition on, press the brake
pedal, and then manually press the
switch down. The brake system
lamp then turns off to confirm the
parking brake is released. ADJUSTABLE
FOOT PEDALS*
Move the brake and accelerator pedals
by using the control located on the left
side of the steering column.
Press the left arrow
to move the
pedals away from you.
Press the right arrow
to move the
pedals closer to you.
Adjust the pedals only after stopping
your vehicle and placing it in park (P).
INFORMATION DISPLAY
PRODUCTIVITY SCREEN*
Monitor and control important vehicle
information and features through the
information display.
• Press the up or down arrows
to
scroll through and highlight the options
within a menu.
• Press the right arrow
to enter into
a sub-menu.
• Press the left arrow
to exit a menu.
• Press OK to choose and confirm a
setting or message.
You can even customize your views
using MyView.
Refer to the Information Displays
chapter in your Owner’s Manual for
more details.
4 – 5
ADAPTIVE
CRUISE CONTROL*
Automatically adjust your speed to
maintain a set distance between
your vehicle and the vehicle in front
of you in the same lane. Set the
gap distance between your vehicle
and the vehicle in front of you by
pressing GAP+ or GAP– or
and controls on the steering wheel.
Note: Driving aids do not replace
the need to watch where the
vehicle is moving and brake where
necessary. Refer to the Cruise
Control chapter in your Owner’s
Manual for more details.
POWER TILT-TELESCOPE
STEERING COLUMN*
Use the control on the side of the
steering column to adjust
the position.
To tilt: Press the top or bottom
of the control.
To telescope: Press the front or rear
of the control. The column moves to
the full up and away position when
you switch the ignition off. It returns
to your previous setting when you
switch the ignition on. You can
enable or disable this feature in the
information display.
Instrument Panel
2
*if equipped
Page 4 of 12

9
10
11
12
109
12
1113
13
AUDIO AND
MEDIA CONTROLS
• Press VOL+ or VOL– to increase or
decrease your volume level.
• Press M repeatedly to access all
possible media sources.
• Press
to access voice recognition*.
• Press
to access SYNC®
phone features*.
PUSH-BUTTON START*
Press the brake pedal and then press
the START STOP button.
An indicator light comes on when
the ignition is on and when the
engine starts.
If you leave your vehicle idling for an
extended period of time, the engine and
ignition automatically turn off.
Before the engine shuts down, a
message appears in the information
display allowing the driver time to
override the shutoff feature.
Note: Your intelligent access
transmitter must be inside your
vehicle to switch the ignition on and
start the engine.
6 – 7ELECTRONIC SHIFT
4WD SYSTEM*
The electronic shift 4WD system allows
you to choose between 2WD, 4x4
AUTO*, 4x4 HIGH or 4x4 LOW.
2H (2WD) sends power to the rear
wheels only and should be used for
street and highway driving. Provides
optimal smoothness and fuel economy
at high speeds.
4A (4x4 AUTO)* provides electronic
control four-wheel drive with power
delivered to the front and rear wheels,
as required, for increased traction.
This is appropriate for all on-road
driving conditions, including dry road
surfaces, but is especially useful on wet
pavement, snow, dirt or gravel.
4H (4x4 HIGH) helps provide extra
traction while driving in snow or
on icy roads or off road situations.
This mode is not intended for use on
dry pavement.
4L (4x4 LOW) uses extra gearing to
provide maximum power to all four
wheels at reduced speeds. Intended
only for off-road applications such
as deep sand, steep grades or pulling
heavy objects. 4L (4x4 LOW) does not
engage while the vehicle is moving
above 3 mph (5 km/h); this is normal
and should be no reason for concern.
Refer to Shifting to or from 4L (4x4
LOW) in the Four-Wheel Drive chapter
of your Owner’s Manual for details. ELECTRONIC LOCKING
DIFFERENTIAL*
When engaged, the system temporarily
locks the rear axle, allowing both rear
wheels to turn at the same speed. This
function helps to provide additional
traction as needed.
Note: Do not use this feature on
dry surfaces.
To use:
4X4: Pull the 4WD control.
4X2: Twist the
control to ON.
The indicator light
continuously
displays in the cluster when the ELD
is active.
INTEGRATED TRAILER
BRAKE CONTROLLER*
The fully integrated trailer brake
controller assists in smooth and
effective trailer braking by powering the
trailer’s electric or electric-over
hydraulic brakes with a proportional
output based on the towing vehicle’s
brake pressure.
The Gain setting is used to set the
trailer brake controller for specific
towing conditions and should be
changed as towing conditions change.
Changes to towing conditions include
trailer load, vehicle load, road
conditions and weather.
Use the Gain + and – adjustment
buttons to increase or decrease the
braking feature’s power output to
the trailer in 0.5 increments. Adjust the Gain by:
1.
Pressing the Gain+ or Gain–
buttons to increase or decrease
the setting to the desired
starting point. For example, a
Gain setting of 6.0 is a good
starting point for heavier loads.
2. Test the adjusted Gain
setting again after you make
adjustments. When testing:
A. In a traffic-free environment,
tow the trailer on a dry, level
surface at a speed of 20-25 mph
(30-40 km/h) and squeeze the
manual control lever completely.
B. If the trailer wheels lock
up (the tires will squeal),
reduce the Gain setting. If
the trailer wheels turn freely,
increase the Gain setting.
C. The proper Gain setting will
be at the point just below
trailer wheel lock-up.
Note: If towing a heavier trailer,
trailer wheel lock-up may not be
attainable even with the maximum
Gain setting of 10.
360-DEGREE CAMERA*
See page 19 for details.
Instrument Panel
*if equipped
Page 5 of 12

14
15
17
18
19
181715161419
HILL DESCENT CONTROL
The feature helps you set and maintain
vehicle speed while descending steep
grades on various surface conditions.
This feature can maintain vehicle speeds
on downhill grades between 2 mph
(5 km/h) and 20 mph (32 km/h). At
speeds between 20 mph (32 km/h) and
40 mph (64 km/h), the system remains
armed, but descent speed cannot be
set or maintained. At speeds above
40 mph (64 km/h), the system will turn
off and you need to switch the system
back on to use.
To switch this feature on and set the
descent speed, do the following:
1. Press and release the hill descent
button
located on the
instrument panel. A light in the
control turns on and a tone sounds.
2. To increase descent speed, press the
accelerator pedal until you reach the
desired speed. To decrease descent
speed, press the brake pedal until
you reach the desired speed. For
more detailed information, please
refer to your Owner’s Manual.
ADVANCETRAC
® WITH ROLL
STABILITY CONTROL™
(RSC®) STABILITY
ENHANCEMENT SYSTEM
The AdvanceTrac stability system helps
you to keep control of your vehicle when
on a slippery surface. The electronic
stability control portion of the system
helps avoid skids and lateral slides. Roll AUTO START-STOP
*
On certain models, the system
helps reduce fuel consumption
by automatically shutting off and
restarting the engine while at a stop.
The engine will restart automatically
when you release the brake pedal.
8 – 9
To switch this feature off, press
the Auto Start-Stop button ,
located on the center console. The
button lights. Press the button again
to restart.
Note: The system automatically
turns off when you switch on tow/
haul or 4x4 mode.
See the Unique Driving
Characteristics chapter in your
Owner's Manual for more details.
110-VOLT, 400-WATT
POWER OUTLET
You can use the power outlet when
your vehicle is running to power
many electric devices, including but
not limited to:
• Electric hand drills.
• Rechargeable power tools.
• Video games.
• Laptops.
• Television screens.
Other power points and outlets
are in the center console. See the
Auxiliary Power Points chapter in
your Owner's Manual for details.
stability control helps avoid a vehicle
rollover. The traction control system
helps avoid drive wheel spin and loss
of traction. You can switch the system
off manually . Refer to your Stability
Control chapter in your Owner’s
Manual for more details.
TRAILER SWAY CONTROL*
The feature applies your vehicle brakes
at individual wheels and, if necessary,
reduces engine power. If the trailer
begins to sway, the stability control
light flashes
. The first thing to do
is slow your vehicle down, then pull
safely to the side of the road and check
for proper tongue load and trailer load
distribution. For more information,
please refer to the Towing chapter in
your Owner’s Manual.
TOW/HAUL MODE
This feature helps improve
transmission operation when towing
a trailer or hauling a heavy load.
To switch tow/haul on, press the button
(on the side of the gearshift lever on
a floor-shift transmission [as shown],
or on the end of the column-shift
transmission lever).
The TOW HAUL indicator light appears
in the instrument cluster.
To switch off, press the button again.
Refer to the Transmission chapter
in your Owner’s Manual for
more information. PROGRESSIVE
RANGE SELECTION
With the gearshift lever in drive
(D), press the (–) button on your
transmission gearshift lever or column
shifter to switch progressive range
selection on. The available and
selected gears light in the information
display. All available gears show with
the current gear indicated. Press the
(–) button again to lock out gears
beginning with the highest gear.
For example, press the (–) button
twice to lock out the 6th and 5th
gears. Only the available gears display
and the transmission automatically
shifts between the available gears.
Press the (+) button to unlock gears
to allow the transmission to shift to
higher gears. The transmission will
shift automatically within the gear
range you select.
HAZARD WARNING
FLASHER CONTROL
16
Instrument Panel
*if equipped
Page 6 of 12
.
• Download your phone book (required to use the full set of voice c")
The system may prompt you to:
• Set your phone as the primary or favorite (the primary phone receives
messages and voicemail).
• Download your phone book (required to use the full set of voice commands).
• Switch on 911 Assist®.
TIPS
• Make sure you accept the request from SYNC to access your phone.
• To pair subsequent phones, please refer to Pairing Subsequent Phones in the
SYNC chapter of your Owner’s Manual.
• If you experience pairing problems, try performing a clean pairing by deleting
your device from SYNC and deleting the SYNC connection from your phone,
and then repeat the process.
WHY DO YOU NEED A SYNC OWNER ACCOUNT?
A SYNC owner account is a requirement if you want to take advantage of the
many personalization features, such as saving your favorites. Receive the latest
software updates that add new places, directions and information; and if you
have questions, you also receive free customer support. For more information,
refer to your Owner’s Manual, visit the website or call the toll-free number. See
the inside front cover of this guide for details.
GETTING STARTED WITH
YOUR SYNC SYSTEM
SYNC is a hands-free, voice recognition system used for entertainment, information
and communication. SYNC. SAY THE WORD.
BEFORE YOU GET STARTED
1.
Set up your owner account at SyncMyRide.com (U.S.) or SyncMyRide.ca (Canada).
Register by following the on-screen instructions. After registering, you can see what
services you may be eligible for.
2. SYNC uses a wireless connection called Bluetooth® to communicate with your
phone. Switch Bluetooth mode on in your phone’s menu options. This lets your
phone find SYNC. For more details on setting up your phone with SYNC, visit
SyncMyRide.com (U.S.) or SyncMyRide.ca (Canada), or your phone
manufacturer’s website.
PAIRING YOUR PHONE WITH SYNC
In order to use many of the features of SYNC, you must first pair and connect your
phone with SYNC. To pair your phone for the first time:
1. Make sure that your vehicle is in park (P) and you switch on your ignition and radio.
2. Press the phone button
. When the display indicates that the system does not
have a paired phone, press OK.
3. When Find SYNC appears in the display, press OK.
4. Put your phone into Bluetooth discovery mode. See your device’s manual, if necessary.
5. When prompted on your phone’s display, enter the six-digit PIN provided by SYNC in the radio display.
6. The display indicates when the pairing is successful. USING YOUR PHONE WITH SYNC
Note: You can download your phone book to make phone calls with voice commands
by name.
MAKING A PHONE CALL
Use SYNC to make a phone call to anyone in your phone book by pressing the voice
button
. When prompted, give a voice command.
For example, you could say “Call Jake Smith at home”. When the system confirms the
number, say “Dial” to initiate the call.
Note: You can also make phone calls by pressing the voice button
. When
prompted, give the voice command “Dial” and then verbally say the phone number.
ANSWERING INCOMING CALLS
Whenever you have an incoming call, you will be able to see the name and number of
the person calling in your display. Press the phone button to answer an incoming call.
You can hang up at any time by pressing and holding the phone button
.
USING SYNC TO ACCESS DIGITAL MEDIA
SYNC has a media hub with multiple inputs allowing you to access personal media from
your digital devices. Plug in your USB media devices such as phones and MP3 players
and use SYNC to play all of your favorite music.
Note: SYNC indexes all of your music. The more music that is stored on your device, the
longer it takes SYNC to index. You can then use voice indexing to find a specific song,
artist, playlist or genre when using the USB port to hard-wire your media device. When
using a Bluetooth connection, voice indexing is not available.
SYNC
®*
10 – 11
*if equipped
Page 7 of 12

GET IN TOUCH USING
YOUR FOUR-CORNER
TOUCHSCREEN
GENERAL TIPS
• Press the home icon at any time
to return to your home screen.
• Large knobs and buttons are easy
to use, even when you wear gloves.
• For a list of commonly used voice
commands and additional support
(including toll-free phone numbers
and websites), see the inside
front cover.
A REVOLUTIONARY WAY TO CONNECT WITH YOUR TRUCK
GETTING STARTED, UNDERSTANDING SYNC WITH MYFORD TOUCH
The four-corner, four-color touchscreen provides easy interaction with your cellular phone, multimedia entertainment, climate controls and navigation* system.
Each feature has its own corner represented by its own color. The touchscreen works the same way as traditional controls, knobs and buttons do.
For easy interaction, press the corners (Phone, Navigation*, Entertainment and Climate) to personalize your vehicle features and settings all in one place.
12 – 13
PHONE
Voice-control your phone for hands-free calling with
your phone securely put away. With SYNC, you do not
need to know the phone number. Instead, say the name
of the person you want from your contacts.
Your phone connects you with other features:
• Automatically connects with a 911 Operator in the event
of an accident (you must switch the system on prior to
an event).
• Transfer calls seamlessly from SYNC to phone as you get
in or out of your vehicle.
PAIRING YOUR PHONE
• Touch Add Phone in the upper left corner of the
touchscreen. Find SYNC appears on the screen and
instructs you to begin the pairing process from your device.
• Make sure that Bluetooth is set to On and that your
cellular phone is in the proper mode. See your device’s
manual, if necessary.
• If prompted to enter a PIN on your device, it does not
support Secure Simple Pairing. To pair, enter the PIN
displayed on the touchscreen. Skip the next step.
• When prompted on your phone’s display, confirm that the
PIN provided by SYNC matches the PIN displayed on your
cellular phone.
• The display indicates when the pairing is successful.
*if equipped
SYNC
® with MyFord Touch
®*
*if equipped
Page 8 of 12

NAVIGATION*
Get started with your navigation system by pressing
the upper-right, green corner.
The available, voice-activated navigation
system includes:
• SiriusXM Traffic™
• SiriusXM Travel Link™
• GPS (Global Positioning System) technology
• 3-D mapping
• Turn-by-turn navigation
Some features require a subscription. Refer to the
MyFord Touch chapter of your Owner’s Manual for
complete details. SET A DESTINATION
Set a destination through your touchscreen
by using a street address, a city center, a place
on the map or a point of interest (POI). The
easiest way, however, is by voice.
1.
Push the voice button
. When prompted,
say “Destination street address”.
2. The system asks you to say the full address
and displays an example on-screen.
3. You can then speak the address
naturally, such as: “One two three Main
Street, Anytown”.
While the vehicle is in park (P), you can use the
touchscreen to enter a destination and narrow
your choices by city or street as you type.
Choose from up to three different types
of routes:
• Fastest: Uses the fastest moving
roads possible.
• Shortest: Uses the shortest
distance possible.
• Eco (EcoRoute): Uses the most
fuel-efficient route.
SAVE A FAVORITE
When you find a specific address or a point of
interest (POI) that you’d like to store within
the system, you can save it to your Favorites. Using the
touchscreen, press Save to Favorites. When you want to view
that destination again, you can press Favorites to retrieve
your stored locations.
Note: Some features, such as Point of Interest (POI) ratings
and the ability to type in a destination, are not available
while the vehicle is moving. For more complete information,
see the MyFord Touch chapter in your Owner’s Manual.
SYNC
® with MyFord Touch
®*
You can also change your map views from Heading
Up, North Up or 3-D.
14 – 15
CLIMATE
SYNC with MyFord Touch controls the temperature, airflow direction, fan
speed, and activates other climate features like heated front seats for you
and your passenger. To use voice commands to operate climate, say a voice
command like “Climate temperature 72 degrees” and MyFord Touch makes
that adjustment. SET YOUR TEMPERATURE
•
Touch the lower-right, blue Climate corner on
the touchscreen.
• Set your exact, desired temperature by using the arrows.
• Touch and hold MyTemp to select a temperature that you
would like the vehicle to remember and maintain for you.
• You can also adjust your climate settings by using the
buttons and knobs located on the instrument panel.
SET YOUR PASSENGER’S TEMPERATURE
• Touch Dual to switch on the passenger temperature control.
• Touch + or – to adjust the temperature.
ADJUST CLIMATE CONTROLLED
FRONT SEATS*
• Touch the heated or cooled seat icon to control
the seat setting.
• More light bars indicate a higher setting.
*if equipped*if equipped