Page 9 of 144

For your convenience we offer a numberof ways to contact us, as well as to helpmanage your account.
Phone: 1-800-727-7000
For more information regarding Ford Credit,as well as to access Account Manager,please go to www.fordcredit.com.
REPLACEMENT PARTS
RECOMMENDATION
Your vehicle has been built to the higheststandards using quality parts. Werecommend that you demand the use ofgenuine Ford and Motorcraft partswhenever your vehicle requires scheduledmaintenance or repair. You can clearlyidentify genuine Ford and Motorcraft partsby looking for the Ford, FoMoCo orMotorcraft branding on the parts or theirpackaging.
Scheduled Maintenance andMechanical Repairs
One of the best ways for you to make surethat your vehicle provides years of serviceis to have it maintained in line with ourrecommendations using parts thatconform to the specifications detailed inthis Owner’s Manual. Genuine Ford andMotorcraft parts meet or exceed thesespecifications.
Collision Repairs
We hope that you never experience acollision, but accidents do happen. GenuineFord replacement collision parts meet ourstringent requirements for fit, finish,structural integrity, corrosion protectionand dent resistance. During vehicle
development we validate these partsdeliver the intended level of protection asa whole system. A great way to know forsure you are getting this level of protectionis to use genuine Ford replacementcollision parts.
Warranty on Replacement Parts
Genuine Ford and Motorcraft replacementparts are the only replacement parts thatbenefit from a Ford Warranty. Damagecaused to your vehicle as a result of thefailure of non-Ford parts may not becovered by the Ford Warranty. Foradditional information, refer to the termsand conditions of the Ford Warranty.
SPECIAL NOTICES
New Vehicle Limited Warranty
For a detailed description of what iscovered and what is not covered by yourvehicle’s New Vehicle Limited Warranty,refer to the Warranty Manual that isprovided to you along with your Owner’sManual.
Special Instructions
For your added safety, your vehicle is fittedwith sophisticated electronic controls.
WARNINGS
Failure to follow the specificwarnings and instructions couldresult in personal injury.
Front seat mounted rear-facing childor infant seats should NEVER beplaced in front of an activepassenger airbag.
6Motorhome (), enUSAIntroduction
Page 10 of 144

MOBILE COMMUNICATIONS
EQUIPMENT
Using mobile communications equipmentis becoming increasingly important in theconduct of business and personal affairs.However, you must not compromise yourown or others’ safety when using suchequipment. Mobile communications canenhance personal safety and security whenappropriately used, particularly inemergency situations. Safety must beparamount when using mobilecommunications equipment to avoidnegating these benefits. Mobilecommunication equipment includes, butis not limited to, cellular phones, pagers,portable email devices, text messagingdevices and portable two-way radios.
WARNING
Driving while distracted can result inloss of vehicle control, crash andinjury. We strongly recommend thatyou use extreme caution when using anydevice that may take your focus off theroad. Your primary responsibility is the safeoperation of your vehicle. We recommendagainst the use of any hand-held devicewhile driving and encourage the use ofvoice-operated systems when possible.Make sure you are aware of all applicablelocal laws that may affect the use ofelectronic devices while driving.
EXPORT UNIQUE OPTIONS
For your particular global region, yourvehicle may be equipped with features andoptions that are different from the featuresand options that are described in thisOwner’s Manual. A market uniquesupplement may be supplied thatcomplements this book. By referring to themarket unique supplement, if provided,you can properly identify those features,recommendations and specifications that
are unique to your vehicle. This Owner’sManual is written primarily for the U.S. andCanadian Markets. Features or equipmentlisted as standard may be different on unitsbuilt for Export.Refer to this Owner’sManual for all other requiredinformation and warnings.
7Motorhome (), enUSAIntroduction
Page 11 of 144
ADJUSTING THE STEERING
WHEEL
WARNING
Do not adjust the steering wheelwhen your vehicle is moving.
1.Pull and hold the steering wheelrelease lever.
2.Adjust the steering wheel to the desiredposition then release the lever.
CRUISE CONTROL
See Cruise Control (page 35).
8Motorhome (), enUSASteering WheelE16151712 E161518
Page 12 of 144

WINDSHIELD WIPERS
Note:Fully defrost the windshield beforeswitching on the windshield wipers.
Note:Make sure the windshield wipers areswitched off before entering a car wash.
Note:Clean the windshield and wiperblades if they begin to leave streaks orsmears. If that doesn't resolve the issue,install new wiper blades.
Note:Do not operate the wipers on a drywindshield. This may scratch the glass,damage the wiper blades or cause the wipermotor to burn out. Always use thewindshield washers before wiping a drywindshield.
Rotate the end of the control:
•away from you to increase the wiperspeed
•toward you to decrease the wiperspeed
WINDSHIELD WASHERS
Note:Do not operate the wipers on a drywindshield. This may scratch the glass,damage the wiper blades or cause the wipermotor to burn out. Always use thewindshield washer before wiping a drywindshield.
Note:Do not operate the washers whenthe washer reservoir is empty. This maycause the washer pump to overheat.
Press the end of the stalk to activate thewasher.
•A brief press causes a single wipewithout washer fluid.
•A quick press and hold causes thewipers to swipe three times withwasher fluid.
•A long press and hold will activate thewipers and washer fluid for up to 10seconds.
9Motorhome (), enUSAWipers and WashersE161461 E161462
Page 13 of 144
LIGHTING CONTROL
OffA
Parking lamps, instrument panellamps, license plate lamps andtail lamps
B
HeadlampsC
High Beams
Push the lever forward to switch the highbeams on.
Push the lever forward again or pull thelever toward you to switch the high beamsoff.
Headlamp Flasher
Pull the lever toward you slightly andrelease it to flash the headlamps.
INSTRUMENT LIGHTING
DIMMER
Note:If you disconnect the battery or itbecomes discharged, the dimmer switchwill require re-calibration. Rotate thedimmer switch from the full dim position tothe full dome/on position to reset.
Note:Move the control to the full uprightposition, past detent, to turn on the interiorlamps.
Move the control up or down to adjust theintensity of the panel lighting.
10Motorhome (), enUSALightingE161456ABCP E161457 E161458 E161459
Page 14 of 144
DAYTIME RUNNING LAMPS (If
Equipped)
WARNING
Always remember to switch yourheadlamps on in low light situationsor during inclement weather. Thesystem does not activate the tail lampsand may not provide adequate lightingduring these conditions. Failure to activateyour headlamps under these conditionsmay result in a collision.
The system switches the low beamheadlamps on at a reduced intensity indaylight conditions.
To switch the system on, switch theignition on, and switch the lighting controlto the off, autolamp or parking lampposition.
DIRECTION INDICATORS
Push the lever up or down to use thedirection indicators.
Note:Tap the lever up or down to make thedirection indicators flash three times toindicate a lane change.
11Motorhome (), enUSALightingE161460
Page 15 of 144
GAUGES
Engine oil pressure gaugeA
TachometerB
Information displayC
Speedometer.D
Transmission fluid temperature gaugeE
Engine coolant temperature gaugeF
Fuel gaugeG
Engine Oil Pressure Gauge
Indicates engine oil pressure. The needleshould stay in the normal operating range(between L and H). If the needle fallsbelow the normal range, stop the vehicle,turn off the engine and check the engineoil level. Add oil if needed. If the oil level iscorrect, have your vehicle checked by yourauthorized dealer.
Speedometer
Indicates vehicle speed. Vehicle speed islimited to either 65 mph (105 km/h) or 75mph (120 km/h).
Transmission Fluid TemperatureGauge
Normal area
The transmission fluid is within the normaloperating temperature (between H andC).
12Motorhome (), enUSAInstrument ClusterE161505ABDECGF
Page 16 of 144
.Operating the transmission fo")
Yellow area
The transmission fluid is higher thannormal operating temperature. This canbe caused by special operation conditions(i.e. snowplowing, towing or off-road use).Operating the transmission for extendedperiods of time with the gauge in theyellow area may cause internaltransmission damage. Altering the severityof the driving conditions is recommendedto lower the transmission temperature intothe normal range.
Red area
The transmission fluid is overheating. Stopthe vehicle to allow the temperature toreturn to normal range.
If the gauge is operating in the yellow orred area, stop the vehicle and verify theairflow is not restricted such as snow ordebris blocking airflow through the grill. Ifthe gauge continues to show hightemperatures, see your authorized dealer.
Engine Coolant TemperatureGauge
WARNING
Never remove the coolant reservoircap while the engine is running or hot.
At normal operating temperature, theneedle will remain in the center section.
Note:Do not restart the engine until thecause of overheating has been resolved.
If the needle enters the red section, theengine is overheating. Stop the engine,switch the ignition off and determine thecause once the engine has cooled down.
Fuel Gauge
Switch the ignition on. The fuel gauge willindicate approximately how much fuel isleft in the fuel tank. The fuel gauge mayvary slightly when your vehicle is movingor on a gradient. The arrow adjacent to thefuel pump symbol indicates on which sideof the vehicle the fuel filler door is located.
WARNING LAMPS AND
INDICATORS
The following warning lamps andindicators will alert you to a vehiclecondition that may become serious. Somelamps will illuminate when you start yourvehicle to make sure they work. If anylamps remain on after starting your vehicle,refer to the respective system warninglamp for further information.
Note:Some warning indicators appear inthe information display and function thesame as a warning lamp but do not displaywhen you start your vehicle.
Anti-Lock Braking System
If it illuminates when you aredriving, this indicates amalfunction. You will continueto have the normal braking system(without ABS) unless the brake systemwarning lamp is also illuminated. Have thesystem checked by your authorized dealer.
Battery
If it illuminates while driving, itindicates a malfunction. Switchoff all unnecessary electricalequipment and have the system checkedby your authorized dealer immediately.
13Motorhome (), enUSAInstrument Cluster
 1
1 2
2 3
3 4
4 5
5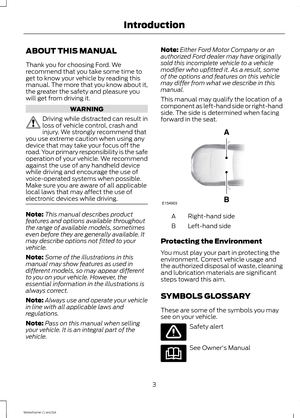 6
6 7
7 8
8 9
9 10
10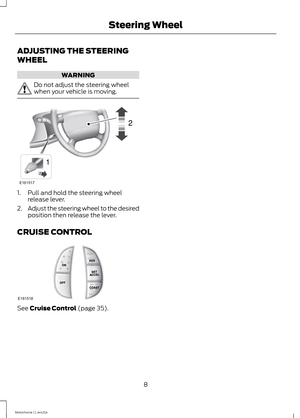 11
11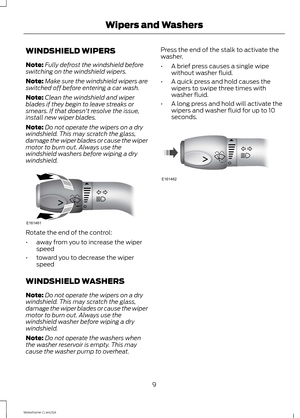 12
12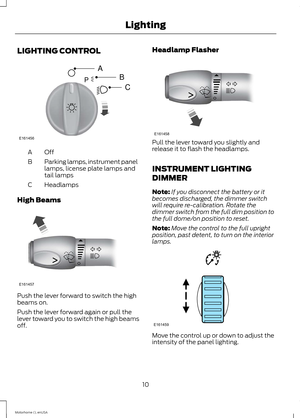 13
13 14
14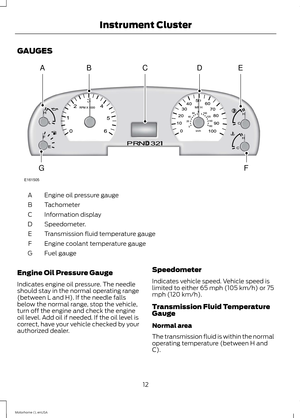 15
15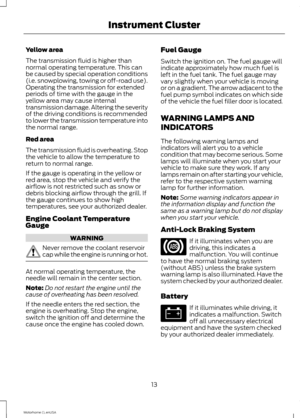 16
16 17
17 18
18 19
19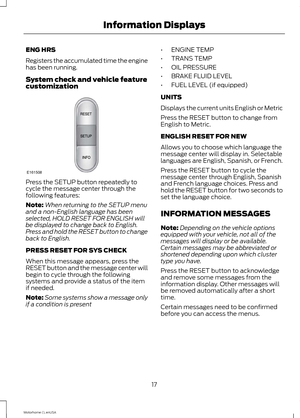 20
20 21
21 22
22 23
23 24
24 25
25 26
26 27
27 28
28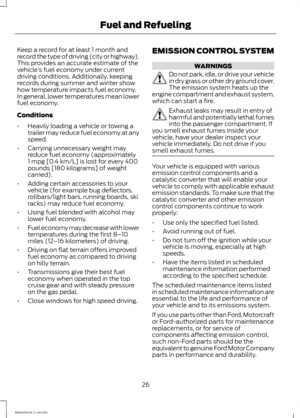 29
29 30
30 31
31 32
32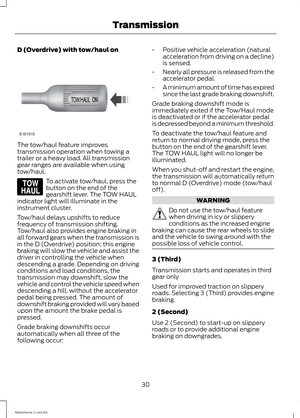 33
33 34
34 35
35 36
36 37
37 38
38 39
39 40
40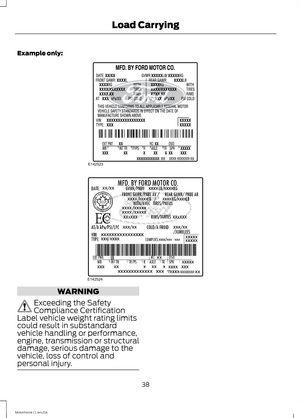 41
41 42
42 43
43 44
44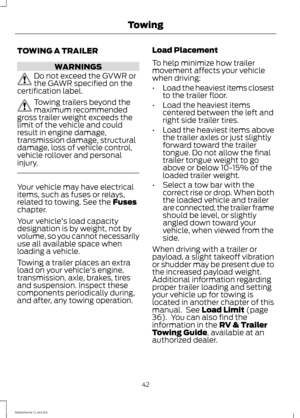 45
45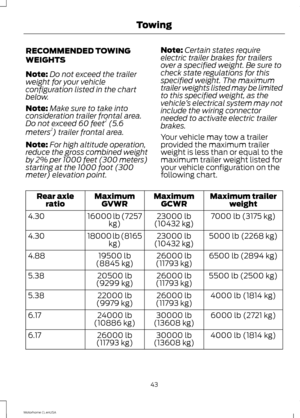 46
46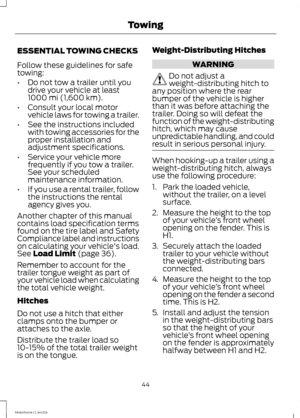 47
47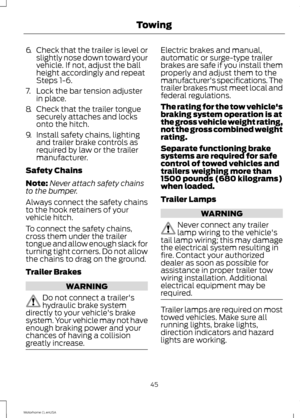 48
48 49
49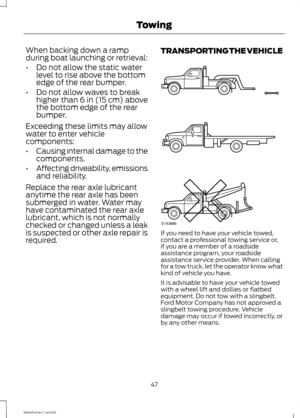 50
50 51
51 52
52 53
53 54
54 55
55 56
56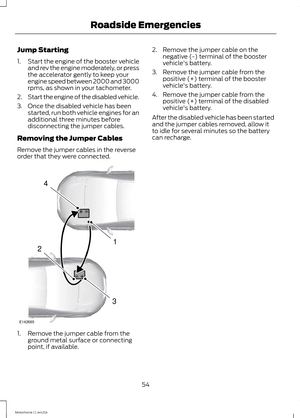 57
57 58
58 59
59 60
60 61
61 62
62 63
63 64
64 65
65 66
66 67
67 68
68 69
69 70
70 71
71 72
72 73
73 74
74 75
75 76
76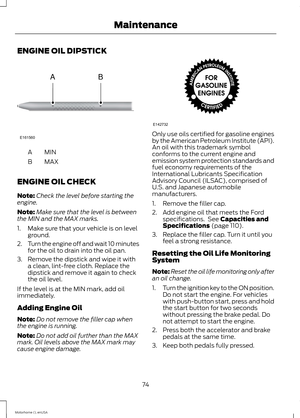 77
77 78
78 79
79 80
80 81
81 82
82 83
83 84
84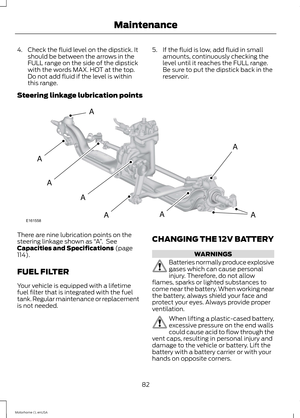 85
85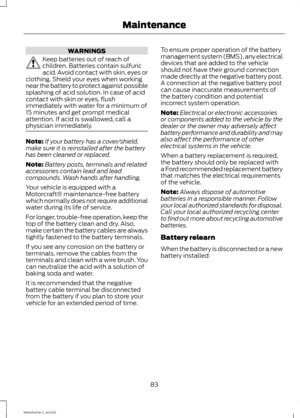 86
86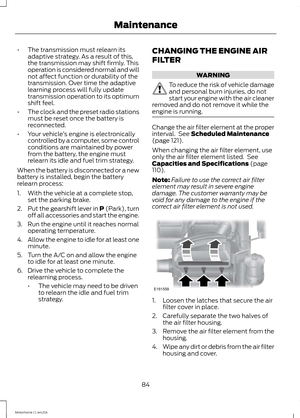 87
87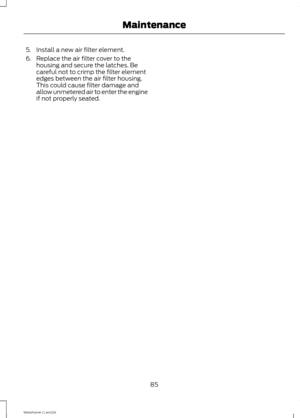 88
88 89
89 90
90 91
91 92
92 93
93 94
94 95
95 96
96 97
97 98
98 99
99 100
100 101
101 102
102 103
103 104
104 105
105 106
106 107
107 108
108 109
109 110
110 111
111 112
112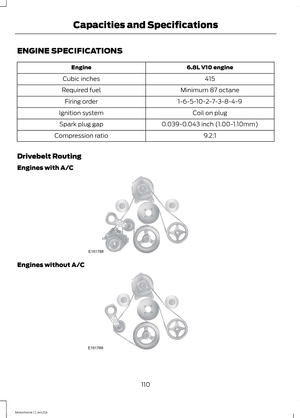 113
113 114
114 115
115 116
116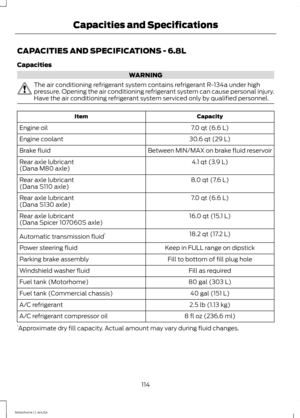 117
117 118
118 119
119 120
120 121
121 122
122 123
123 124
124 125
125 126
126 127
127 128
128 129
129 130
130 131
131 132
132 133
133 134
134 135
135 136
136 137
137 138
138 139
139 140
140 141
141 142
142 143
143


WARNING
Always remember to switch yourheadlamps on in low light situationsor during inclement weather. Thesystem does not activate the tail lampsand may not provide")
