Page 290 of 596

Note:When you try to restart your vehicle after a fuel shutoff, the
vehicle makes sure that various systems are safe to restart. Once your
vehicle determines that the systems are safe, then the vehicle will allow
you to restart.
Note:In the event that your vehicle does not restart after your third
attempt, contact an authorized dealer.
JUMP-STARTING THE VEHICLE
WARNING:The gases around the battery can explode if exposed
to flames, sparks, or lit cigarettes. An explosion could result in
injury or vehicle damage.
WARNING:Batteries contain sulfuric acid which can burn skin,
eyes and clothing, if contacted.
Do not attempt to push-start your automatic transmission vehicle.
Automatic transmissions do not have push-start capability. Attempting to
push-start a vehicle with an automatic transmission may cause
transmission damage.
When the battery is disconnected or a new battery is installed, the
automatic transmission must relearn its shift strategy. As a result, the
transmission may exhibit a combination of firm and soft shifts. This
operation is considered normal and will not affect function or durability
of the transmission. Over time, the adaptive learning process will fully
update transmission operation.
Preparing Your Vehicle
Note:Use only a 12–volt supply to start your vehicle.
Note:Do not disconnect the battery of the disabled vehicle as this could
damage the vehicle’s electrical system.
1. Park the booster vehicle close to the hood of the disabled vehicle
making sure the two vehicles do not touch. Set the parking brake on
both vehicles and stay clear of the engine cooling fan and other moving
parts.
2. Check all battery terminals. Remove the positive terminal cover (if
equipped) and any excessive corrosion before you attach the battery
cables. Ensure that vent caps are tight and level.
3. Turn the heater fan on in both vehicles to protect from any electrical
surges. Turn all other accessories off.
Roadside Emergencies289
2015 Explorer(exp)
Owners Guide gf, 2nd Printing, September 2014
USA(fus)
Page 304 of 596
Fuse or relay
numberFuse amp
ratingProtected components
39 40A** Auxiliary blower motor
40 — Not used
41 30A** Second row heated seats
42 30A** Passenger seat
43 40A** Anti-lock brake system valves
44 — Rear washer relay
45 5A* Rain sensor
46 — Not used
47 — Not used
48 — Not used
49 — Not used
50 15A* Heated mirrors
51 — Not used
52 — Not used
53 — Trailer tow left stop/turn lamps
relay
54 — Not used
55 — Wiper relay
56 15A* Transmission control module
57 20A* Left high-intensity discharge
headlamps
58 10A* Alternator sensor
59 10A* Brake on/off switch
60 10A* Trailer tow back-up lamps
61 20A* Second row seat release
62 10A* Air conditioning clutch
63 15A* Trailer tow stop/turn lamps
64 15A* Rear wipers
65 30A* Fuel pump
66 — Powertrain control module relay
Fuses303
2015 Explorer(exp)
Owners Guide gf, 2nd Printing, September 2014
USA(fus)
Page 306 of 596
Fuse or relay
numberFuse amp
ratingProtected components
89 5A* Front blower relay coil,
Electronic power assist steering
module
90 10A* Powertrain control module,
Transmission control module,
Engine control module (2.0L
engine)
91 10A* Adaptive cruise control
92 10A* Anti-lock brake system module,
Plant EVAC and fill
93 5A* Rear blower motor, Rear
defroster, Trailer tow battery
charge relays
94 30A** Passenger compartment fuse
panel run/start
95 — Not used
96 — Not used
97 — Not used
98 — Air conditioning clutch relay
*Mini Fuses **Cartridge Fuses
Fuses305
2015 Explorer(exp)
Owners Guide gf, 2nd Printing, September 2014
USA(fus)
Page 314 of 596
3.5L V6 Engine
A. Engine coolant reservoir
B. Brake fluid reservoir
C. Battery
D. Power distribution box
E. Air filter assembly
F. Transmission fluid dipstick (out of view)
G. Engine oil dipstick
H. Engine oil filler cap
I. Windshield washer fluid reservoir
ABCD
EFGHI
Maintenance313
2015 Explorer(exp)
Owners Guide gf, 2nd Printing, September 2014
USA(fus)
Page 315 of 596
3.5L V6 EcoBoost® Engine
A. Engine coolant reservoir
B. Brake fluid reservoir
C. Battery
D. Power distribution box
E. Air filter assembly
F. Automatic transmission fluid dipstick (out of view)
G. Engine oil dipstick
H. Engine oil filler cap
I. Windshield washer fluid reservoir
ABCD
EFGHI
314Maintenance
2015 Explorer(exp)
Owners Guide gf, 2nd Printing, September 2014
USA(fus)
Page 323 of 596

TRANSMISSION FLUID CHECK
6F35 TRANSMISSION (if equipped)
Note:Transmission fluid should be checked by an authorized dealer. If
required, fluid should be added by an authorized dealer.
The automatic transmission does not have a transmission fluid dipstick.
Refer to yourscheduled maintenance informationfor scheduled
intervals for fluid checks and changes. Your transmission does not
consume fluid. However, the fluid level should be checked if the
transmission is not working properly, (i.e., if the transmission slips or
shifts slowly) or if you notice some sign of fluid leakage.
Do not use supplemental transmission fluid additives, treatments or
cleaning agents. The use of these materials may affect transmission
operation and result in damage to internal transmission components.
6F50/6F55 Transmission
WARNING:The dipstick cap and surrounding components may
be hot; gloves are recommended.
WARNING:Use gloves when moving the air filter assembly;
components will be hot.
Note:Automatic transmission fluid expands when warmed. To obtain an
accurate fluid check, drive the vehicle until it is warmed up
(approximately 20 miles [30 km]). If your vehicle has been operated for
an extended period at high speeds, in city traffic during hot weather or
pulling a trailer, the vehicle should be turned off until normal operating
temperatures are reached to allow the fluid to cool before checking.
Depending on vehicle use, cooling times could take up to 30 minutes or
longer.
Refer to yourscheduled maintenance informationfor scheduled
intervals for fluid checks and changes. Your transmission does not
consume fluid. However, the fluid level should be checked if the
transmission is not working properly, i.e., if the transmission slips or
shifts slowly or if you notice some sign of fluid leakage.
1. Drive the vehicle 20 miles (30 km) or until it reaches normal operating
temperature.
2. Park the vehicle on a level surface and engage the parking brake.
322Maintenance
2015 Explorer(exp)
Owners Guide gf, 2nd Printing, September 2014
USA(fus)
Page 324 of 596

3. With the parking brake engaged and your foot on the brake pedal,
start the engine and move the gearshift lever through all of the gear
ranges. Allow a minimum of 10 seconds for each gear to engage.
4. Latch the gearshift lever inP(Park) and leave the engine running.
5. Remove the dipstick, wiping it clean with a clean, dry lintfree rag. If
necessary, refer toUnder hood overviewin this chapter for the location
of the dipstick. (For vehicles with the EcoBoost engine, move the air
filter assembly aside to access the transmission dipstick. SeeMoving the
Air Filter Assembly (EcoBoost engine)for more information.
6. Install the dipstick making sure it is fully seated in the filler tube by
turning it to the locked position.
7. Remove the dipstick and inspect the fluid level. The fluid should be in
the designated areas for normal operating temperature.
Moving the Air Filter Assembly (EcoBoost engine)
WARNING:Do not run engine with the air filter disconnected.
1. Shut the engine off.
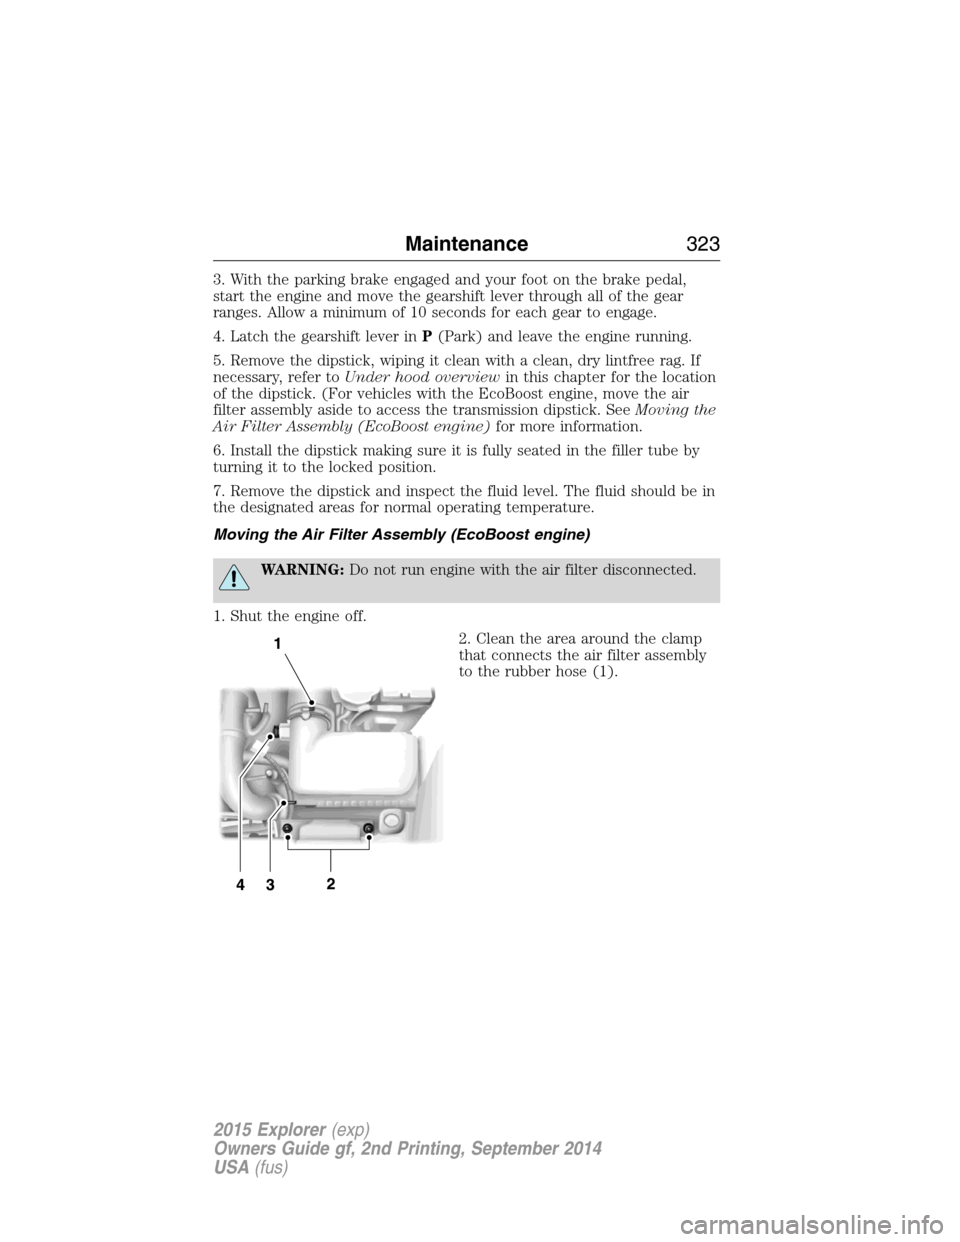
2. Clean the area around the clamp
that connects the air filter assembly
to the rubber hose (1).
Maintenance323
2015 Explorer(exp)
Owners Guide gf, 2nd Printing, September 2014
USA(fus)
Page 325 of 596
3. Remove the bolt cover (if
equipped).
4. Remove two bolts that attach the air filter assembly to the front of the
vehicle (2).
5. Loosen the clamp holding the air filter assembly to the rubber hose
(1).
6. Remove the harness retaining clip by pulling up (3). Do not
disconnect the sensor (4).
7. Without disconnecting the sensor (4), pull the air filter assembly up to
disconnect the air filter assembly from the seated grommets located
underneath the air filter assembly.
8. Rotate the air filter assembly 90
degrees counterclockwise and
reinstall into the rubber hose.
9. Tighten the clamp (1).
10. The transmission fluid level indicator can now be accessed.
324Maintenance
2015 Explorer(exp)
Owners Guide gf, 2nd Printing, September 2014
USA(fus)