Page 122 of 596

Speed control (RTT) (if equipped)
The speed control system indicator light changes color to
indicate what mode the system is in:
•On (gray light–type 1 and type 2): Illuminates when the speed control
system is turned on. Turns off when the speed control system is
turned off.
•Engaged (white light-type 1, green light-type 2): Illuminates when the
speed control system is engaged. Turns off when the speed control
system is disengaged.
Stability Control System
Displays when the AdvanceTrac®/Traction control is active. If
the light remains on, have the system serviced immediately.
Stability Control System Off
Illuminates when AdvanceTrac®/Traction control has been
disabled by the driver.
Transmission Tow/Haul Feature (RTT) (if equipped)
Displays when the Tow/Haul feature has been activated. If the
light flashes steadily, have the system serviced immediately,
damage to the transmission could occur.
Turn signal
Illuminates when the left or right turn signal or the hazard
warning flasher is turned on. If the indicators stay on or flash
faster, check for a burned out bulb.
Instrument Cluster121
2015 Explorer(exp)
Owners Guide gf, 2nd Printing, September 2014
USA(fus)
Page 127 of 596

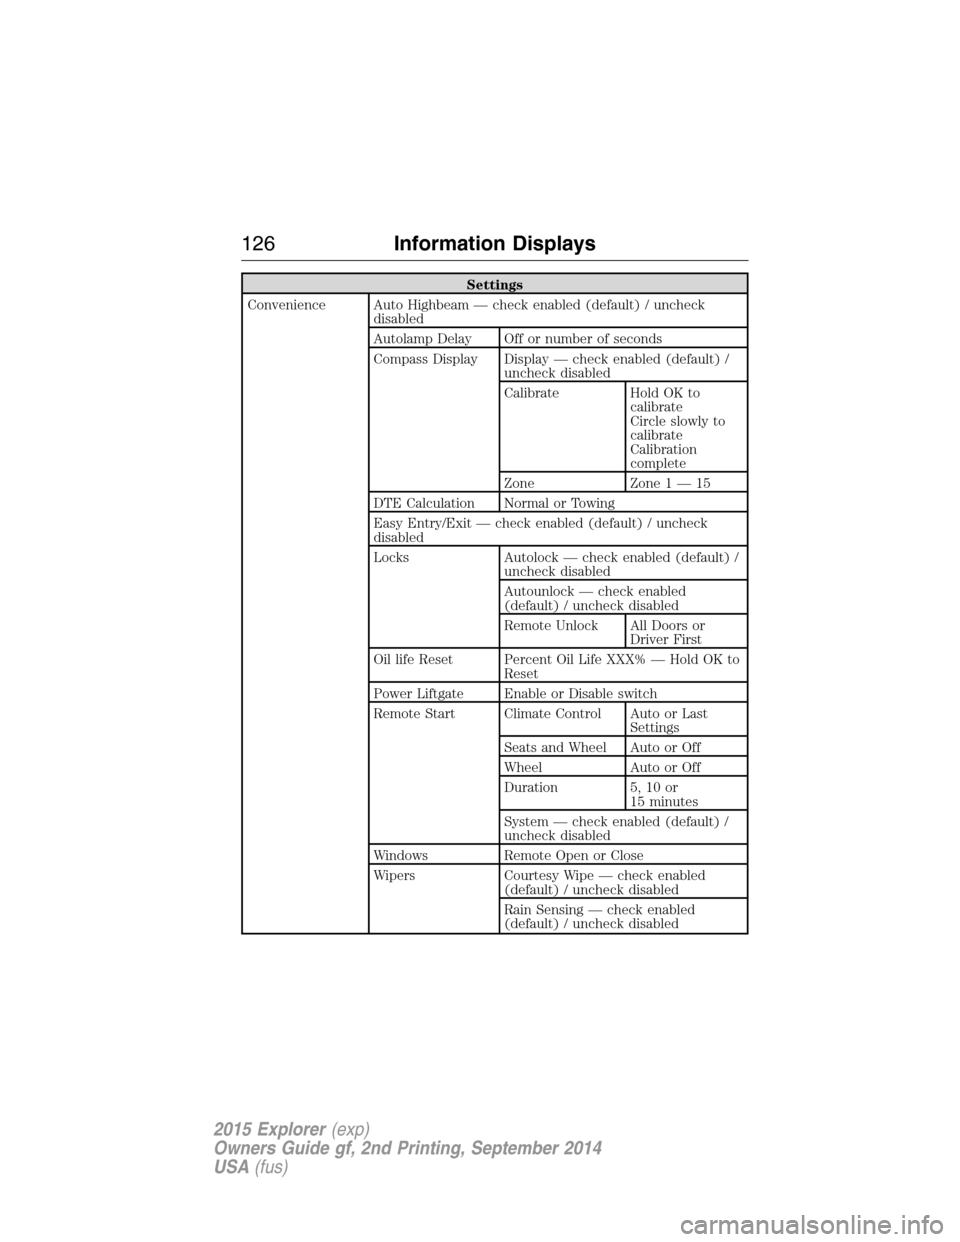
Settings
Convenience Auto Highbeam — check enabled (default) / uncheck
disabled
Autolamp Delay Off or number of seconds
Compass Display Display — check enabled (default) /
uncheck disabled
Calibrate Hold OK to
calibrate
Circle slowly to
calibrate
Calibration
complete
Zone Zone 1 — 15
DTE Calculation Normal or Towing
Easy Entry/Exit — check enabled (default) / uncheck
disabled
Locks Autolock — check enabled (default) /
uncheck disabled
Autounlock — check enabled
(default) / uncheck disabled
Remote Unlock All Doors or
Driver First
Oil life Reset Percent Oil Life XXX% — Hold OK to
Reset
Power Liftgate Enable or Disable switch
Remote Start Climate Control Auto or Last
Settings
Seats and Wheel Auto or Off
Wheel Auto or Off
Duration 5, 10 or
15 minutes
System — check enabled (default) /
uncheck disabled
Windows Remote Open or Close
Wipers Courtesy Wipe — check enabled
(default) / uncheck disabled
Rain Sensing — check enabled
(default) / uncheck disabled
126Information Displays
2015 Explorer(exp)
Owners Guide gf, 2nd Printing, September 2014
USA(fus)
Page 133 of 596
Settings
In this mode, you can configure different driver setting choices.
Note:Some items are optional and may not appear.
Settings
Vehicle DTE Calculation Normal / Towing
Easy Entry/Exit — check enabled / uncheck disabled
Lighting Auto highbeam On / Off
Autolamp Delay Off or number of
seconds
Locks Autolock On / Off
Autounlock On / Off
Remote
UnlockingAll doors /
Driver’s door
Oil Life ResetPercent Oil Life XXX %
Hold OK to Reset
Power Liftgate Enabled or Disabled
Remote StartClimate Control
(using this
feature allows
you to select
different climate
control modes
when the vehicle
is started using
the remote start
feature)Auto / Last
Settings
Seats and Wheel
or SeatsAuto / Off
Duration5/10
/15 minutes
System Enable / Disable
Windows Remote Open or Close
WipersCourtesy Wipe On / Off
Rain Sensing On / Off
132Information Displays
2015 Explorer(exp)
Owners Guide gf, 2nd Printing, September 2014
USA(fus)
Page 153 of 596

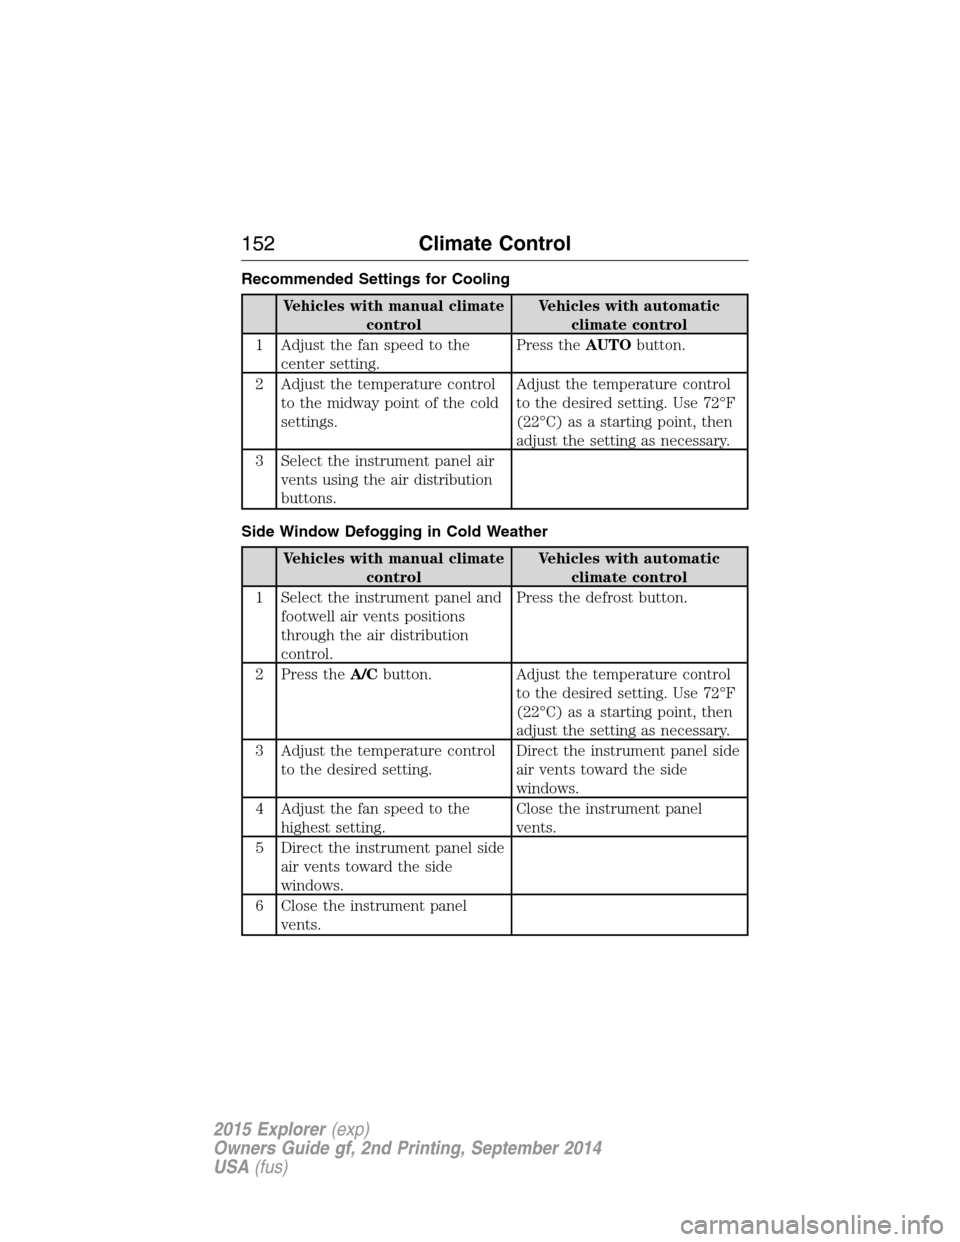
Recommended Settings for Cooling
Vehicles with manual climate
controlVehicles with automatic
climate control
1 Adjust the fan speed to the
center setting.Press theAUTObutton.
2 Adjust the temperature control
to the midway point of the cold
settings.Adjust the temperature control
to the desired setting. Use 72°F
(22°C) as a starting point, then
adjust the setting as necessary.
3 Select the instrument panel air
vents using the air distribution
buttons.
Side Window Defogging in Cold Weather
Vehicles with manual climate
controlVehicles with automatic
climate control
1 Select the instrument panel and
footwell air vents positions
through the air distribution
control.Press the defrost button.
2 Press theA/Cbutton. Adjust the temperature control
to the desired setting. Use 72°F
(22°C) as a starting point, then
adjust the setting as necessary.
3 Adjust the temperature control
to the desired setting.Direct the instrument panel side
air vents toward the side
windows.
4 Adjust the fan speed to the
highest setting.Close the instrument panel
vents.
5 Direct the instrument panel side
air vents toward the side
windows.
6 Close the instrument panel
vents.
152Climate Control
2015 Explorer(exp)
Owners Guide gf, 2nd Printing, September 2014
USA(fus)
Page 159 of 596
Second-row outboard seat head
restraints
The head restraints consist of:
A. Energy absorbing head restraint.
B. Steel stems.
C. Guide sleeve unlock and remove buttons.
D. Fold strap.
•Fold: Pull the fold strap (D). Pull it back up to reset.
•Remove: Fold the head restraint. Press and hold both of the unlock
and remove buttons (C), then pull up on the head restraint.
•Reinstall: Align the steel stems into the guide sleeves and push the
head restraint down until it locks.
Third-row head restraints
The head restraints consist of:
A. Energy absorbing head restraint.
B. Steel stems.
C. Fold strap.
Fold: Pull the fold strap (C). Pull it back up to reset.
Note:Press the stow or fold button on the power folding seats to
automatically fold the head restraint.
C
B
AD
158Seats
2015 Explorer(exp)
Owners Guide gf, 2nd Printing, September 2014
USA(fus)
Page 171 of 596

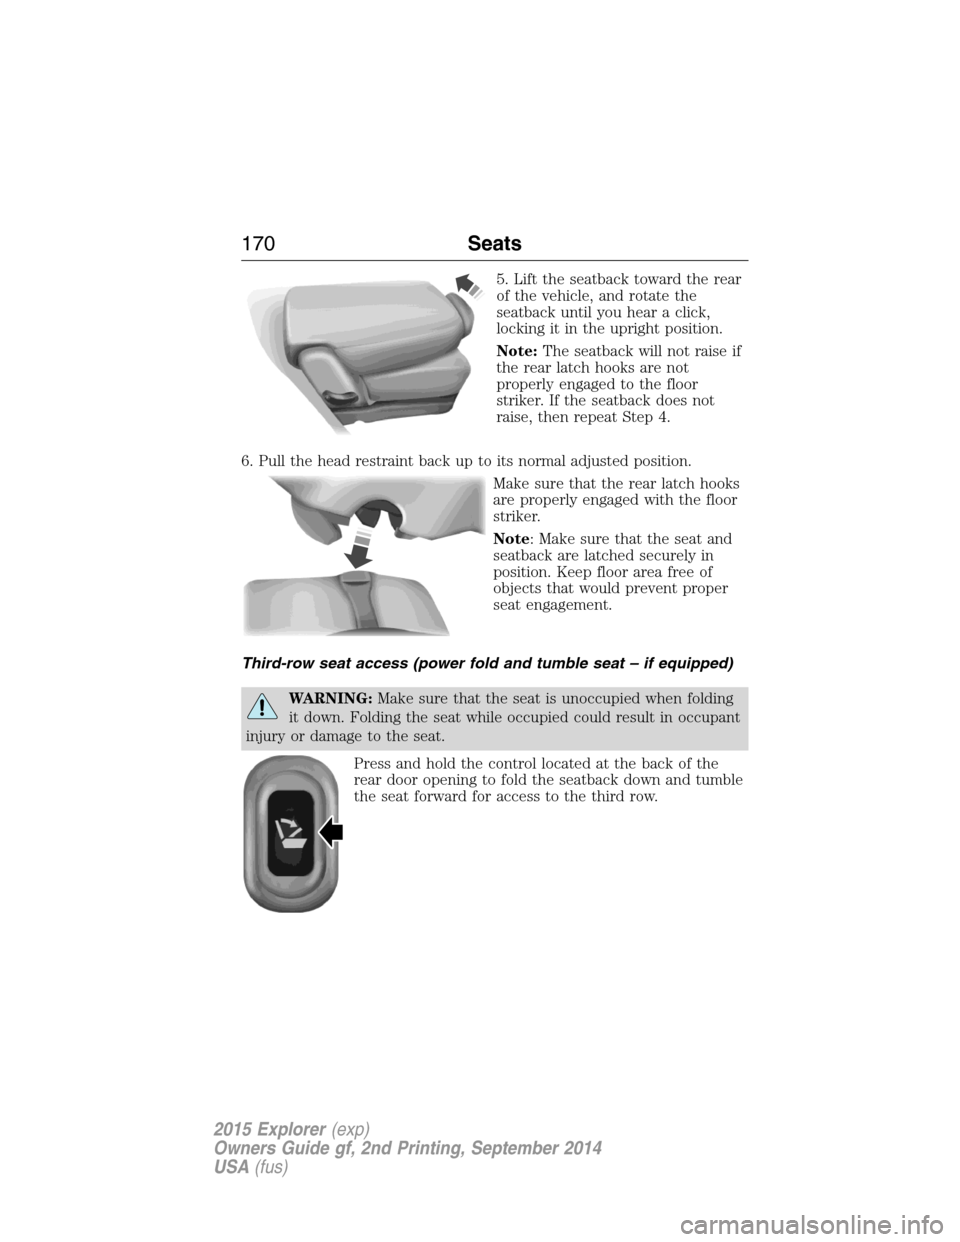
5. Lift the seatback toward the rear
of the vehicle, and rotate the
seatback until you hear a click,
locking it in the upright position.
Note:The seatback will not raise if
the rear latch hooks are not
properly engaged to the floor
striker. If the seatback does not
raise, then repeat Step 4.
6. Pull the head restraint back up to its normal adjusted position.
Make sure that the rear latch hooks
are properly engaged with the floor
striker.
Note: Make sure that the seat and
seatback are latched securely in
position. Keep floor area free of
objects that would prevent proper
seat engagement.
Third-row seat access (power fold and tumble seat – if equipped)
WARNING:Make sure that the seat is unoccupied when folding
it down. Folding the seat while occupied could result in occupant
injury or damage to the seat.
Press and hold the control located at the back of the
rear door opening to fold the seatback down and tumble
the seat forward for access to the third row.
170Seats
2015 Explorer(exp)
Owners Guide gf, 2nd Printing, September 2014
USA(fus)
Page 173 of 596
3. To return the seatback to the floor from the
tumbled position, rotate the seat down until you hear
it latching to the floor.
4. Lift the seatback toward the rear
of the vehicle, and rotate the
seatback until you hear a click,
locking it in the upright position.
Note:The seatback will not raise if
the rear latch hooks are not
properly engaged to the floor
striker. If the seatback does not
raise, then repeat Step 3.
5. Pull the head restraint back up to its normal adjusted position.
Make sure that the rear latch hooks
are properly engaged with the floor
striker.
Note:Make sure that the seat and
seatback are latched securely in
position. Keep floor area free of
objects that would prevent proper
seat engagement.
172Seats
2015 Explorer(exp)
Owners Guide gf, 2nd Printing, September 2014
USA(fus)
Page 174 of 596
Folding the Third-Row Manual Seat
1. Remove all objects from the seat and stowage tub.
2. Fold the outboard head restraint
by pulling the head restraint release
strap.
3. From the rear of the vehicle, fold
the seatback by pulling and holding
the red strap while pushing the
seatback forward. Release the strap
once the seatback starts rotating
forward.
4. Release the cushion latches by pulling the
short black strap while pulling on the strap
located at the top of the seatback to tumble
the seat all the way into the tub in the floor.
Note:Do not use the seat anchors as cargo tie downs.
Seats173
2015 Explorer(exp)
Owners Guide gf, 2nd Printing, September 2014
USA(fus)