2015 FORD EXPLORER change wheel
[x] Cancel search: change wheelPage 224 of 596
PRINCIPLES OF OPERATION
WARNING:Vehicle modifications involving braking system,
aftermarket roof racks, suspension, steering system, tire
construction and wheel or tire size may change the handling
characteristics of the vehicle and may adversely affect the performance
of the AdvanceTrac® system. In addition, installing any stereo
loudspeakers may interfere with and adversely affect the AdvanceTrac®
system. Install any aftermarket stereo loudspeaker as far as possible
from the front center console, the tunnel, and the front seats in order
to minimize the risk of interfering with the AdvanceTrac® sensors.
Reducing the effectiveness of the AdvanceTrac® system could lead to
an increased risk of loss of vehicle control, vehicle rollover, personal
injury and death.
WARNING:Remember that even advanced technology cannot
defy the laws of physics. It’s always possible to lose control of a
vehicle due to inappropriate driver input for the conditions. Aggressive
driving on any road condition can cause you to lose control of your
vehicle increasing the risk of personal injury or property damage.
Activation of the AdvanceTrac® system is an indication that at least
some of the tires have exceeded their ability to grip the road; this could
reduce the operator’s ability to control the vehicle potentially resulting
in a loss of vehicle control, vehicle rollover, personal injury and death. If
your AdvanceTrac® system activates, SLOW DOWN.
The AdvanceTrac® with Roll Stability Control™ system helps you keep
control of your vehicle when on a slippery surface. The electronic
stability control portion of the system helps avoid skids and lateral slides,
curve control assists in vehicle handling in following the road during
adverse maneuvering and roll stability control helps avoid a vehicle
rollover. The traction control system helps avoid drive wheel spin and
loss of traction. See theTraction Controlchapter for details on traction
control system operation.
Stability Control223
2015 Explorer(exp)
Owners Guide gf, 2nd Printing, September 2014
USA(fus)
Page 238 of 596
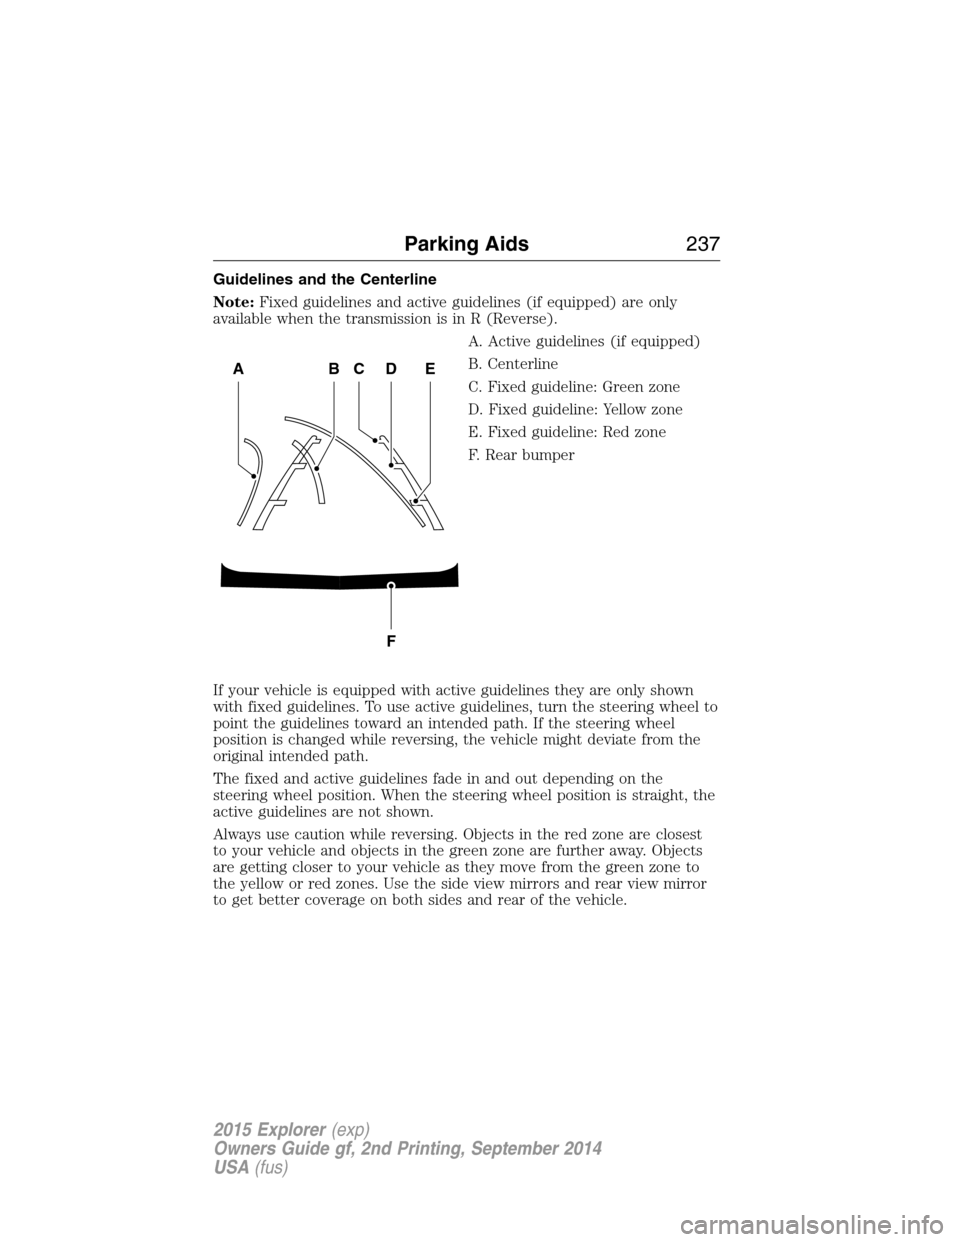
Guidelines and the Centerline
Note:Fixed guidelines and active guidelines (if equipped) are only
available when the transmission is in R (Reverse).
A. Active guidelines (if equipped)
B. Centerline
C. Fixed guideline: Green zone
D. Fixed guideline: Yellow zone
E. Fixed guideline: Red zone
F. Rear bumper
If your vehicle is equipped with active guidelines they are only shown
with fixed guidelines. To use active guidelines, turn the steering wheel to
point the guidelines toward an intended path. If the steering wheel
position is changed while reversing, the vehicle might deviate from the
original intended path.
The fixed and active guidelines fade in and out depending on the
steering wheel position. When the steering wheel position is straight, the
active guidelines are not shown.
Always use caution while reversing. Objects in the red zone are closest
to your vehicle and objects in the green zone are further away. Objects
are getting closer to your vehicle as they move from the green zone to
the yellow or red zones. Use the side view mirrors and rear view mirror
to get better coverage on both sides and rear of the vehicle.
ABCD
F
E
Parking Aids237
2015 Explorer(exp)
Owners Guide gf, 2nd Printing, September 2014
USA(fus)
Page 240 of 596
PRINCIPLES OF OPERATION
Cruise control lets you maintain a set speed without keeping your foot
on the accelerator pedal.
USING CRUISE CONTROL
WARNING:Do not use cruise control in heavy traffic, on
winding roads or when the road surface is slippery. This could
result in loss of vehicle control, serious injury or death.
WARNING:When you are going downhill, your vehicle speed
may increase above the set speed. The system will not apply the
brakes. Change down a gear to assist the system in maintaining the set
speed. Failure to do so could result in loss of vehicle control, serious
injury or death.
Note:Cruise control will disengage if your vehicle speed decreases more
than 10 mph (16 km/h) below your set speed while driving uphill.
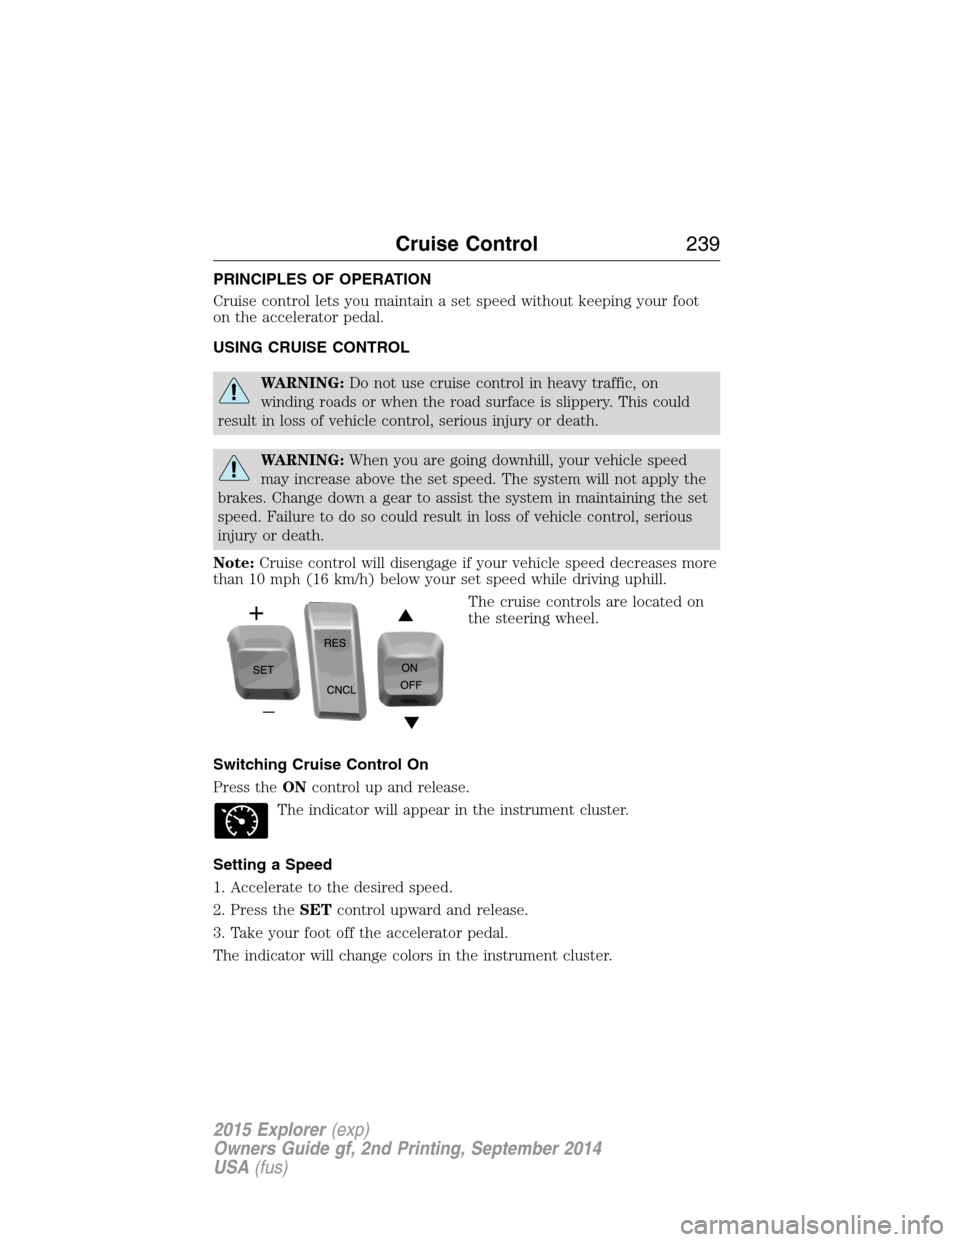
The cruise controls are located on
the steering wheel.
Switching Cruise Control On
Press theONcontrol up and release.
The indicator will appear in the instrument cluster.
Setting a Speed
1. Accelerate to the desired speed.
2. Press theSETcontrol upward and release.
3. Take your foot off the accelerator pedal.
The indicator will change colors in the instrument cluster.
Cruise Control239
2015 Explorer(exp)
Owners Guide gf, 2nd Printing, September 2014
USA(fus)
Page 251 of 596
LANE KEEPING SYSTEM (IF EQUIPPED)
WARNING:The system is designed to aid the driver. It is not
intended to replace the driver’s attention and judgment. The
driver is still responsible to drive with due care and attention.
The system notifies you to stay in your lane through the steering system
and the instrument cluster display when the front camera detects an
unintentional drift out of your lane is likely to occur. The system
automatically detects and tracks the road lane markings using a camera
that is mounted behind the interior rear view mirror.
Note:The system works above 40 mph (64 km/h).
Note:The system works as long as one lane marking can be detected by
the camera.
Note:If the camera is blocked or if the windshield is damaged, the
system may not function.
Note:When Aid mode is on and the system detects no driver steering
activity for a short period after system activation, the system alerts the
driver to keep their hands on the steering wheel. The system may detect
a light touch or grip on the steering wheel as hands-off driving.
Switching the System On and Off
Press the button located on the turn signal lever to switch the
system on or off.
Note:The system on/off setting is stored until it is manual changed,
unless a MyKey® is detected. If a MyKey® is detected, the system is
defaulted to on and the mode is set to Alert.
Note:If a MyKey® is detected, pressing the button will not affect the
on/off status of the system. Only the Mode and Intensity settings can be
changed when a MyKey® is present.
System Settings
The system has one standard feature setting and one optional setting
menu available. To view or adjust the settings, refer to theInformation
Displayschapter. The last-known selection for each of these settings is
stored by the system. You do not need to readjust your settings each
time you turn on the system.
250Driving Aids
2015 Explorer(exp)
Owners Guide gf, 2nd Printing, September 2014
USA(fus)
Page 359 of 596
E.15:Indicates the wheel or rim diameter in inches. If you change your
wheel size, you will have to purchase new tires to match the new wheel
diameter.
F.95:Indicates the tire’s load index. It is an index that relates to how
much weight a tire can carry. You may find this information in your
owner’s manual. If not, contact a local tire dealer.
Note:You may not find this information on all tires because it is not
required by federal law.
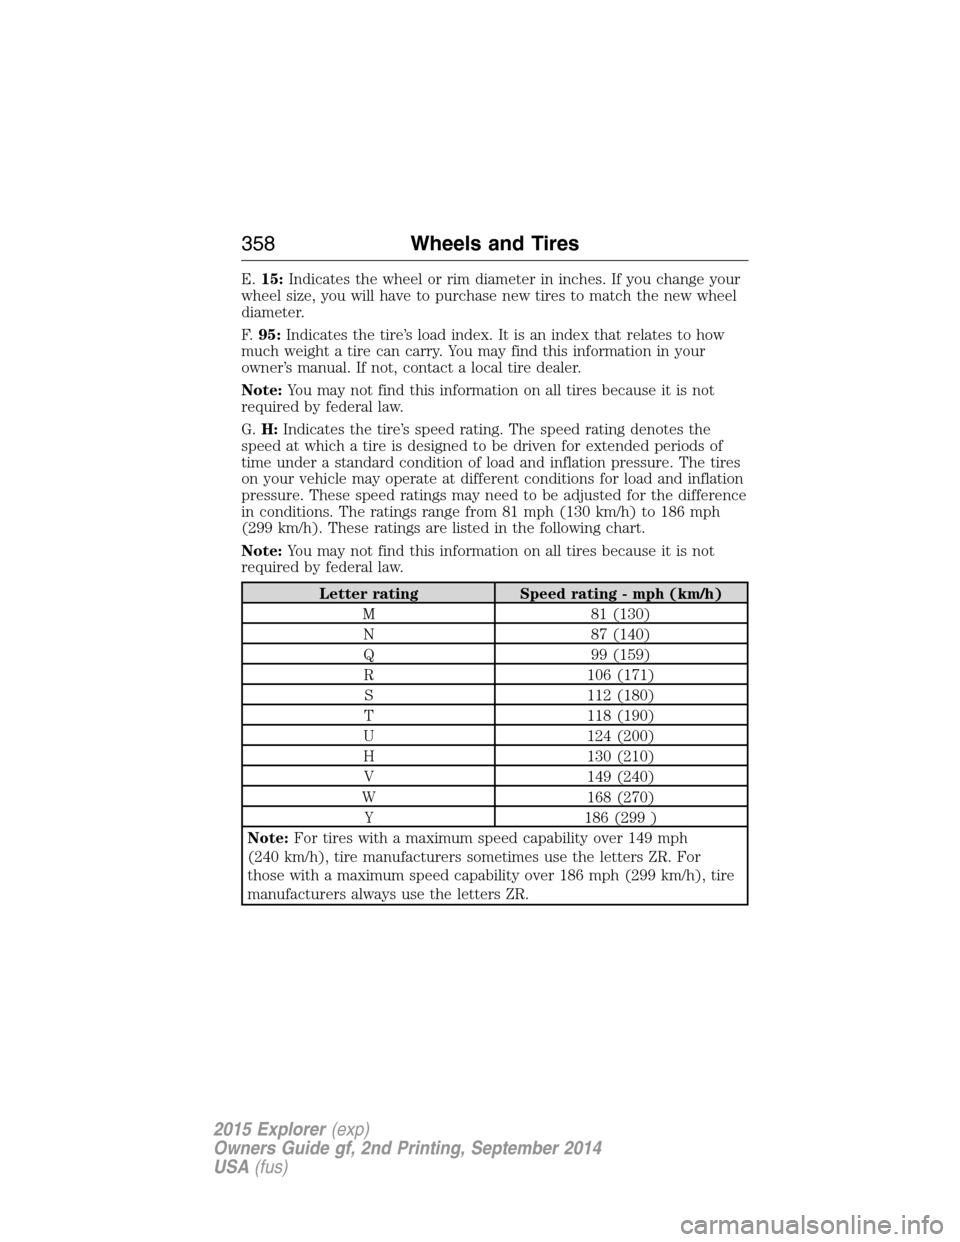
G.H:Indicates the tire’s speed rating. The speed rating denotes the
speed at which a tire is designed to be driven for extended periods of
time under a standard condition of load and inflation pressure. The tires
on your vehicle may operate at different conditions for load and inflation
pressure. These speed ratings may need to be adjusted for the difference
in conditions. The ratings range from 81 mph (130 km/h) to 186 mph
(299 km/h). These ratings are listed in the following chart.
Note:You may not find this information on all tires because it is not
required by federal law.
Letter rating Speed rating - mph (km/h)
M 81 (130)
N 87 (140)
Q 99 (159)
R 106 (171)
S 112 (180)
T 118 (190)
U 124 (200)
H 130 (210)
V 149 (240)
W 168 (270)
Y 186 (299 )
Note:For tires with a maximum speed capability over 149 mph
(240 km/h), tire manufacturers sometimes use the letters ZR. For
those with a maximum speed capability over 186 mph (299 km/h), tire
manufacturers always use the letters ZR.
358Wheels and Tires
2015 Explorer(exp)
Owners Guide gf, 2nd Printing, September 2014
USA(fus)
Page 362 of 596
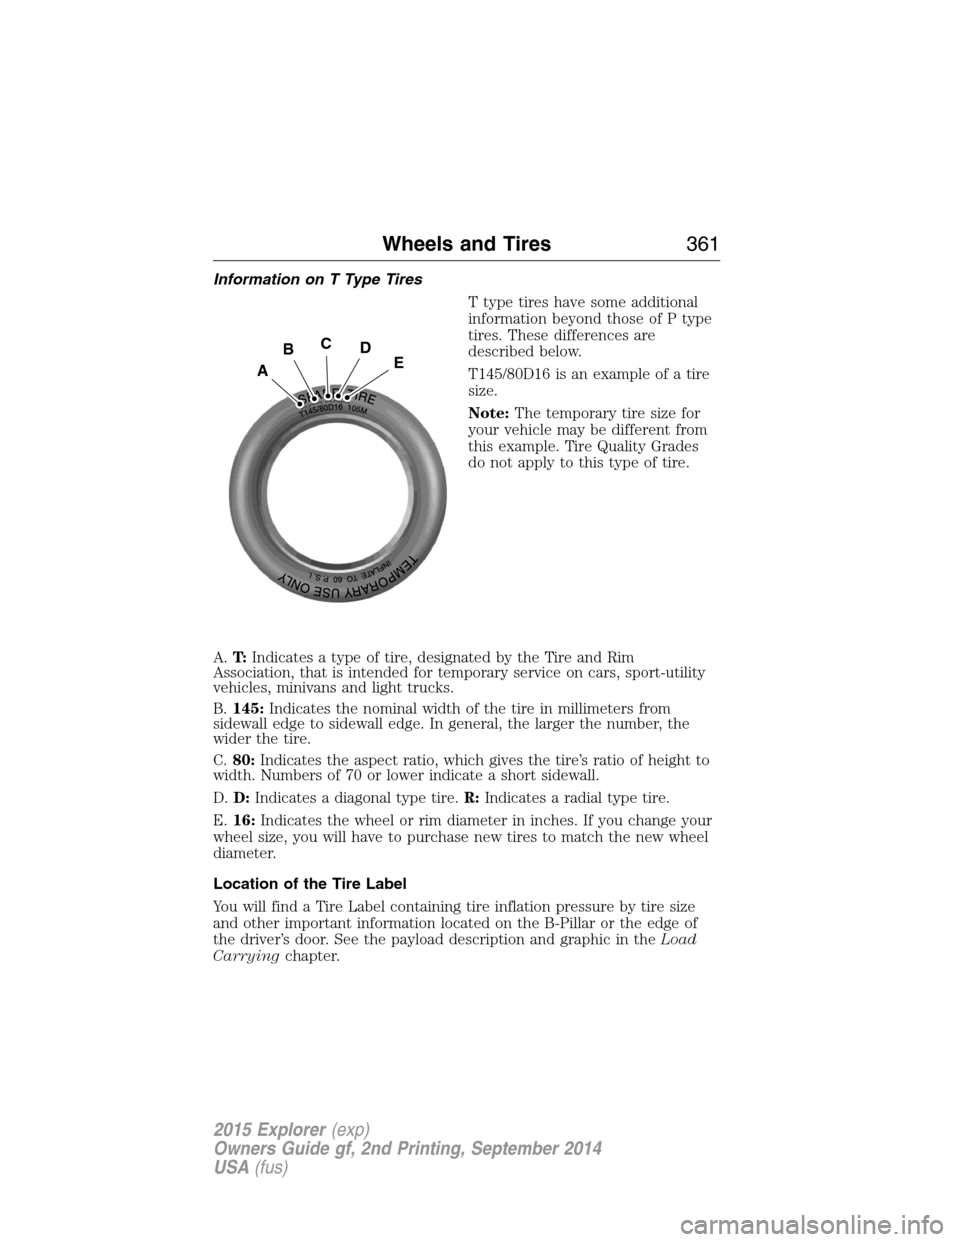
Information on T Type Tires
T type tires have some additional
information beyond those of P type
tires. These differences are
described below.
T145/80D16 is an example of a tire
size.
Note:The temporary tire size for
your vehicle may be different from
this example. Tire Quality Grades
do not apply to this type of tire.
A.T:Indicates a type of tire, designated by the Tire and Rim
Association, that is intended for temporary service on cars, sport-utility
vehicles, minivans and light trucks.
B.145:Indicates the nominal width of the tire in millimeters from
sidewall edge to sidewall edge. In general, the larger the number, the
wider the tire.
C.80:Indicates the aspect ratio, which gives the tire’s ratio of height to
width. Numbers of 70 or lower indicate a short sidewall.
D.D:Indicates a diagonal type tire.R:Indicates a radial type tire.
E.16:Indicates the wheel or rim diameter in inches. If you change your
wheel size, you will have to purchase new tires to match the new wheel
diameter.
Location of the Tire Label
You will find a Tire Label containing tire inflation pressure by tire size
and other important information located on the B-Pillar or the edge of
the driver’s door. See the payload description and graphic in theLoad
Carryingchapter.
A
BCDE
Wheels and Tires361
2015 Explorer(exp)
Owners Guide gf, 2nd Printing, September 2014
USA(fus)
Page 364 of 596
on the Safety Compliance Certification Label (affixed to either the door
hinge pillar, door-latch post, or the door edge that meets the door-latch
post, next to the driver’s seating position), or Tire Label which is located
on the B-Pillar or the edge of the driver’s door. The cold inflation
pressure should never be set lower than the recommended pressure on
the Safety Compliance Certification Label or Tire Label.
When weather temperature changes occur, tire inflation pressures also
change. A 10°F (6°C) temperature drop can cause a corresponding drop
of 1 psi (7 kPa) in inflation pressure. Check your tire pressures
frequently and adjust them to the proper pressure which can be found
on the Safety Compliance Certification Label or Tire Label.
To check the pressure in your tire(s):
1. Make sure the tires are cool, meaning they are not hot from driving
even a mile.
Note:If you are checking tire pressure when the tire is hot (for
example, driven more than 1 mile [1.6 kilometers]), never bleed or
reduce air pressure. The tires are hot from driving and it is normal for
pressures to increase above recommended cold pressures. A hot tire at
or below recommended cold inflation pressure could be significantly
under-inflated.
Note:If you have to drive a distance to get air for your tire(s), check
and record the tire pressure first and add the appropriate air pressure
when you get to the pump. It is normal for tires to heat up and the air
pressure inside to go up as you drive.
2. Remove the cap from the valve on one tire, then firmly press the tire
gauge onto the valve and measure the pressure.
3. Add enough air to reach the recommended air pressure.
Note:If you overfill the tire, release air by pressing on the metal stem in
the center of the valve. Then recheck the pressure with your tire gauge.
4. Replace the valve cap.
5. Repeat this procedure for each tire, including the spare.
Note:Some spare tires operate at a higher inflation pressure than the
other tires. For T-type mini-spare tires, see theDissimilar Spare Tire
and Wheel Assembly Informationsection. Store and maintain at 60 psi
(4.15 bar). For full-size and dissimilar spare tires, seeDissimilar Spare
Tire and Wheel Assembly InformationunderChanging a Road Wheel
in this chapter. Store and maintain at the higher of the front and rear
inflation pressure as shown on the Tire Label.
Wheels and Tires363
2015 Explorer(exp)
Owners Guide gf, 2nd Printing, September 2014
USA(fus)
Page 378 of 596
•Ground clearance and parking at curbs
•Winter weather driving capability
•Wet weather driving capability
•All-wheel driving capability (if applicable)
•Load leveling adjustment (if applicable)
When driving with the full-size dissimilar spare tire and wheel assembly,
additional caution should be given to:
•towing a trailer.
•driving vehicles equipped with a camper body.
•driving vehicles with a load on the cargo rack.
Drive cautiously when using a full-size dissimilar spare tire and wheel,
and seek service as soon as possible.
Tire Change Procedure
WARNING:When one of the front wheels is off the ground, the
transmission alone will not prevent the vehicle from moving or
slipping off the jack, even if the transmission is in park (P).
WARNING:To help prevent the vehicle from moving when you
change a tire, be sure to place the transmission in park (P), set
the parking brake and block (in both directions) the wheel that is
diagonally opposite (other side and end of the vehicle) to the tire being
changed.
WARNING:Never get underneath a vehicle that is supported
only by a jack. If the vehicle slips off the jack, you or someone
else could be seriously injured.
WARNING:Do not attempt to change a tire on the side of the
vehicle close to moving traffic. Pull far enough off the road to
avoid the danger of being hit when operating the jack or changing the
wheel.
Wheels and Tires377
2015 Explorer(exp)
Owners Guide gf, 2nd Printing, September 2014
USA(fus)