Page 383 of 596

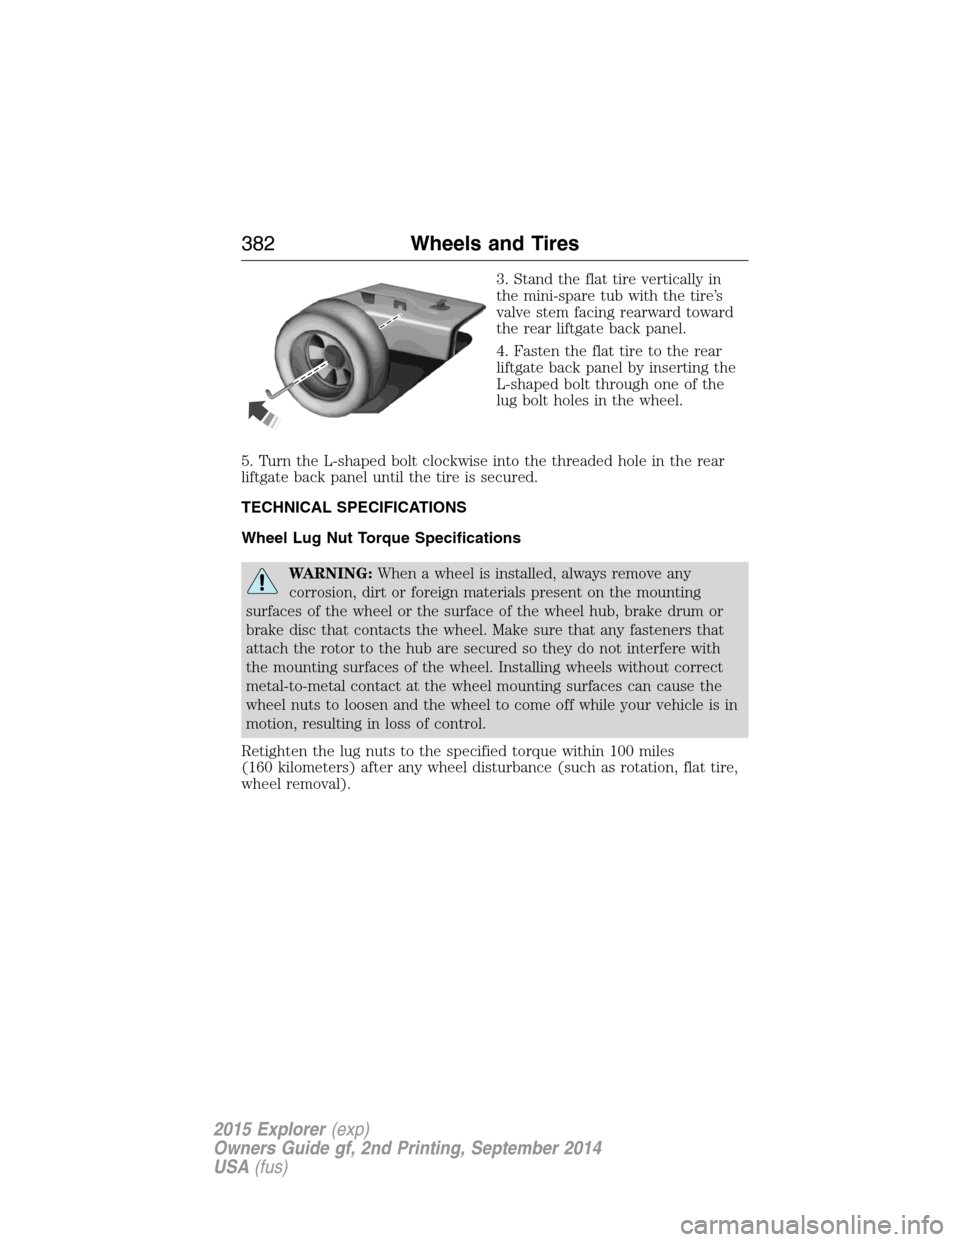
3. Stand the flat tire vertically in
the mini-spare tub with the tire’s
valve stem facing rearward toward
the rear liftgate back panel.
4. Fasten the flat tire to the rear
liftgate back panel by inserting the
L-shaped bolt through one of the
lug bolt holes in the wheel.
5. Turn the L-shaped bolt clockwise into the threaded hole in the rear
liftgate back panel until the tire is secured.
TECHNICAL SPECIFICATIONS
Wheel Lug Nut Torque Specifications
WARNING:When a wheel is installed, always remove any
corrosion, dirt or foreign materials present on the mounting
surfaces of the wheel or the surface of the wheel hub, brake drum or
brake disc that contacts the wheel. Make sure that any fasteners that
attach the rotor to the hub are secured so they do not interfere with
the mounting surfaces of the wheel. Installing wheels without correct
metal-to-metal contact at the wheel mounting surfaces can cause the
wheel nuts to loosen and the wheel to come off while your vehicle is in
motion, resulting in loss of control.
Retighten the lug nuts to the specified torque within 100 miles
(160 kilometers) after any wheel disturbance (such as rotation, flat tire,
wheel removal).
382Wheels and Tires
2015 Explorer(exp)
Owners Guide gf, 2nd Printing, September 2014
USA(fus)
Page 387 of 596
TECHNICAL SPECIFICATIONS
Item CapacityRecommended
Fluids and
LubricantsFord part number / Ford
specification
Brake fluid
1
Between MIN and
MAX on reservoirMotorcraft DOT 4
Low Viscosity High
Performance Motor
Vehicle Brake FluidPM-20 /
WSS-M6C65-A2
Hinges, latches, striker
plates and rotors, seat
tracks, fuel filler door
hinge and spring—Motorcraft
Multi-Purpose Grease
SprayXL-5 /
ESB-M1C93-B
Door weatherstrips —Silicone Spray
LubricantXL-6 /
ESR-M13P4-A
Lock cylinders —Motorcraft
Penetrating and Lock
LubricantXL-1 /
None
386Capacities and Specifications
2015 Explorer(exp)
Owners Guide gf, 2nd Printing, September 2014
USA(fus)
Page 396 of 596

Peace of mind
•Keyless entry keypad
•Cargo shade
•Vehicle security systems
•Locking gas plug
•Wheel locks
•Remote start
•Parking sensors*
*The accessory manufacturer designs, develops and therefore warrants
Ford Licensed Accessories, and does not design or test these accessories
to Ford Motor Company engineering requirements. Contact an
authorized Ford dealer for the manufacturer’s limited warranty details,
and request a copy of the Ford Licensed Accessories product limited
warranty from the accessory manufacturer.
For maximum vehicle performance, keep the following information in
mind when adding accessories or equipment to your vehicle:
•When adding accessories, equipment, passengers and luggage to your
vehicle, do not exceed the total weight capacity of the vehicle or of
the front or rear axle (GVWR or GAWR as indicated on the Safety
Compliance Certification label). Ask an authorized dealer for specific
weight information.
•The Federal Communications Commission (FCC) and Canadian Radio
Telecommunications Commission (CRTC) regulate the use of mobile
communications systems that are equipped with radio transmitters, for
example, two-way radios, telephones and theft alarms. Any such
equipment installed in your vehicle should comply with Federal
Communications Commission (FCC) and Canadian Radio
Telecommunications Commission (CRTC) regulations and should be
installed only by an authorized dealer.
•An authorized dealer needs to install mobile communications systems.
Improper installation may harm the operation of your vehicle,
particularly if the manufacturer did not design the mobile
communication system specifically for automotive use.
•
If you or an authorized Ford dealer add any non-Ford electrical or
electronic accessories or components to your vehicle, you may adversely
affect battery performance and durability. In addition, you may also
adversely affect the performance of other electrical systems in the vehicle.
Accessories395
2015 Explorer(exp)
Owners Guide gf, 2nd Printing, September 2014
USA(fus)
Page 398 of 596

Roadside Assistance
Exclusive 24/7 roadside assistance, including:
•Towing, flat-tire change and battery jump starts
•Out of fuel and lock-out assistance
•Travel expense reimbursement for lodging, meals and rental car
•Destination assistance for taxi, shuttle, rental car coverage and
emergency transportation
Transferable Coverage
If you sell your vehicle before your Ford Extended Service Plan coverage
expires, you can transfer any remaining coverage to the new owner.
Whenever you sell your vehicle, prospective buyers may have a higher
degree of confidence that vehicle was properly maintained with Ford
ESP, thereby improving resale value.
Avoid the Rising Cost of Properly Maintaining Your Vehicle!
Ford Extended Service Plan also offers a Premium Maintenance Plan
that covers all scheduled maintenance, and selected wear items. The
coverage is prepaid, so you never have to worry about affording your
vehicle’s maintenance. It covers regular checkups, routine inspections,
preventive care and replacement of select items that require periodic
attention for normal wear:
•Windshield wiper blades
•Spark plugs (except in California)
•The clutch disc
•Brake pads and linings
•Shock absorbers
•Belts and hoses
•Diesel exhaust fluid replenishment
Contact your selling authorized Ford or Lincoln dealership today so they
can customize a Ford Extended Service Plan that fits your driving
lifestyle and budget.
Extended Service Plan397
2015 Explorer(exp)
Owners Guide gf, 2nd Printing, September 2014
USA(fus)
Page 403 of 596

C.Memory presets:
•In radio mode, store your favorite radio stations. To store a radio
station, tune to the station, then press and hold a preset button until
sound returns.
•In CD mode, press one of these buttons to select a track.
D.Function buttons:Select different functions of the audio system
depending on which mode you are in (such as Radio mode or CD mode).
E.TUNE:
•
In radio mode, turn the control to manually search the frequency band.
•In satellite radio mode, turn the control to tune to the next or previous
channel.
F.Reverse and Fast Forward; AM/FM/CD Seek:
•In radio mode, select a frequency band and press one of these
buttons. The system stops at the first station it finds in that direction.
Press and hold one of these buttons to move quickly in that direction
to the next strong radio station or memory preset.
•In Sirius mode, press one of these buttons to select the previous or
next channel. If you select a specific category (such as Jazz, Rock or
News), use these buttons to find the previous or next channel in the
selected category. Press and hold one of these buttons to move
quickly in that direction to the next channel or category.
•In CD mode, press one of these buttons to select the previous or next
track. Press and hold one of these buttons to move quickly in that
direction within the current track.
G.OK and arrow buttons:
•Press the up and down or left and right arrow buttons to browse
menu selections.
•PressOKto confirm menu selections.
H.Eject:Press this button to eject a CD.
I.Power and Volume:
•Press this button to switch the system off and on.
•Turn it to adjust the volume.
J.CLOCK:Press this button to access the clock setting. Use the center
arrow controls to change the hours and minutes.
K.SOUND:Press this button to adjust settings for Treble, Midrange,
Bass, Balance and Fade.
L.MENU:Press this button to access different audio system features.
SeeMenu structurelater in this section.
402Audio System
2015 Explorer(exp)
Owners Guide gf, 2nd Printing, September 2014
USA(fus)
Page 404 of 596

M.PHONE:Press this button to access the phone features of the SYNC
system. See theSYNCchapter for more information.
N.AUX:Press this button to access your auxiliary input jack or switch
between devices you plug into the input jack or USB port. SeeAuxiliary
input jacklater in this chapter.
O.SIRIUS:Press this button to listen to Sirius satellite radio.
Menu Structure
Note:Depending on your system, some options may appear slightly
different.
PressMENU.
Press the up and down arrow buttons to scroll through the options.
Press the right arrow to enter a menu. Press the left arrow to exit a
menu.
PressOKto confirm a selection.
Radio Settings
ScanSelect for a brief sampling of all available
channels.
RBDS/RDS TextSelect to view additional broadcast data, if
available. This feature defaults to off. RBDS
must be on for you to set a category.
SIRIUS
ScanSelect for a brief sampling of all available
channels.
Show ESNSelect to view your satellite radio electronic
serial number (ESN). You need this number
when communicating with Sirius to activate,
modify or track your account.
Channel GuideSelect to view available satellite radio
channels. PressOKtoopenalistofthe
following options for this channel: Tune
Channel, Skip Channel or Lock Channel. Once
you skip or lock a channel, you can only access
it by pressing Direct and entering the channel
number. Locking or unlocking a channel
requires your PIN.
Audio System403
2015 Explorer(exp)
Owners Guide gf, 2nd Printing, September 2014
USA(fus)
Page 405 of 596

SIRIUS
Set CategorySelect to view channel categories (such as
Pop, Rock or News). If you select a category,
seek and scan functions only stop on channels
in that category.
AlertsSelect to turn off or turn on alerts for songs,
artists or teams. The system alerts you when
the selection is playing on another channel.
Save up to 20 alerts.
Unlock All StationsUse your PIN to unlock previously locked
stations.
Skip No StationsRemove the skip feature from all the channels
you previously skipped.
Parental Lock (PIN)Select to create a PIN, which allows you to
lock or unlock channels. Your initial PIN is
1234.
Audio Settings
Speed Compensated
VolumeAutomatically adjusts the volume to
compensate for speed and wind noise. You can
set the system between 0 and +7.
SoundSelect to adjust settings for Treble, Midrange,
Bass, Fade and Balance.
CD Settings
Scan AllSelect to scan all disc selections.
Scan FolderSelect to scan all music in the current MP3
folder.
CD CompressionSelect to bring soft and loud passages together
for a more consistent listening level.
404Audio System
2015 Explorer(exp)
Owners Guide gf, 2nd Printing, September 2014
USA(fus)
Page 406 of 596
Clock Settings
Set TimeSelect to set the time.
Set DateSelect to set the calendar date.
24h ModeSelect to view clock time in a 12–hour mode or
24–hour mode.
Display Settings
DimmingSelect to change display brightness.
LanguageSelect to display the language in English,
French or Spanish.
Temp. SettingSelect to display the outside temperature in
Fahrenheit or Celsius.
Audio System405
2015 Explorer(exp)
Owners Guide gf, 2nd Printing, September 2014
USA(fus)