Page 324 of 596

3. With the parking brake engaged and your foot on the brake pedal,
start the engine and move the gearshift lever through all of the gear
ranges. Allow a minimum of 10 seconds for each gear to engage.
4. Latch the gearshift lever inP(Park) and leave the engine running.
5. Remove the dipstick, wiping it clean with a clean, dry lintfree rag. If
necessary, refer toUnder hood overviewin this chapter for the location
of the dipstick. (For vehicles with the EcoBoost engine, move the air
filter assembly aside to access the transmission dipstick. SeeMoving the
Air Filter Assembly (EcoBoost engine)for more information.
6. Install the dipstick making sure it is fully seated in the filler tube by
turning it to the locked position.
7. Remove the dipstick and inspect the fluid level. The fluid should be in
the designated areas for normal operating temperature.
Moving the Air Filter Assembly (EcoBoost engine)
WARNING:Do not run engine with the air filter disconnected.
1. Shut the engine off.
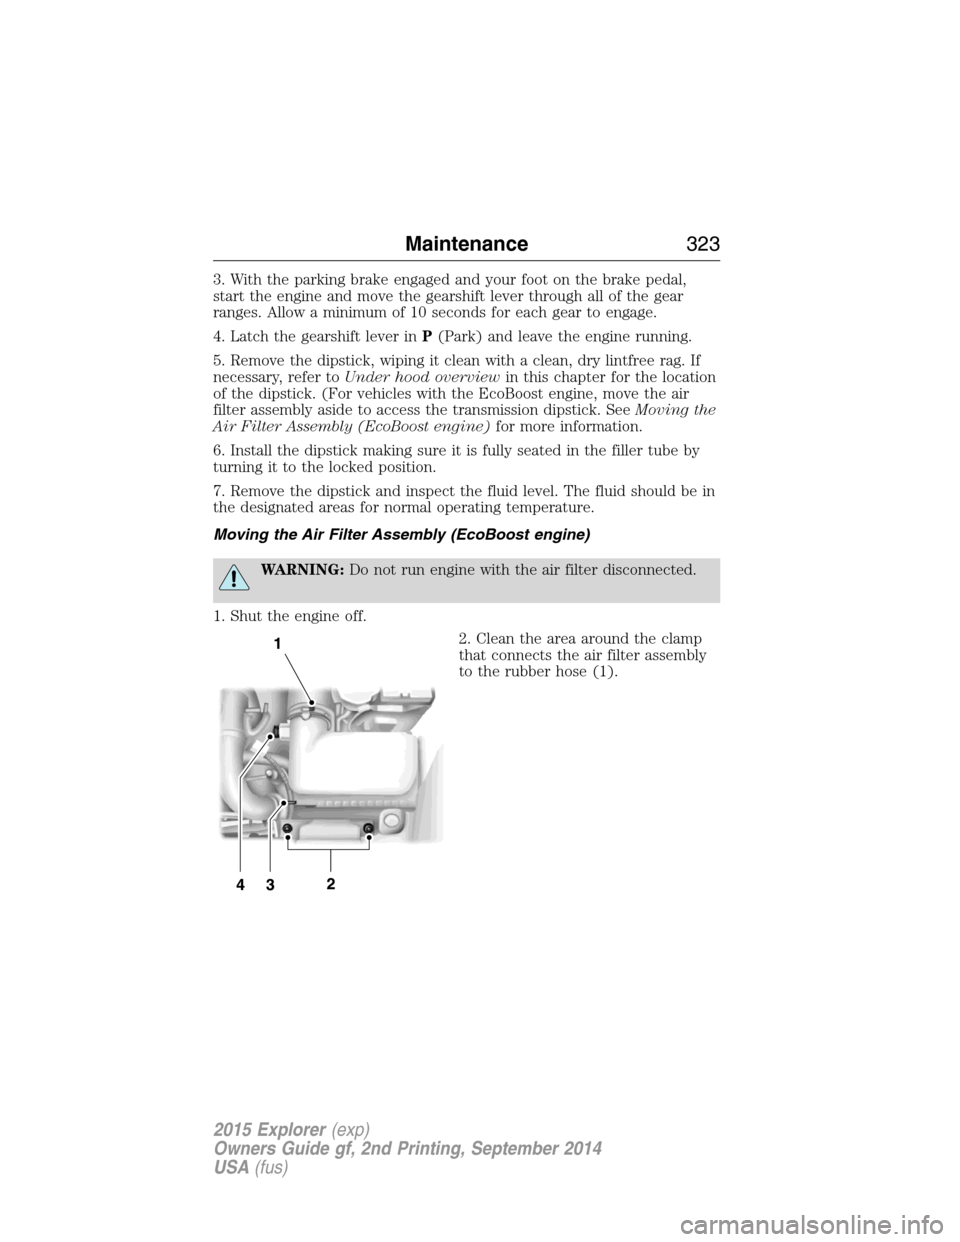
2. Clean the area around the clamp
that connects the air filter assembly
to the rubber hose (1).
Maintenance323
2015 Explorer(exp)
Owners Guide gf, 2nd Printing, September 2014
USA(fus)
Page 325 of 596
3. Remove the bolt cover (if
equipped).
4. Remove two bolts that attach the air filter assembly to the front of the
vehicle (2).
5. Loosen the clamp holding the air filter assembly to the rubber hose
(1).
6. Remove the harness retaining clip by pulling up (3). Do not
disconnect the sensor (4).
7. Without disconnecting the sensor (4), pull the air filter assembly up to
disconnect the air filter assembly from the seated grommets located
underneath the air filter assembly.
8. Rotate the air filter assembly 90
degrees counterclockwise and
reinstall into the rubber hose.
9. Tighten the clamp (1).
10. The transmission fluid level indicator can now be accessed.
324Maintenance
2015 Explorer(exp)
Owners Guide gf, 2nd Printing, September 2014
USA(fus)
Page 327 of 596

If an overfill occurs, excess fluid
should be removed by an authorized
dealer.
Note:An overfill condition of transmission fluid may cause shift and/or
engagement concerns and/or possible damage.
Do not use supplemental transmission fluid additives, treatments or
cleaning agents. The use of these materials may affect transmission
operation and result in damage to internal transmission components.
For vehicles equipped with the EcoBoost engine, reinstall the air filter
assembly.
After the fluid level has been checked and adjusted as necessary, do the
following:
1. Shut the engine off.
2. Loosen the clamp holding the air filter assembly to the rubber hose.
3. Rotate the air filter assembly 90 degrees clockwise without
disconnecting the sensor.
4. Seat the air filter assembly back into the grommets by pushing down
on the air filter assembly.
5. Tighten the clamp.
6. Install and tighten two bolts that attach air filter assembly to the front
of the vehicle.
7. Install the bolt cover (if equipped).
8. Reinstall the harness retaining clip into the front of the air filter
assembly.
BRAKE FLUID CHECK
Fluid levels between the MIN and MAX lines are within the normal
operating range; there is no need to add fluid. If the fluid levels are
outside of the normal operating range, the performance of the system
could be compromised; seek service from your authorized dealer
immediately.
POWER STEERING FLUID CHECK
Your vehicle is equipped with an electric power steering (EPS) system.
There is no fluid reservoir to check or fill. For additional information on
the electric power steering (EPS) system, Refer toDriving Aids.MAX MIN
326Maintenance
2015 Explorer(exp)
Owners Guide gf, 2nd Printing, September 2014
USA(fus)
Page 330 of 596

•The vehicle may need to be driven to relearn the idle and fuel trim
strategy.
•Note:If you do not allow the engine to relearn its idle trim, the idle
quality of your vehicle may be adversely affected until the idle trim is
eventually relearned.
When the battery is disconnected or a new battery installed, the
transmission must relearn its adaptive strategy. As a result of this, the
transmission may shift firmly. This operation is considered normal and
will not affect function or durability of the transmission. Over time the
adaptive learning process will fully update transmission operation to its
optimum shift feel.
If the battery has been disconnected or a new battery has been installed,
the clock and the preset radio stations must be reset once the battery is
reconnected.
Always dispose of automotive batteries in a responsible manner. Follow
your local authorized standards for disposal. Call your local authorized
recycling center to find out more about recycling automotive batteries.
Battery management system
The battery management system (BMS) monitors battery conditions and
takes actions to extend battery life. If excessive battery drain is
detected, the system may temporarily disable certain electrical features
to protect the battery. Those electrical accessories affected include rear
defrost, heated/cooled seats, climate control fan, heated steering wheel,
audio and navigation system. A message may be displayed on the
instrument cluster or center stack display to alert the driver that battery
protection actions are active. See theInformation displaysin the
Instrument ClusterandEntertainment Systemschapters for more
information. These messages are only for notification that an action is
taking place, and do not necessarily indicate that an electrical problem
exists or that the battery requires replacement.
Electrical accessory installation
To ensure proper operation of the BMS, any electrical devices that are
added to the vehicle should not have their ground connection made
directly at the negative battery post. A connection at the negative
battery post can cause inaccurate measurements of the battery condition
and potential incorrect system operation.
Note:Electrical or electronic accessories added to the vehicle by the
dealer or the owner may adversely affect battery performance and
durability and may also affect the performance of other electrical
systems in the vehicle.
Maintenance329
2015 Explorer(exp)
Owners Guide gf, 2nd Printing, September 2014
USA(fus)
Page 331 of 596

When a battery replacement is required, the battery should be replaced
with a Ford recommended replacement battery that matches the
electrical requirements of the vehicle. After battery replacement, or in
some cases after charging the battery with an external charger, the BMS
requires eight hours of vehicle sleep time (key off with doors closed) to
relearn the new battery state of charge. Prior to relearning state of
charge, the BMS may disable electrical features (to protect the battery)
earlier than normal.
CHECKING THE WIPER BLADES
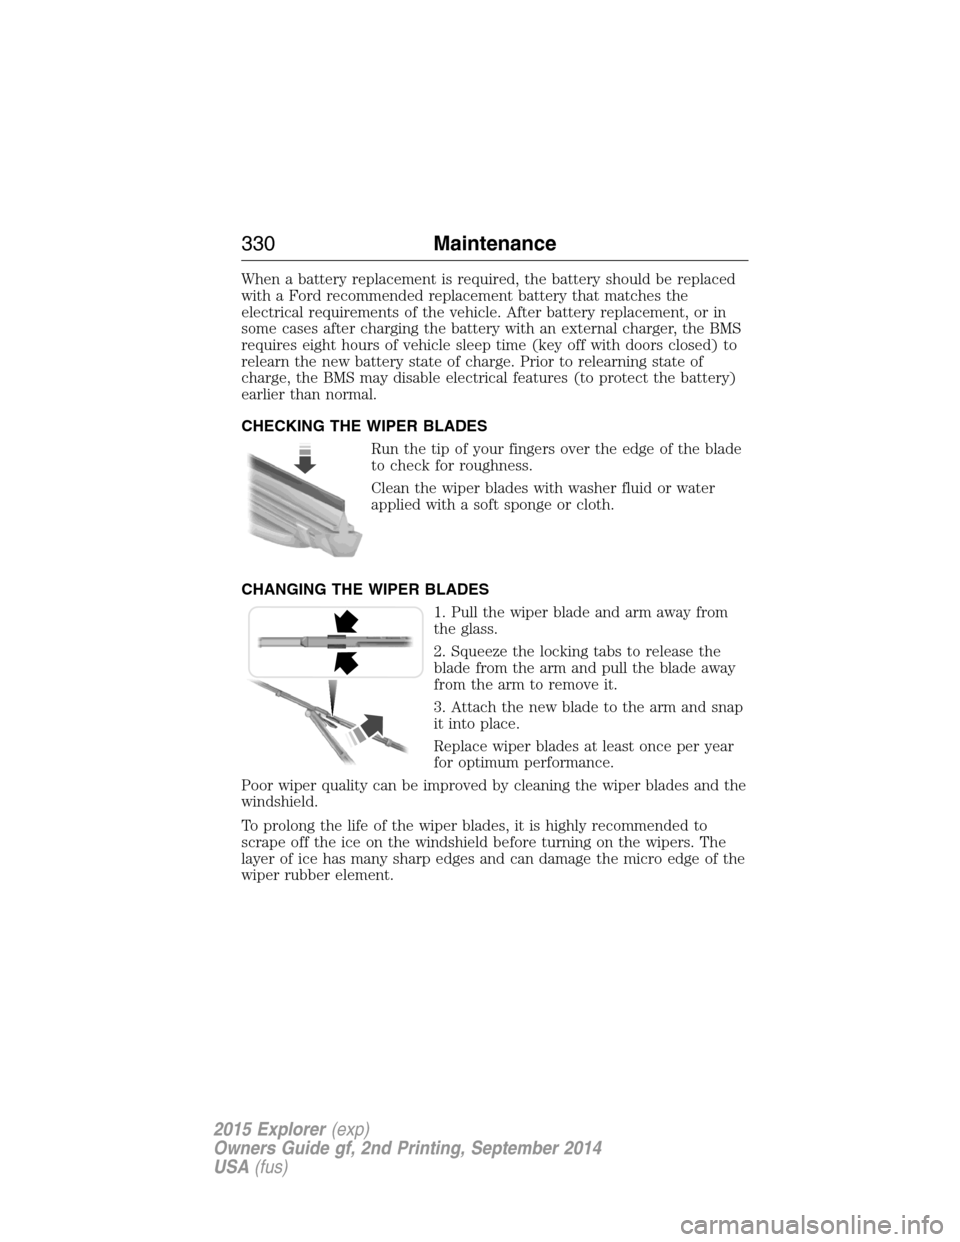
Run the tip of your fingers over the edge of the blade
to check for roughness.
Clean the wiper blades with washer fluid or water
applied with a soft sponge or cloth.
CHANGING THE WIPER BLADES
1. Pull the wiper blade and arm away from
the glass.
2. Squeeze the locking tabs to release the
blade from the arm and pull the blade away
from the arm to remove it.
3. Attach the new blade to the arm and snap
it into place.
Replace wiper blades at least once per year
for optimum performance.
Poor wiper quality can be improved by cleaning the wiper blades and the
windshield.
To prolong the life of the wiper blades, it is highly recommended to
scrape off the ice on the windshield before turning on the wipers. The
layer of ice has many sharp edges and can damage the micro edge of the
wiper rubber element.
330Maintenance
2015 Explorer(exp)
Owners Guide gf, 2nd Printing, September 2014
USA(fus)
Page 334 of 596

7. Lower the driver’s side of the cover and slide the
three tabs on the cover into the three slots in the
housing.
8. Lower the passenger’s side of the cover. Engage
the two clamps to secure the cover to the housing.
ADJUSTING THE HEADLAMPS
The headlamps on your vehicle are properly aimed at the assembly plant.
If your vehicle has been in an accident, an authorized dealer should
check the alignment of your headlamps.
Vertical Aim Adjustment
The headlamps on your vehicle can only be vertically adjusted. Your
vehicle does not require horizontal aim adjustments.
To adjust the headlamps:
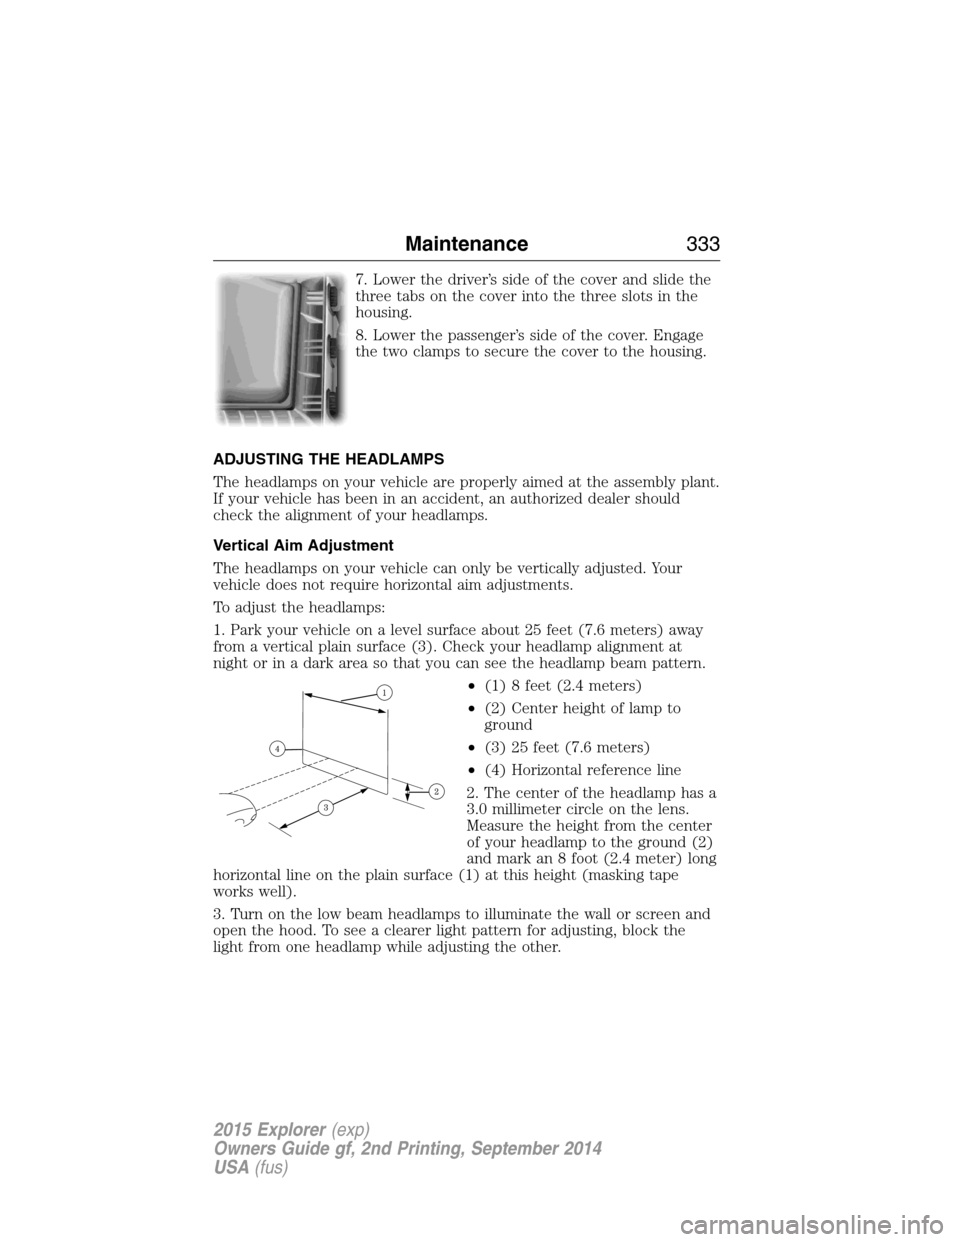
1. Park your vehicle on a level surface about 25 feet (7.6 meters) away
from a vertical plain surface (3). Check your headlamp alignment at
night or in a dark area so that you can see the headlamp beam pattern.
•(1) 8 feet (2.4 meters)
•(2) Center height of lamp to
ground
•(3) 25 feet (7.6 meters)
•(4) Horizontal reference line
2. The center of the headlamp has a
3.0 millimeter circle on the lens.
Measure the height from the center
of your headlamp to the ground (2)
and mark an 8 foot (2.4 meter) long
horizontal line on the plain surface (1) at this height (masking tape
works well).
3. Turn on the low beam headlamps to illuminate the wall or screen and
open the hood. To see a clearer light pattern for adjusting, block the
light from one headlamp while adjusting the other.
Maintenance333
2015 Explorer(exp)
Owners Guide gf, 2nd Printing, September 2014
USA(fus)
Page 335 of 596
For vehicles with halogen headlamps:
On the wall or screen you will
observe a flat zone of high intensity
light located at the top of the right
hand portion of the beam pattern. If
the top edge of the high intensity
light zone is not at the horizontal
reference line, the headlamp will
need to be adjusted.
For vehicles with HID headlamps:
There is a distinct cut-off (change
from light to dark) in the left
portion of the beam pattern. The
top edge of this cut-off should be
positioned two inches (50.8
millimeters) below the horizontal
reference line.
4. Open the hood.
5. Locate the vertical adjuster for
each headlamp. Using a Phillips #2
screwdriver, turn the adjuster
control either clockwise or
counterclockwise in order to adjust
the vertical aim of the headlamp.
Note:HORIZONTAL AIMING IS
NOT REQUIRED FOR THIS
VEHICLE AND IS
NON-ADJUSTABLE.
334Maintenance
2015 Explorer(exp)
Owners Guide gf, 2nd Printing, September 2014
USA(fus)
Page 337 of 596
3. Remove the bulb cover.
4. Turn the bulb base counterclockwise and remove
it.
5. Disconnect the electrical connector.
Reverse steps to reinstall bulb(s).
Replacing HID headlamp bulbs (if equipped)
The headlamps on your vehicle use a “high intensity discharge” source.
These lamps operate at a high voltage. When the bulb is burned out, the
bulb and starter capsule assembly must be replaced by your authorized
dealer.
336Maintenance
2015 Explorer(exp)
Owners Guide gf, 2nd Printing, September 2014
USA(fus)