2015 FORD EXPLORER inflation pressure
[x] Cancel search: inflation pressurePage 47 of 596

3. Wait 10 seconds after the safety belt warning light turns off.
•Step 4 must be completed within 20 seconds after the completion of
Step 3.
4. For the seating position being disabled, buckle then unbuckle the
safety belt three times at a moderate speed, ending in the unbuckled
state.
•After Step 4, the safety belt warning light will be turned on for three
seconds.
5. Within about seven seconds of the light turning off, buckle then
unbuckle the safety belt.
•This will disable the feature for that seating position if it is currently
enabled.
•This will enable the feature for that seating position if it is currently
disabled.
REAR INFLATABLE SAFETY BELT (IF EQUIPPED)
WARNING:Do not attempt to service, repair, or modify the rear
inflatable safety belt as you could be seriously injured or killed.
Note:The rear inflatable safety belts are compatible with most infant
and child safety car seats and belt positioning booster seats when
properly installed. This is because they are designed to fill with a cool
gas at a lower pressure and at a slower rate than traditional airbags.
After inflation, the shoulder portion of the safety belt remains cool to the
touch.
The rear inflatable safety belts are located in the shoulder portion of the
safety belts of the second-row outboard seating positions.
The rear inflatable safety belt consists of the following:
•An inflatable bag located in the shoulder safety belt webbing.
•Lap safety belt webbing with automatic locking mode.
•Crash sensors and monitoring system with readiness
indicator.
SeeCrash Sensors and Airbag Indicatorin theSupplemental
Restraint Systemchapter.
46Safety Belts
2015 Explorer(exp)
Owners Guide gf, 2nd Printing, September 2014
USA(fus)
Page 254 of 596
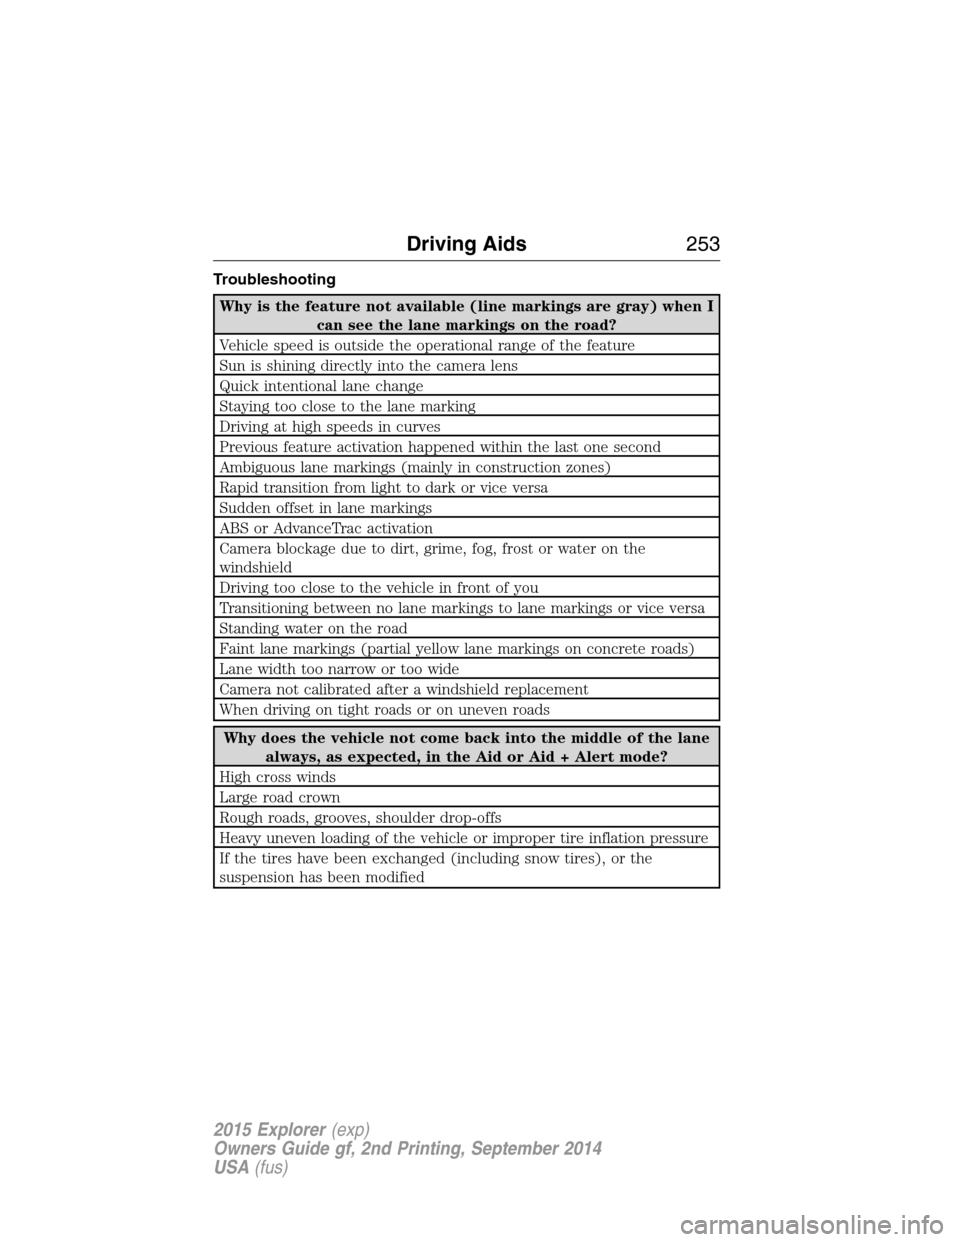
Troubleshooting
Why is the feature not available (line markings are gray) when I
can see the lane markings on the road?
Vehicle speed is outside the operational range of the feature
Sun is shining directly into the camera lens
Quick intentional lane change
Staying too close to the lane marking
Driving at high speeds in curves
Previous feature activation happened within the last one second
Ambiguous lane markings (mainly in construction zones)
Rapid transition from light to dark or vice versa
Sudden offset in lane markings
ABS or AdvanceTrac activation
Camera blockage due to dirt, grime, fog, frost or water on the
windshield
Driving too close to the vehicle in front of you
Transitioning between no lane markings to lane markings or vice versa
Standing water on the road
Faint lane markings (partial yellow lane markings on concrete roads)
Lane width too narrow or too wide
Camera not calibrated after a windshield replacement
When driving on tight roads or on uneven roads
Why does the vehicle not come back into the middle of the lane
always, as expected, in the Aid or Aid + Alert mode?
High cross winds
Large road crown
Rough roads, grooves, shoulder drop-offs
Heavy uneven loading of the vehicle or improper tire inflation pressure
If the tires have been exchanged (including snow tires), or the
suspension has been modified
Driving Aids253
2015 Explorer(exp)
Owners Guide gf, 2nd Printing, September 2014
USA(fus)
Page 351 of 596
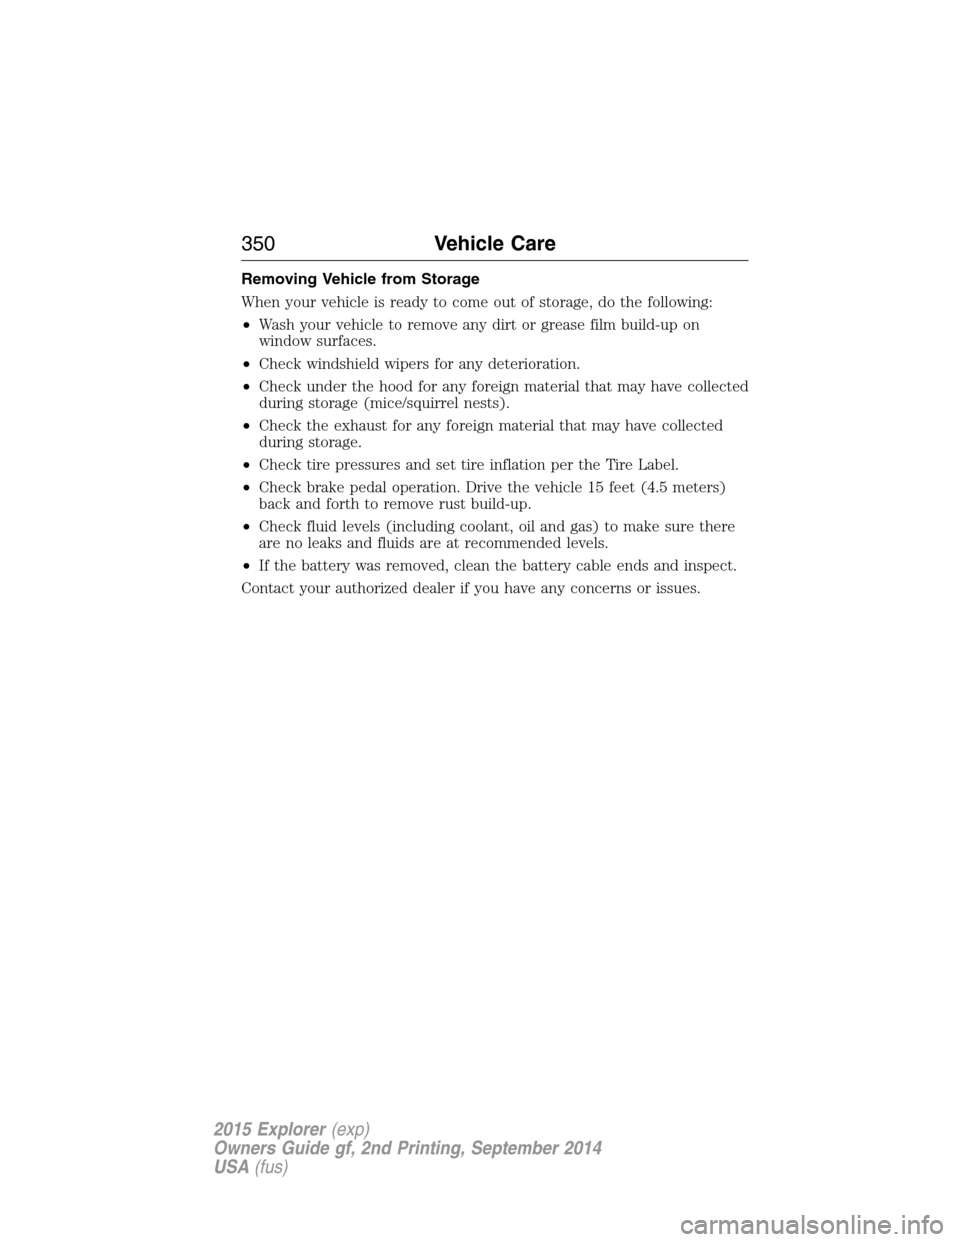
Removing Vehicle from Storage
When your vehicle is ready to come out of storage, do the following:
•Wash your vehicle to remove any dirt or grease film build-up on
window surfaces.
•Check windshield wipers for any deterioration.
•Check under the hood for any foreign material that may have collected
during storage (mice/squirrel nests).
•Check the exhaust for any foreign material that may have collected
during storage.
•Check tire pressures and set tire inflation per the Tire Label.
•Check brake pedal operation. Drive the vehicle 15 feet (4.5 meters)
back and forth to remove rust build-up.
•Check fluid levels (including coolant, oil and gas) to make sure there
are no leaks and fluids are at recommended levels.
•If the battery was removed, clean the battery cable ends and inspect.
Contact your authorized dealer if you have any concerns or issues.
350Vehicle Care
2015 Explorer(exp)
Owners Guide gf, 2nd Printing, September 2014
USA(fus)
Page 355 of 596
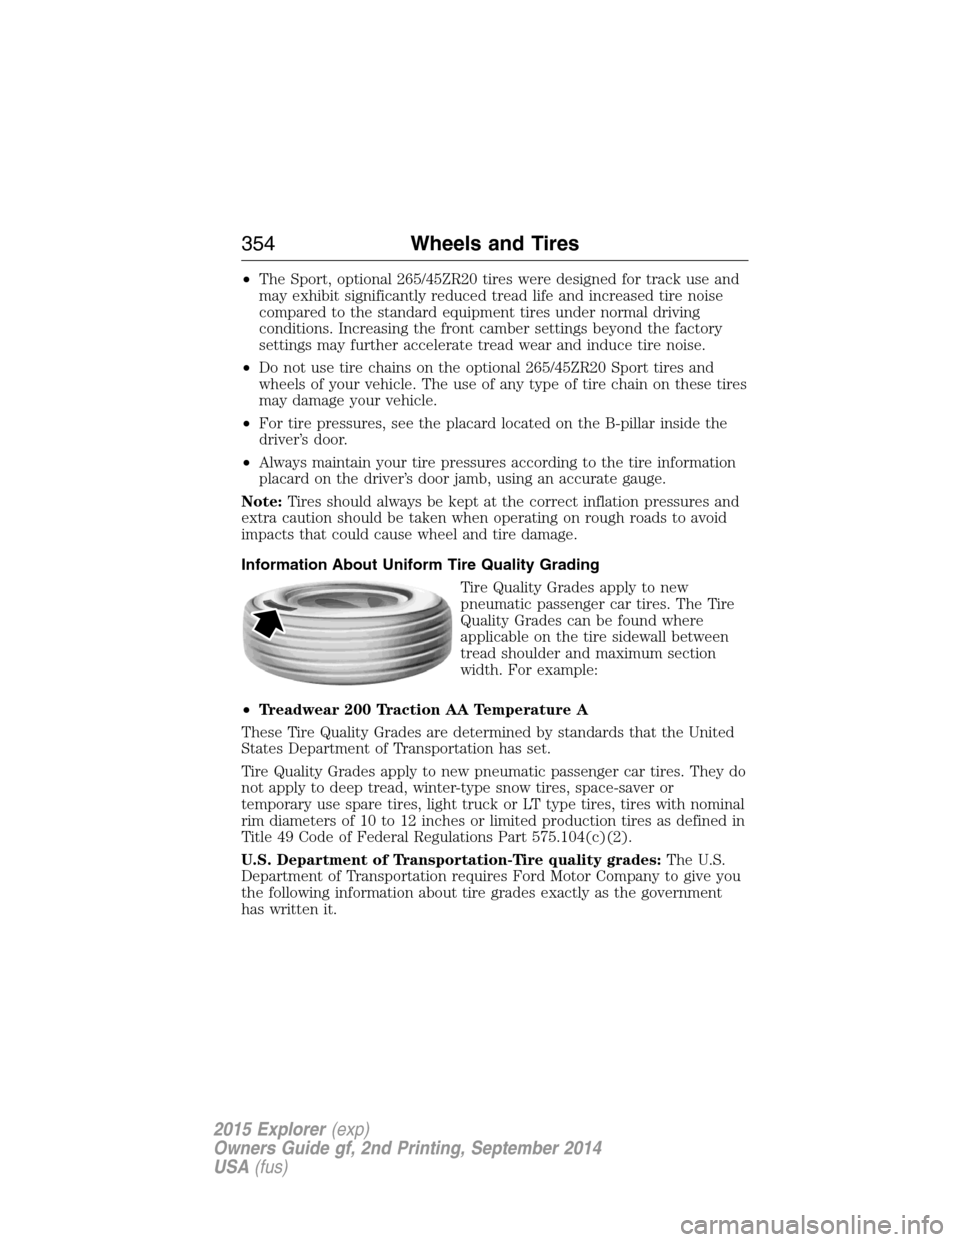
•The Sport, optional 265/45ZR20 tires were designed for track use and
may exhibit significantly reduced tread life and increased tire noise
compared to the standard equipment tires under normal driving
conditions. Increasing the front camber settings beyond the factory
settings may further accelerate tread wear and induce tire noise.
•Do not use tire chains on the optional 265/45ZR20 Sport tires and
wheels of your vehicle. The use of any type of tire chain on these tires
may damage your vehicle.
•For tire pressures, see the placard located on the B-pillar inside the
driver’s door.
•Always maintain your tire pressures according to the tire information
placard on the driver’s door jamb, using an accurate gauge.
Note:Tires should always be kept at the correct inflation pressures and
extra caution should be taken when operating on rough roads to avoid
impacts that could cause wheel and tire damage.
Information About Uniform Tire Quality Grading
Tire Quality Grades apply to new
pneumatic passenger car tires. The Tire
Quality Grades can be found where
applicable on the tire sidewall between
tread shoulder and maximum section
width. For example:
•Treadwear 200 Traction AA Temperature A
These Tire Quality Grades are determined by standards that the United
States Department of Transportation has set.
Tire Quality Grades apply to new pneumatic passenger car tires. They do
not apply to deep tread, winter-type snow tires, space-saver or
temporary use spare tires, light truck or LT type tires, tires with nominal
rim diameters of 10 to 12 inches or limited production tires as defined in
Title 49 Code of Federal Regulations Part 575.104(c)(2).
U.S. Department of Transportation-Tire quality grades:The U.S.
Department of Transportation requires Ford Motor Company to give you
the following information about tire grades exactly as the government
has written it.
354Wheels and Tires
2015 Explorer(exp)
Owners Guide gf, 2nd Printing, September 2014
USA(fus)
Page 357 of 596
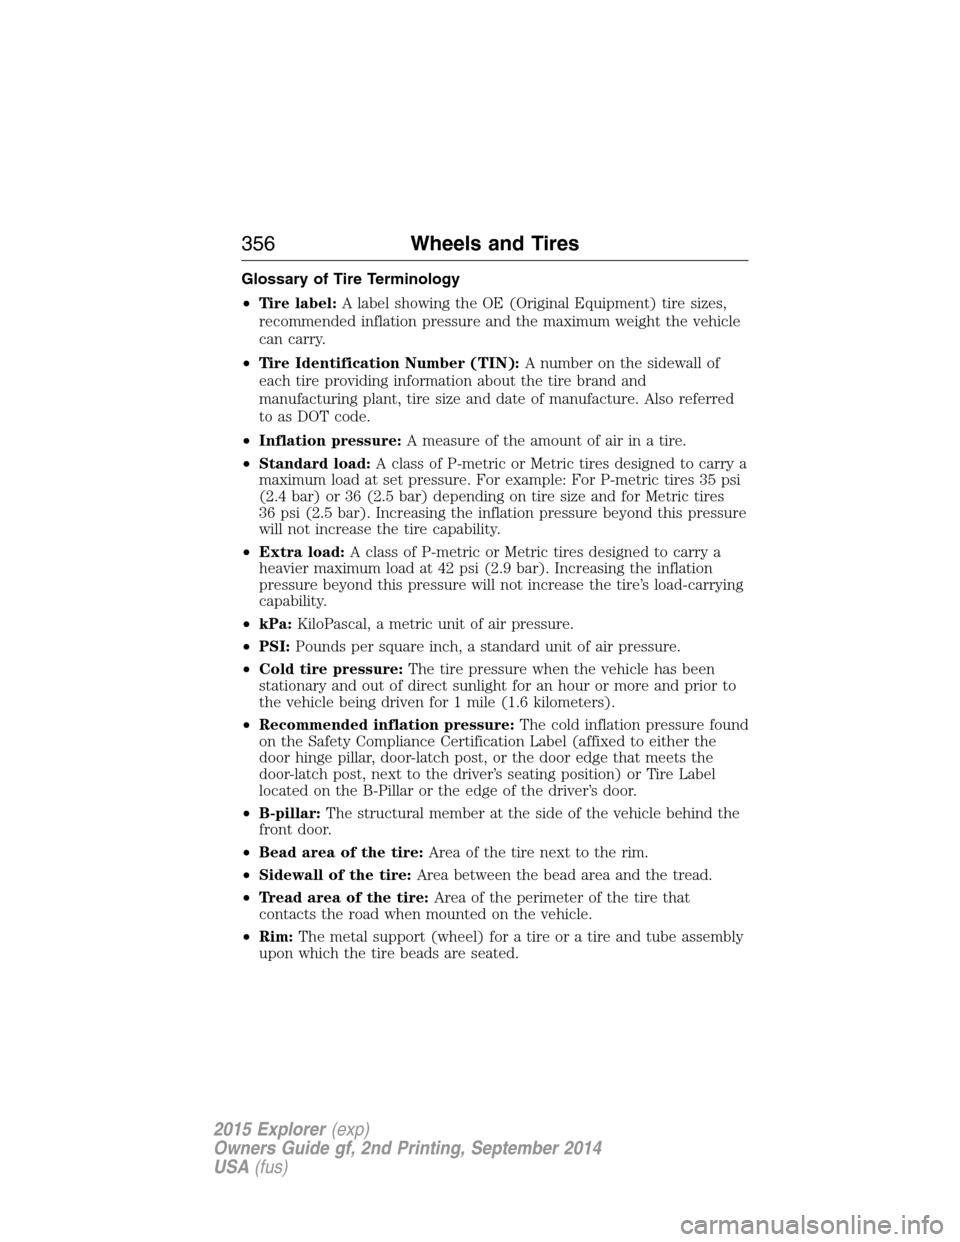
Glossary of Tire Terminology
•Tire label:A label showing the OE (Original Equipment) tire sizes,
recommended inflation pressure and the maximum weight the vehicle
can carry.
•Tire Identification Number (TIN):A number on the sidewall of
each tire providing information about the tire brand and
manufacturing plant, tire size and date of manufacture. Also referred
to as DOT code.
•Inflation pressure:A measure of the amount of air in a tire.
•Standard load:A class of P-metric or Metric tires designed to carry a
maximum load at set pressure. For example: For P-metric tires 35 psi
(2.4 bar) or 36 (2.5 bar) depending on tire size and for Metric tires
36 psi (2.5 bar). Increasing the inflation pressure beyond this pressure
will not increase the tire capability.
•Extra load:A class of P-metric or Metric tires designed to carry a
heavier maximum load at 42 psi (2.9 bar). Increasing the inflation
pressure beyond this pressure will not increase the tire’s load-carrying
capability.
•kPa:KiloPascal, a metric unit of air pressure.
•PSI:Pounds per square inch, a standard unit of air pressure.
•Cold tire pressure:The tire pressure when the vehicle has been
stationary and out of direct sunlight for an hour or more and prior to
the vehicle being driven for 1 mile (1.6 kilometers).
•Recommended inflation pressure:The cold inflation pressure found
on the Safety Compliance Certification Label (affixed to either the
door hinge pillar, door-latch post, or the door edge that meets the
door-latch post, next to the driver’s seating position) or Tire Label
located on the B-Pillar or the edge of the driver’s door.
•B-pillar:The structural member at the side of the vehicle behind the
front door.
•Bead area of the tire:Area of the tire next to the rim.
•Sidewall of the tire:Area between the bead area and the tread.
•Tread area of the tire:Area of the perimeter of the tire that
contacts the road when mounted on the vehicle.
•Rim:The metal support (wheel) for a tire or a tire and tube assembly
upon which the tire beads are seated.
356Wheels and Tires
2015 Explorer(exp)
Owners Guide gf, 2nd Printing, September 2014
USA(fus)
Page 359 of 596
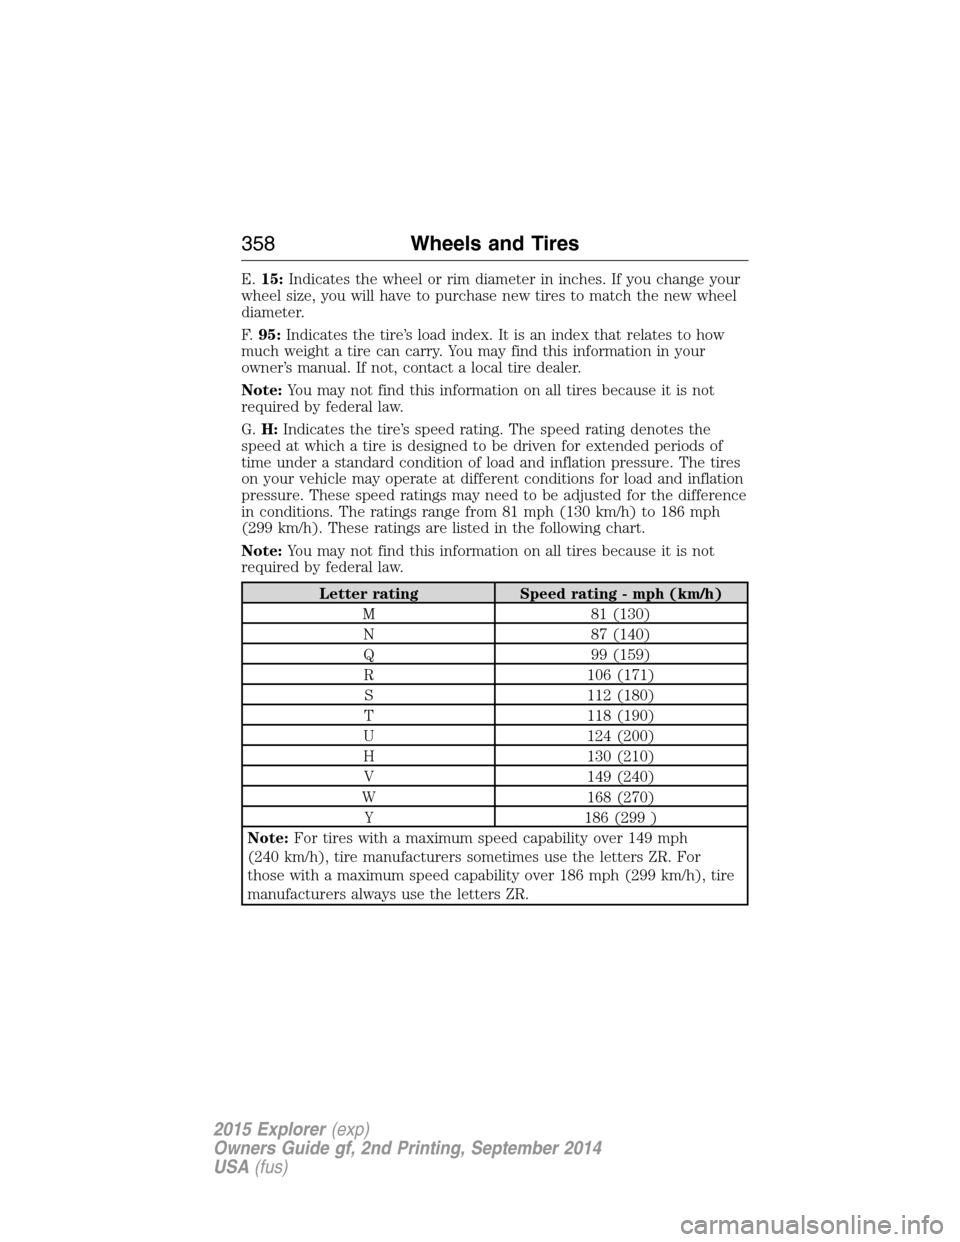
E.15:Indicates the wheel or rim diameter in inches. If you change your
wheel size, you will have to purchase new tires to match the new wheel
diameter.
F.95:Indicates the tire’s load index. It is an index that relates to how
much weight a tire can carry. You may find this information in your
owner’s manual. If not, contact a local tire dealer.
Note:You may not find this information on all tires because it is not
required by federal law.
G.H:Indicates the tire’s speed rating. The speed rating denotes the
speed at which a tire is designed to be driven for extended periods of
time under a standard condition of load and inflation pressure. The tires
on your vehicle may operate at different conditions for load and inflation
pressure. These speed ratings may need to be adjusted for the difference
in conditions. The ratings range from 81 mph (130 km/h) to 186 mph
(299 km/h). These ratings are listed in the following chart.
Note:You may not find this information on all tires because it is not
required by federal law.
Letter rating Speed rating - mph (km/h)
M 81 (130)
N 87 (140)
Q 99 (159)
R 106 (171)
S 112 (180)
T 118 (190)
U 124 (200)
H 130 (210)
V 149 (240)
W 168 (270)
Y 186 (299 )
Note:For tires with a maximum speed capability over 149 mph
(240 km/h), tire manufacturers sometimes use the letters ZR. For
those with a maximum speed capability over 186 mph (299 km/h), tire
manufacturers always use the letters ZR.
358Wheels and Tires
2015 Explorer(exp)
Owners Guide gf, 2nd Printing, September 2014
USA(fus)
Page 361 of 596
M.Maximum Inflation Pressure:Indicates the tire manufacturer’s
maximum permissible pressure or the pressure at which the maximum
load can be carried by the tire. This pressure is normally higher than the
vehicle manufacturer’s recommended cold inflation pressure, which can
be found on the Safety Compliance Certification Label (affixed to either
the door hinge pillar, door-latch post, or the door edge that meets the
door-latch post, next to the driver’s seating position), or Tire Label which
is located on the B-Pillar or the edge of the driver’s door. The cold
inflation pressure should never be set lower than the recommended
pressure on the vehicle label.
The tire suppliers may have additional markings, notes or warnings, such
as standard load or radial tubeless.
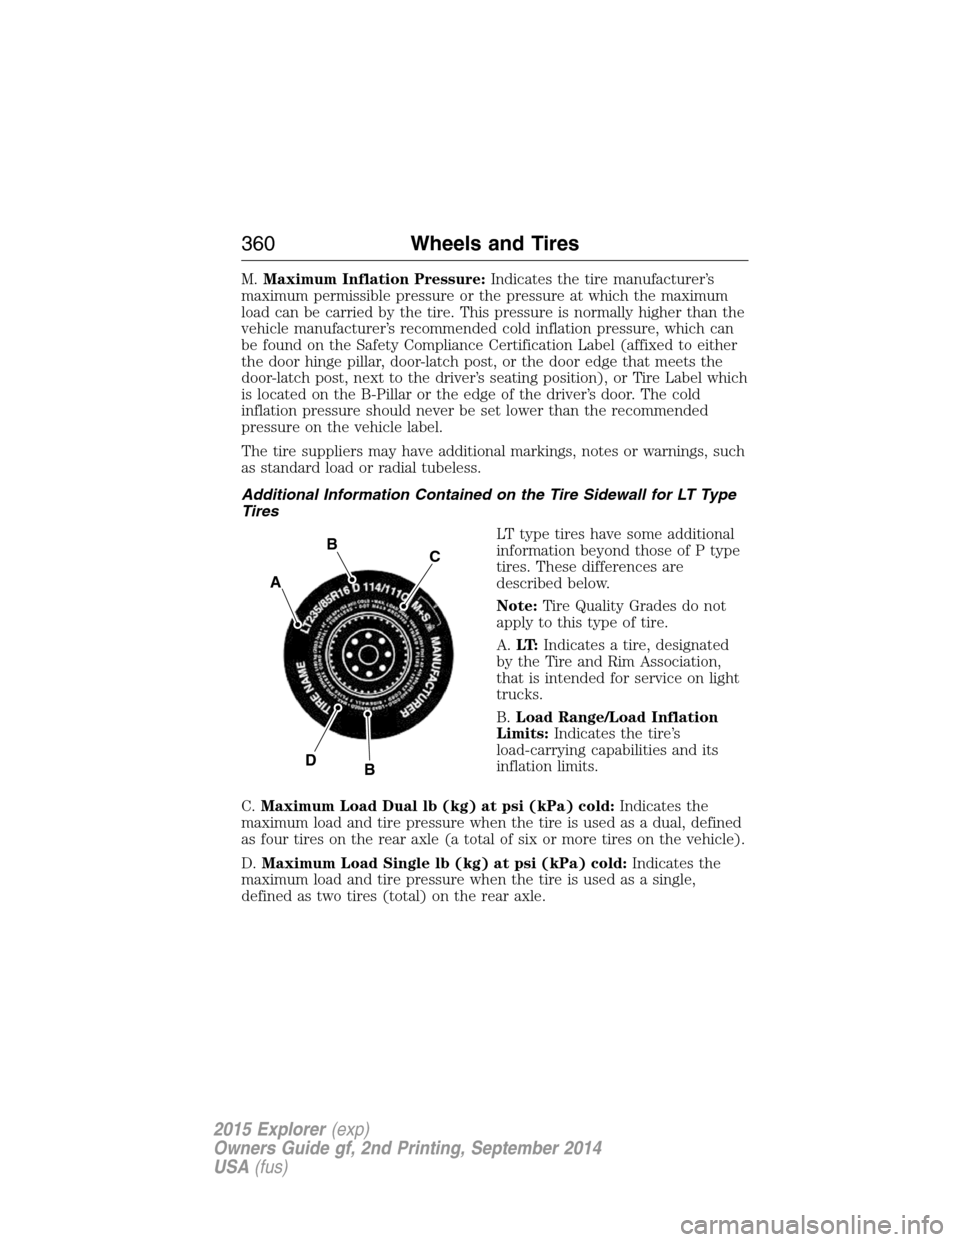
Additional Information Contained on the Tire Sidewall for LT Type
Tires
LT type tires have some additional
information beyond those of P type
tires. These differences are
described below.
Note:Tire Quality Grades do not
apply to this type of tire.
A.LT:Indicates a tire, designated
by the Tire and Rim Association,
that is intended for service on light
trucks.
B.Load Range/Load Inflation
Limits:Indicates the tire’s
load-carrying capabilities and its
inflation limits.
C.Maximum Load Dual lb (kg) at psi (kPa) cold:Indicates the
maximum load and tire pressure when the tire is used as a dual, defined
as four tires on the rear axle (a total of six or more tires on the vehicle).
D.Maximum Load Single lb (kg) at psi (kPa) cold:Indicates the
maximum load and tire pressure when the tire is used as a single,
defined as two tires (total) on the rear axle.
A
BC
BD
360Wheels and Tires
2015 Explorer(exp)
Owners Guide gf, 2nd Printing, September 2014
USA(fus)
Page 362 of 596
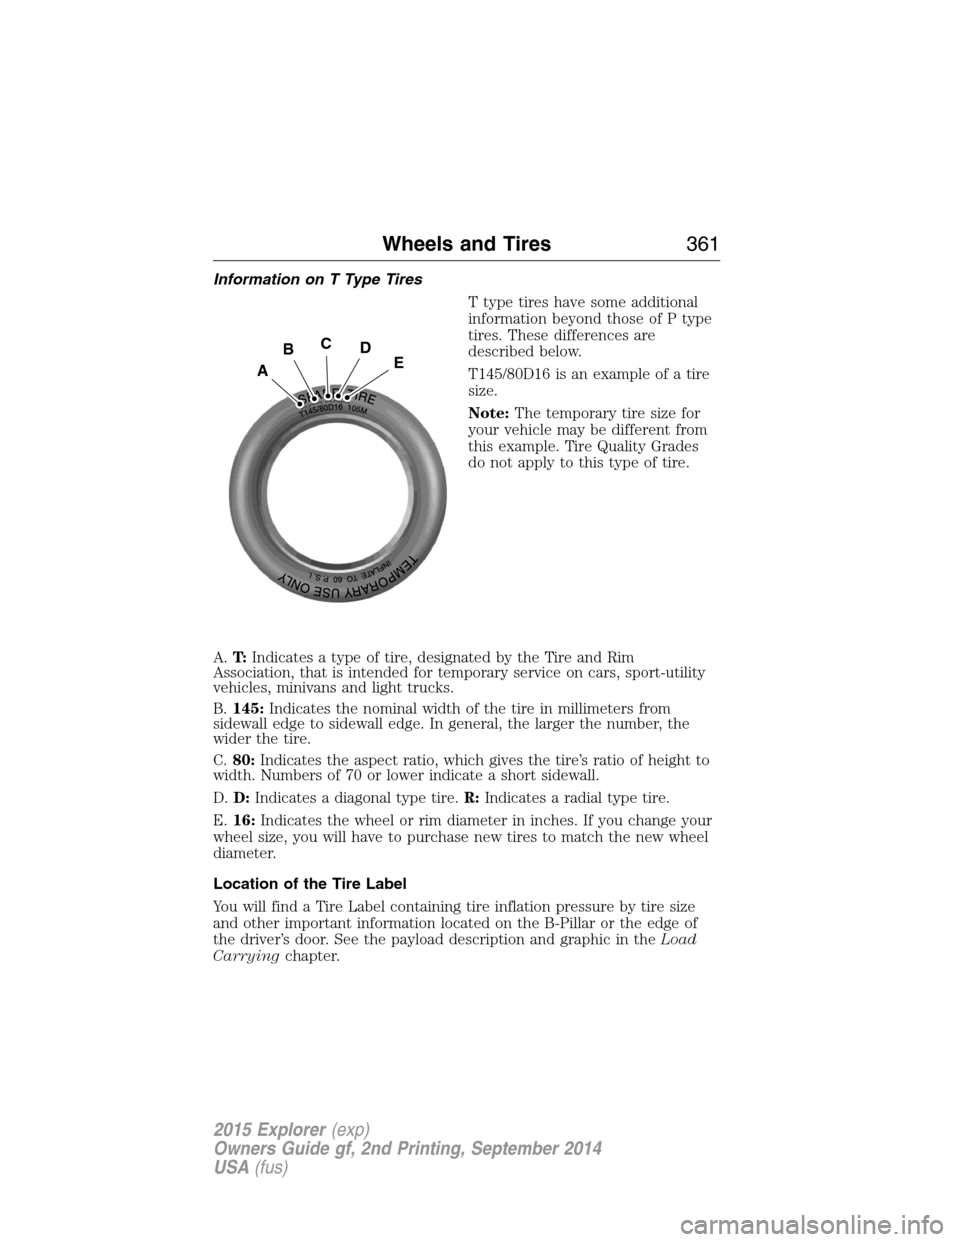
Information on T Type Tires
T type tires have some additional
information beyond those of P type
tires. These differences are
described below.
T145/80D16 is an example of a tire
size.
Note:The temporary tire size for
your vehicle may be different from
this example. Tire Quality Grades
do not apply to this type of tire.
A.T:Indicates a type of tire, designated by the Tire and Rim
Association, that is intended for temporary service on cars, sport-utility
vehicles, minivans and light trucks.
B.145:Indicates the nominal width of the tire in millimeters from
sidewall edge to sidewall edge. In general, the larger the number, the
wider the tire.
C.80:Indicates the aspect ratio, which gives the tire’s ratio of height to
width. Numbers of 70 or lower indicate a short sidewall.
D.D:Indicates a diagonal type tire.R:Indicates a radial type tire.
E.16:Indicates the wheel or rim diameter in inches. If you change your
wheel size, you will have to purchase new tires to match the new wheel
diameter.
Location of the Tire Label
You will find a Tire Label containing tire inflation pressure by tire size
and other important information located on the B-Pillar or the edge of
the driver’s door. See the payload description and graphic in theLoad
Carryingchapter.
A
BCDE
Wheels and Tires361
2015 Explorer(exp)
Owners Guide gf, 2nd Printing, September 2014
USA(fus)