2015 FORD EXPLORER brake
[x] Cancel search: brakePage 315 of 596
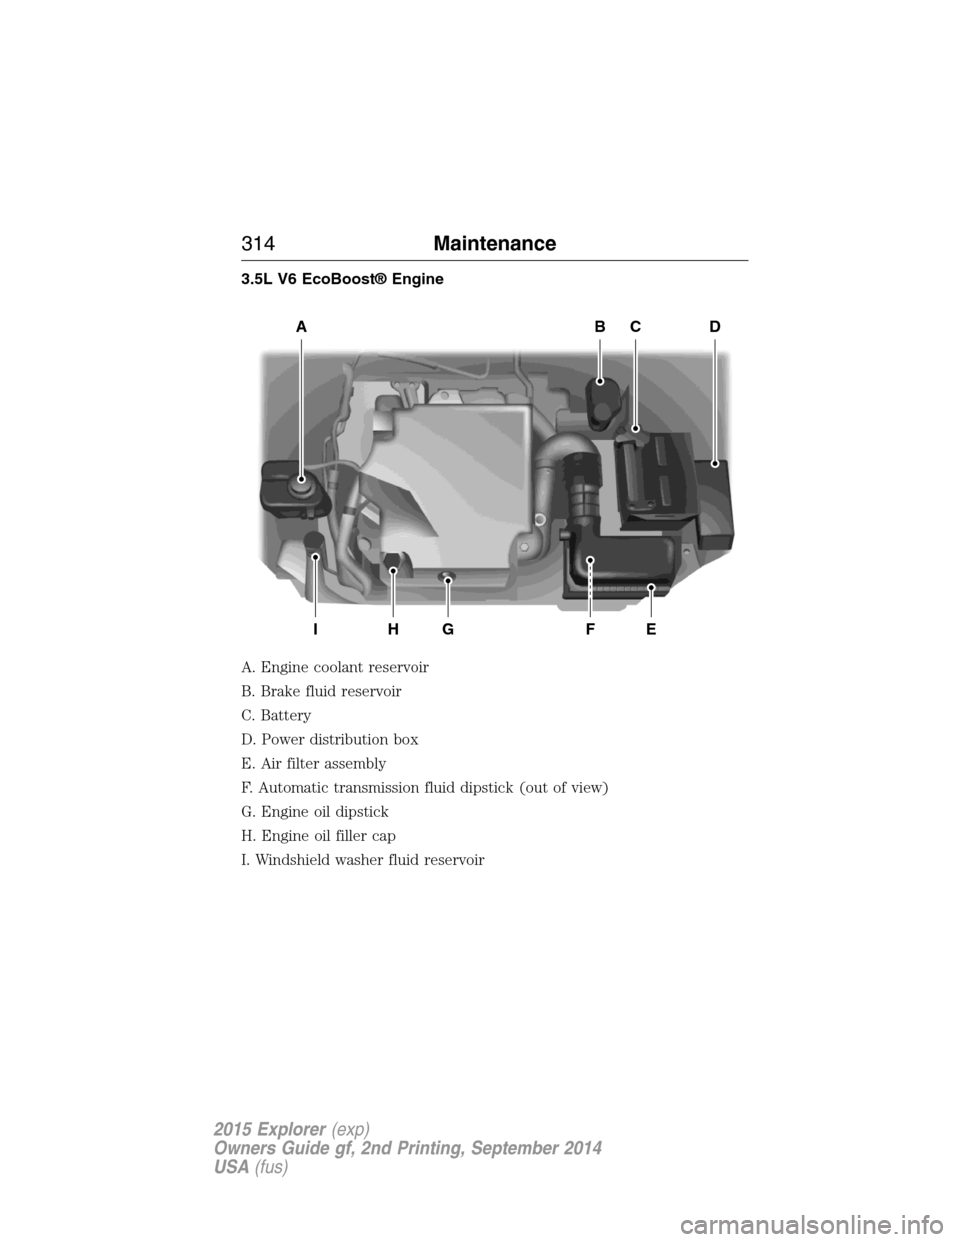
3.5L V6 EcoBoost® Engine
A. Engine coolant reservoir
B. Brake fluid reservoir
C. Battery
D. Power distribution box
E. Air filter assembly
F. Automatic transmission fluid dipstick (out of view)
G. Engine oil dipstick
H. Engine oil filler cap
I. Windshield washer fluid reservoir
ABCD
EFGHI
314Maintenance
2015 Explorer(exp)
Owners Guide gf, 2nd Printing, September 2014
USA(fus)
Page 322 of 596
When this occurs the vehicle will still operate. However:
•The engine power will be limited.
•The air conditioning system will be disabled.
Continued operation will increase the engine temperature and the engine
will completely shut down, causing steering and braking effort to
increase.
Once the engine temperature cools, the engine can be restarted. Take
your vehicle to an authorized dealer as soon as possible to minimize
engine damage.
When Fail-Safe Mode is Activated
WARNING:Fail-safe mode is for use during emergencies only.
Operate the vehicle in fail-safe mode only as long as necessary to
bring the vehicle to rest in a safe location and seek immediate repairs.
When in fail-safe mode, the vehicle will have limited power, will not be
able to maintain high-speed operation, and may completely shut down
without warning, potentially losing engine power, power steering assist,
and power brake assist, which may increase the possibility of a crash
resulting in serious injury.
WARNING:Never remove the coolant reservoir cap while the
engine is running or hot.
You have limited engine power when in the fail-safe mode, so drive the
vehicle with caution. The vehicle will not be able to maintain high-speed
operation and the engine will run rough. Remember that the engine is
capable of completely shutting down automatically to prevent engine
damage, therefore:
1. Pull off the road as soon as safely possible and turn off the engine.
2. Arrange for the vehicle to be taken to an authorized dealer.
3. If this is not possible, wait a short period for the engine to cool.
4. Check the coolant level and replenish if low.
5. Restart the engine and take your vehicle to an authorized dealer.
Note:Driving the vehicle without repairing the engine problem increases
the chance of engine damage. Take your vehicle to an authorized dealer
as soon as possible.
Maintenance321
2015 Explorer(exp)
Owners Guide gf, 2nd Printing, September 2014
USA(fus)
Page 323 of 596

TRANSMISSION FLUID CHECK
6F35 TRANSMISSION (if equipped)
Note:Transmission fluid should be checked by an authorized dealer. If
required, fluid should be added by an authorized dealer.
The automatic transmission does not have a transmission fluid dipstick.
Refer to yourscheduled maintenance informationfor scheduled
intervals for fluid checks and changes. Your transmission does not
consume fluid. However, the fluid level should be checked if the
transmission is not working properly, (i.e., if the transmission slips or
shifts slowly) or if you notice some sign of fluid leakage.
Do not use supplemental transmission fluid additives, treatments or
cleaning agents. The use of these materials may affect transmission
operation and result in damage to internal transmission components.
6F50/6F55 Transmission
WARNING:The dipstick cap and surrounding components may
be hot; gloves are recommended.
WARNING:Use gloves when moving the air filter assembly;
components will be hot.
Note:Automatic transmission fluid expands when warmed. To obtain an
accurate fluid check, drive the vehicle until it is warmed up
(approximately 20 miles [30 km]). If your vehicle has been operated for
an extended period at high speeds, in city traffic during hot weather or
pulling a trailer, the vehicle should be turned off until normal operating
temperatures are reached to allow the fluid to cool before checking.
Depending on vehicle use, cooling times could take up to 30 minutes or
longer.
Refer to yourscheduled maintenance informationfor scheduled
intervals for fluid checks and changes. Your transmission does not
consume fluid. However, the fluid level should be checked if the
transmission is not working properly, i.e., if the transmission slips or
shifts slowly or if you notice some sign of fluid leakage.
1. Drive the vehicle 20 miles (30 km) or until it reaches normal operating
temperature.
2. Park the vehicle on a level surface and engage the parking brake.
322Maintenance
2015 Explorer(exp)
Owners Guide gf, 2nd Printing, September 2014
USA(fus)
Page 324 of 596
3. With the parking brake engaged and your foot on the brake pedal,
start the engine and move the gearshift lever through all of the gear
ranges. Allow a minimum of 10 seconds for each gear to engage.
4. Latch the gearshift lever inP(Park) and leave the engine running.
5. Remove the dipstick, wiping it clean with a clean, dry lintfree rag. If
necessary, refer toUnder hood overviewin this chapter for the location
of the dipstick. (For vehicles with the EcoBoost engine, move the air
filter assembly aside to access the transmission dipstick. SeeMoving the
Air Filter Assembly (EcoBoost engine)for more information.
6. Install the dipstick making sure it is fully seated in the filler tube by
turning it to the locked position.
7. Remove the dipstick and inspect the fluid level. The fluid should be in
the designated areas for normal operating temperature.
Moving the Air Filter Assembly (EcoBoost engine)
WARNING:Do not run engine with the air filter disconnected.
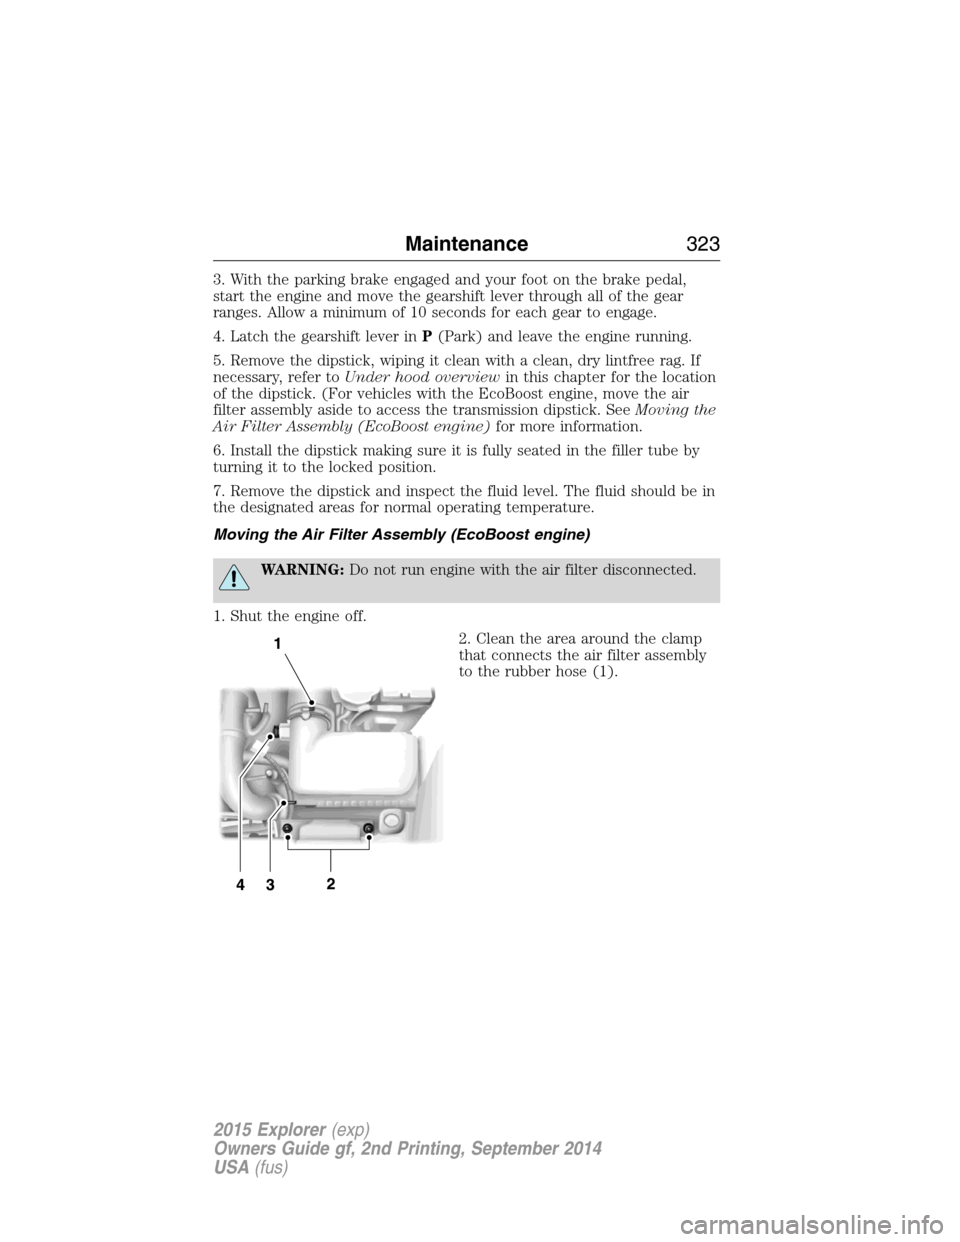
1. Shut the engine off.
2. Clean the area around the clamp
that connects the air filter assembly
to the rubber hose (1).
Maintenance323
2015 Explorer(exp)
Owners Guide gf, 2nd Printing, September 2014
USA(fus)
Page 327 of 596

If an overfill occurs, excess fluid
should be removed by an authorized
dealer.
Note:An overfill condition of transmission fluid may cause shift and/or
engagement concerns and/or possible damage.
Do not use supplemental transmission fluid additives, treatments or
cleaning agents. The use of these materials may affect transmission
operation and result in damage to internal transmission components.
For vehicles equipped with the EcoBoost engine, reinstall the air filter
assembly.
After the fluid level has been checked and adjusted as necessary, do the
following:
1. Shut the engine off.
2. Loosen the clamp holding the air filter assembly to the rubber hose.
3. Rotate the air filter assembly 90 degrees clockwise without
disconnecting the sensor.
4. Seat the air filter assembly back into the grommets by pushing down
on the air filter assembly.
5. Tighten the clamp.
6. Install and tighten two bolts that attach air filter assembly to the front
of the vehicle.
7. Install the bolt cover (if equipped).
8. Reinstall the harness retaining clip into the front of the air filter
assembly.
BRAKE FLUID CHECK
Fluid levels between the MIN and MAX lines are within the normal
operating range; there is no need to add fluid. If the fluid levels are
outside of the normal operating range, the performance of the system
could be compromised; seek service from your authorized dealer
immediately.
POWER STEERING FLUID CHECK
Your vehicle is equipped with an electric power steering (EPS) system.
There is no fluid reservoir to check or fill. For additional information on
the electric power steering (EPS) system, Refer toDriving Aids.MAX MIN
326Maintenance
2015 Explorer(exp)
Owners Guide gf, 2nd Printing, September 2014
USA(fus)
Page 329 of 596
WARNING:Keep batteries out of reach of children. Batteries
contain sulfuric acid. Avoid contact with skin, eyes or clothing.
Shield your eyes when working near the battery to protect against
possible splashing of acid solution. In case of acid contact with skin or
eyes, flush immediately with water for a minimum of 15 minutes and
get prompt medical attention. If acid is swallowed, call a physician
immediately.
WARNING:Battery posts, terminals and related accessories
contain lead and lead compounds. Wash hands after handling.
Your vehicle is equipped with a Motorcraft® maintenance-free battery
which normally does not require additional water during its life of service.
Note:If your battery has a cover or a shield, make sure it is reinstalled
after the battery has been cleaned or replaced.
For longer, trouble-free operation, keep the top of the battery clean and
dry. Also, make certain the battery cables are always tightly fastened to
the battery terminals.
If you see any corrosion on the battery or terminals, remove the cables
from the terminals and clean with a wire brush. You can neutralize the
acid with a solution of baking soda and water.
It is recommended that the negative battery cable terminal be
disconnected from the battery if you plan to store your vehicle for an
extended period of time.
Battery relearn
Because your vehicle’s engine is electronically controlled by a computer,
some control conditions are maintained by power from the battery. When
the battery is disconnected or a new battery is installed, the engine must
relearn its idle and fuel trim strategy for optimum driveability and
performance. To begin this process:
1. With the vehicle at a complete stop, set the parking brake.
2. Put the gearshift lever inP(Park), turn off all accessories and start
the engine.
3. Run the engine until it reaches normal operating temperature.
4. Allow the engine to idle for at least one minute.
5. Turn the A/C on and allow the engine to idle for at least one minute.
6. Drive the vehicle to complete the relearning process.
328Maintenance
2015 Explorer(exp)
Owners Guide gf, 2nd Printing, September 2014
USA(fus)
Page 339 of 596
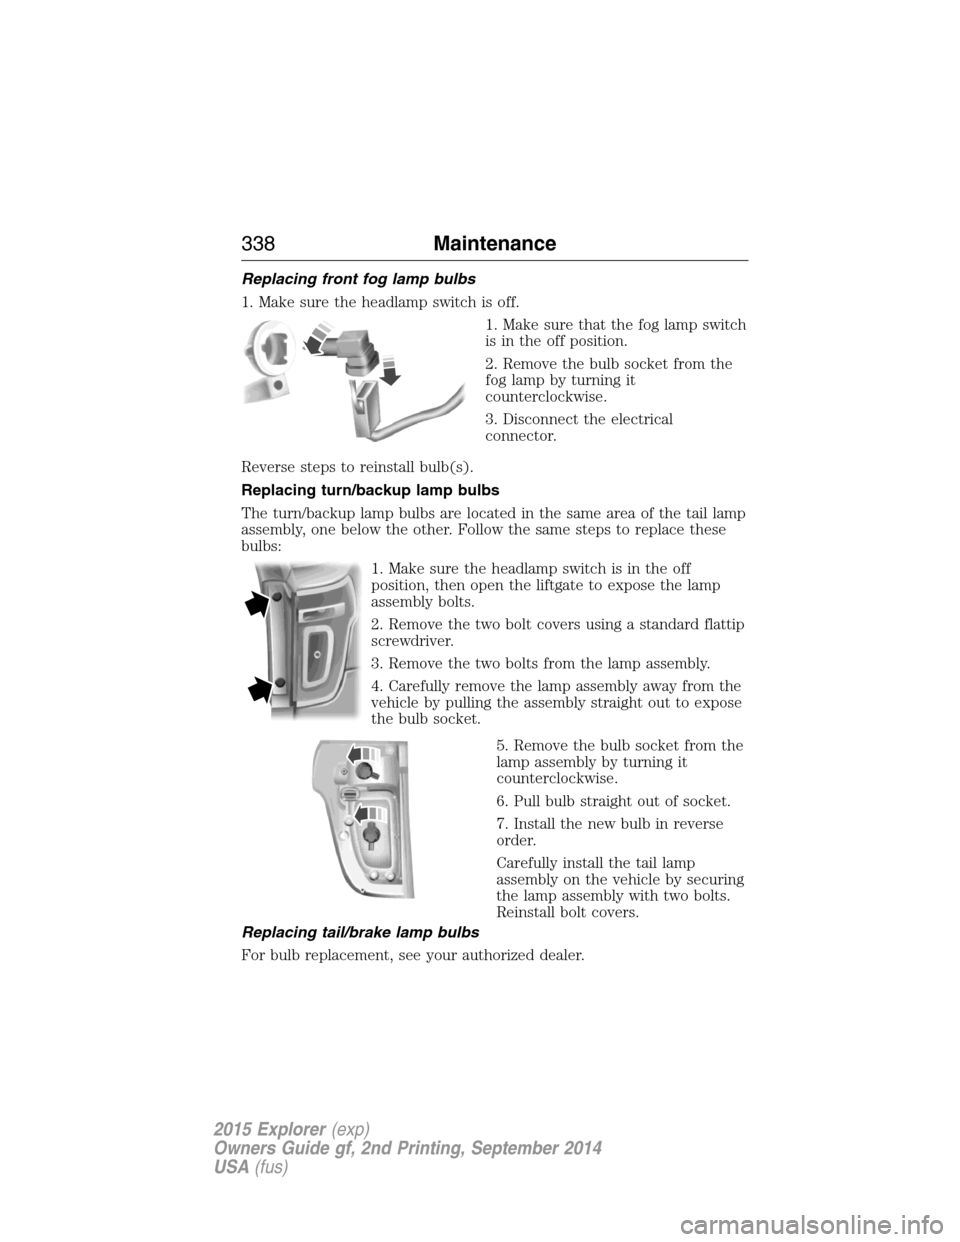
Replacing front fog lamp bulbs
1. Make sure the headlamp switch is off.
1. Make sure that the fog lamp switch
is in the off position.
2. Remove the bulb socket from the
fog lamp by turning it
counterclockwise.
3. Disconnect the electrical
connector.
Reverse steps to reinstall bulb(s).
Replacing turn/backup lamp bulbs
The turn/backup lamp bulbs are located in the same area of the tail lamp
assembly, one below the other. Follow the same steps to replace these
bulbs:
1. Make sure the headlamp switch is in the off
position, then open the liftgate to expose the lamp
assembly bolts.
2. Remove the two bolt covers using a standard flattip
screwdriver.
3. Remove the two bolts from the lamp assembly.
4. Carefully remove the lamp assembly away from the
vehicle by pulling the assembly straight out to expose
the bulb socket.
5. Remove the bulb socket from the
lamp assembly by turning it
counterclockwise.
6. Pull bulb straight out of socket.
7. Install the new bulb in reverse
order.
Carefully install the tail lamp
assembly on the vehicle by securing
the lamp assembly with two bolts.
Reinstall bolt covers.
Replacing tail/brake lamp bulbs
For bulb replacement, see your authorized dealer.
338Maintenance
2015 Explorer(exp)
Owners Guide gf, 2nd Printing, September 2014
USA(fus)
Page 340 of 596
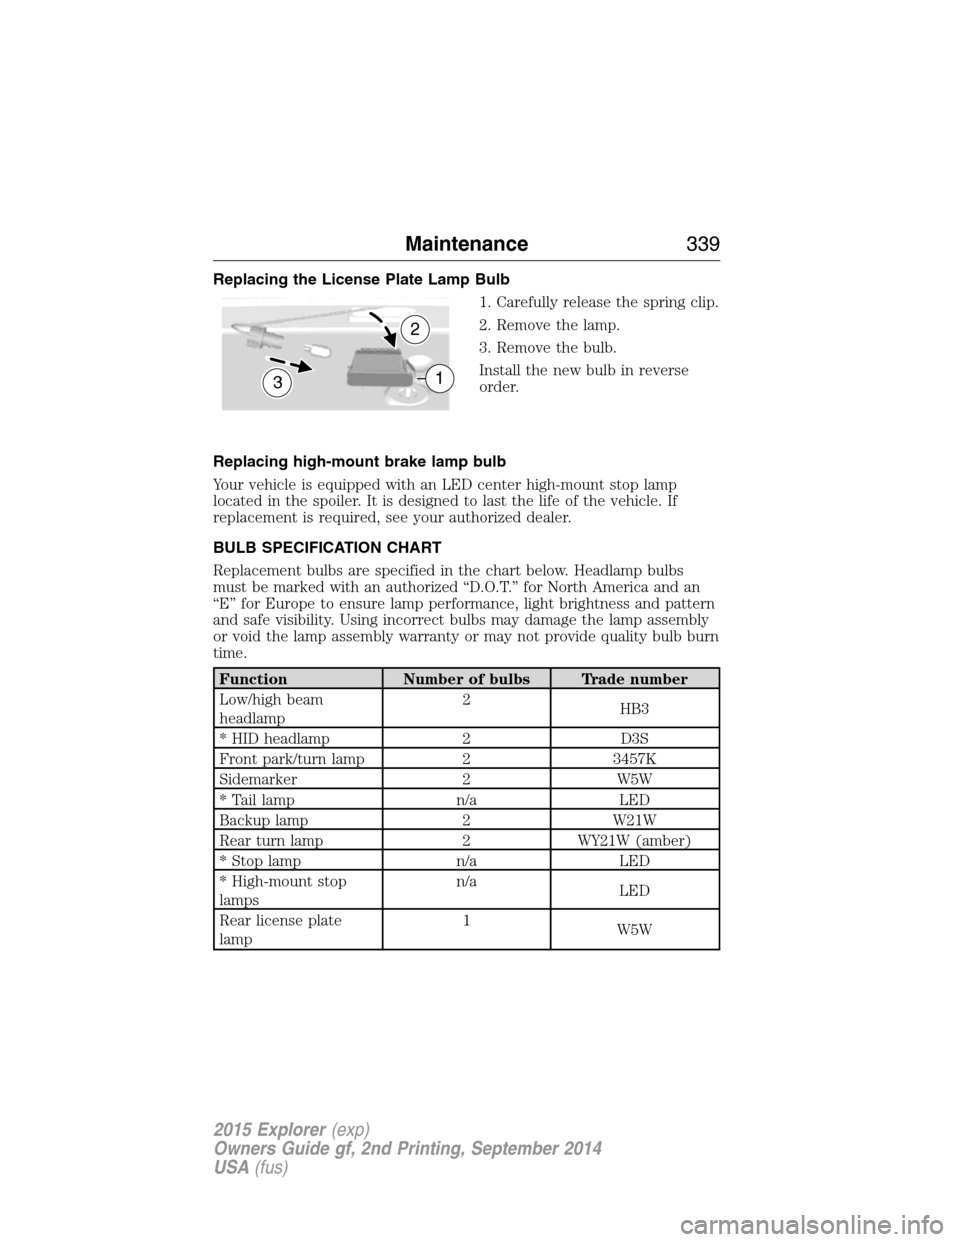
Replacing the License Plate Lamp Bulb
1. Carefully release the spring clip.
2. Remove the lamp.
3. Remove the bulb.
Install the new bulb in reverse
order.
Replacing high-mount brake lamp bulb
Your vehicle is equipped with an LED center high-mount stop lamp
located in the spoiler. It is designed to last the life of the vehicle. If
replacement is required, see your authorized dealer.
BULB SPECIFICATION CHART
Replacement bulbs are specified in the chart below. Headlamp bulbs
must be marked with an authorized “D.O.T.” for North America and an
“E” for Europe to ensure lamp performance, light brightness and pattern
and safe visibility. Using incorrect bulbs may damage the lamp assembly
or void the lamp assembly warranty or may not provide quality bulb burn
time.
Function Number of bulbs Trade number
Low/high beam
headlamp2
HB3
* HID headlamp 2 D3S
Front park/turn lamp 2 3457K
Sidemarker 2 W5W
* Tail lamp n/a LED
Backup lamp 2 W21W
Rear turn lamp 2 WY21W (amber)
* Stop lamp n/a LED
* High-mount stop
lampsn/a
LED
Rear license plate
lamp1
W5W
3
2
1
Maintenance339
2015 Explorer(exp)
Owners Guide gf, 2nd Printing, September 2014
USA(fus)