2015 FORD EXPEDITION tow bar
[x] Cancel search: tow barPage 116 of 564
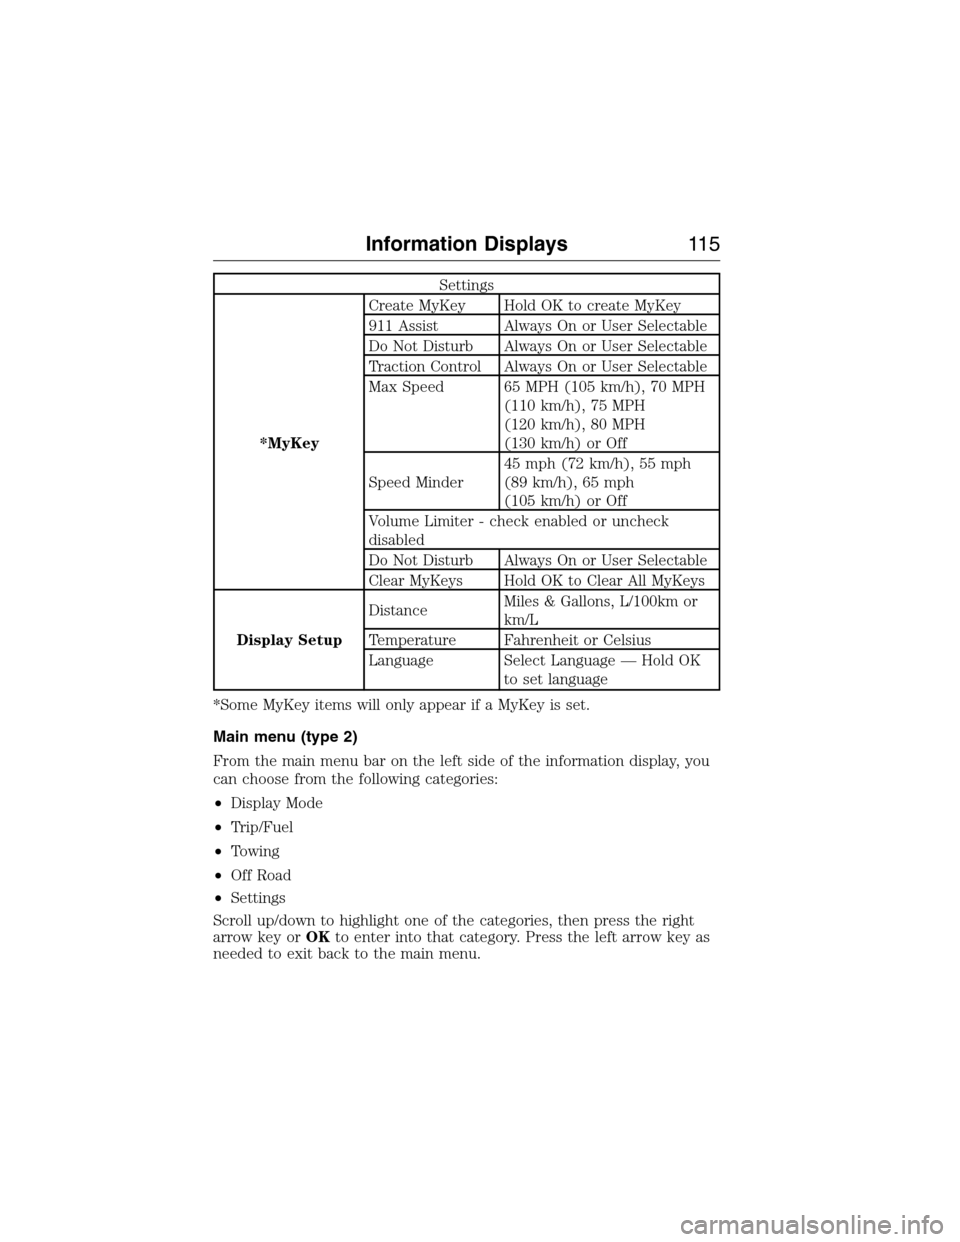
Settings
*MyKeyCreate MyKey Hold OK to create MyKey
911 Assist Always On or User Selectable
Do Not Disturb Always On or User Selectable
Traction Control Always On or User Selectable
Max Speed 65 MPH (105 km/h), 70 MPH
(110 km/h), 75 MPH
(120 km/h), 80 MPH
(130 km/h) or Off
Speed Minder45 mph (72 km/h), 55 mph
(89 km/h), 65 mph
(105 km/h) or Off
Volume Limiter - check enabled or uncheck
disabled
Do Not Disturb Always On or User Selectable
Clear MyKeys Hold OK to Clear All MyKeys
Display SetupDistanceMiles & Gallons, L/100km or
km/L
Temperature Fahrenheit or Celsius
Language Select Language — Hold OK
to set language
*Some MyKey items will only appear if a MyKey is set.
Main menu (type 2)
From the main menu bar on the left side of the information display, you
can choose from the following categories:
•Display Mode
•Trip/Fuel
•Towing
•Off Road
•Settings
Scroll up/down to highlight one of the categories, then press the right
arrow key orOKto enter into that category. Press the left arrow key as
needed to exit back to the main menu.
Information Displays11 5
2015 Expedition(exd)
Owners Guide gf, 1st Printing, July 2014
USA(fus)
Page 121 of 564
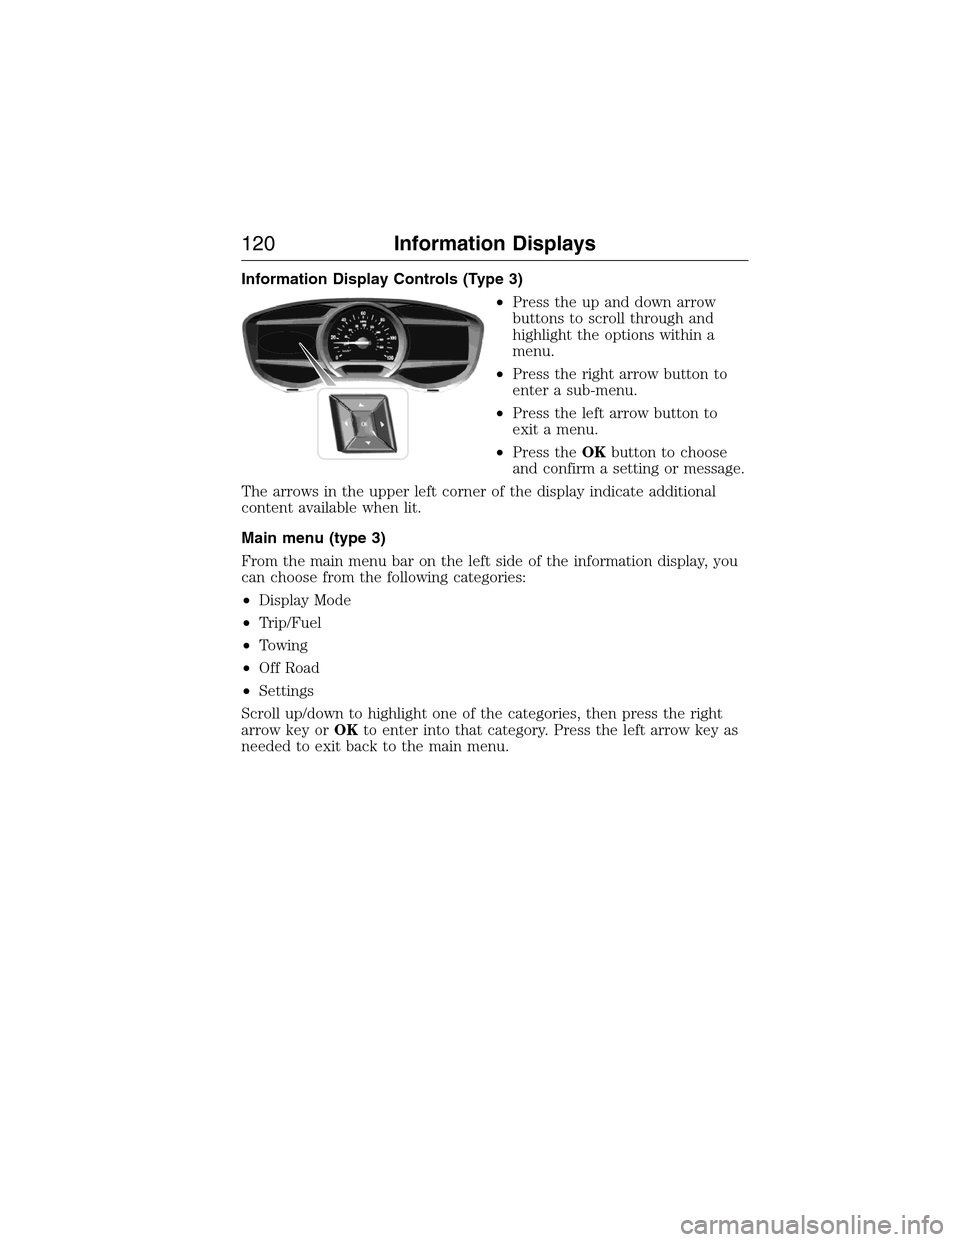
Information Display Controls (Type 3)
•Press the up and down arrow
buttons to scroll through and
highlight the options within a
menu.
•Press the right arrow button to
enter a sub-menu.
•Press the left arrow button to
exit a menu.
•Press theOKbutton to choose
and confirm a setting or message.
The arrows in the upper left corner of the display indicate additional
content available when lit.
Main menu (type 3)
From the main menu bar on the left side of the information display, you
can choose from the following categories:
•Display Mode
•Trip/Fuel
•Towing
•Off Road
•Settings
Scroll up/down to highlight one of the categories, then press the right
arrow key orOKto enter into that category. Press the left arrow key as
needed to exit back to the main menu.
120Information Displays
2015 Expedition(exd)
Owners Guide gf, 1st Printing, July 2014
USA(fus)
Page 249 of 564

TOWING A TRAILER
WARNING:Do not exceed the GVWR or the GAWR specified on
the certification label.
WARNING:Towing trailers beyond the maximum recommended
gross trailer weight exceeds the limit of your vehicle and could
result in engine damage, transmission damage, structural damage, loss
of vehicle control, vehicle rollover and personal injury.
Note:For information on electrical items such as fuses or relays, see the
Fuseschapter.
The load capacity of your vehicle is designated by weight not volume.
You may not necessarily be able to use all available space when loading
your vehicle or trailer.
Towing a trailer places extra load on the engine, transmission, axle,
brakes, tires, and suspension. Inspect these components before, during
and after towing.
Load Placement
To help minimize how trailer movement affects your vehicle when
driving:
•Load the heaviest items closest to the trailer floor.
•Load the heaviest items centered between the left and right side
trailer tires.
•Load the heaviest items above the trailer axles or just slightly forward
toward the trailer tongue. Do not allow the final trailer tongue weight
to go above or below 10–15% of the loaded trailer weight.
•Select a tow bar with the correct rise or drop. When both the loaded
vehicle and trailer are connected, the trailer frame should be level, or
slightly angled down toward your vehicle, when viewed from the side.
When driving with a trailer or payload, a slight takeoff vibration or
shudder may be present due to the increased payload weight. You can
find more information about proper trailer loading and setting your
vehicle up for towing underLoad limitin theLoad Carryingchapter.
You can also find information in theRV and Trailer Towing Guide
available at your authorized dealer.
248Towing
2015 Expedition(exd)
Owners Guide gf, 1st Printing, July 2014
USA(fus)
Page 251 of 564
Note:Certain states require electric trailer brakes for trailers over a
specified weight. Be sure to check state regulations for this specified
weight. The maximum trailer weights listed may be limited to this
specified weight, as your vehicle’s electrical system may not include the
wiring connector needed to use electric trailer brakes.
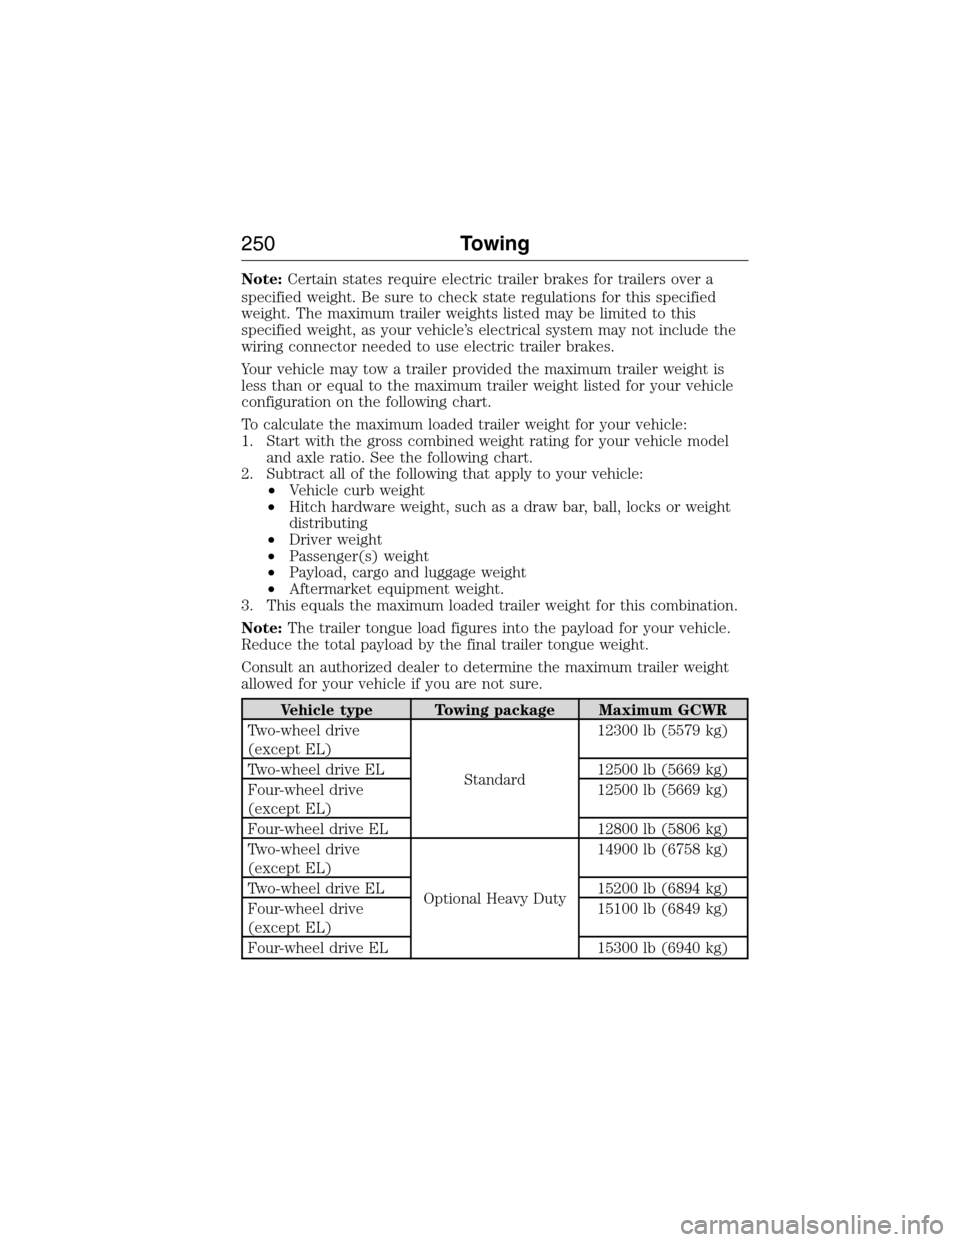
Your vehicle may tow a trailer provided the maximum trailer weight is
less than or equal to the maximum trailer weight listed for your vehicle
configuration on the following chart.
To calculate the maximum loaded trailer weight for your vehicle:
1. Start with the gross combined weight rating for your vehicle model
and axle ratio. See the following chart.
2. Subtract all of the following that apply to your vehicle:
•Vehicle curb weight
•Hitch hardware weight, such as a draw bar, ball, locks or weight
distributing
•Driver weight
•Passenger(s) weight
•Payload, cargo and luggage weight
•Aftermarket equipment weight.
3. This equals the maximum loaded trailer weight for this combination.
Note:The trailer tongue load figures into the payload for your vehicle.
Reduce the total payload by the final trailer tongue weight.
Consult an authorized dealer to determine the maximum trailer weight
allowed for your vehicle if you are not sure.
Vehicle type Towing package Maximum GCWR
Two-wheel drive
(except EL)
Standard12300 lb (5579 kg)
Two-wheel drive EL 12500 lb (5669 kg)
Four-wheel drive
(except EL)12500 lb (5669 kg)
Four-wheel drive EL 12800 lb (5806 kg)
Two-wheel drive
(except EL)
Optional Heavy Duty14900 lb (6758 kg)
Two-wheel drive EL 15200 lb (6894 kg)
Four-wheel drive
(except EL)15100 lb (6849 kg)
Four-wheel drive EL 15300 lb (6940 kg)
250Towing
2015 Expedition(exd)
Owners Guide gf, 1st Printing, July 2014
USA(fus)
Page 253 of 564
Hitches
WARNING:The trailer hitch on this vehicle is part of the vehicle
rear crash safety structure. Do not remove the trailer hitch.
Failure to follow this warning could compromise vehicle crash structure
and increase the risk of injury in a rear end crash.
Do not use a hitch that clamps onto your vehicle’s bumper. Use a
load-carrying hitch. You must distribute the load in your trailer so that
10–15% of the total weight of the trailer is on the tongue.
Integrated Hitch Rating
WARNING:Towing trailers beyond the maximum tongue weight
exceeds the limit of the towing system and could result in vehicle
structural damage, loss of vehicle control and personal injury.
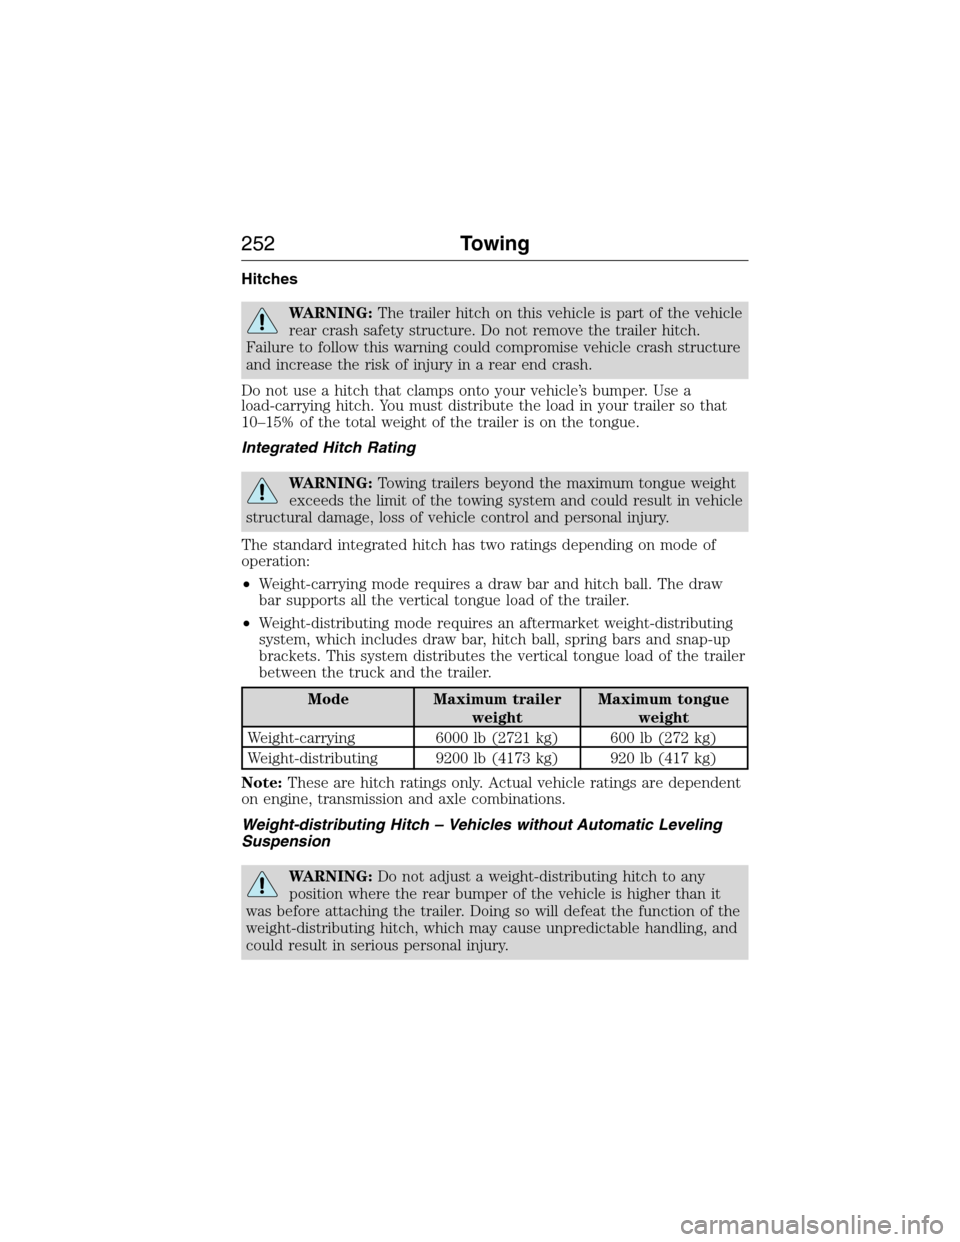
The standard integrated hitch has two ratings depending on mode of
operation:
•Weight-carrying mode requires a draw bar and hitch ball. The draw
bar supports all the vertical tongue load of the trailer.
•Weight-distributing mode requires an aftermarket weight-distributing
system, which includes draw bar, hitch ball, spring bars and snap-up
brackets. This system distributes the vertical tongue load of the trailer
between the truck and the trailer.
Mode Maximum trailer
weightMaximum tongue
weight
Weight-carrying 6000 lb (2721 kg) 600 lb (272 kg)
Weight-distributing 9200 lb (4173 kg) 920 lb (417 kg)
Note:These are hitch ratings only. Actual vehicle ratings are dependent
on engine, transmission and axle combinations.
Weight-distributing Hitch – Vehicles without Automatic Leveling
Suspension
WARNING:Do not adjust a weight-distributing hitch to any
position where the rear bumper of the vehicle is higher than it
was before attaching the trailer. Doing so will defeat the function of the
weight-distributing hitch, which may cause unpredictable handling, and
could result in serious personal injury.
252Towing
2015 Expedition(exd)
Owners Guide gf, 1st Printing, July 2014
USA(fus)
Page 254 of 564
When hooking-up a trailer using a weight-distributing hitch, always use
the following procedure:
1. Park your vehicle, without the trailer, on a level surface.
2. Measure the height of the top of your vehicle’s front wheel opening
on the fender. This is H1.
3. Attach the trailer to your vehicle without the weight-distributing bars
connected.
4. Measure the height of the top of your vehicle’s front wheel opening
on the fender a second time. This is H2.
5. Install and adjust the tension in the weight distributing bars so that
the height of the front fender is approximately halfway between H1
and H2.
6.
Check that the trailer is level or slightly nose down toward your
vehicle. If not, adjust the ball height accordingly and repeat Steps 2–6.
Once the trailer is level or slightly nose down toward the vehicle:
•
Lock the bar tension adjuster in place.
•Check that the trailer tongue securely attaches and locks onto the hitch.
•Install safety chains, lighting, and trailer brake controls as required by law
or the trailer manufacturer.
Weight-distributing Hitch – Vehicles with Automatic Leveling
Suspension
WARNING:Do not adjust a weight-distributing hitch to any
position where the rear bumper of the vehicle is higher than it
was before attaching the trailer. Doing so will defeat the function of the
weight-distributing hitch, which may cause unpredictable handling, and
could result in serious personal injury.
Note:
If you do not move the loaded vehicle for approximately 12 hours, the
leveling system may bleed down to a lower height. This can be especially
apparent if you leave a trailer attached to the parked vehicle for long
periods. You must drive your vehicle in order to re-level the suspension.
When connecting a trailer to a vehicle with automatic leveling suspension
using a weight-distributing hitch, always use the following procedure:
1.
Load the interior of the vehicle to a weight similar to that which you
intend to carry when towing. This includes things such as passenger
weight and cargo.
2. Drive the vehicle for approximately 2 miles (3 kilometers) to re-level
the suspension.
3. Park your vehicle, without the trailer, on a level surface.
4. Measure the height to the top of your vehicle’s front wheel opening on
the fender. This is H1.
Towing253
2015 Expedition(exd)
Owners Guide gf, 1st Printing, July 2014
USA(fus)
Page 255 of 564
5. Attach the trailer to your vehicle without the weight-distributing bars
connected.
6. Make sure you securely attach and lock the trailer tongue to the hitch.
7. Install safety chains, lighting, and trailer brake controls as required by
law or the trailer manufacturer.
8. Drive the vehicle and trailer at 20–25 mph (32–40 km/h) for
approximately 2 miles (3 kilometers) to re-level the suspension.
9. Park your vehicle and trailer on a level surface.
10. Measure the height to the top of your vehicles front wheel opening on
the fender a second time. This is H2.
11. Install and adjust the tension in the weight distributing bars so that
the height of the front fender is approximately halfway between H1
and H2.
12. Check that the trailer is level or slightly nose down toward the vehicle.
If it is not, remove the trailer, adjust the ball height accordingly, and
repeat Steps 5 -11.
Once the trailer is level or slightly nose down toward the vehicle:
•Lock the bar tension adjuster in place.
•Check that the trailer tongue securely attaches and locks onto the
hitch.
•Install safety chains, lighting, and trailer brake controls as required by
law or the trailer manufacturer.
Safety Chains
Note:Do not attach safety chains to the bumper.
Always connect the trailer’s safety chains to the frame or hook retainers
of your vehicle hitch.
To connect the trailer’s safety chains, cross the chains under the trailer
tongue and allow enough slack for turning tight corners. Do not allow the
chains to drag on the ground.
Trailer Brakes
WARNING:Do not connect a trailer’s hydraulic brake system
directly to your vehicle’s brake system. Your vehicle may not have
enough braking power and your chances of having a collision greatly
increase.
Electric brakes and manual, automatic or surge-type trailer brakes are
safe if you install them properly and adjust them to the manufacturer’s
specifications. The trailer brakes must meet local and federal regulations.
254Towing
2015 Expedition(exd)
Owners Guide gf, 1st Printing, July 2014
USA(fus)
Page 256 of 564
The rating for the tow vehicle’s braking system operation is at the
gross vehicle weight rating, not the gross combined weight rating.
Separate functioning brake systems are required for safe control
of towed vehicles and trailers weighing more than 1500 pounds
(680 kilograms) when loaded.
Integrated Trailer Brake Controller (If Equipped)
WARNING:The Ford TBC has been verified to be compatible
with trailers having electric-actuated drum brakes (one to four
axles) and some electric-over-hydraulic (EOH) brakes. It will not
activate hydraulic surge-style trailer brakes. It is the responsibility of
the customer to ensure that the trailer brakes are adjusted
appropriately, functioning normally and all electric connections are
properly made. Failure to do so may result in loss of vehicle control,
crash or serious injury.
When used properly, the trailer brake controller assists in smooth and
effective trailer braking by powering the trailer’s electric or
electric-over-hydraulic brakes with a proportional output based on the
towing vehicle’s brake pressure.
Ford has tested the trailer brake controller to be compatible with several
major brands of electric-over-hydraulic trailer brakes. Contact an
authorized dealer for information on which brands you can use.
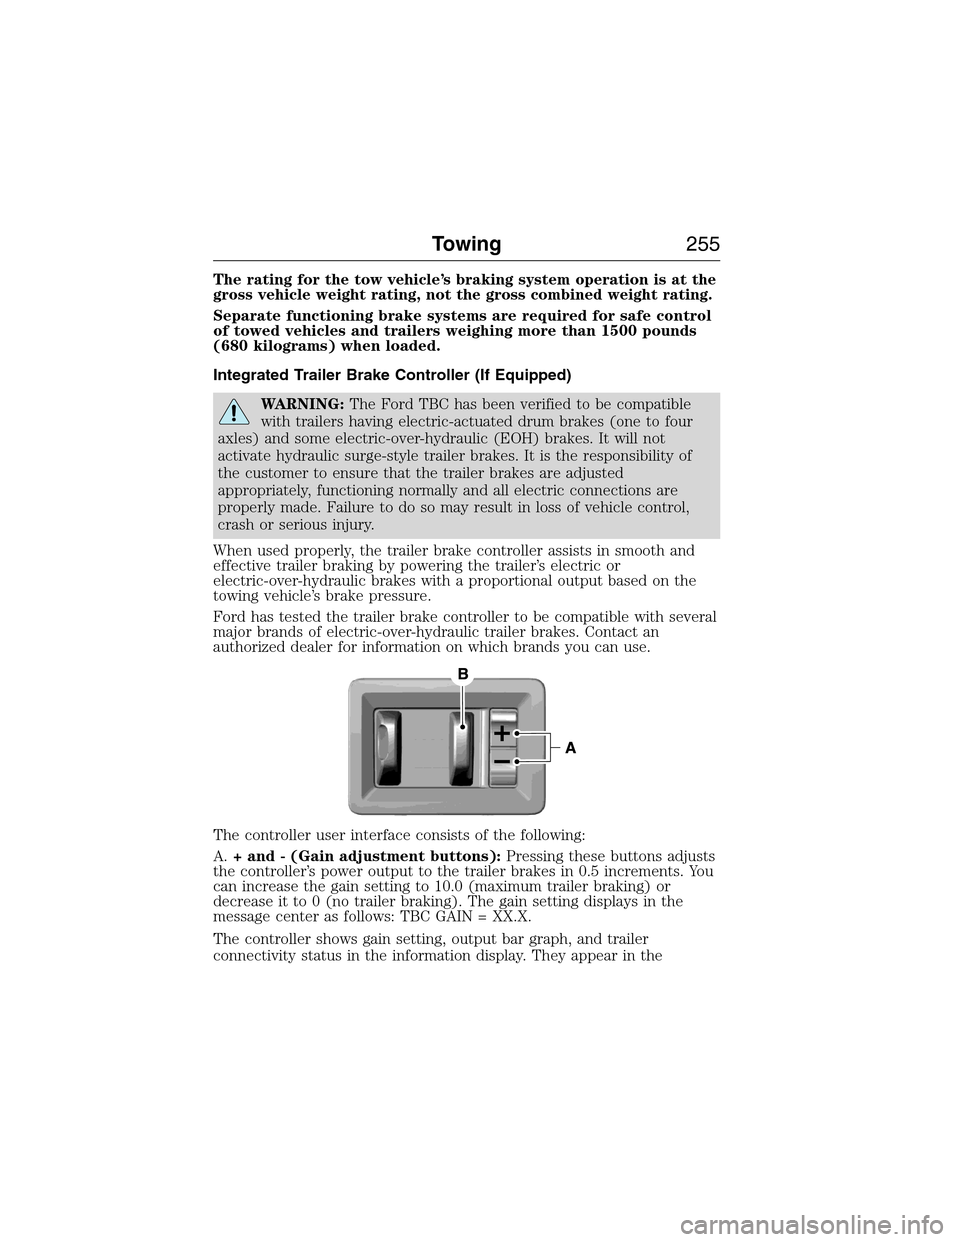
The controller user interface consists of the following:
A.+ and - (Gain adjustment buttons):Pressing these buttons adjusts
the controller’s power output to the trailer brakes in 0.5 increments. You
can increase the gain setting to 10.0 (maximum trailer braking) or
decrease it to 0 (no trailer braking). The gain setting displays in the
message center as follows: TBC GAIN = XX.X.
The controller shows gain setting, output bar graph, and trailer
connectivity status in the information display. They appear in the
Towing255
2015 Expedition(exd)
Owners Guide gf, 1st Printing, July 2014
USA(fus)