2015 FORD EXPEDITION remove seats
[x] Cancel search: remove seatsPage 22 of 564
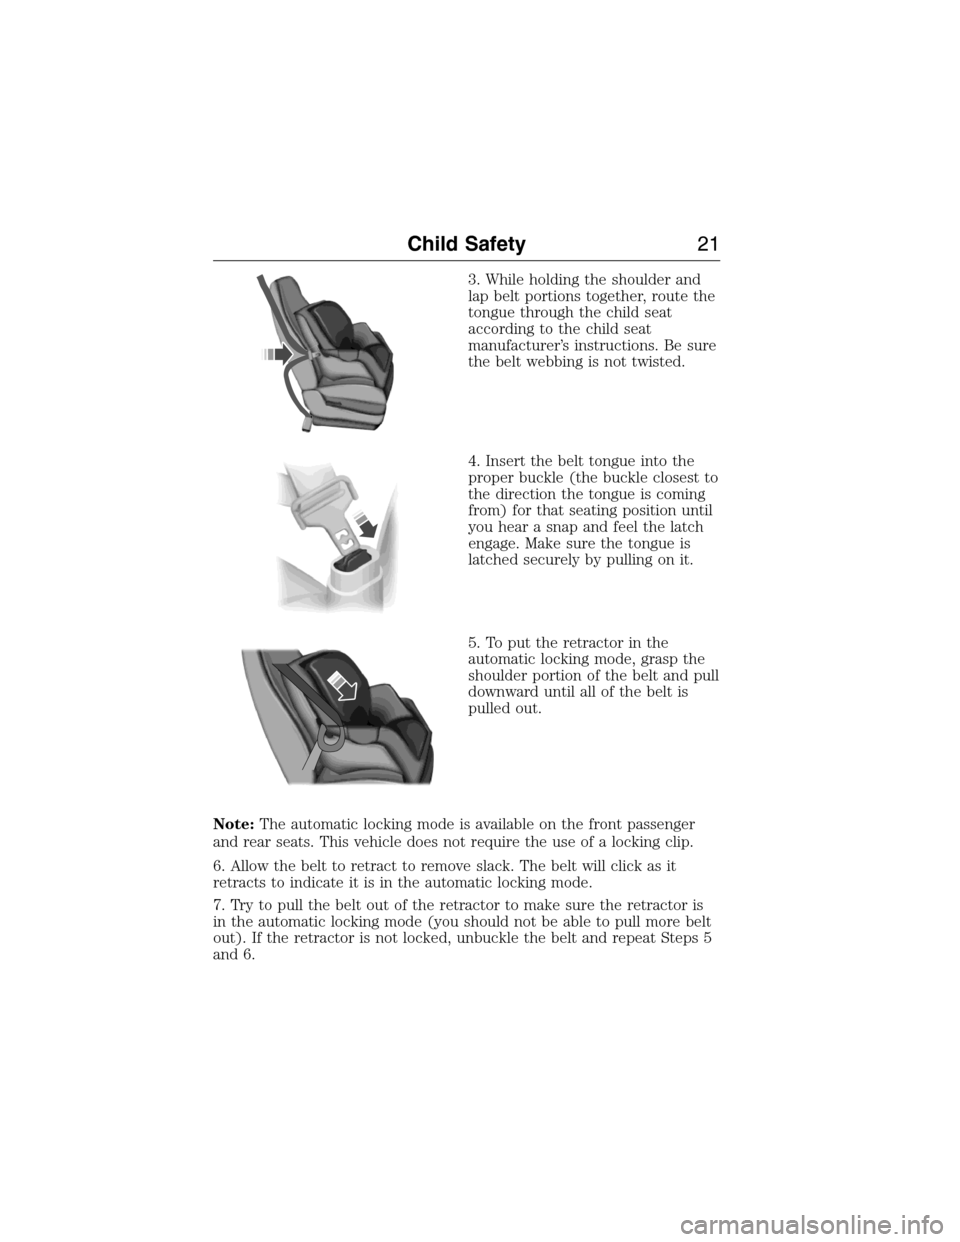
3. While holding the shoulder and
lap belt portions together, route the
tongue through the child seat
according to the child seat
manufacturer’s instructions. Be sure
the belt webbing is not twisted.
4. Insert the belt tongue into the
proper buckle (the buckle closest to
the direction the tongue is coming
from) for that seating position until
you hear a snap and feel the latch
engage. Make sure the tongue is
latched securely by pulling on it.
5. To put the retractor in the
automatic locking mode, grasp the
shoulder portion of the belt and pull
downward until all of the belt is
pulled out.
Note:The automatic locking mode is available on the front passenger
and rear seats. This vehicle does not require the use of a locking clip.
6. Allow the belt to retract to remove slack. The belt will click as it
retracts to indicate it is in the automatic locking mode.
7. Try to pull the belt out of the retractor to make sure the retractor is
in the automatic locking mode (you should not be able to pull more belt
out). If the retractor is not locked, unbuckle the belt and repeat Steps 5
and 6.
Child Safety21
2015 Expedition(exd)
Owners Guide gf, 1st Printing, July 2014
USA(fus)
Page 31 of 564
•Does the lap belt rest low across the hips?
•Is the shoulder belt centered on the shoulder and chest?
•Can the child stay seated like this for the whole trip?
Always use booster seats in conjunction with your vehicle lap and
shoulder belt.
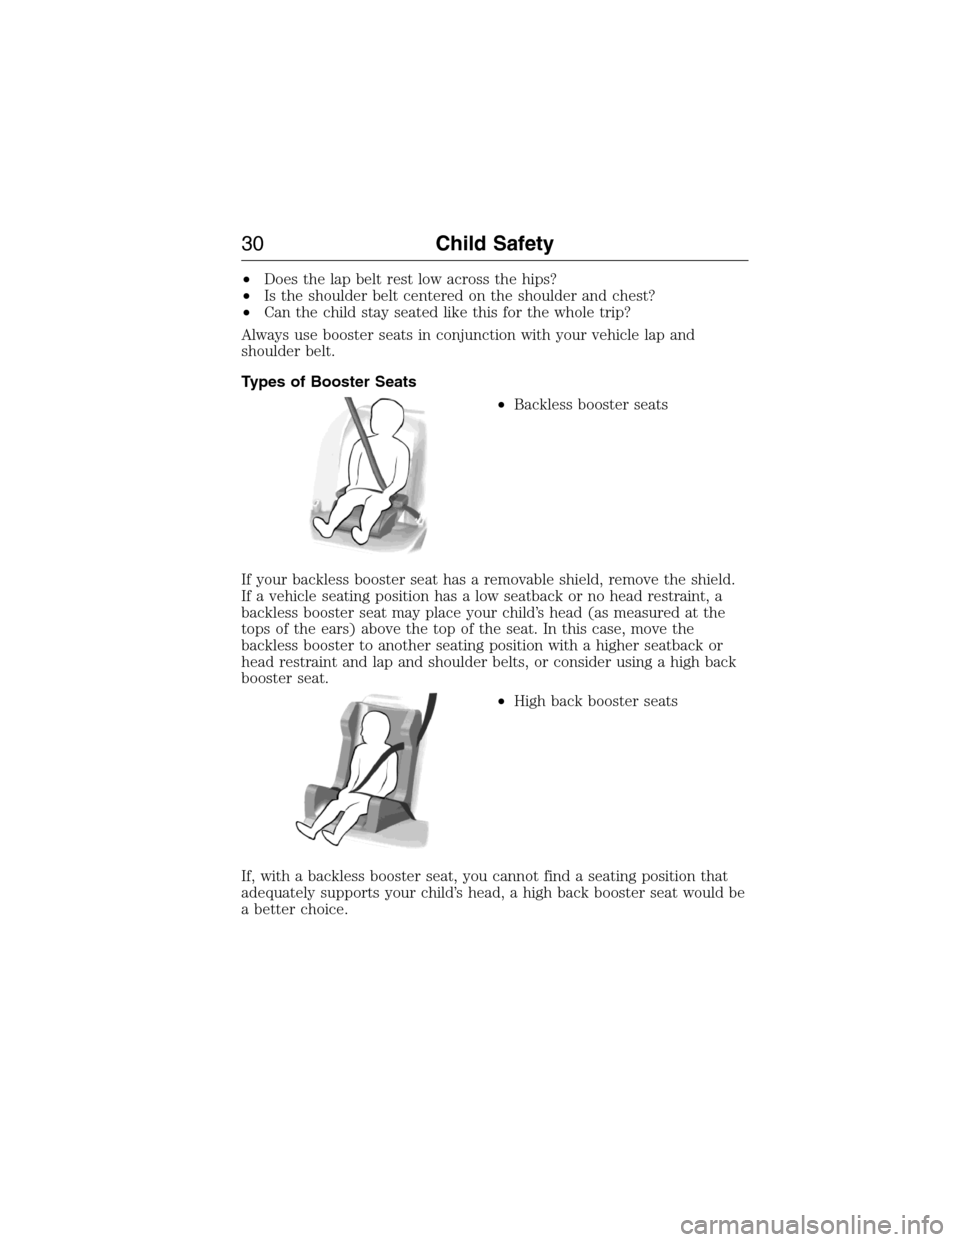
Types of Booster Seats
•Backless booster seats
If your backless booster seat has a removable shield, remove the shield.
If a vehicle seating position has a low seatback or no head restraint, a
backless booster seat may place your child’s head (as measured at the
tops of the ears) above the top of the seat. In this case, move the
backless booster to another seating position with a higher seatback or
head restraint and lap and shoulder belts, or consider using a high back
booster seat.
•High back booster seats
If, with a backless booster seat, you cannot find a seating position that
adequately supports your child’s head, a high back booster seat would be
a better choice.
30Child Safety
2015 Expedition(exd)
Owners Guide gf, 1st Printing, July 2014
USA(fus)
Page 34 of 564
WARNING:Never place, or allow a child to place, the shoulder
belt under a child’s arm or behind the back because it reduces
the protection for the upper part of the body and may increase the risk
of injury or death in a crash.
WARNING:To avoid risk of injury, do not leave children or pets
unattended in your vehicle.
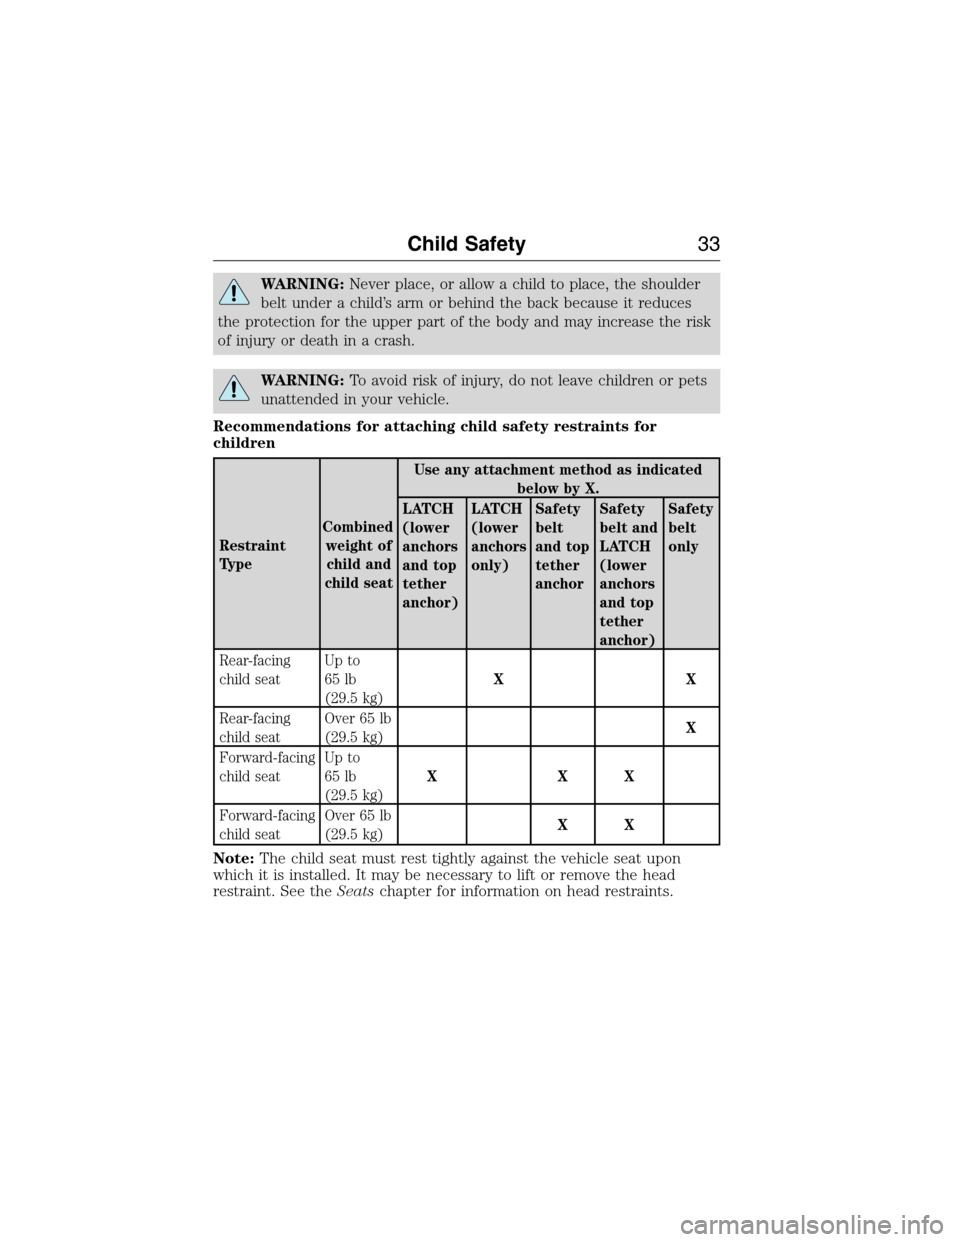
Recommendations for attaching child safety restraints for
children
Restraint
Ty p eCombined
weight of
child and
child seatUse any attachment method as indicated
belowbyX.
LATCH
(lower
anchors
and top
tether
anchor)LATCH
(lower
anchors
only)Safety
belt
and top
tether
anchorSafety
belt and
LATCH
(lower
anchors
and top
tether
anchor)Safety
belt
only
Rear-facing
child seatUp to
65 lb
(29.5 kg)XX
Rear-facing
child seatOver 65 lb
(29.5 kg)X
Forward-facing
child seatUp to
65 lb
(29.5 kg)XXX
Forward-facing
child seatOver 65 lb
(29.5 kg)XX
Note:The child seat must rest tightly against the vehicle seat upon
which it is installed. It may be necessary to lift or remove the head
restraint. See theSeatschapter for information on head restraints.
Child Safety33
2015 Expedition(exd)
Owners Guide gf, 1st Printing, July 2014
USA(fus)
Page 144 of 564
GENERAL OPERATING TIPS
General Hints
Note:Prolonged use of recirculated air may cause the windows to fog
up.
Note:You may feel a small amount of air from the footwell air vents
regardless of the air distribution setting.
Note:To reduce humidity build-up inside your vehicle, do not drive with
the system switched off or with recirculated air always switched on.
Note:Do not place objects under the front seats as this may interfere
with the airflow to the rear seats.
Note:Remove any snow, ice or leaves from the air intake area at the
base of the windshield.
Note:To improve the time to reach comfort in hot weather, drive with
the windows slightly open for 2-3 minutes after start-up or until your
vehicle airs out.
Manual Climate Control
Note:To reduce fogging of the windshield during humid weather, adjust
the air distribution control to the windshield air vents position.
Automatic Climate Control
Note:Adjusting the settings when your vehicle interior is extremely hot
or cold is not necessary. The system automatically adjusts to heat or cool
the cabin to your selected temperature as quickly as possible. For the
system to function efficiently, the instrument panel and side air vents
should be fully open.
Note:If you selectAUTOduring cold outside temperatures, the system
directs airflow to the windshield and side window vents. In addition, the
fan may run at a slower speed until the engine warms up.
Note:If you selectAUTOduring hot outside temperatures, or when the
inside of the vehicle is hot, the system automatically uses recirculated air
to maximize interior cooling. When the interior reaches the selected
temperature, the system automatically switches to using outside air.
Climate Control143
2015 Expedition(exd)
Owners Guide gf, 1st Printing, July 2014
USA(fus)
Page 147 of 564
HEATED WINDOWS AND MIRRORS (IF EQUIPPED)
Heated Rear Window
Note:The vehicle must be running to use this feature.
Press the control to clear the rear window of thin ice and fog. Press the
control again within 15 minutes to switch it off. It turns off automatically
after approximately 15 minutes, or when you switch off the ignition.
Do not use razor blades or other sharp objects to clean the inside
of the rear window or to remove decals from the inside of the
rear window. This may cause damage to the heated grid lines.
Your warranty does not cover this damage.
Heated Exterior Mirrors (If Equipped)
Note:Do not remove ice from the mirrors with a scraper or attempt to
readjust the mirror glass that has frozen in place. These actions could
cause damage to the glass and mirrors.
Note:Do not clean the housing or glass of any mirror with harsh
abrasives, fuel or other petroleum-based cleaning products.
Both mirrors heat to remove ice, mist and fog when you switch on the
heated rear window.
REMOTE START (IF EQUIPPED)
The remote start feature allows you to pre-condition the interior of your
vehicle. The climate control system works to achieve comfort according
to your previous settings.
Note:You cannot adjust the system during remote start operation.
Turn the ignition on to return the system to its previous settings. You
can now make adjustments normally, but you need to turn certain
vehicle-dependent features back on, such as:
•Heated seats.
•Cooled seats.
•Heated steering wheel.
•Heated mirrors.
•Heated rear window.
You can adjust the default remote start settings using the information
display controls. See theInformation Displayschapter.
146Climate Control
2015 Expedition(exd)
Owners Guide gf, 1st Printing, July 2014
USA(fus)
Page 151 of 564
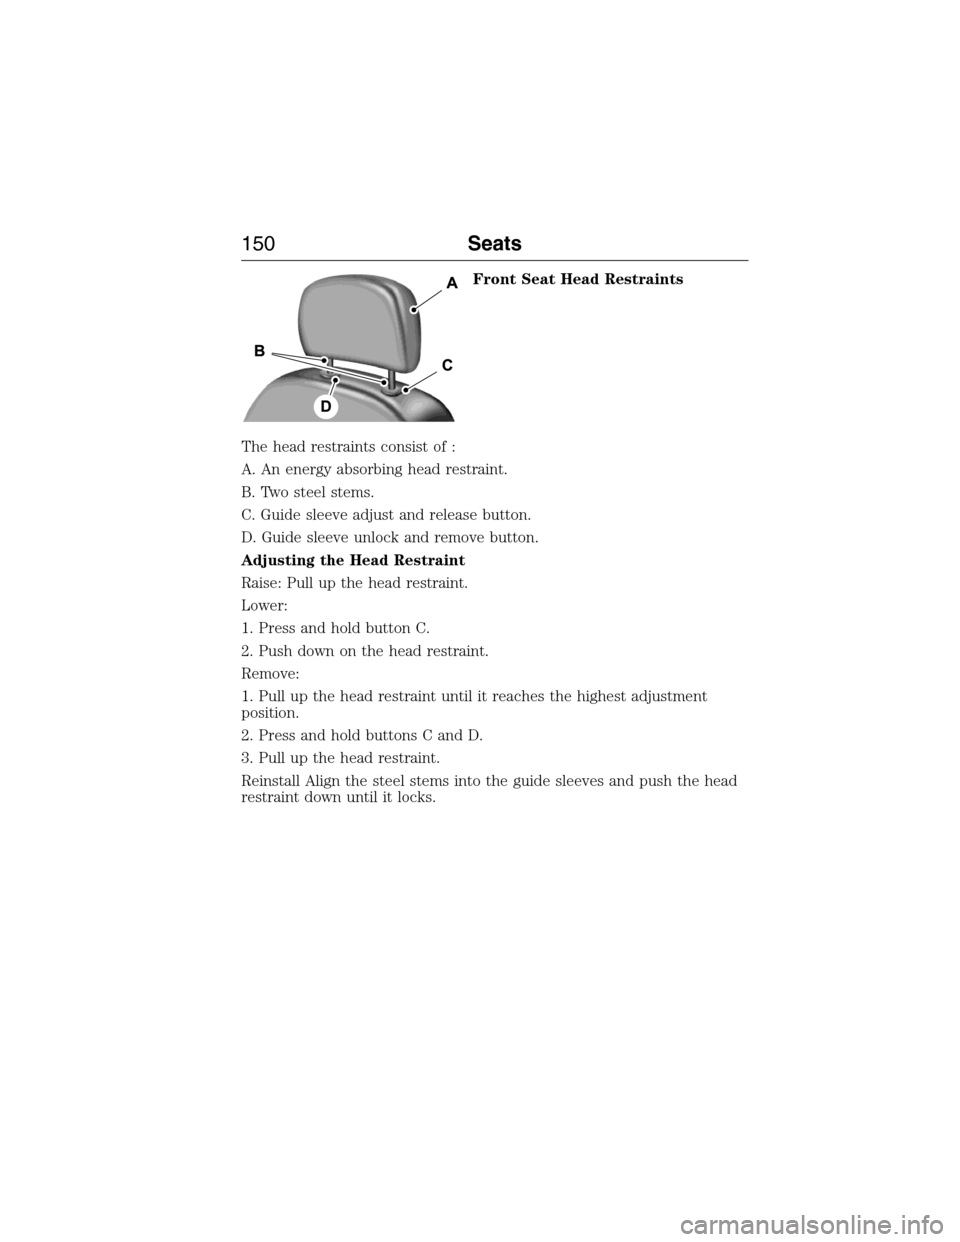
Front Seat Head Restraints
The head restraints consist of :
A. An energy absorbing head restraint.
B. Two steel stems.
C. Guide sleeve adjust and release button.
D. Guide sleeve unlock and remove button.
Adjusting the Head Restraint
Raise: Pull up the head restraint.
Lower:
1. Press and hold button C.
2. Push down on the head restraint.
Remove:
1. Pull up the head restraint until it reaches the highest adjustment
position.
2. Press and hold buttons C and D.
3. Pull up the head restraint.
Reinstall Align the steel stems into the guide sleeves and push the head
restraint down until it locks.
150Seats
2015 Expedition(exd)
Owners Guide gf, 1st Printing, July 2014
USA(fus)
Page 157 of 564
Easy Entry and Exit Feature (If Equipped)
The Easy Entry and Exit feature adjusts the position of the seat and
steering column to allow easier exit and entry to the vehicle.
The driver seat automatically moves 2 inches (5 centimeters) rearward
when the transmission is in park (P) and you remove the key from the
ignition or you switch the ignition off.
The driver seat returns to the previous position when you put the key in
the ignition or switch the ignition on.
Enable or disable this feature through the information display. See the
Information Displayschapter.
Climate Controlled Seats (If Equipped)
Heated Seats
WARNING:Persons who are unable to feel pain to the skin
because of advanced age, chronic illness, diabetes, spinal cord
injury, medication, alcohol use, exhaustion, or other physical conditions,
must exercise care when using the seat heater. The seat heater may
cause burns even at low temperatures, especially if used for long
periods of time. Do not place anything on the seat that insulates against
heat, such as a blanket or cushion, because this may cause the seat
heater to overheat. Do not puncture the seat with pins, needles, or
other pointed objects because this may damage the heating element
which may cause the seat heater to overheat. An overheated seat may
cause serious personal injury.
Note:Do not do the following:
•Place heavy objects on the seat.
•Operate the seat heater if water or any other liquid is spilled on the
seat. Allow the seat to dry thoroughly.
The heated seats will only function when the engine is running.
To operate the heated seats:
Press the heated seat symbol to cycle through the various
heat settings and off. Warmer settings are indicated by
more indicator lights.
156Seats
2015 Expedition(exd)
Owners Guide gf, 1st Printing, July 2014
USA(fus)
Page 158 of 564
Cooled Seats
The cooled seats will only function when the engine is running.
To operate the cooled seats:
Press the cooled seat symbol to cycle through the various
cooling settings and off. Cooler settings are indicated by
more indicator lights.
If the engine falls below 350 RPM while the cooled seats are
on, the feature will turn itself off. You will need to reactivate it.
Climate Controlled Seats Air Filter Replacement (If Equipped)
The climate controlled seat system includes air filters. You must replace
them periodically. Seescheduled maintenance informationfor more
information.
There is a filter located under each front seat. You can access the filter
from the second row seat. Move the front seats all the way forward and
up to ease access.
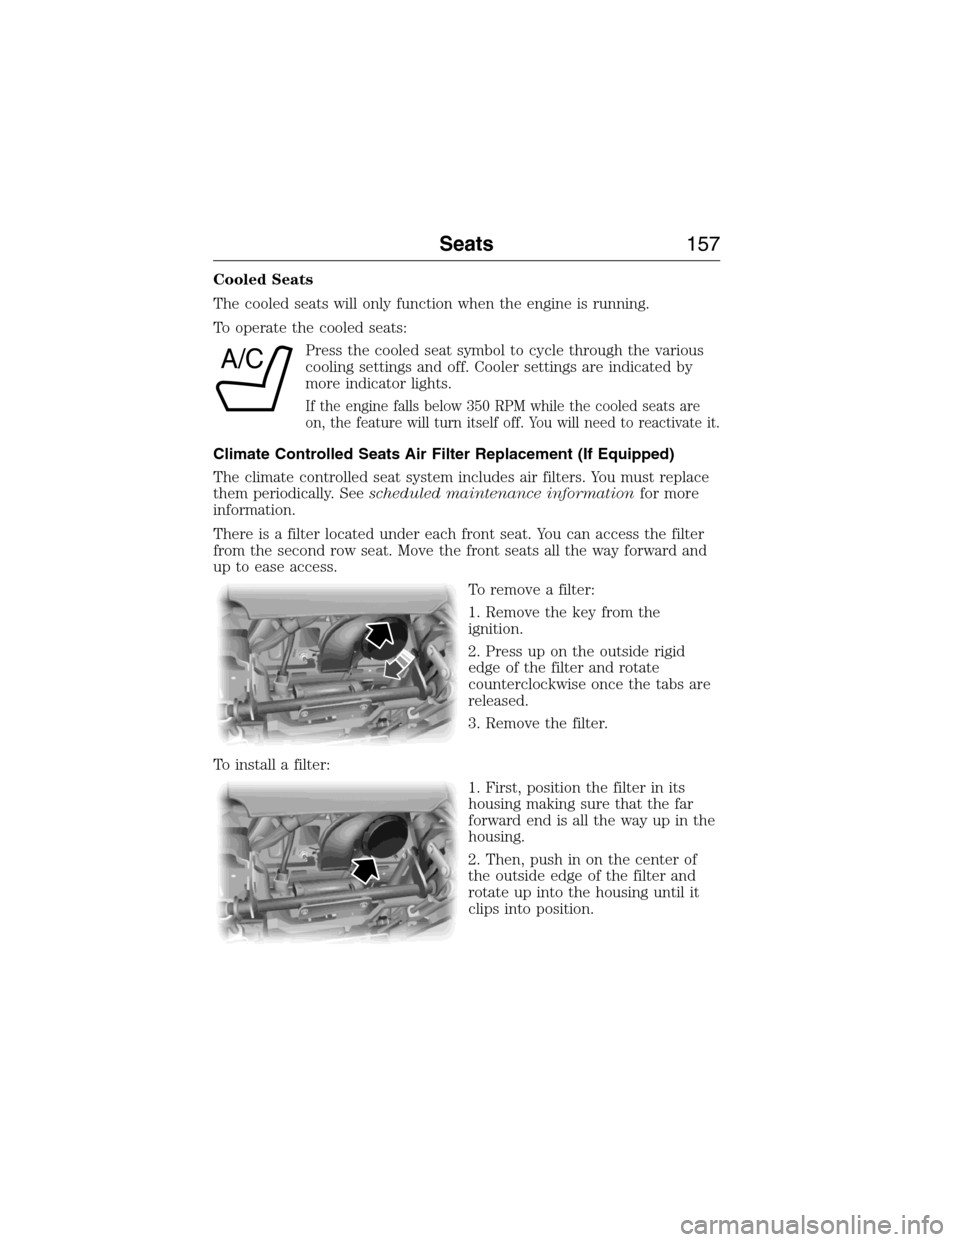
To remove a filter:
1. Remove the key from the
ignition.
2. Press up on the outside rigid
edge of the filter and rotate
counterclockwise once the tabs are
released.
3. Remove the filter.
To install a filter:
1. First, position the filter in its
housing making sure that the far
forward end is all the way up in the
housing.
2. Then, push in on the center of
the outside edge of the filter and
rotate up into the housing until it
clips into position.
A/C
Seats157
2015 Expedition(exd)
Owners Guide gf, 1st Printing, July 2014
USA(fus)