2015 FORD EXPEDITION lights
[x] Cancel search: lightsPage 216 of 564
PRINCIPLES OF OPERATION
The traction control system helps avoid drive wheel spin and loss of
traction.
If your vehicle begins to slide, the system applies the brakes to individual
wheels and, when needed, reduces engine power at the same time. If the
wheels spin when accelerating on slippery or loose surfaces, the system
reduces engine power in order to increase traction.
USING TRACTION CONTROL
In certain situations (for example, stuck in snow or mud), turning the
traction control off may be beneficial as this allows the wheels to spin
with full engine power.
Turn the traction control system off by pressing the
stability control button located on the center of the
instrument panel.
System indicator lights and messages
WARNING:If a failure has been detected within the traction
control system, the stability control light will illuminate steadily.
Verify that the traction control system was not manually disabled using
the stability control button. If the stability control light still illuminates
steadily, have the system serviced by an authorized dealer immediately.
Operating your vehicle with traction control disabled could lead to an
increased risk of loss of vehicle control, vehicle rollover, personal injury
and death.
The stability control light temporarily illuminates on engine
start-up and flashes when a driving condition activates the
stability system.
The stability control off light temporarily illuminates on engine
start-up and stays on when the traction control system is
turned off or if a problem occurs in the stability system.
Traction Control215
2015 Expedition(exd)
Owners Guide gf, 1st Printing, July 2014
USA(fus)
Page 227 of 564
Guidelines and the Centerline
Note:Fixed guidelines are only available when the transmission is in R
(Reverse).
Note:The centerline is only available if fixed guidelines are on.
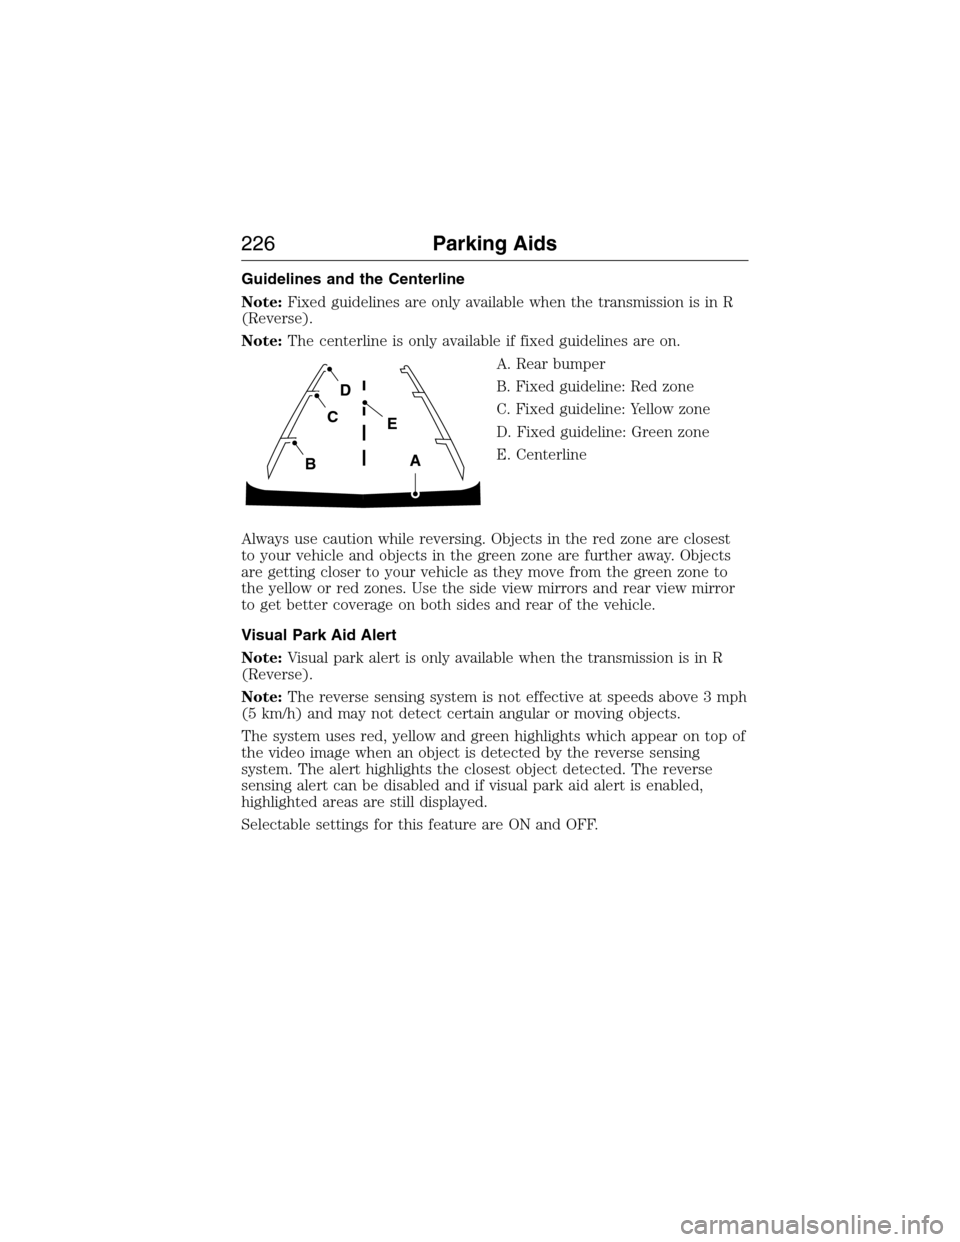
A. Rear bumper
B. Fixed guideline: Red zone
C. Fixed guideline: Yellow zone
D. Fixed guideline: Green zone
E. Centerline
Always use caution while reversing. Objects in the red zone are closest
to your vehicle and objects in the green zone are further away. Objects
are getting closer to your vehicle as they move from the green zone to
the yellow or red zones. Use the side view mirrors and rear view mirror
to get better coverage on both sides and rear of the vehicle.
Visual Park Aid Alert
Note:Visual park alert is only available when the transmission is in R
(Reverse).
Note:The reverse sensing system is not effective at speeds above 3 mph
(5 km/h) and may not detect certain angular or moving objects.
The system uses red, yellow and green highlights which appear on top of
the video image when an object is detected by the reverse sensing
system. The alert highlights the closest object detected. The reverse
sensing alert can be disabled and if visual park aid alert is enabled,
highlighted areas are still displayed.
Selectable settings for this feature are ON and OFF.
A
E
D
C
B
226Parking Aids
2015 Expedition(exd)
Owners Guide gf, 1st Printing, July 2014
USA(fus)
Page 233 of 564

Zone coverage also decreases when parking at shallow angles. Here, the
left sensor is mostly obstructed; zone coverage on that side is severely
limited.
System Lights and Messages
The BLIS® and CTA systems
illuminate a yellow alert indicator in
the outside mirror on the side of
the vehicle the approaching vehicle
is coming from.
Note:The alert indicator dims when nighttime darkness is detected.
CTA also sounds an audible alarm and a message appears in the
information display indicating a vehicle is coming from the right or left.
CTA works with the reverse sensing system which sounds its own
audible alarm; see theParking Aidschapter.
232Driving Aids
2015 Expedition(exd)
Owners Guide gf, 1st Printing, July 2014
USA(fus)
Page 252 of 564
ESSENTIAL TOWING CHECKS
Follow these guidelines for safe towing:
•Do not tow a trailer until you drive your vehicle at least 1000 miles
(1600 kilometers).
•Consult your local motor vehicle laws for towing a trailer.
•See the instructions included with towing accessories for the proper
installation and adjustment specifications.
•Service your vehicle more frequently if you tow a trailer. See your
scheduled maintenance information.
•If you use a rental trailer, follow the instructions the rental agency
gives you.
For load specification terms found on the tire label and Safety
Compliance label and for instructions on calculating your vehicle’s load,
refer toLoad limitin theLoad Carryingchapter.
Remember to account for the trailer tongue weight as part of your
vehicle load when calculating the total vehicle weight.
Trailer Towing Connector (Vehicles with a Trailer Towing Package
and 7–Pin Connector)
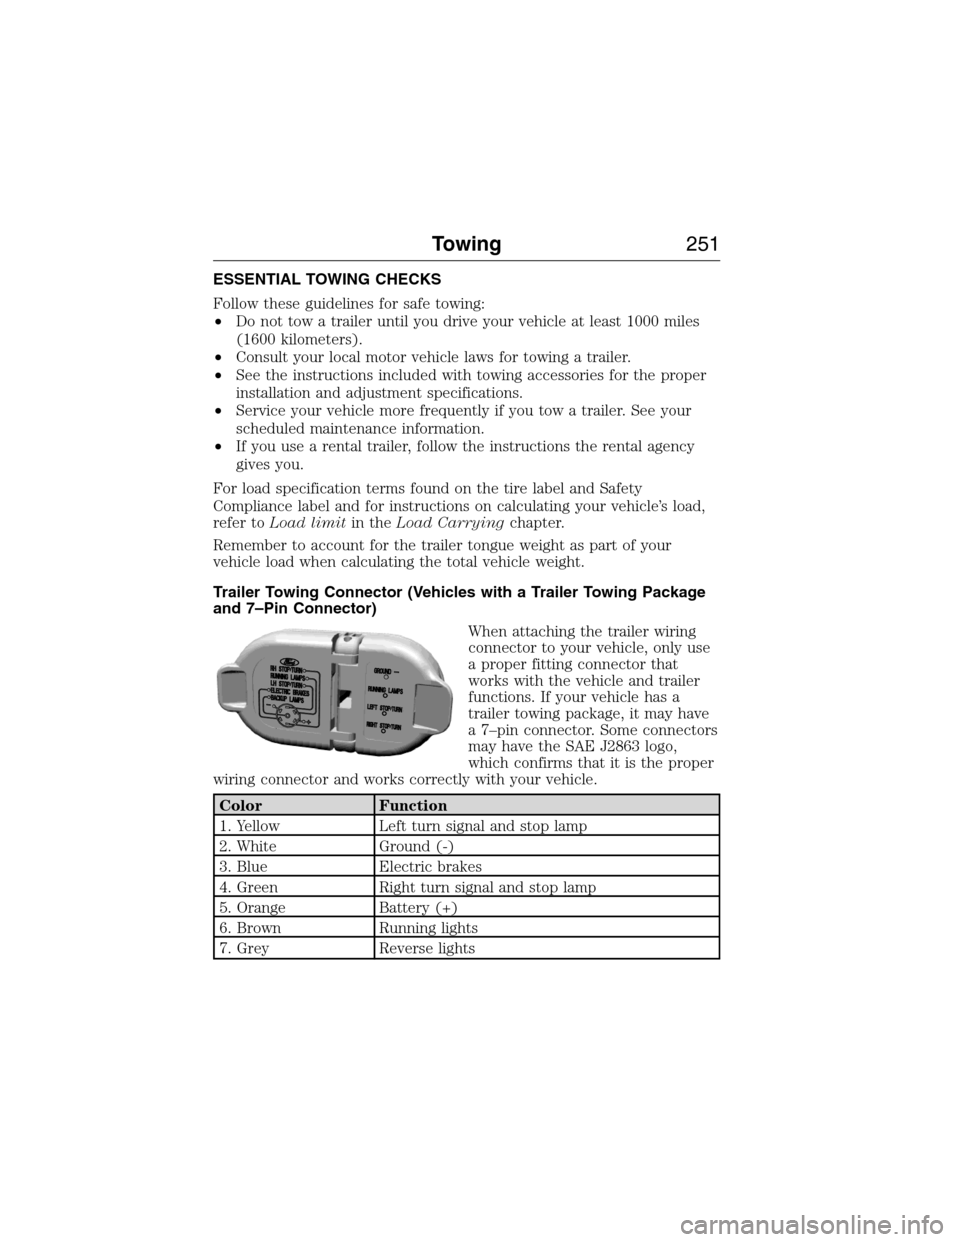
When attaching the trailer wiring
connector to your vehicle, only use
a proper fitting connector that
works with the vehicle and trailer
functions. If your vehicle has a
trailer towing package, it may have
a 7–pin connector. Some connectors
may have the SAE J2863 logo,
which confirms that it is the proper
wiring connector and works correctly with your vehicle.
Color Function
1. Yellow Left turn signal and stop lamp
2. White Ground (-)
3. Blue Electric brakes
4. Green Right turn signal and stop lamp
5. Orange Battery (+)
6. Brown Running lights
7. Grey Reverse lights
Towing251
2015 Expedition(exd)
Owners Guide gf, 1st Printing, July 2014
USA(fus)
Page 260 of 564
Trailer Lamps
WARNING:Never connect any trailer lamp wiring to the
vehicle’s tail lamp wiring; this may damage the electrical system
resulting in a fire. Contact an authorized dealer as soon as possible for
assistance in proper trailer tow wiring installation. Additional electrical
equipment may be required.
Trailer lamps are required on most towed vehicles. Make sure all running
lights, brake lights, turn signals and hazard lights are working.
Before Towing a Trailer
Practice turning, stopping and backing up to get the feel of your
vehicle-trailer combination before starting on a trip. When turning, make
wider turns so the trailer wheels clear curbs and other obstacles.
When Towing a Trailer
•Do not drive faster than 70 mph (113 km/h) during the first 500 miles
(800 kilometers).
•Do not make full-throttle starts.
•Check your hitch, electrical connections and trailer wheel lug nuts
thoroughly after you have traveled 50 miles (80 kilometers).
•When stopped in congested or heavy traffic during hot weather, place
the gearshift in positionPto aid engine and transmission cooling and
to help air conditioning performance.
•Turn off the speed control with heavy loads or in hilly terrain. The
speed control may turn off automatically when you are towing on
long, steep grades.
•Shift to a lower gear when driving down a long or steep hill. Do not
apply the brakes continuously, as they may overheat and become less
effective.
•If your transmission is equipped with a Grade Assist or Tow/Haul
feature, use this feature when towing. This provides engine braking
and helps eliminate excessive transmission shifting for optimum fuel
economy and transmission cooling.
•If your vehicle is equipped with AdvanceTrac™ with RSC, this system
may turn on during typical cornering maneuvers with a heavily loaded
trailer. This is normal. Turning the corner at a slower speed while
towing may reduce this tendency.
Towing259
2015 Expedition(exd)
Owners Guide gf, 1st Printing, July 2014
USA(fus)
Page 267 of 564
•Add particular accessories to your vehicle (e.g.; bug deflectors,
rollbars or light bars, running boards, ski racks).
•Drive with the wheels out of alignment.
DRIVING THROUGH WATER
WARNING:Do not drive through flowing or deep water as you
may lose control of your vehicle.
Note:Driving through standing water can cause vehicle damage.
Note:Engine damage can occur if water enters the air filter.
Before driving through standing water, check the depth. Never drive
through water that is higher than the bottom
of the wheel hubs.
When driving through standing water, drive
very slowly and do not stop your vehicle. Your
brake performance and traction may be
limited. After driving through water and as
soon as it is safe to do so:
•Lightly press the brake pedal to dry the
brakes and to check that they work.
•Check that the horn works.
•Check that the exterior lights work.
•Turn the steering wheel to check that the steering power assist works.
FLOOR MATS
WARNING:Always use floor mats that are designed to fit the
foot well of your vehicle. Only use floor mats that leave the pedal
area unobstructed. Only use floor mats that are firmly secured to
retention posts so that they cannot slip out of position and interfere
with the pedals or impair safe operation of your vehicle in other ways.
WARNING:Pedals that cannot move freely can cause loss of
vehicle control and increase the risk of serious personal injury.
266Driving Hints
2015 Expedition(exd)
Owners Guide gf, 1st Printing, July 2014
USA(fus)
Page 313 of 564
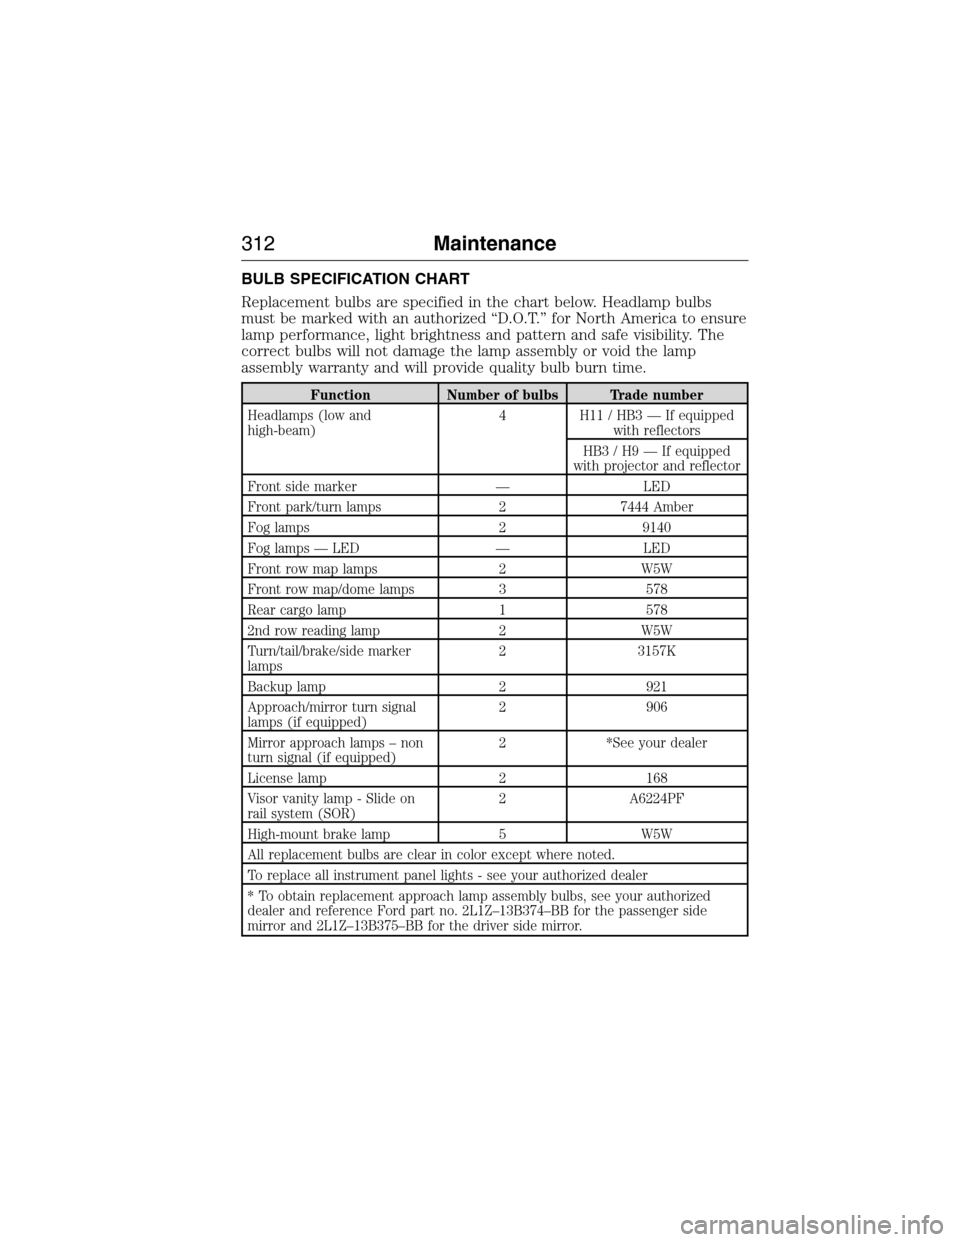
BULB SPECIFICATION CHART
Replacement bulbs are specified in the chart below. Headlamp bulbs
must be marked with an authorized “D.O.T.” for North America to ensure
lamp performance, light brightness and pattern and safe visibility. The
correct bulbs will not damage the lamp assembly or void the lamp
assembly warranty and will provide quality bulb burn time.
Function Number of bulbs Trade number
Headlamps (low and
high-beam)4 H11 / HB3 — If equipped
with reflectors
HB3 / H9 — If equipped
with projector and reflector
Front side marker — LED
Front park/turn lamps 2 7444 Amber
Fog lamps 2 9140
Fog lamps — LED — LED
Front row map lamps 2 W5W
Front row map/dome lamps 3 578
Rear cargo lamp 1 578
2nd row reading lamp 2 W5W
Turn/tail/brake/side marker
lamps2 3157K
Backup lamp 2 921
Approach/mirror turn signal
lamps (if equipped)2 906
Mirror approach lamps – non
turn signal (if equipped)2 *See your dealer
License lamp 2 168
Visor vanity lamp - Slide on
rail system (SOR)2 A6224PF
High-mount brake lamp 5 W5W
All replacement bulbs are clear in color except where noted.
To replace all instrument panel lights - see your authorized dealer
* To obtain replacement approach lamp assembly bulbs, see your authorized
dealer and reference Ford part no. 2L1Z–13B374–BB for the passenger side
mirror and 2L1Z–13B375–BB for the driver side mirror.
312Maintenance
2015 Expedition(exd)
Owners Guide gf, 1st Printing, July 2014
USA(fus)
Page 347 of 564
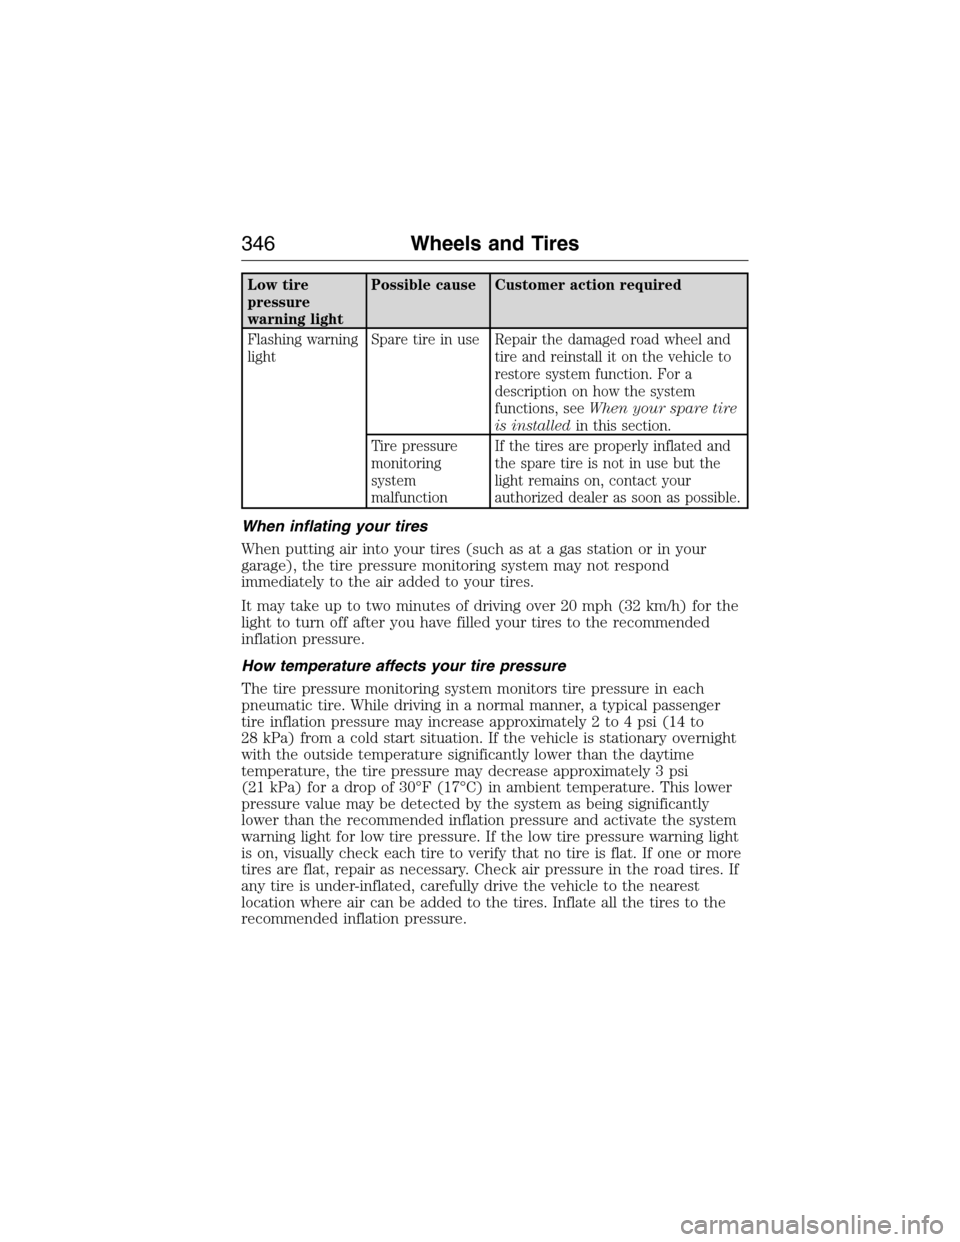
Low tire
pressure
warning lightPossible cause Customer action required
Flashing warning
lightSpare tire in use Repair the damaged road wheel and
tire and reinstall it on the vehicle to
restore system function. For a
description on how the system
functions, seeWhen your spare tire
is installedin this section.
Tire pressure
monitoring
system
malfunctionIf the tires are properly inflated and
the spare tire is not in use but the
light remains on, contact your
authorized dealer as soon as possible.
When inflating your tires
When putting air into your tires (such as at a gas station or in your
garage), the tire pressure monitoring system may not respond
immediately to the air added to your tires.
It may take up to two minutes of driving over 20 mph (32 km/h) for the
light to turn off after you have filled your tires to the recommended
inflation pressure.
How temperature affects your tire pressure
The tire pressure monitoring system monitors tire pressure in each
pneumatic tire. While driving in a normal manner, a typical passenger
tire inflation pressure may increase approximately 2 to 4 psi (14 to
28 kPa) from a cold start situation. If the vehicle is stationary overnight
with the outside temperature significantly lower than the daytime
temperature, the tire pressure may decrease approximately 3 psi
(21 kPa) for a drop of 30°F (17°C) in ambient temperature. This lower
pressure value may be detected by the system as being significantly
lower than the recommended inflation pressure and activate the system
warning light for low tire pressure. If the low tire pressure warning light
is on, visually check each tire to verify that no tire is flat. If one or more
tires are flat, repair as necessary. Check air pressure in the road tires. If
any tire is under-inflated, carefully drive the vehicle to the nearest
location where air can be added to the tires. Inflate all the tires to the
recommended inflation pressure.
346Wheels and Tires
2015 Expedition(exd)
Owners Guide gf, 1st Printing, July 2014
USA(fus)