Page 293 of 412

WARNING! (Continued)
• Do not get under the vehicle when it is on a
jack. If you need to get under a raised vehicle,
take it to a service center where it can be raised
on a lift .
• Only use the jack in the positions indicated and
for lifting this vehicle during a tire change.
• If working on or near a roadway, be extremely
careful of motor traffic .
• To assure that spare tires, flat or inflated, are
securely stowed, spares must be stowed with the
valve stem facing the ground.
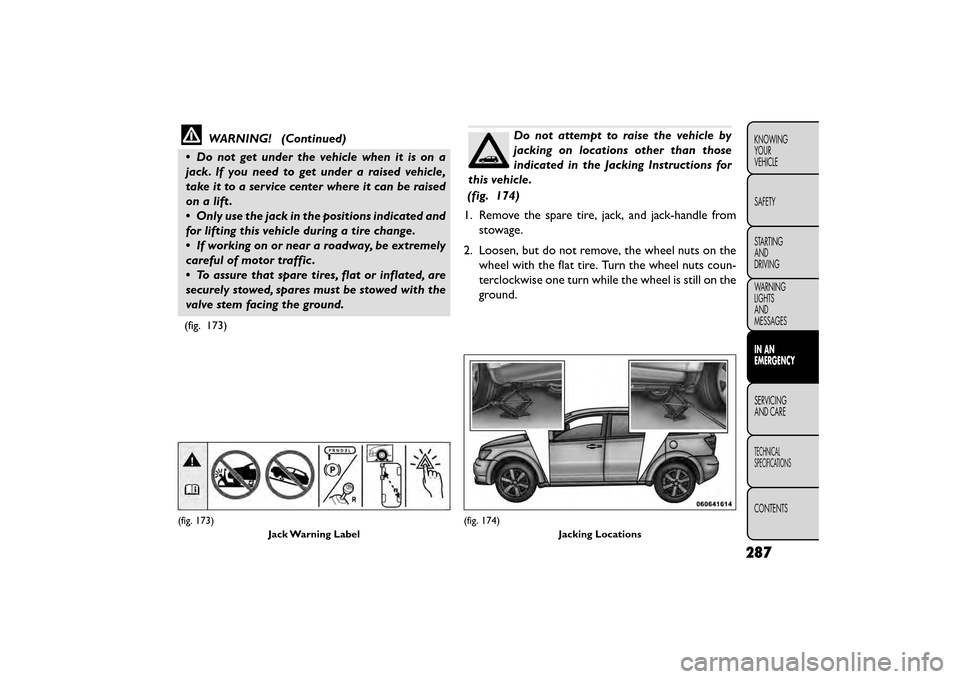
(fig. 173)
Do not attempt to raise the vehicle by
jacking on locations other than those
indicated in the Jacking Instructions for
this vehicle.
(fig. 174)
1. Remove the spare tire, jack, and jack-handle from stowage.
2. Loosen, but do not remove, the wheel nuts on the wheel with the flat tire. Turn the wheel nuts coun-
terclockwise one turn while the wheel is still on the
ground.
(fig. 173)
Jack Warning Label(fig. 174) Jacking Locations
287
KNOWING
YOUR
VEHICLE
SAFETY
STARTING
AND
DRIVING
WARNING
LIGHTS
AND
MESSAGES
IN AN
EMERGENCY
SERVICING
AND
CARE
TECHNICAL
SPECIFICATIONS
CONTENTS
Page 294 of 412
3. Place the jack underneath the lift area that is closestto the flat tire. Center the jack saddle between the
drain flute formations on the sill flange. Turn the
jack screw clockwise to firmly engage the jack saddle
with the lift area of the sill flange.
(fig. 175) (fig. 176) (fig. 177) (fig. 178)
4. Raise the vehicle by turning the jack screw clock- wise with the jack handle. Raise the vehicle until the
tire just clears the road surface and enough clear-
ance is obtained to install the spare tire. Minimum
tire lift provides maximum stability.
(fig. 175)
Front Jacking Location
(fig. 176)Front Jack Engaged With Jack Handle
(fig. 177) Rear Jacking Location
288
KNOWINGYOUR
VEHICLE
SAFETY
STARTING AND
DRIVING
WARNING LIGHTSAND
MESSAGES
IN AN
EMERGENCY
SER VICING
AND
CARE
TECHNICAL
SPECIFICATIONS
CONTENTS
Page 296 of 412

NOTE:
• For vehicles so equipped, do not attempt to install acenter cap or wheel cover on the compact spare.
• Refer to “Compact Spare Tire” and to “Limited-Use Spare” under “Tires — General Information” in
“Technical Specifications” for additional warnings,
cautions, and information about the spare tire, its
use, and operation.
7. Install the wheel nuts with the cone-shaped end of the nut toward the wheel. Lightly tighten the wheel
nuts.
WARNING!
To avoid the risk of forcing the vehicle
off t
he jack, do not tighten the wheel
nuts fully until the vehicle has been lowered.
Failure to follow this warning may result in per-
sonal injury.
8. Lower the vehicle by turning the jack screw coun- terclockwise with the jack handle. 9. Finish tightening the lug nuts. Push down on the
wrench while at the end of the handle for increased
leverage. Tighten the lug nuts in a star pattern until
each nut has been tightened twice. Refer to “Torque
Specifications” in this section for proper lug nut
torque. If in doubt about the correct tightness, have
them checked with a torque wrench by your autho-
rized dealer or service station.
10. Lower the jack to its fully closed position.
11. Place the deflated (flat) tire in the cargo area. Do
not stow the deflated tire in the spare tire
stowage location. Have the deflated (flat) tire
repaired or replaced as soon as possible.
12. To stow the winch cable and retainer, fit the assembled jack-handle over the winch drive nut.
Rotate the jack-handle assembly clockwise until
you hear the winch mechanism click three times. It
cannot be over tightened.
13. Stow the jack-handle and jack. Remove the wheel blocks from the vehicle and release the park brake.
14. Check the tire pressure as soon as possible. Adjust the tire pressure as required.
290
KNOWING YOUR
VEHICLE
SAFETY
STARTING AND
DRIVING
WARNING LIGHTSAND
MESSAGES
IN AN
EMERGENCY
SER VICING
AND
CARE
TECHNICAL
SPECIFICATIONS
CONTENTS
Page 297 of 412

ROAD TIRE INSTALLATION
Vehicles Equipped With Wheel Covers
1. Mount the road tire on the axle.
2. To ease the installation process for steel wheelswith wheel covers, install two lug nuts on the
mounting studs which are on each side of the valve
stem. Install the lug nuts with the cone shaped end
of the nut toward the wheel. Lightly tighten the lug
nuts.
WARNING!
To avoid the risk of forcing the vehicle
off t
he jack, do not tighten the lug nuts
fully until the vehicle has been lowered. Failure to
follow this warning may result in personal injury.
(fig. 180)
3. Align the valve notch in the wheel cover with the valve stem on the wheel. Install the cover by hand,
snapping the cover over the two lug nuts. Do not
use a hammer or excessive force to install the cover.
4. Install the remaining lug nuts with the cone shaped end of the nut toward the wheel. Lightly tighten the
lug nuts.
WARNING!
To avoid the risk of forcing the vehicle
off t
he jack, do not tighten the lug nuts
fully until the vehicle has been lowered. Failure to
follow this warning may result in personal injury.
5. Lower the vehicle to the ground by turning the jack handle counterclockwise.
(fig. 180)
Tire And Wheel Cover Or Center Cap
1 — Valve Stem 4 — Wheel Cover
2 — Valve Notch 5 — Mounting Stud
3 — Wheel Lug Nut
291
KNOWING
YOUR
VEHICLE
SAFETY
STARTING
AND
DRIVING
WARNING
LIGHTS
AND
MESSAGES
IN AN
EMERGENCY
SER VICING
AND
CARE
TECHNICAL
SPECIFICATIONS
CONTENTS
Page 298 of 412

6. Finish tightening the lug nuts. Push down on thewrench while at the end of the handle for increased
leverage. Tighten the lug nuts in a star pattern until
each nut has been tightened twice. For the correct
lug nut torque refer to Torque Specifications in this
section. If in doubt about the correct tightness, have
them checked with a torque wrench by your autho-
rized dealer or service station.
7. After 40 km check the lug nut torque with a torque wrench to ensure that all lug nuts are properly
seated against the wheel.
Vehicles Without Wheel Covers
1. Mount the road tire on the axle.
2. Install the remaining lug nuts with the cone shaped end of the nut toward the wheel. Lightly tighten the
lug nuts.WARNING!
To avoid the risk of forcing the vehicle
off t
he jack, do not tighten the lug nuts
fully until the vehicle has been lowered. Failure to
follow this warning may result in personal injury.
3. Lower the vehicle to the ground by turning the jack handle counterclockwise.
4. Finish tightening the lug nuts. Push down on the wrench while at the end of the handle for increased
leverage. Tighten the lug nuts in a star pattern until
each nut has been tightened twice. For proper lug
nut torque refer to Torque Specifications in this
secton. If in doubt about the correct tightness, have
them checked with a torque wrench by your autho-
rized dealer or service station.
5. After 40 km check the lug nut torque with a torque wrench to ensure that all lug nuts are properly
seated against the wheel.
292
KNOWING YOUR
VEHICLE
SAFETY
STARTING AND
DRIVING
WARNING LIGHTSAND
MESSAGES
IN AN
EMERGENCY
SER VICING
AND
CARE
TECHNICAL
SPECIFICATIONS
CONTENTS
Page 308 of 412

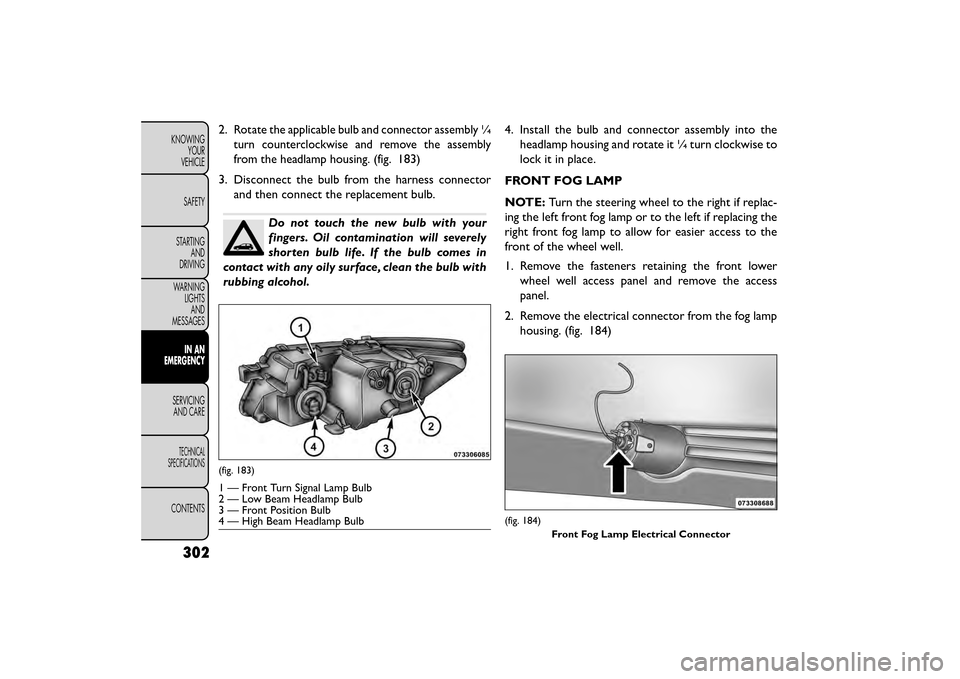
2.Rotate the applicable bulb and connector assembly ¼
turn counterclockwise and remove the assembly
from the headlamp housing.
(fig. 183)
3. Disconnect the bulb from the harness connector and then connect the replacement bulb.
Do not touch the new bulb with your
fingers. Oil contamination will severely
shorten bulb life. If the bulb comes in
contact with any oily surface, clean the bulb with
rubbing alcohol. 4. Install the bulb and connector assembly into the
headlamp housing and rotate it ¼ turn clockwise to
lock it in place.
FRONT FOG LAMP
NOTE: Turn the steering wheel to the right if replac-
ing the left front fog lamp or to the left if replacing the
right front fog lamp to allow for easier access to the
front of the wheel well.
1. Remove the fasteners retaining the front lower wheel well access panel and remove the access
panel.
2. Remove the electrical connector from the fog lamp housing. (fig. 184)
(fig. 183)
1 — Front Turn Signal Lamp Bulb
2 — Low Beam Headlamp Bulb
3 — Front Position Bulb
4 — High Beam Headlamp Bulb
(fig. 184)
Front Fog Lamp Electrical Connector
302
KNOWINGYOUR
VEHICLE
SAFETY
STARTING AND
DRIVING
WARNING LIGHTSAND
MESSAGES
IN AN
EMERGENCY
SER VICING
AND
CARE
TECHNICAL
SPECIFICATIONS
CONTENTS
Page 311 of 412

REAR TURN SIGNAL AND BACKUP LAMP
The taillamps are a two-piece design. The tail/stop/rear
turn signal lamps are located in the rear corner body
panels. The tail and backup lamps are located in the
liftgate.
Changing The Rear Turn Signal Lamp
1. Open the liftgate.
2. Remove the two fasteners from the inboard side ofthe taillamp housing. (fig. 188) 3. Carefully insert a trim stick (plastic flat-blade tool)
between the body panel and the outboard side of
the taillamp housing with one hand and grasp the
flange on the inboard side of the taillamp housing
with the other hand. Use the trim stick and hand
pressure together to disengage the taillamp housing
from the vehicle.
4. Rotate the applicable bulb's electrical connector ¼ turn counterclockwise and remove it from the tail-
lamp housing.
5. Remove the bulb from the connector socket and install the replacement bulb.
6. Install the bulb and connector assembly into the taillamp housing and rotate the connector ¼ turn
clockwise to lock it in place.
7. Reinstall the taillamp housing and fasteners.
(fig. 188) Inboard Tail Lamp Housing Fasteners
305
KNOWING
YOUR
VEHICLE
SAFETY
STARTING
AND
DRIVING
WARNING
LIGHTS
AND
MESSAGES
IN AN
EMERGENCY
SERVICING
AND
CARE
TECHNICAL
SPECIFICATIONS
CONTENTS
Page 312 of 412
Changing The Backup Lamp
1. Open the liftgate.
2. Remove the two fasteners retaining the taillamphousing to the liftgate from the inboard face of the
liftgate. (fig. 189)
3. Carefully insert a trim stick (plastic flat-blade tool) between the taillamp housing and the liftgate. Use
the trim stick and hand pressure together to disen-
gage the taillamp housing from the liftgate.
(fig. 190) 4. Rotate the applicable bulb's electrical connector ¼
turn counterclockwise and remove it from the
housing.
5. Remove the bulb from the connector socket and install the replacement bulb.
6. Install the bulb and connector assembly into the housing and rotate the connector ¼ turn clockwise
to lock it in place.
7. Reinstall the taillamp housing and fasteners.
(fig. 189) Tail Lamp Housing Retainers(fig. 190) Tail Gate Lamp
306
KNOWINGYOUR
VEHICLE
SAFETY
STARTING AND
DRIVING
WARNING LIGHTSAND
MESSAGES
IN AN
EMERGENCY
SER VICING
AND
CARE
TECHNICAL
SPECIFICATIONS
CONTENTS