2015 FIAT 500X Engine light
[x] Cancel search: Engine lightPage 133 of 240

ENGINE COMPARTMENT FUSE BOXUSERSFUSE AMPEREHornF10 10
Power supply for cigar lighter/power socket F84 20
.
DASHBOARD FUSE BOXUSERSFUSE AMPEREFront electric window (passenger side) F33 20
Front electric window (driver side) F34 20
Supply forUconnect
™
system, Climate Control system, Electric
door mirror folding, EOBD system, USB port/AUX socket, rear
side roof lights (versions with sun roof)F36 15
Dead Lock device (Driver side door unlocking for versions/
markets, where provided)/Door unlocking/Central locking/Electric
tailgate unlockingF38 20
Rear left electric window F47 20
Rear right electric window F48 20
131
15-12-2014 8:23 Pagina 131
Page 135 of 240

CHANGING A WHEELJACKPlease note that:
❒the weight of the jack is 2.8 kg;
❒The jack requires no adjustment;
❒the jack cannot be repaired and in
the event of a fault it must be replaced
by another original one;
❒No tool other than its cranking device
may be fitted on the jack.CHANGING PROCEDURE
132) 133) 134) 135) 136) 137) 138) 139)
Proceed as follows:
❒stop the vehicle in a position that is
not dangerous for oncoming traffic
where you can change the wheel safely.
The ground should be flat if possible,
and sufficiently firm;
❒stop the engine, engage the hazard
warning lights and the electric parking
brake;
❒engage first gear or reverse or, for
versions with automatic transmission,
move the lever to position P (Park);
❒wear the reflective safety jacket
(compulsory by law in certain countries)
before getting out of the vehicle;❒open the boot and position the
reconfigurable load platform in
an inclined position (see "Boot" in the
"Knowing your vehicle" chapter);
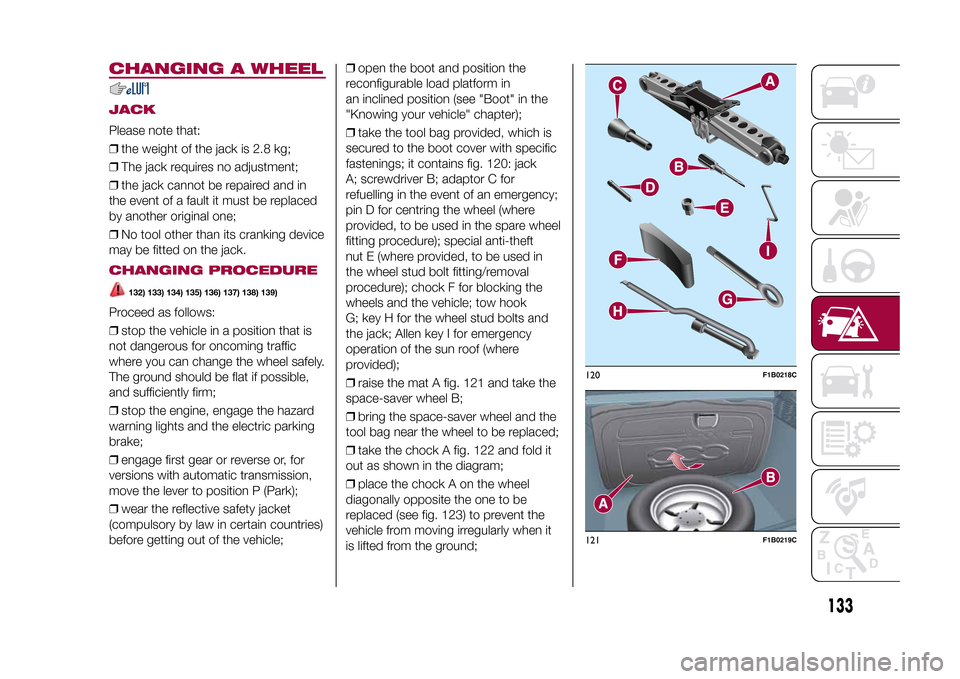
❒take the tool bag provided, which is
secured to the boot cover with specific
fastenings; it contains fig. 120: jack
A; screwdriver B; adaptor C for
refuelling in the event of an emergency;
pin D for centring the wheel (where
provided, to be used in the spare wheel
fitting procedure); special anti-theft
nut E (where provided, to be used in
the wheel stud bolt fitting/removal
procedure); chock F for blocking the
wheels and the vehicle; tow hook
G; key H for the wheel stud bolts and
the jack; Allen key I for emergency
operation of the sun roof (where
provided);
❒raise the mat A fig. 121 and take the
space-saver wheel B;
❒bring the space-saver wheel and the
tool bag near the wheel to be replaced;
❒take the chock A fig. 122 and fold it
out as shown in the diagram;
❒place the chock A on the wheel
diagonally opposite the one to be
replaced (see fig. 123) to prevent the
vehicle from moving irregularly when it
is lifted from the ground;
120
F1B0218C
121
F1B0219C
133
15-12-2014 8:23 Pagina 133
Page 140 of 240

WARNING
54)In the event of a puncture caused by
foreign bodies, the kit may be used to
repair tyres showing damage on the tread
or shoulder up to max. 4 mm diameter.
WARNING
3)Dispose of the bottle and the sealant
properly. Dispose of the components
in compliance with national and local
regulations.
EMERGENCY
STARTING
55)
If the battery is flat, a jump starting can
be performed using the battery and
the cables of another vehicle, or using
an auxiliary battery. In all cases, the
battery used must have a capacity
equal to or a little higher than the flat
one.IMPORTANTDo not use an auxiliary battery or any
other source of external supply with
a voltage above 12 V: the battery, the
starter, the alternator and the electrical
system of the vehicle could be
damaged.
Do not attempt jump starting if the
battery is frozen. The battery could
break and explode!JUMP STARTINGThe vehicle battery is located in the
engine compartment, behind the left
light cluster.
148) 149) 150) 151)
IMPORTANT The positive terminal (+) of
the battery is shielded by a protective
element. Raise it to access the terminal.Proceed as follows:
❒operate the parking brake, move the
lever to P (Park), for versions equipped
with automatic transmission, or neutral,
for versions with manual gearbox,
then set the ignition device to STOP;
❒switch off all the other electrical
appliances in the vehicle;
❒should you be using the battery of
another vehicle, park the other vehicle
within the range of the cables used
for the connection, operate the parking
brake and ensure that its ignition is
off.
IMPORTANT If the procedure below is
carried out incorrectly, it can cause
severe injury to people or damage the
recharging system of one or both
vehicles. Carefully follow the
instructions given below.
Cable connection
56)
Proceed as follows to carry out bump
starting fig. 129:
❒connect one end of the cable used
for positive (+) to the positive terminal
(+) of the vehicle with flat battery;
❒connect the other end of the cable
used for positive (+) to the positive
terminal (+) of the auxiliary battery;
138
IN AN EMERGENCY
15-12-2014 8:23 Pagina 138
Page 142 of 240

FUEL CUT-OFF
SYSTEMDESCRIPTIONThis intervenes in the case of an impact
causing:
❒the interruption of the fuel supply with
the engine consequently switching off;
❒the automatic unlocking of the doors;
❒turning on of the lights inside the
vehicle;
❒deactivation of climate control system
ventilation;
❒switching on of the hazard warning
lights (to deactivate the lights press the
button on the dashboard).
On some versions, the intervention of
the system is indicated by a message
shown on the display. In the same way,
a dedicated message on the display
warns the driver if system operation is
compromised.
IMPORTANT Carefully check the vehicle
for fuel leaks, for instance in the engine
compartment, under the vehicle or
near the tank area. After a collision,
bring the ignition device to STOP to
prevent the battery from running down.
FUEL CUT-OFF SYSTEM
RESETTo restore correct operation of the
vehicle, carry out the following
procedure (this procedure must be
started and completed within less than
1 minute):
152)
Operations to be carried out
With direction indicator lever in neutral
position, bring the ignition device to STOP
Bring the ignition device to MAR
Activate the right direction indicator
Activate the left direction indicator
Activate the right direction indicator
Activate the left direction indicator
Deactivate the left direction indicator
Bring the ignition device to STOP
Bring the ignition device to MAR
WARNING
152)If, after an impact, you smell fuel or
notice leaks from the fuel system, do
not reactivate the system to avoid the risk
of fire.
AUTOMATIC
TRANSMISSION
GEAR LEVER
UNLOCKINGIn the event of a fault, to move the gear
lever from P (Park), proceed as follows:
❒stop the engine;
❒engage the electric parking brake;
❒working carefully in the point
indicated by the arrow, remove the trim
A fig. 130 (complete with gaiter) lifting
it upwards (see also fig. 131);130
F1B0028C
131
F1B0055C
140
IN AN EMERGENCY
15-12-2014 8:23 Pagina 140
Page 148 of 240

SCHEDULED SERVICING PLAN (1.4 Turbo MultiAir versions)The checks listed in the Scheduled Servicing Plan, after reaching 120,000 km/8 years, must be cyclically repeated starting from
the first interval, thus following the same intervals as before.Thousands of miles 9 18 27 36 45 54 63 72 81 90
Thousands of kilometres 15 30 45 60 75 90 105 120 135 150
Years12345678910Check tyre condition/wear and adjust pressure, if
necessary. Check Fix&Go quick tyre repair kit recharge
expiry date (where provided)●●●●●●●●●●
Check operation of lighting system (headlights, direction
indicators, hazard warning lights, boot, passenger
compartment, glove compartment, instrument panel
warning lights, etc.)●●●●●●●●●●
Check and, if necessary, top up fluid levels (engine
coolant, hydraulic clutch/brakes, screen washer, battery,
etc.)●●●●●●●●●●
Check exhaust emissions/smokiness●●●●●●●●●●
Use the diagnosis socket to check engine management
system operation, emissions and, for versions/markets,
where provided, engine oil degradation●●●●●●●●●●
Visually inspect conditions of: exterior bodywork,
underbody protection, pipes and hoses (exhaust, fuel
system, brakes), rubber elements (gaiters, sleeves,
bushes, etc.)●●●●●
Check windscreen and rear window wiper blade position/
wear●●●●●
146
SERVICING AND MAINTENANCE
15-12-2014 8:23 Pagina 146
Page 151 of 240

SCHEDULED SERVICING PLAN (1.6 E.torQ versions)The checks listed in the Scheduled Servicing Plan, after reaching 120,000 km/8 years, must be cyclically repeated starting from
the first interval, thus following the same intervals as before.Thousands of miles 9 18 27 36 45 54 63 72 81 90
Thousands of kilometres 15 30 45 60 75 90 105 120 135 150
Years12345678910Check tyre condition/wear and adjust pressure, if
necessary. Check Fix&Go quick tyre repair kit recharge
expiry date (where provided)●●●●●●●●●●
Check operation of lighting system (headlights, direction
indicators, hazard warning lights, boot, passenger
compartment, glove compartment, instrument panel
warning lights, etc.)●●●●●●●●●●
Check and, if necessary, top up fluid levels (engine
coolant, hydraulic clutch/brakes, screen washer, battery,
etc.)●●●●●●●●●●
Check exhaust emissions/smokiness●●●●●●●●●●
Use the diagnosis socket to check engine management
system operation, emissions and, for versions/markets,
where provided, engine oil degradation●●●●●●●●●●
Visually inspect conditions of: exterior bodywork,
underbody protection, pipes and hoses (exhaust, fuel
system, brakes), rubber elements (gaiters, sleeves,
bushes, etc.)●●●●●
Check windscreen and rear window wiper blade position/
wear●●●●●
149
15-12-2014 8:23 Pagina 149
Page 154 of 240

SCHEDULED SERVICING PLAN (1.6 MultiJet and 2.0 MultiJet versions)The checks listed in the Scheduled Servicing Plan, after reaching 120,000 km/6 years, must be cyclically repeated starting from
the first interval, thus following the same intervals as before.Thousands of miles 12 24 36 48 60 72 84 96 108 120
Thousands of kilometres 20 40 60 80 100 120 140 160 180 200
Years12345678910Check tyre condition/wear and adjust pressure, if
necessary. Check Fix&Go quick tyre repair kit recharge
expiry date (where provided)●●●●●●●●●●
Check operation of lighting system (headlights, direction
indicators, hazard warning lights, boot, passenger
compartment, glove compartment, instrument panel
warning lights, etc.)●●●●●●●●●●
Check and, if necessary, top up fluid levels (engine
coolant, hydraulic clutch/brakes, screen washer, battery,
etc.)●●●●●●●●●●
Check exhaust emissions/smokiness●●●●●●●●●●
Use the diagnosis socket to check supply/engine
management systems operation, emissions and, for
versions/markets, where provided, engine oil degradation●●●●●●●●●●
Visually inspect conditions of: exterior bodywork,
underbody protection, pipes and hoses (exhaust, fuel
system, brakes), rubber elements (gaiters, sleeves,
bushes, etc.)●●●●●
Check windscreen and rear window wiper blade position/
wear●●●●●
152
SERVICING AND MAINTENANCE
15-12-2014 8:23 Pagina 152
Page 155 of 240

Thousands of miles 12 24 36 48 60 72 84 96 108 120
Thousands of kilometres 20 40 60 80 100 120 140 160 180 200
Years12345678910Check operation of the wiper/washer system and adjust
jets, if necessary●●●●●
Check cleanliness of bonnet and boot locks, as well as
cleanliness and lubrication of linkages●●●●●
Visually inspect conditions and wear of front disc brake
pads and operation of pad wear indicator●●●●●●●●●●
Visually inspect conditions and wear of rear disc brake
pads and operation of pad wear indicator●●●●●●●●●●
Visual check of accessory drive belt(s) (versions without
automatic tensioner)●
Check tension of accessory drive belt (versions without
automatic tensioner)●●
Visually inspect conditions of toothed timing drive belt●●
Check drive transmission idler unit oil level (PTU) (4x4
versions)●●
Check rear differential oil level (4x4 versions)●●
Change engine oil and replace the oil filter (versions with
DPF) (2)(2) The actual interval for changing engine oil and replacing the engine oil filter depends on the vehicle usage conditions and is signalled by the warning light or
message in the instrument panel. In any case, it must never exceed 2 years. If the vehicle is mainly used in towns and cities, change the engine oil and filter
every year.
153
15-12-2014 8:23 Pagina 153