2015 FIAT 500L radio
[x] Cancel search: radioPage 61 of 148
•SiriusXM also offers the option to permanently block selected channels.Call
(1-888-601-6297 for U.S.customers, 1-877-438-9677 for Canadian customers) and
request the Family-Friendly Package.
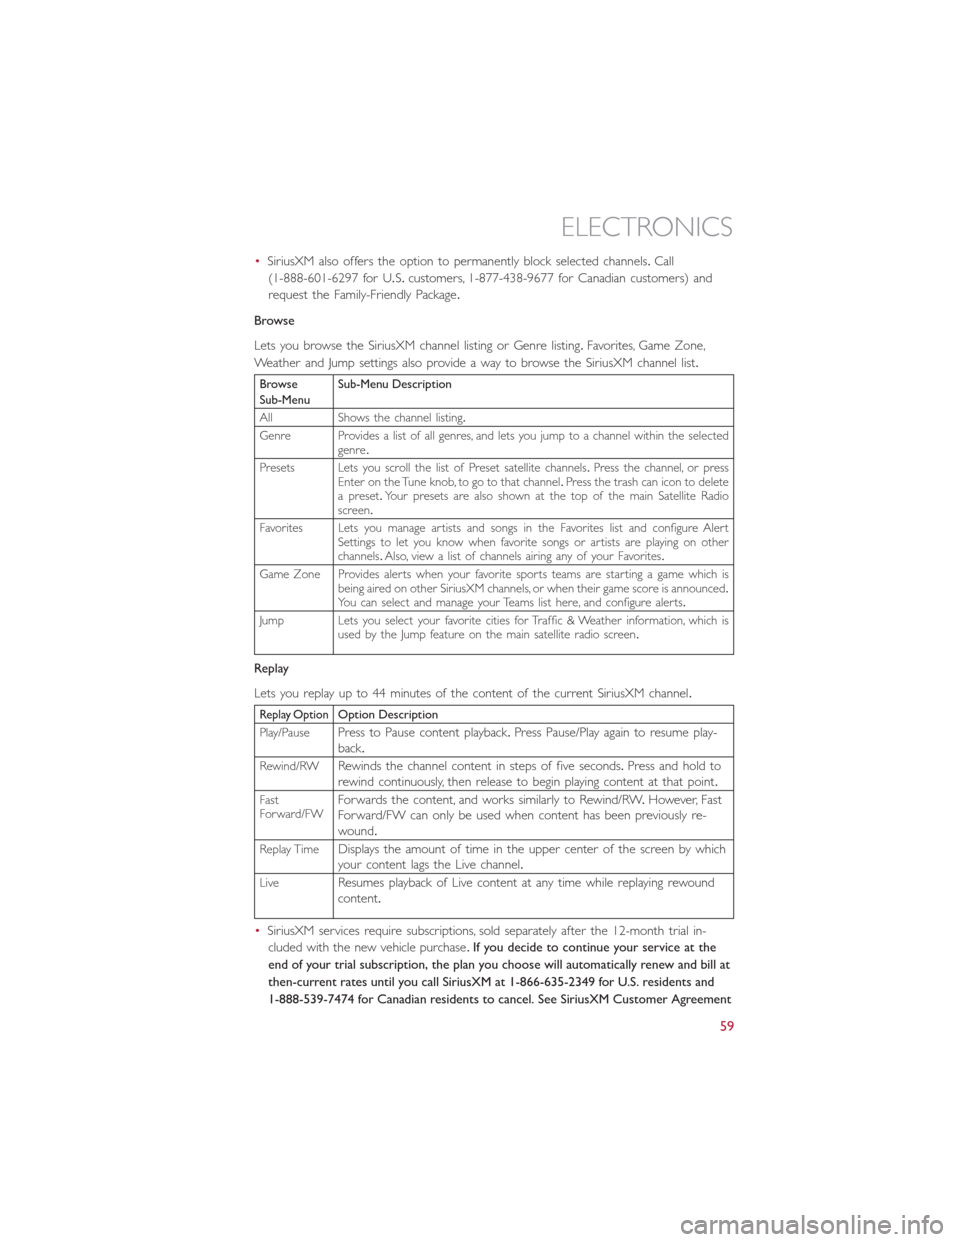
Browse
Lets you browse the SiriusXM channel listing or Genre listing.Favorites, Game Zone,
Weather and Jump settings also provide a way to browse the SiriusXM channel list.
BrowseSub-MenuSub-Menu Description
All Shows the channel listing.
Genre Provides a list of all genres, and lets you jump to a channel within the selectedgenre.
Presets Lets you scroll the list of Preset satellite channels.Press the channel, or pressEnter on the Tune knob, to go to that channel.Press the trash can icon to deletea preset.Your presets are also shown at the top of the main Satellite Radioscreen.
Favorites Lets you manage artists and songs in the Favorites list and configure AlertSettings to let you know when favorite songs or artists are playing on otherchannels.Also, view a list of channels airing any of your Favorites.
Game Zone Provides alerts when your favorite sports teams are starting a game which isbeing aired on other SiriusXM channels, or when their game score is announced.You can select and manage your Teams list here, and configure alerts.
Jump Lets you select your favorite cities for Traffic & Weather information, which isused by the Jump feature on the main satellite radio screen.
Replay
Lets you replay up to 44 minutes of the content of the current SiriusXM channel.
Replay OptionOption Description
Play/PausePress to Pause content playback.Press Pause/Play again to resume play-back.
Rewind/RWRewinds the channel content in steps of five seconds.Press and hold torewind continuously, then release to begin playing content at that point.
FastForward/FWForwards the content, and works similarly to Rewind/RW.However, FastForward/FW can only be used when content has been previously re-wound.
Replay TimeDisplays the amount of time in the upper center of the screen by whichyour content lags the Live channel.
LiveResumes playback of Live content at any time while replaying rewoundcontent.
•SiriusXM services require subscriptions, sold separately after the 12-month trial in-
cluded with the new vehicle purchase.If you decide to continue your service at the
end of your trial subscription, the plan you choose will automatically renew and bill at
then-current rates until you call SiriusXM at 1-866-635-2349 for U.S. residents and
1-888-539-7474 for Canadian residents to cancel. See SiriusXM Customer Agreement
ELECTRONICS
59
Page 62 of 148
for complete terms at www.siriusxm.com for U.S. residents and www.siriusxm.ca for
Canadian residents.All fees and programming subject to change.Our satellite service
is available only to those at least 18 and older in the 48 contiguous USA and D.C.
Our Sirius satellite service is also available in PR (with coverage limitations).Our Inter-
net radio service is available throughout our satellite service area and in AK and HI.©
2014 Sirius XM Radio Inc.Sirius, XM and all related marks and logos are trademarks of
Sirius XM Radio Inc.
MEDIA HUB – PLAYING iPod®/USB/MP3 DEVICES
There are many ways to play music from iPod®/MP3 players or USB devices through
your vehicle's sound system.
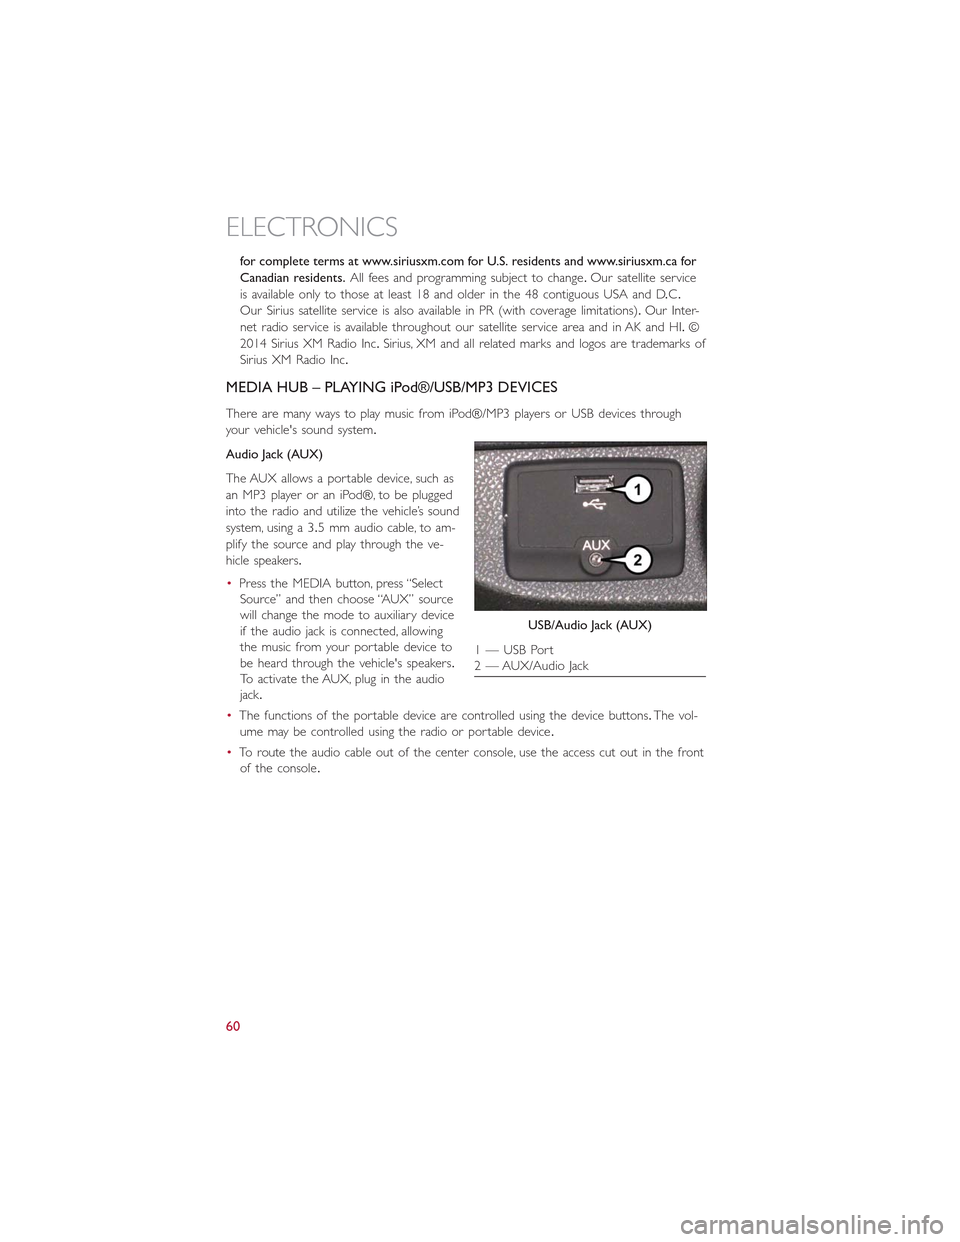
Audio Jack (AUX)
The AUX allows a portable device, such as
an MP3 player or an iPod®, to be plugged
into the radio and utilize the vehicle’s sound
system, using a 3.5 mm audio cable, to am-
plify the source and play through the ve-
hicle speakers.
•Press the MEDIA button, press “Select
Source” and then choose “AUX” source
will change the mode to auxiliary device
if the audio jack is connected, allowing
the music from your portable device to
be heard through the vehicle's speakers.
To activate the AUX, plug in the audio
jack.
•The functions of the portable device are controlled using the device buttons.The vol-
ume may be controlled using the radio or portable device.
•To route the audio cable out of the center console, use the access cut out in the front
of the console.
USB/Audio Jack (AUX)
1 — USB Port2 — AUX/Audio Jack
ELECTRONICS
60
Page 63 of 148
USB Port
Connect your iPod® or compatible device using a USB cable into the USB Port.USB
Memory sticks with audio files can also be used.Then, audio from the device can be
played on the vehicles sound system while providing metadata (artist, track title, album,
etc.) information on the radio display.
When connected, the iPod®/compatible USB device can be controlled using the radio or
Steering Wheel Audio Controls to play, skip to the next or previous track, browse, and list
the contents.
The iPod® battery charges when plugged into the USB port (if supported by the specific
device).
•To route the USB/iPod® cable out of the center console, use the access cut out.
NOTE:
•When connecting your iPod® device for the first time, the system may take several
minutes to read your music, depending on the number of files.For example, the sys-
tem will take approximately five minutes for every 1,000 songs loaded on the device.
Also during the reading process, the Shuffle and Browse functions will be disabled.This
process ensures the full use of your iPod® features and only happens the first time it
is connected.After the first time, the reading process of your iPod® will take consider-
ably less time unless changes are made or new songs are added to the play list.
•The USB port supports certain Mini, Classic, Nano, Touch, and iPhone® devices.The
USB port also supports playing music from compatible external USB Mass Storage
Class memory devices.Some iPod® software versions may not fully support the USB
port features.Please visit Apple’s website for iPod® software updates.
ELECTRONICS
61
Page 71 of 148

Radio
Use your voice to quickly get to the AM, FM or SiriusXM Satellite Radio® stations you
would like to hear.(Subscription or included SiriusXM Satellite Radio trial required.)
Push the VR button.After the beep, say:
•Tune toninety-five-point-five FM
•Tune toSatellite Channel Hits 1
TIP
At any time, if you are not sure of what to say or want to learn a Voice Command, push
the VR buttonand say“Help.”The system will provide you with a list of com-
mands.
Uconnect® 6.5A/6.5AN Radio
ELECTRONICS
69
Page 75 of 148

Voice Text Reply
Uconnect® will announceincomingtext messages.Push the Phone buttonand say
Listen.(Must have compatible mobile phone paired to Uconnect® system.)
1.Once an incoming text message is read to you, push the Phone button.After
the beep, say:Reply
2.Listen to the Uconnect® prompts.After the beep, repeat one of the pre-defined
messages and follow the system prompts.
TIP
Your mobile phone must have the full implementation of theMessage Access Profile
(MAP)to take advantage of this feature.For details about MAP, visit UconnectPhone.com
for U.S.residents.Apple iPhone® iOS6 or later supports readingincomingtext messages
only.
PRE-DEFINED VOICE TEXT REPLY RESPONSES
Yes.Stuck in Traffic.See you later.
No.Start without me.I’ll be Late.
Okay.Where are you?I will be
I’ll call you later.I need directions.See you in
Additional Information
© 2014 FCA US LLC.All rights reserved.Mopar and Uconnect are registered trade-
marks and Mopar Owner Connect is a trademark of FCA US LLC.Android is a trade-
mark of Google Inc.SiriusXM and all related marks and logos are trademarks of SiriusXM
Radio Inc.Yelp, Yelp logo, Yelp burst and related marks are registered trademarks of Yelp.
Uconnect® System Support:
•DriveUconnect.com
•U.Sresidentscall:1-877-855-8400
•Canadian residents call: 1-800-465-2001 (English) or 1-800-387-9983 (French)
Mon.– Fri., 7:00 am – 12:00 am, ET
Sat., 8:00 am – 10:00 pm, ET
Sun., 9:00 am – 5:00 pm, ET
Uconnect® Access Services Support 1-855-792-4241.Please have your Uconnect® Secu-
rity PIN ready when you call.
ELECTRONICS
73
Page 78 of 148
Refer to theUnderstand The Features Of Your Vehiclesection of your vehicle's Owner's
Manual on the DVD for further details.
NOTE:
•The Uconnect® Phone requires a mobile phone equipped with the Bluetooth®
Hands-Free Profile, Version 1.0 or higher.
•Most mobile phones/devices are compatible with the Uconnect® system, however
some mobile phones/devices may not be equipped with all of the required features to
utilize all of the Uconnect® system features.
•For Uconnect® Customer Care:
•U.S.residents visit Uconnec tPhone.com or call 1-877-855-8400.
•Canadian Residents visit UconnectPhone.com or call, 1-800-465-2001 (English) or
1-800-387-9983 (French).
Pairing (Wirelessly Connecting) Your Mobile Phone To The Uconnect®
System
Mobile phone pairing is the process of establishing a wireless connection between a cellu-
lar phone and the Uconnect system.
NOTE:
•To use the Uconnect® Phone feature, you first must determine if your mobile phone
and software are compatible with the Uconnect® system.Please visit
UconnectPhone.com for complete mobile phone compatibility information.
•Mobile phone pairing is not available while the vehicle is in motion.
•A maximum of 10 mobile phones can be paired to the Uconnect® system.
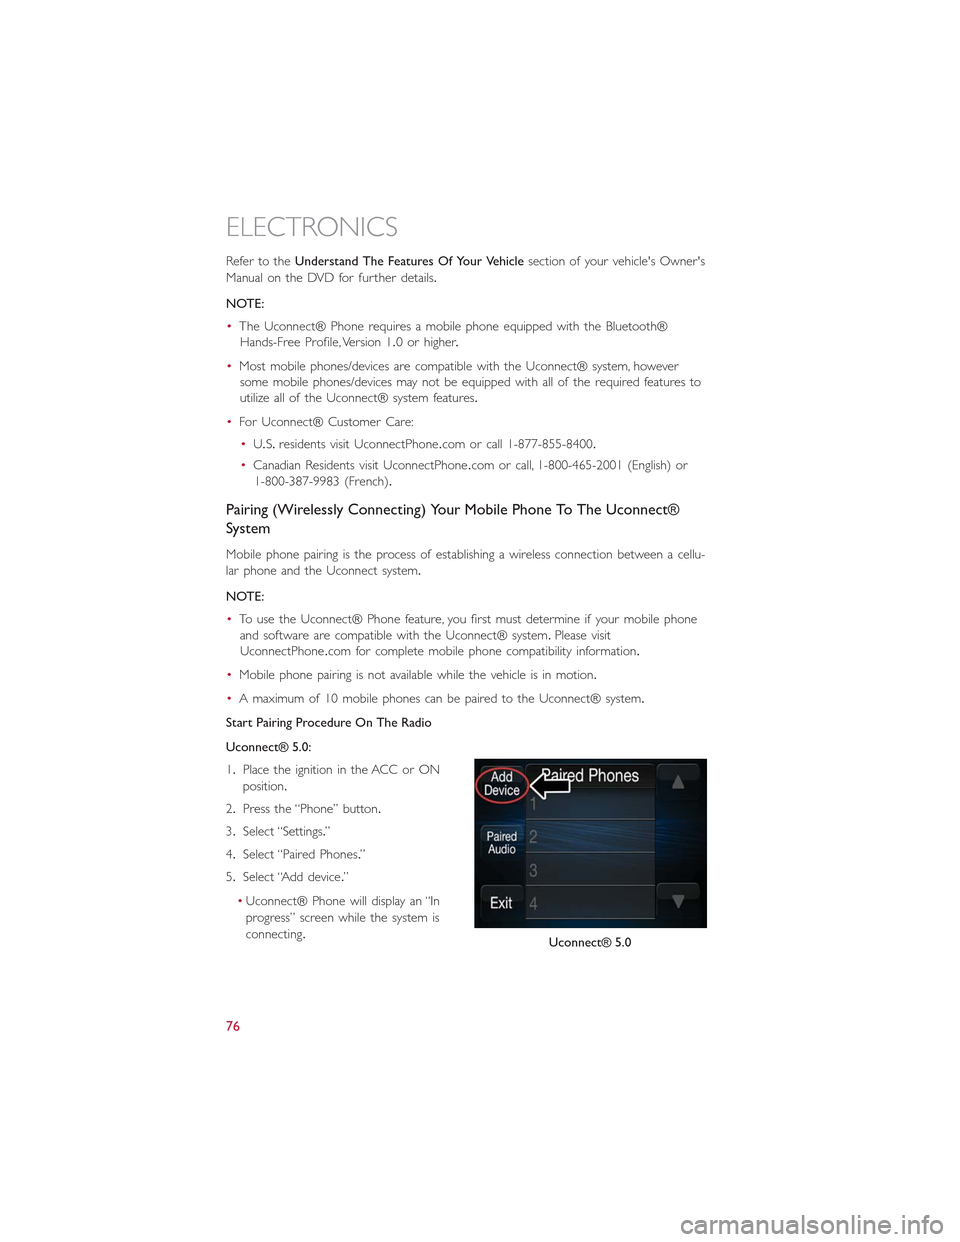
Start Pairing Procedure On The Radio
Uconnect® 5.0:
1.Place the ignition in the ACC or ON
position.
2.Press the “Phone” button.
3.Select “Settings.”
4.Select “Paired Phones.”
5.Select “Add device.”
•Uconnect® Phone will display an “In
progress” screen while the system is
connecting.Uconnect® 5.0
ELECTRONICS
76
Page 82 of 148
Phonebook
The Uconnect® system will automatically sync your phonebook from your paired phone,
if this feature is supported by your phone.Phonebook contacts are updated each time
that the phone is connected.If your phone book entries do not appear, check the set-
tings on your phone.Some phones require you to enable this feature manually.
•Your phonebook can be browsed on the Uconnect® system touchscreen, but editing
can only be done on your phone.To browse, press the “Phone” button on the touch-
screen, then the “Phonebook” button on the touchscreen.
Favorite phonebook entries can be saved as Favorites for quicker access.Favorites are
shown at the top of the main phone screen.
Voice Command Tips
•Speaking complete names (i.e; Call John Doe vs.Call John) will result in greater system
accuracy.
•You can “link” commands together for faster results.Say “Call John Doe, mobile,” for
example.
•If you are listening to available voice command options, you do not have to listen to
the entire list.When you hear the command that you need, push thebutton
on the steering wheel, wait for the beep and say your command.
Changing The Volume
•Start a dialogue by pushing the Phone button, then say a command for example
- "Help."
•Use the radio VOLUME/MUTE rotary knob to adjust the volume to a comfortable
level while the Uconnect® system is speaking.Please note the volume setting for
Uconnect® is different than the audio system.
NOTE:
To access help, push the Uconnect® Phone buttonon the steering wheel and say
"help." Press the display or press either the Phoneor VRbutton and say
"cancel" to cancel the help session.
Incoming Text Messages
After pairing your Uconnect® system with a Bluetooth® enabled mobile device with the
Message Access Profile (MAP), the Uconnect® system can announce a new incoming text
message and read it to you over the vehicle’s audio system.
NOTE:
Only incoming text messages received during the current ignition cycle can be viewed/
read.
To enable incoming text messaging:
iPhone®
1.Press the settings button on the mobile phone.
ELECTRONICS
80
Page 86 of 148
STEERING WHEEL AUDIO CONTROLS
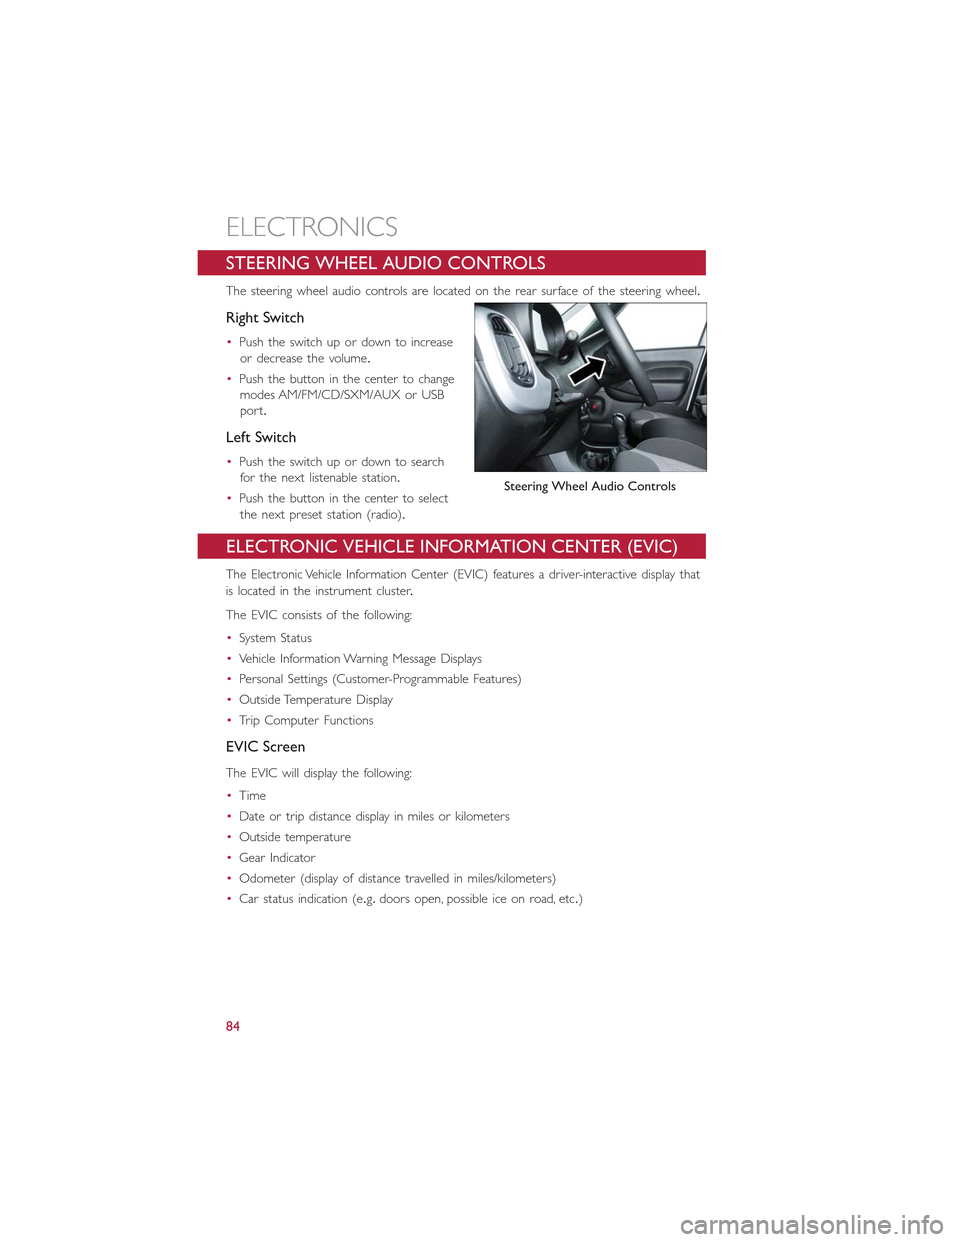
The steering wheel audio controls are located on the rear surface of the steering wheel.
Right Switch
•Push the switch up or down to increase
or decrease the volume.
•Push the button in the center to change
modes AM/FM/CD/SXM/AUX or USB
port.
Left Switch
•Push the switch up or down to search
for the next listenable station.
•Push the button in the center to select
the next preset station (radio).
ELECTRONIC VEHICLE INFORMATION CENTER (EVIC)
The Electronic Vehicle Information Center (EVIC) features a driver-interactive display that
is located in the instrument cluster.
The EVIC consists of the following:
•System Status
•Vehicle Information Warning Message Displays
•Personal Settings (Customer-Programmable Features)
•Outside Temperature Display
•Trip Computer Functions
EVIC Screen
The EVIC will display the following:
•Time
•Date or trip distance display in miles or kilometers
•Outside temperature
•Gear Indicator
•Odometer (display of distance travelled in miles/kilometers)
•Car status indication (e.g.doors open, possible ice on road, etc.)
Steering Wheel Audio Controls
ELECTRONICS
84