Page 62 of 148

for complete terms at www.siriusxm.com for U.S. residents and www.siriusxm.ca for
Canadian residents.All fees and programming subject to change.Our satellite service
is available only to those at least 18 and older in the 48 contiguous USA and D.C.
Our Sirius satellite service is also available in PR (with coverage limitations).Our Inter-
net radio service is available throughout our satellite service area and in AK and HI.©
2014 Sirius XM Radio Inc.Sirius, XM and all related marks and logos are trademarks of
Sirius XM Radio Inc.
MEDIA HUB – PLAYING iPod®/USB/MP3 DEVICES
There are many ways to play music from iPod®/MP3 players or USB devices through
your vehicle's sound system.
Audio Jack (AUX)
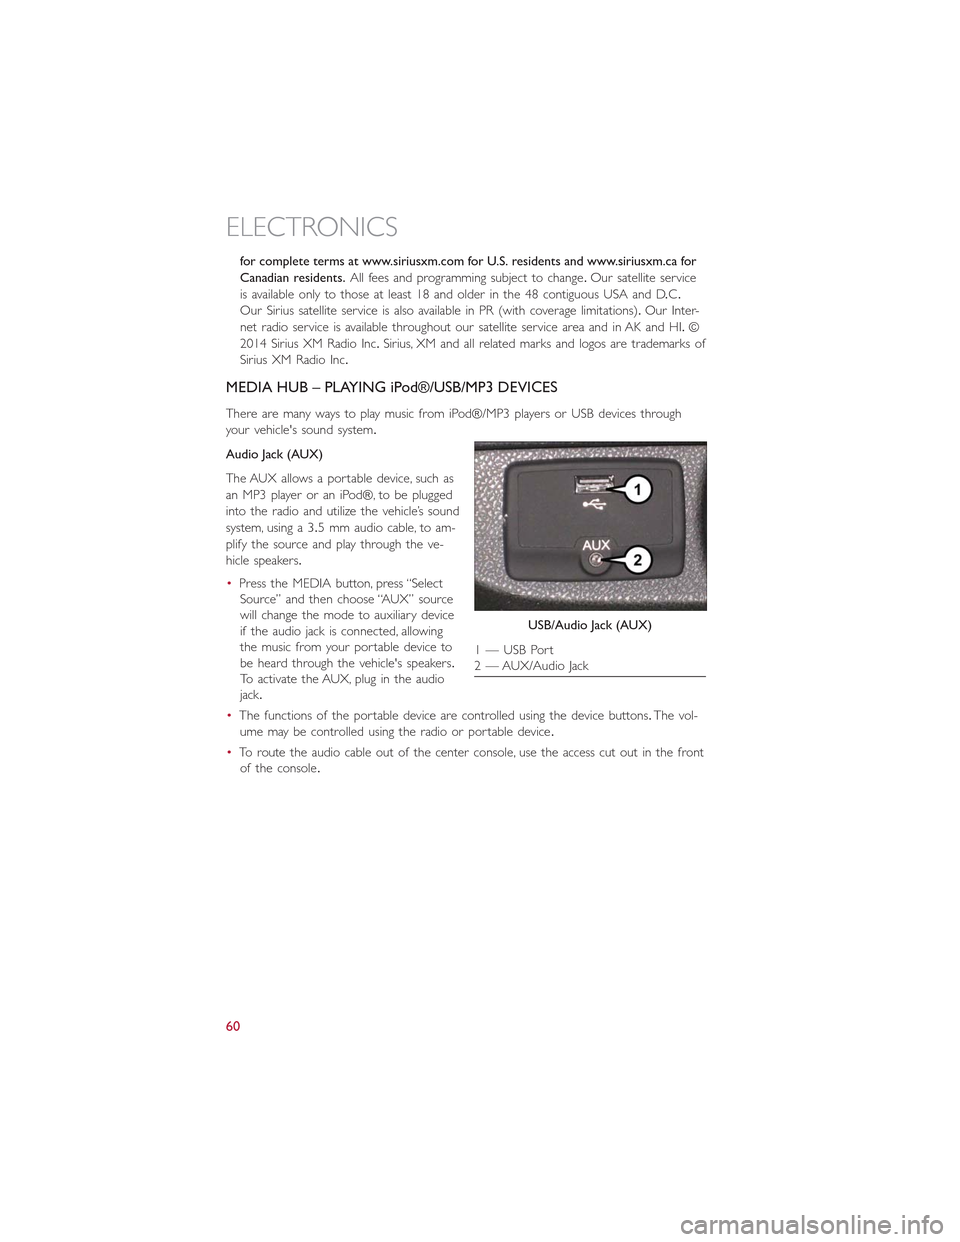
The AUX allows a portable device, such as
an MP3 player or an iPod®, to be plugged
into the radio and utilize the vehicle’s sound
system, using a 3.5 mm audio cable, to am-
plify the source and play through the ve-
hicle speakers.
•Press the MEDIA button, press “Select
Source” and then choose “AUX” source
will change the mode to auxiliary device
if the audio jack is connected, allowing
the music from your portable device to
be heard through the vehicle's speakers.
To activate the AUX, plug in the audio
jack.
•The functions of the portable device are controlled using the device buttons.The vol-
ume may be controlled using the radio or portable device.
•To route the audio cable out of the center console, use the access cut out in the front
of the console.
USB/Audio Jack (AUX)
1 — USB Port2 — AUX/Audio Jack
ELECTRONICS
60
Page 63 of 148

USB Port
Connect your iPod® or compatible device using a USB cable into the USB Port.USB
Memory sticks with audio files can also be used.Then, audio from the device can be
played on the vehicles sound system while providing metadata (artist, track title, album,
etc.) information on the radio display.
When connected, the iPod®/compatible USB device can be controlled using the radio or
Steering Wheel Audio Controls to play, skip to the next or previous track, browse, and list
the contents.
The iPod® battery charges when plugged into the USB port (if supported by the specific
device).
•To route the USB/iPod® cable out of the center console, use the access cut out.
NOTE:
•When connecting your iPod® device for the first time, the system may take several
minutes to read your music, depending on the number of files.For example, the sys-
tem will take approximately five minutes for every 1,000 songs loaded on the device.
Also during the reading process, the Shuffle and Browse functions will be disabled.This
process ensures the full use of your iPod® features and only happens the first time it
is connected.After the first time, the reading process of your iPod® will take consider-
ably less time unless changes are made or new songs are added to the play list.
•The USB port supports certain Mini, Classic, Nano, Touch, and iPhone® devices.The
USB port also supports playing music from compatible external USB Mass Storage
Class memory devices.Some iPod® software versions may not fully support the USB
port features.Please visit Apple’s website for iPod® software updates.
ELECTRONICS
61
Page 90 of 148

Using HomeLink®
To operate, push and release the programmed HomeLink®button.Activation will
now occur for the programmed device (i.e., garage door opener, gate operator, security
system, entry door lock, home/office lighting, etc.,).The hand-held transmitter of the de-
vice may also be used at any time.
WARNING!
•Your motorized door or gate will open and close while you are programming the
universal transceiver.Do not program the transceiver if people or pets are in the
path of the door or gate.
•Do not run your vehicle in a closed garage or confined area while programming
the transceiver.Exhaust gas from your vehicle contains Carbon Monoxide (CO)
which is odorless and colorless.Carbon Monoxide is poisonous when inhaled and
can cause you and others to be severely injured or killed.
POWER INVERTER — IF EQUIPPED
There is a 115 Volt, 150 Watt power in-
verter outlet located on the back of the
center console.This outlet can power cellu-
lar phones, electronics and other low
power devices requiring power up to 150
Wa t t s.
•To turn on the power outlet, simply plug
in the device.The outlet automatically
turns off when the device is unplugged.
NOTE:
The power inverter is designed with built-in overload protection.If the power rating of
150 Watts is exceeded, the power inverter will automatically shut down.Once the elec-
trical device has been removed from the outlet, the inverter should automatically reset.If
the power rating exceeds approximately 170 Watts, the power inverter may have to be
reset manually.To reset the inverter manually, unplug the device and plug it in again.To
avoid overloading the circuit, check the power ratings on electrical devices prior to using
the inverter.
Power Inverter
ELECTRONICS
88
Page 118 of 148

SHIFT LEVER OVERRIDE
•If a malfunction occurs and the shift lever cannot be moved out of the PARK position,
you can use the following procedure to temporarily move the shift lever:
•Turn the ignition switch to the OFF position.
•Firmly set the parking brake.
•Remove the rubber storage tray liner from the center console, then lift up the front
of the shift lever bezel, carefully disengage the bezel from the shift lever housing, and
slide it up to the top of the shift lever.
•Push and maintain firm pressure on the brake pedal.
•Insert a small screwdriver or similar tool down into the access slot at the right rear
corner of the shift lever assembly, and push and hold the white override release lever
down.
•Move the shift lever into the NEUTRAL position.
•The vehicle may then be started in NEUTRAL.
•Reinstall the shift lever bezel (use care to avoid pinching the wiring), and the rubber
storage tray liner.
TOWING A DISABLED VEHICLE
NOTE:
This section describes procedures for towing a disabled vehicle using a commercial towing
service.
Towing Condi-
tion
WheelsOFF
The Ground
MANUAL
TRANSMIS-
SION
EURO TWIN
CLUTCH
TRANSMIS-
SION
AUTOMATIC
(AISIN HD)
TRANSMIS-
SION
Flat Tow NONETrans inNEUTRALTrans inNEUTRAL
NOT
ALLOWED
Dolly TowRearNOT
ALLOWED
NOT
ALLOWED
NOT
ALLOWED
FrontOK OK OK
FlatbedALLBEST
METHOD
BEST
METHOD
BEST
METHOD
Proper towing or lifting equipment is required to prevent damage to your vehicle.Use
only tow bars and other equipment designed for this purpose, following equipment
manufacturer’s instructions.Use of safety chains is mandatory.Attach a tow bar or other
towing device to main structural members of the vehicle, not to bumpers or associated
brackets.State and local laws regarding vehicles under tow must be observed.
WHAT TO DO IN EMERGENCIES
116