Page 176 of 438

As an added safety feature, your vehicle has been
equipped with a Tire Pressure Monitoring System
(TPMS) that illuminates a low tire pressure telltale when
one or more of your tires is significantly under-inflated.
Accordingly, when the low tire pressure telltale illumi-
nates, you should stop and check your tires as soon as
possible, and inflate them to the proper pressure. Driving
on a significantly under-inflated tire causes the tire to
overheat and can lead to tire failure. Under-inflation also
reduces fuel efficiency and tire tread life, and may affect
the vehicles handling and stopping ability.
Please note that the TPMS is not a substitute for proper
tire maintenance, and it is the driver ’s responsibility to
maintain correct tire pressure, even if under-inflation has
not reached the level to trigger illumination of the TPMS
low tire pressure telltale.
Your vehicle has also been equipped with a TPMS
malfunction indicator to indicate when the system is not
operating properly. The TPMS malfunction indicator is
combined with the low tire pressure telltale. When the
system detects a malfunction, the telltale will flash for
approximately one minute and then remain continuously
illuminated. This sequence will continue upon subse-
quent vehicle start-ups as long as the malfunction exists.
When the malfunction indicator is illuminated, the sys-
tem may not be able to detect or signal low tire pressure
as intended. TPMS malfunctions may occur for a variety
of reasons, including the installation of replacement or
alternate tires or wheels on the vehicle that prevent the
TPMS from functioning properly. Always check the
TPMS malfunction telltale after replacing one or more
tires or wheels on your vehicle, to ensure that the
replacement or alternate tires and wheels allow the TPMS
to continue to function properly.
174 UNDERSTANDING YOUR INSTRUMENT PANEL
Page 177 of 438

CAUTION!
The TPMS has been optimized for the original
equipment tires and wheels. TPMS pressures and
warning have been established for the tire size
equipped on your vehicle. Undesirable system opera-
tion or sensor damage may result when using re-
placement equipment that is not of the same size,
type, and/or style. Aftermarket wheels can cause
sensor damage. Using aftermarket tire sealants may
cause the Tire Pressure Monitoring System (TPMS)
sensor to become inoperable. After using an after-
market tire sealant it is recommended that you take
your vehicle to an authorized dealership to have your
sensor function checked.
21. Glow Plug Light — If Equipped
This vehicle will inhibit engine cranking when the
ambient temperature is less than –22° F (–30° C)
and the oil temperature sensor reading indicates an
engine block heater has not been used. The Glow Plug
light will flash during in cold weather for up to 10
seconds.
If equipped with a block heater harness the message
#Plug In Engine Heater#, will be displayed in the instru-
ment cluster when the ambient temperature is below 5°F
(-15° C) at the time the engine is shut off as a reminder to
avoid possible crank delays at the next cold start.
22. Odometer / Trip Odometer / Electronic Vehicle Infor-
mation Center (EVIC) Display Area
This display indicates the total distance the vehicle has
been driven.
4
UNDERSTANDING YOUR INSTRUMENT PANEL 175
Page 190 of 438
Refer to the Uconnect® 5.0/6.5 User’s Manual for iPod®
and external USB support capability.
STEERING WHEEL AUDIO CONTROLS
The remote sound system controls are located at the rear
of the steering wheel. Reach behind the wheel to access
the switches.
USB/AUX Ports
1—USBConnector2—AUX/CableJack
Remote Sound System Controls (Back View Of Steering
Wheel)
188 UNDERSTANDING YOUR INSTRUMENT PANEL
Page 205 of 438

with maximum temperature settings for best wind-
shield and side window defrosting. When the defrost
mode is selected, the blower will automatically default
to medium-high.
•Right Arrow – Air flow at central and side dashboard
vents to ventilate the chest and the face during the hot
season.
•Down Arrow – Air flow to the front and rear footwell
diffusers. This air distribution setting heats the passen-
ger compartment most quickly, giving a prompt sen-
sation of warmth.
•Right/Down Arrows – Air flow distributed between
footwell diffusers (hotter air) and central and side
dashboard vents (cooler air). This distribution setting
is useful in spring and autumn on sunny days.
•Up/Down Arrows – Air flow distributed between
footwell diffusers and windshield and front side win-
dow defrosting diffusers. This distribution setting al-
lows the passenger compartment to be warmed effec-
tively and prevents the windows from misting.
•Up/Right Arrows – Air flow distribution between
windshield defrosting diffusers and side and central
dashboard vents. This allows air to be sent to the
windshield in conditions of strong sunlight.
•Up/Right/Down Arrows – Air flow distribution to all
diffusers on the car.
NOTE:Air always flows from the side dashboard diffus-
ers: it is, however, possible to interrupt the air flow by
operating the wheel located near the corresponding
vents.
4
UNDERSTANDING YOUR INSTRUMENT PANEL 203
Page 213 of 438

Get Started
All you need to control your Uconnect® system with
your voice are the buttons on your steering wheel.
1. VisitUconnectPhone.comto check mobile device and
feature compatibility and to find phone pairing in-
structions.
2.Reduce background noise. Wind and passenger conversa-
tions are examples of noise that may impact recognition.
3. Speak clearly at a normal pace and volume while
facing straight ahead. The microphone is positioned
on the rearview mirror and aimed at the driver.
4. Each time you give a Voice Command, you must first
push either the VR or Phone button, wait untilafter
the beep, then say your Voice Command.
5. You can interrupt the help message or system prompts
by pushing the VR or Phone button and saying a Voice
Command from current category.
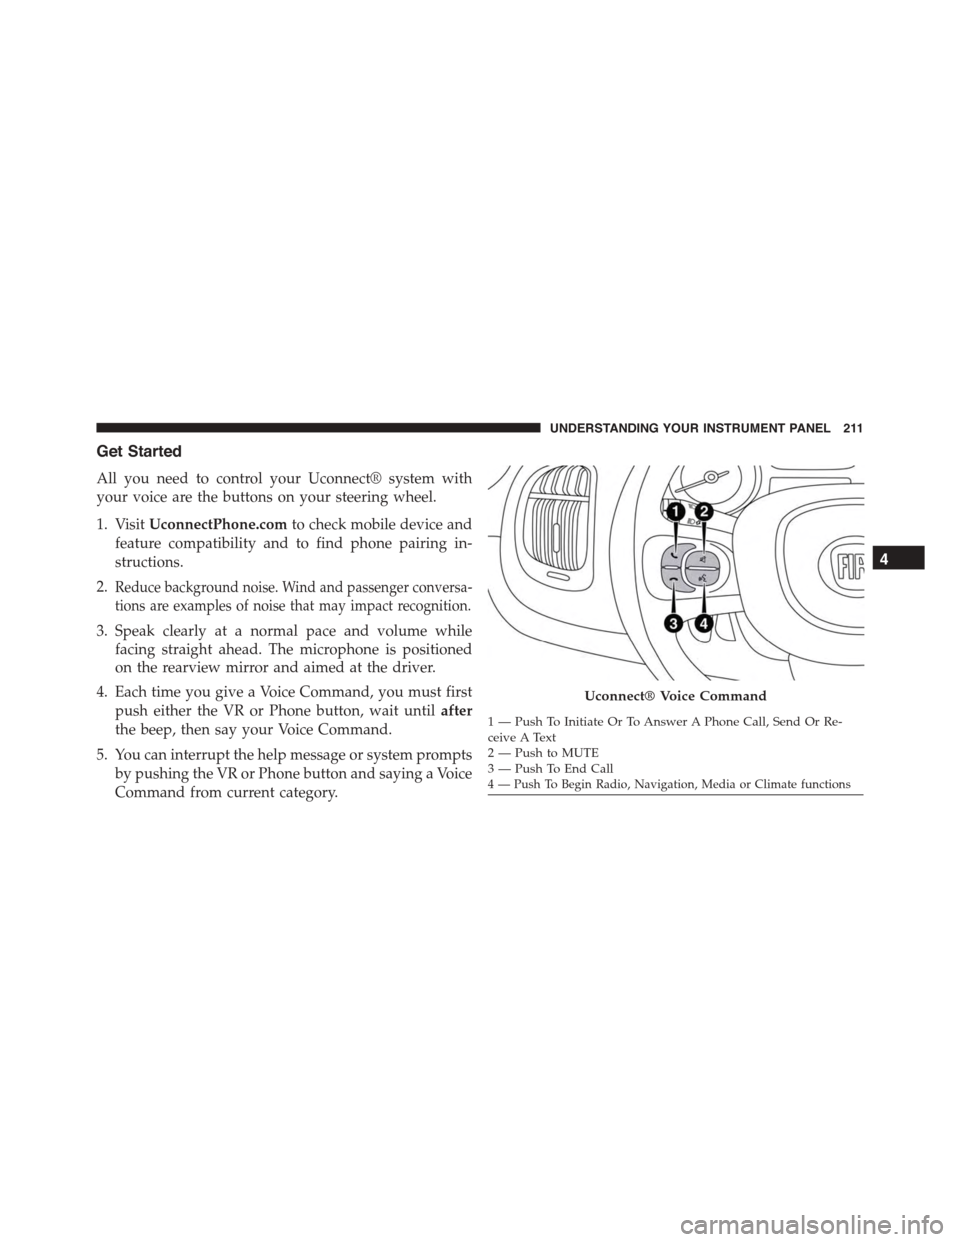
Uconnect® Voice Command
1—PushToInitiateOrToAnswerAPhoneCall,SendOrRe-ceive A Text2—PushtoMUTE3—PushToEndCall4 — Push To Begin Radio, Navigation, Media or Climate functions
4
UNDERSTANDING YOUR INSTRUMENT PANEL 211
Page 224 of 438

!DRIVING ON SLIPPERY SURFACES.........251
▫Acceleration.........................251
▫Traction............................252
!DRIVING THROUGH WATER.............252
▫Flowing/Rising Water..................253
▫Shallow Standing Water.................253
!ELECTRIC POWER STEERING.............255
!PARKING BRAKE......................255
!BRAKE SYSTEM.......................257
!ELECTRONIC BRAKE CONTROL SYSTEM . . . .257
▫Four-Wheel Anti-Lock Brake System (ABS) . . .257
▫Brake Assist System (BAS)...............259
▫Traction Control System (TCS)............260
▫Hill Start Assist (HSA).................260
▫Dynamic Steering Torque (DST)...........261
▫Electronic Stability Control (ESC)..........262
▫ESC Activation/Malfunction Indicator Light And
ESC OFF Indicator Light................263
▫Electronic Roll Mitigation (ERM)..........265
!TIRE SAFETY INFORMATION.............266
▫Tire Markings........................266
▫Tire Identification Number (TIN)...........270
▫Tire Terminology And Definitions..........271
▫Tire Loading And Tire Pressure...........273
!TIRES — GENERAL INFORMATION........278
▫Tire Pressure........................278
▫Tire Inflation Pressures.................279
222 STARTING AND OPERATING
Page 235 of 438

NOTE:If the shift lever cannot be moved to the PARK,
REVERSE, or NEUTRAL position (when pushed for-
ward) it is probably in the AutoStick (+/-) position
(beside the DRIVE position). In AutoStick mode, the
transmission gear (1, 2, 3, etc.) is displayed in the
instrument cluster. Move the shift lever to the right (into
the DRIVE [D] position) for access to PARK, REVERSE,
and NEUTRAL.
Gear Ranges
DO NOT race the engine when shifting from PARK or
NEUTRAL into another gear range.
NOTE:After selecting any gear range, wait a moment to
allow the selected gear to engage before accelerating.
This is especially important when the engine is cold.
PARK (P)
This range supplements the parking brake by locking the
transmission. The engine can be started in this range.
Never attempt to use PARK while the vehicle is in
motion. Apply the parking brake when leaving the
vehicle in this range.
When parking on a level surface, you may shift the
transmission into PARK first, and then apply the parking
brake.
When parking on a hill, apply the parking brake before
shifting the transmission to PARK, otherwise the load on
the transmission locking mechanism may make it diffi-
cult to move the shift lever out of PARK. As an added
precaution, turn the front wheels toward the curb on a
downhill grade and away from the curb on an uphill
grade.
5
STARTING AND OPERATING 233
Page 247 of 438

the transmission locking mechanism may make it diffi-
cult to move the shift lever out of PARK. As an added
precaution, turn the front wheels toward the curb on a
downhill grade and away from the curb on an uphill
grade.
WARNING!
•Never use the PARK position as a substitute for the
parking brake. Always apply the parking brake
fully when parked to guard against vehicle move-
ment and possible injury or damage.
•Your vehicle could move and injure you and others
if it is not completely in PARK. Check by trying to
move the shift lever out of PARK with the brake
pedal released. Make sure the transmission is in
PARK before leaving the vehicle.
(Continued)
WARNING!(Continued)
•It is dangerous to shift out of PARK or NEUTRAL
if the engine speed is higher than idle speed. If
your foot is not firmly pressing the brake pedal, the
vehicle could accelerate quickly forward or in re-
verse. You could lose control of the vehicle and hit
someone or something. Only shift into gear when
the engine is idling normally and your foot is
firmly pressing the brake pedal.
(Continued)
5
STARTING AND OPERATING 245