2015 FIAT 500L wheel
[x] Cancel search: wheelPage 345 of 438
3. Unlock the steering column, pull the tilt/telescoping
control handle down.
4. Pull the steering wheel outward until it is in the end of
the travel position, then lock the steering column in
position, push the control handle up until fully en-
gaged.
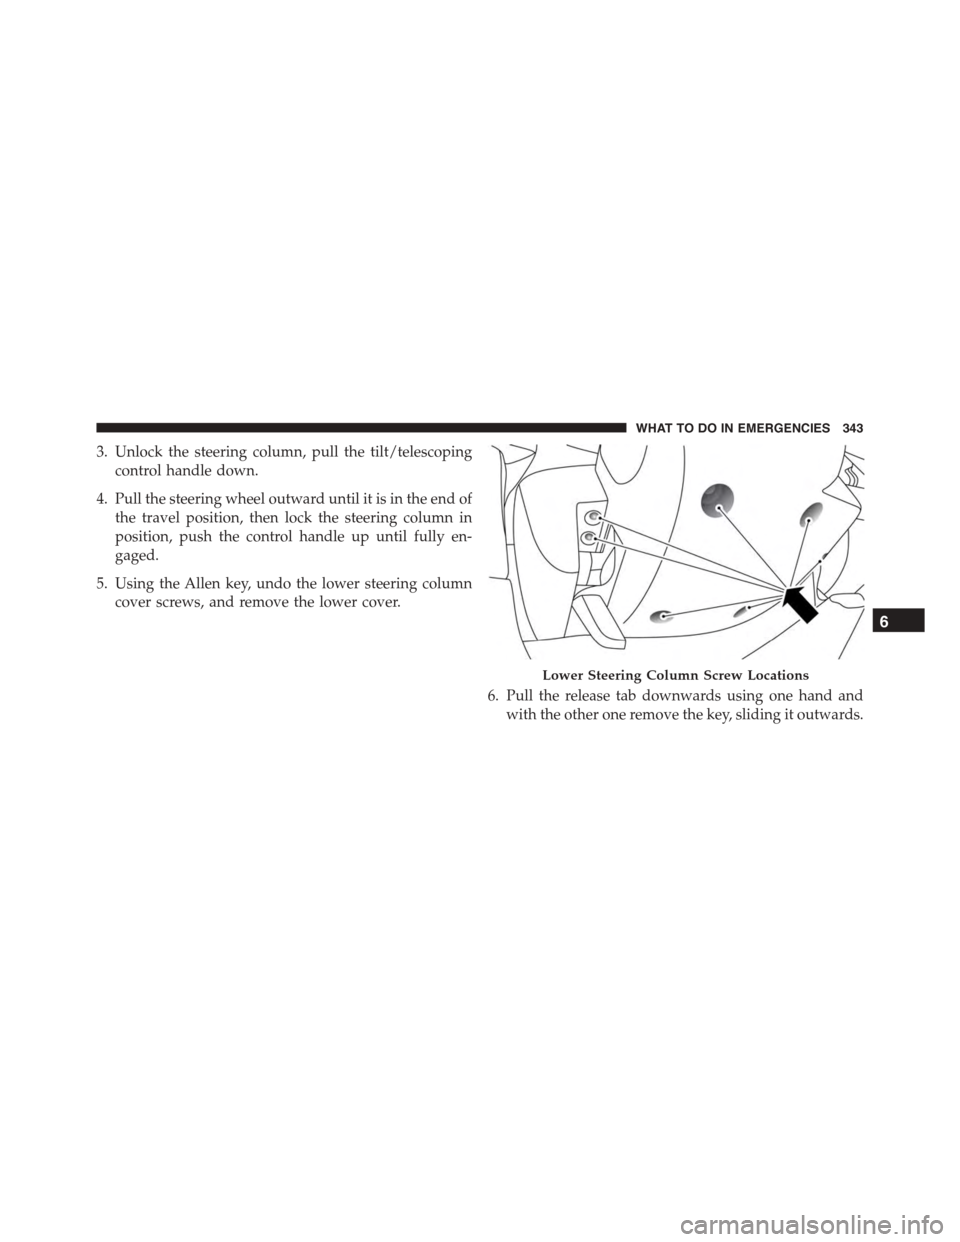
5. Using the Allen key, undo the lower steering column
cover screws, and remove the lower cover.
6. Pull the release tab downwards using one hand and
with the other one remove the key, sliding it outwards.
Lower Steering Column Screw Locations
6
WHAT TO DO IN EMERGENCIES 343
Page 381 of 438
CAUTION!(Continued)
•Use of power washers exceeding 1,200 psi (8 274
kPa) can result in damage or removal of paint and
decals.
•If the engine compartment is washed with an high
pressure jet, keep it at a distance of at least 8 inches
(20 centimeters) from filler surface.
Special Care
•If you drive on salted or dusty roads or if you drive
near the ocean, hose off the undercarriage at least once
a month.
•It is important that the drain holes in the lower edges
of the doors, rocker panels, and trunk be kept clear and
open.
•If you detect any stone chips or scratches in the paint,
touch them up immediately. The cost of such repairs is
considered the responsibility of the owner.
•If your vehicle is damaged due to a collision or similar
cause that destroys the paint and protective coating,
have your vehicle repaired as soon as possible. The
cost of such repairs is considered the responsibility of
the owner.
•If you carry special cargo such as chemicals, fertilizers,
de-icer salt, etc., be sure that such materials are well
packaged and sealed.
•If a lot of driving is done on gravel roads, consider
mud or stone shields behind each wheel.
•Use MOPAR® Touch Up Paint on scratches as soon as
possible. Your authorized dealer has touch up paint to
match the color of your vehicle.
Wheel And Wheel Trim Care
•All wheels and wheel trim, especially aluminum and
chrome plated wheels, should be cleaned regularly
with a mild soap and water to prevent corrosion.
7
MAINTAINING YOUR VEHICLE 379
Page 382 of 438
•To remove heavy soil and/or excessive brake dust, use
MOPAR® Wheel Cleaner.
NOTE:If your vehicle is equipped with Dark Vapor or
Black Satin Chrome wheels DO NOT USE wheel cleaners,
abrasives or polishing compounds. They will perma-
nently damage this finish and such damage is not cov-
ered by the New Vehicle Limited Warranty. USE ONLY
MILD SOAP AND WATER WITH A SOFT CLOTH. Used
on a regular basis this is all that is required to maintain
this finish.
CAUTION!
Do not use scouring pads, steel wool, a bristle brush,
or metal polishes. Do not use oven cleaner. These
products may damage the wheel’s protective finish.
Avoid automatic car washes that use acidic solutions
(Continued)
CAUTION!(Continued)
or harsh brushes that may damage the wheel’s pro-
tective finish. Only MOPAR® Wheel Cleaner or
equivalent is recommended.
Stain Repel Fabric Cleaning Procedure — If
Equipped
Stain Repel seats may be cleaned in the following man-
ner:
•Remove as much of the stain as possible by blotting
with a clean, dry towel.
•Blot any remaining stain with a clean, damp towel.
•For tough stains, apply MOPAR® Total Clean, or a
mild soap solution to a clean, damp cloth and remove
stain. Use a fresh, damp towel to remove soap residue.
380 MAINTAINING YOUR VEHICLE
Page 397 of 438

Front Turn Signal, Parking And Daytime Running
Lamps
1. Turn front wheels inboard to access upper cover in
wheel liner.
2. Open the upper cover on the front of the wheel liner.
3. Remove the cap from the back of the lower headlamp
housing.
4. Rotate the bulb counter clockwise and remove.
5. Install the bulb into socket, and rotate bulb/socket
clockwise into lamp locking it in place.
6. Reinstall the plastic cap and close the cover on the
wheel liner.
Front Fog Lamps
To replace the front fog lights, see your authorized dealer.
Front, Rear Roof Lamps
1. Remove two screw and remove the lamp assembly.
2. Remove the socket bulb by turning counterclockwise.
3. Remove bulb and replace as needed.
4. Reinstall the bulb socket and rotate clockwise to lock
in place.
5. Reinstall lamp.7
MAINTAINING YOUR VEHICLE 395
Page 418 of 438
significantly from the norm due to variations in driving
habits, service practices, and differences in road charac-
teristics and climate.
Traction Grades
The Traction grades, from highest to lowest, are AA, A, B,
and C. These grades represent the tire’s ability to stop on
wet pavement, as measured under controlled conditions on
specified government test surfaces of asphalt and concrete.
A tire marked C may have poor traction performance.
WARNING!
The traction grade assigned to this tire is based on
straight-ahead braking traction tests, and does not
include acceleration, cornering, hydroplaning, or
peak traction characteristics.
Temperature Grades
The temperature grades are A (the highest), B, and C,
representing the tire’s resistance to the generation of heat
and its ability to dissipate heat, when tested under
controlled conditions on a specified indoor laboratory
test wheel. Sustained high temperature can cause the
material of the tire to degenerate and reduce tire life, and
excessive temperature can lead to sudden tire failure. The
grade C corresponds to a level of performance, which all
passenger car tires must meet under the Federal Motor
Vehicle Safety Standard No. 109. Grades B and A repre-
sent higher levels of performance on the laboratory test
wheel, than the minimum required by law.
416 IF YOU NEED CONSUMER ASSISTANCE
Page 424 of 438

Cellular Phone...........................190
Center High Mounted Stop Light..............396
Chains, Tire.............................290
Changing A Flat Tire.......................324
Chart, Tire Sizing.........................268
Check Engine Light (Malfunction Indicator Light) . .172
Checking Your Vehicle For Safety...............83
Checks, Safety............................83
Child Restraint............................61
Child Restraints
Booster Seats...........................65
Child Restraints.........................61
Child Seat Installation.....................79
How To Stow An Unused ALR Seat Belt........75
Infants And Child Restraints................63
Install A LATCH-compatible Child Restraint.....74
Installing Child Restraints Using The Vehicle
Seat Belt..............................76
Lower Anchors And Tethers For Children.......68
Older Children And Child Restraints..........64
Seating Positions........................67
Child Safety Locks.........................25
Cigar Lighter............................148
Clean Air Gasoline........................299
Cleaning
Wheels...............................379
Windshield Wiper Blades..................358
Climate Control..........................191
Manual..............................191
Clutch.................................371
Clutch Fluid.............................371
Compact Disc (CD) Maintenance..............190
Compact Spare Tire........................285
Connector
UCI . . . . . . . . . . . . . . . . . . . . . . . . . . . . . . . ..187
Universal Consumer Interface (UCI)..........187
Contract, Service..........................412
Coolant (Antifreeze).......................397
422 INDEX
Page 434 of 438
Starting................................224
Automatic Transmission..................224
Cold Weather..........................225
Engine Fails to Start.....................226
Euro Twin Clutch Transmission.............224
Manual Transmission....................224
Steering
Tilt Column...........................122
Wheel, Tilt............................122
Steering Wheel Audio Controls...............188
Steering Wheel Mounted Sound System Controls . . .188
Storage................................389
Storage, Vehicle...........................389
Storing Your Vehicle.......................389
Stuck, Freeing............................337
Sun Roof...............................145
Sun Visor Extension........................96
Supplemental Restraint System - Airbag..........44
Tachometer..............................171
Telescoping Steering Column.................122
Temperature Gauge, Engine Coolant............169
Tilt Steering Column.......................122
Tire and Loading Information Placard...........273
Tire Markings............................266
Ti re s . . . . . . . . . . . . . . . . . . . . . . . . . . . . . . . . . . . 8 7
Aging (Life of Tires).....................288
Air Pressure...........................278
Chains...............................290
Changing.............................324
Compact Spare.........................285
General Information.....................278
High Speed...........................281
Inflation Pressures.......................279
Jacking...............................324
Life of Tires...........................288
Load Capacity.........................273
Pressure Monitor System (TPMS)............293
432 INDEX
Page 436 of 438
Unleaded Gasoline........................299
Untwisting Procedure, Seat Belt................39
Vehicle Identification Number (VIN).............7
Vehicle Loading..........................275
Vehicle Modifications/Alterations...............8
Vehicle Security Alarm (Security Alarm)..........15
Vehicle Storage...........................389
Wait to Start Light.........................175
Warning Lights (Instrument Cluster Description) . . .167
Warnings and Cautions.......................7
Warranty Information........................4
Washer
Adding Fluid..........................362
Washers, Windshield.......................118
Washing Vehicle..........................378
Water
Driving Through........................252
Wheel and Wheel Trim.....................379
Wheel and Wheel Trim Care.................379
Wind Buffeting............................29
Windows................................26
Power................................26
Windshield Defroster.......................85
Windshield Washers.......................118
Windshield Wiper Blades....................358
Windshield Wipers........................118
Wiper Blade Replacement...................358
Wrench (Service Indicator)...................175
434 INDEX