Page 200 of 438

3. Rear Defrost Control
Push and release the Rear Defrost Control button to turn
ON the rear window defroster and the heated outside
mirrors (if equipped). An indicator will illuminate when
the rear window defroster is ON. The rear window
defroster automatically turns OFF after 20 minutes.
4. A/C Control
Push and release the A/C Control Button to change the
current setting. The indicator illuminates when A/C is
ON. Performing this function again will cause the A/C
operation to switch into AUTO mode and the A/C
indicator will turn OFF.
5. ON/OFF Control
Push and release this button to turn the Climate Control
ON/OFF.
6. Blower Control
Blower control is used to regulate the amount of air
forced through the climate system. Adjusting the blower
will cause automatic mode to switch to manual opera-
tion. The speeds can be selected by rotating the Blower
Control adjustment knob.
7. Blower Control Indicator LEDs
LEDs illuminate to visually indicate blower speed.
8. Mode Control
The airflow distribution mode can be adjusted so air
comes from the instrument panel outlets, floor outlets,
demist outlets and defrost outlets.
9. Front Defrost Control
Push and release the Front Defrost Control button to
change the current airflow setting to Defrost mode. The
198 UNDERSTANDING YOUR INSTRUMENT PANEL
Page 203 of 438

•air distribution to seven positions;
•compressor enablement;
•rapid defrosting/demisting function;
•air recirculation;
•heated rear window;
•system deactivation.
NOTE:The climate control system detects the passenger
compartment temperature using a mean radiant tem-
perature sensor located in the interior rear view mirror
and protected by a specific cover. Obstructing the field of
view of this sensor with any object could cause the
climate control system to operate with less than optimal
efficiency.
Switching On The Climate Control System
The climate control system can be switched on in differ-
ent ways: it is advisable to push the AUTO button and
turn the knobs to set the desired temperatures.
In this way the system operates completely automatically
to adjust the temperature, quantity and distribution of
the air introduced into the passenger compartment. It
also manages the air recirculation function and the acti-
vation of the air conditioning compressor.
During automatic operation, you can change the set
temperatures, air distribution and fan speed at any time
by using the relevant buttons or knobs: the system will
automatically change the settings to adjust to the new
requirements.
4
UNDERSTANDING YOUR INSTRUMENT PANEL 201
Page 210 of 438

Selecting the footwell/windshield or only windshield dis-
tribution activates the climate control system compressor
(LED on A/C button on) and the air recirculation is set to
#outside air#intake (LED on the recirculation button off ).
This logic guarantees optimum visibility at the windows.
It is, however, always possible to manage air recirculation
and the climate control system compressor manually.
Rear Window Defrosting
Push the Rear Defrost button to activate heated rear
window defrosting.
The effective activation of the function is indicated by the
rear defrost warning light on the instrument panel
switching ON.
This function switches OFF automatically after about 20
minutes or when the engine is turned OFF. It is not
switched on automatically the next time the engine is
started.
If equipped, push the rear defrost button to activate
defrosting of door mirrors and heated rear window.
NOTE:Do not affix stickers to the inside of the heated
rear window over the heating filaments, to avoid damage
that might cause them to stop working properly.
Switching Off The Climate Control System
Push the On/Off button.
With climate control system off:
•air recirculation is on, thus isolating the passenger
compartment from the outside;
•the compressor is off;
•the fan is off;
•the heated rear window can be activated / deacti-
vated.
208 UNDERSTANDING YOUR INSTRUMENT PANEL
Page 213 of 438

Get Started
All you need to control your Uconnect® system with
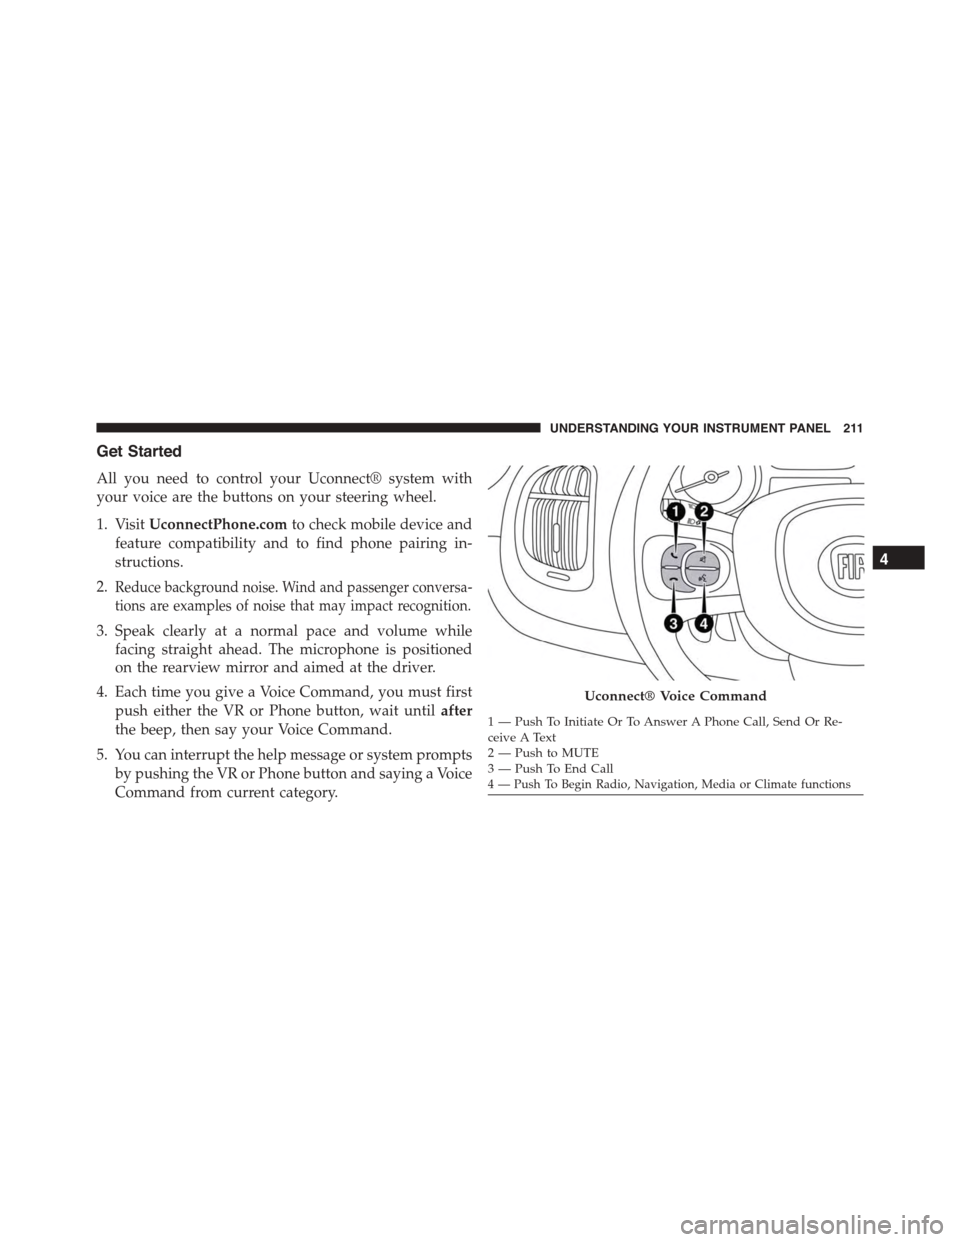
your voice are the buttons on your steering wheel.
1. VisitUconnectPhone.comto check mobile device and
feature compatibility and to find phone pairing in-
structions.
2.Reduce background noise. Wind and passenger conversa-
tions are examples of noise that may impact recognition.
3. Speak clearly at a normal pace and volume while
facing straight ahead. The microphone is positioned
on the rearview mirror and aimed at the driver.
4. Each time you give a Voice Command, you must first
push either the VR or Phone button, wait untilafter
the beep, then say your Voice Command.
5. You can interrupt the help message or system prompts
by pushing the VR or Phone button and saying a Voice
Command from current category.
Uconnect® Voice Command
1—PushToInitiateOrToAnswerAPhoneCall,SendOrRe-ceive A Text2—PushtoMUTE3—PushToEndCall4 — Push To Begin Radio, Navigation, Media or Climate functions
4
UNDERSTANDING YOUR INSTRUMENT PANEL 211
Page 226 of 438

STARTING PROCEDURES
Before starting your vehicle, adjust your seat, adjust both
inside and outside mirrors, and fasten your seat belts.
WARNING!
•Never leave children alone in a vehicle, or with
access to an unlocked vehicle.
•Allowing children to be in a vehicle unattended is
dangerous for a number of reasons. A child or
others could be seriously or fatally injured. Chil-
dren should be warned not to touch the parking
brake, brake pedal or the shift lever.
•Do not leave the Key Fob in or near the vehicle (or
in a location accessible to children). A child could
operate power windows, other controls, or move
the vehicle.
Manual Transmission — If Equipped
Apply the parking brake, place the shift lever in NEU-
TRAL, and press the clutch pedal before starting the
vehicle. This vehicle is equipped with a clutch interlock-
ing ignition system. It will not start unless the clutch
pedal is pressed to the floor.
Automatic Transmission — If Equipped
The shift lever must be in the PARK or NEUTRAL
position before you can start the engine. Depress the
brake pedal before shifting to any driving gear.
NOTE:You must press the brake pedal before shifting
out of PARK.
Normal Starting
NOTE:Normal starting of either a cold or a warm
engine is obtained without pumping or pressing the
accelerator pedal.
224 STARTING AND OPERATING
Page 384 of 438

Cleaning Headlights
Your vehicle has plastic headlights that are lighter and
less susceptible to stone breakage than glass headlights.
Plastic is not as scratch resistant as glass and therefore
different lens cleaning procedures must be followed.
To minimize the possibility of scratching the lenses and
reducing light output, avoid wiping with a dry cloth. To
remove road dirt, wash with a mild soap solution fol-
lowed by rinsing.
Do not use abrasive cleaning components, solvents, steel
wool or other aggressive material to clean the lenses.
Glass Surfaces
All glass surfaces should be cleaned on a regular basis
with MOPAR® Glass Cleaner, or any commercial
household-type glass cleaner. Never use an abrasive type
cleaner. Use caution when cleaning the inside rear win-
dow equipped with electric defrosters or windows
equipped with radio antennas. Do not use scrapers or
other sharp instrument that may scratch the elements.
When cleaning the rear view mirror, spray cleaner on the
towel or rag that you are using. Do not spray cleaner
directly on the mirror.
Instrument Panel Cover
The instrument panel cover has a low glare surface which
minimizes reflections on the windshield. Do not use
protectants or other products which may cause undesir-
able reflections. Use soap and warm water to restore the
low glare surface.
382 MAINTAINING YOUR VEHICLE
Page 389 of 438
CavityMaxi FuseMini FuseDescription
F18–5 Amp Tan Powertrain (Multiair – If Equipped)
F19–7.5 Amp Brown Air Conditioning
F20–30 Amp Green Rear Defroster
F21–15 Amp Blue Fuel Pump
F23–20 Amp Yellow Anti-Lock Brake Valves
F24–7.5 Amp Brown Stability Control System
F30–5 Amp Tan After Run Pump
F8170 Amp Tan–PTC (Secondary)
F8240 Amp Orange–Transmission
F8340 Amp Orange–PTC (Primary)
F847.5 Amp Brown Transmission
F8515 Amp Blue Front Power Outlet 12V
F86–15 Amp Blue Rear Power Outlet 12V
F887.5 Amp Brown Heated Mirrors
7
MAINTAINING YOUR VEHICLE 387
Page 422 of 438

Adding Engine Coolant (Antifreeze)............367
Adding Fuel.............................302
Adding Washer Fluid......................362
Additives, Fuel...........................300
Air bag . . . . . . . . . . . . . . . . . . . . . . . . . . . . . . . . .44
Air Bag
Air bag Operation.......................47
Air Bag Warning Light....................57
Driver Knee Air Bag......................48
Enhanced Accident Response................55
Event Data Recorder (EDR).................60
Front Air Bag . . . . . . . . . . . . . . . . . . . . . . . . . . .44
If A Deployment Occurs...................53
Knee Impact Bolsters.....................48
Maintaining Your Air Bag System............59
Air bag Deployment........................44
Air bag Light.............................57
Air bag Maintenance........................59
Air Cleaner, Engine (Engine Air Cleaner Filter) . . . .352
Air Conditioner Maintenance.................355
Air Conditioning Filter.....................356
Air Conditioning Refrigerant.................355
Air Conditioning System....................355
Air Pressure, Tires.........................279
Alarm (Security Alarm)......................15
Alarm System (Security Alarm)................15
Alfa Twin Clutch Transmission
Fluid Type............................374
Alterations/Modifications, Vehicle...............8
Antifreeze (Engine Coolant)..................366
Capacities............................397
Disposal..............................369
Anti-Lock Brake System (ABS)................257
Anti-Lock Warning Light....................177
Appearance Care.........................377
Arming System (Security Alarm)...............15
Audio Systems (Radio).....................187
Automatic Dimming Mirror...................93
420 INDEX