2015 FIAT 500 ABARTH buttons
[x] Cancel search: buttonsPage 33 of 108

AUTOMATIC TEMPERATURE CONTROLS (ATC)
Automatic Operation
1. Push the AUTO button.
2. Select the desired temperature by pushing the temperature control buttons.
• The system will maintain the set temperature automatically.
Air Recirculation
• Use recirculation for maximum A/C operation.
• For window defogging, turn the air recirculation button off.
Heated Mirrors
• The mirrors are heated to melt frost or ice. This feature is activated when you turn
on the rear window defroster, which is located in the center of the instrument
panel, below the radio.
Automatic Temperature Controls
1 — Push Auto Button2 — Push A/C Button3 — Push OFF Button4 — Push Air Recirculation Button5 — Push Temperature Control Up/Down Button
6 — Push Blower Control Up/DownButton7 — Push Rear Defrost Button8 — Push Mode Control Buttons9—Push Front Window DefrosterButton
OPERATING YOUR VEHICLE
31
Page 36 of 108

WARNING!
• Do not let children play with the sunroof, or leave children unattended in the
vehicle, and do not leave the key in or near the vehicle (or in a location ac-
cessible to children). Occupants, particularly unattended children, can be-
come entrapped by the power sunroof while operating the power sunroof
switch. Such entrapment may result in serious injury or death.
• In a collision, there is a greater risk of being thrown from a vehicle with an
open sunroof. You could also be seriously injured or killed. Always fasten
your seat belt properly and make sure all passengers are properly secured.
• Do not allow small children to operate the sunroof. Never allow your fingers,
other body parts, or any object to project through the sunroof opening. Injury
may result.
POWER CONVERTIBLE TOP
On vehicles equipped with a power convertible top, the power convertible top
switch is located on the overhead console. The switch contains two buttons. The
passenger side button, is used to open the power top, and the driver side button, is
used to close the power top.
NOTE:
• The power top buttons will operate when the ignition switch is turned to the ACC/
ON/RUN position.
• The power top can be remotely operated with the key fob. Refer to “Opening
Power Top Remote Function” in “Things To Know Before Starting” in the Owner’s
Manual on the DVD for more information.
Lowering The Power Top
Auto Open
Push the top open button approximately one second for the three-quarter open/
spoiler position. Push the top open button for approximately one second a second
time to fully open the convertible top.
Manual Open
For manual open, push and hold the open button until desired roof position or until
spoiler position.
NOTE:
Vertical movement only operates in auto open/close mode.
OPERATING YOUR VEHICLE
34
Page 42 of 108

AM/FM RADIO WITH CD PLAYER AND SiriusXM
SATELLITE RADIO
Seek Up/Down Buttons
• Push the Right or Left arrows to seek through radio stations in AM or FM bands
or seek through tracks in a CD.
• Hold either button to bypass stations or CD tracks without stopping.
Tune Up/Down Buttons
• Push the Up or Down arrows to manually search through radio stations in AM or
FM bands. Use these buttons to Fast Forward or Fast Rewind through a CD
track.
AM/FM Radio With CD Player And SiriusXM Satellite Radio
1 — Mute 9 — Fast Rewind2 — Volume Up 10 — MENU3 — ON/OFF 11 — AUDIO Settings4 — Information 12 — Presets5 — Eject CD 13—A-B-CPresets6 — Seek Down 14 — TUNER7 — Fast Forward 15 — MEDIA Player8 — Seek Up 16 — Volume Down
ELECTRONICS
40
Page 43 of 108

Audio Settings
• Push the AUDIO button, then press the Up and Down arrows to select BASS,
TREBLE, BALANCE and FADE. To adjust a setting, use the right and left arrows.
Tuner
• Push the TUNER button to select between AM, FM, SAT (SiriusXM Satellite Ra-
dio) modes.
Info
• Press the Info button to view Song, Artist, Album, Genre, Playlist, Folder informa-
tion (if available) in CD, Media Player and SiriusXM Satellite Radio (if so equipped).
Also, the Info button toggles RDS information in FM mode.
Menu
• Press the MENU button and one of the following options will appear on the Radio
display. Use the up and down arrows to scroll through the options; use the left
and right arrows to change a selection setting.
• Speech Volume • SiriusXM Telephone Number
• Aux Audio Offset • System Reset
• Radio Off • On Volume Limit
• Sat ID • Speed Volume
Station Presets
• To store a tuned station, find the station to store by either pushing the right and
left arrow (Seek) buttons or by pushing up or down arrow (Manual Tune) buttons.
• Once the station is found, push and hold one of the PRESET buttons, until you
hear a confirmation beep (Preset Saved will be shown in the radio display). A total
of 15 FM, 10 AM and 15 SiriusXM Satellite Radio stations can be preset by
pressing the A-B-C button.
A-B-C Button
• Push the A-B-C button to choose between the presets stored in the AM, FM or
SAT modes. The mode (AM, FM, SAT), station preset (A, B, C) and preset button
number (P 1-5) will be displayed in the middle of the radio display.
ELECTRONICS
41
Page 46 of 108

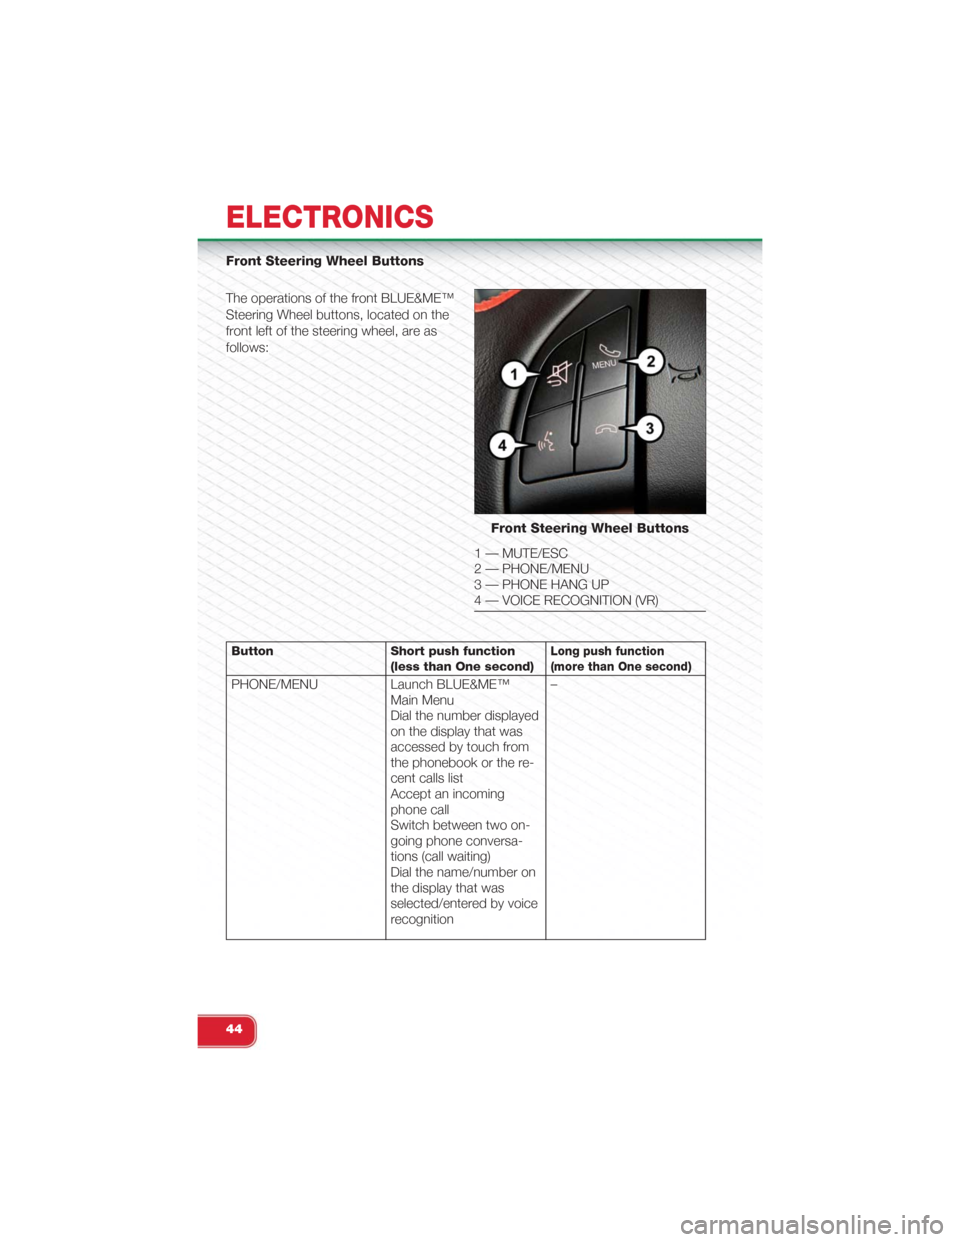
Front Steering Wheel Buttons
The operations of the front BLUE&ME™
Steering Wheel buttons, located on the
front left of the steering wheel, are as
follows:
Button Short push function(less than One second)Long push function(more than One second)
PHONE/MENU Launch BLUE&ME™Main MenuDial the number displayedon the display that wasaccessed by touch fromthe phonebook or the re-cent calls listAccept an incomingphone callSwitch between two on-going phone conversa-tions (call waiting)Dial the name/number onthe display that wasselected/entered by voicerecognition
–
Front Steering Wheel Buttons
1 — MUTE/ESC2 — PHONE/MENU3 — PHONE HANG UP4 — VOICE RECOGNITION (VR)
ELECTRONICS
44
Page 47 of 108

Button Short push function(less than One second)Long push function(more than One second)
MUTE/ESC Cancel voice recognitionCancel a voice announce-mentInterrupt message readingExit BLUE&ME™ MainMenuExit the sub-menu andreturn to the previousmenu optionExit current menu optionwithout storing settingsTurn the microphone on/off during a phone con-versationMute the ring tone of anincoming callMedia player Pause on/off
–
VOICE RECOGNITION(VR)Activate voice recognitionInterrupt voice announce-ment to provide a newvoice command
Repeat the last utterancein a voice interaction
PHONE HANG UP Reject an incoming calland end a phone call inprogressEnd an active call andswitch to a call waiting (onhold)
–
PRESET UP/OK (centerbutton on left side back ofsteering wheel)
Confirm manually se-lected menu optionSwitch phone conversa-tion from the hands-freephone to your mobilephone and vice versaSelect displayed message
–
SCAN UP/SCAN DOWN(upper and lower buttonson left side back of steer-ing wheel
Scroll BLUE&ME™ menuitemsScroll through mediaplayer tracksSeek up and downthrough radio stationsScroll inbox messages
–
ELECTRONICS
45
Page 49 of 108

• For certain mobile phones the phonebook is not copied automatically, in this case
you must transfer the phonebook contacts using your mobile phone keypad. If
BLUE&ME™ asks you to do this, then perform this procedure following the in-
structions specific to your mobile phone and push the PHONE/MENU button on
the steering wheel when you have finished. Certain mobile phones may require
you to indicate that you do not want to be asked every time to copy the phone-
book. If this is the case, this could be indicated by checking a box during on the
phone the pairing process. If applicable, this option will only be presented on the
phone during the pairing process.
Making A Phone Call
• Assume that “John Smith” is one of the contacts stored in your phonebook.
• To call John Smith, push the steering wheel button PHONE/MENU and pro-
nounce “Call John Smith.”
• If the name is recognized, the system will display the recognized contact’s infor-
mation on the display screen.
• If there is just one phone number for John Smith in your phonebook, the system
will ask if you would like to call John Smith. To start the call say “Yes,” otherwise
say “No.”
• If John Smith has several phone numbers, the system will ask which phone num-
ber you would like to call (e.g.: “Call John Smith (at) Work or (at) Home?”). An-
swer with the type of required phone number (e.g.: “(at) Home”).
• If John Smith has several phone numbers but the “location” (e.g.: the type of
phone number like work, home, etc.) is missing, the system will display the se-
lected contact and a list of related phone numbers on the instrument cluster dis-
play. The hands-free phone system will ask if you would like to call the phone
number displayed. To respond with yes, say “Yes,” otherwise say “No.” If this is
the correct contact but the wrong number, say “Forward” or “Backward” to navi-
gate to the phone number you’d like to call. To call the displayed phone number,
pronounce “Call.” You can also scroll through the phone number list manually by
pushing the buttons on the back of the steering wheel until you find the required
number. Then, push the PRESET UP/OK button on the rear of the steering wheel
to start the call.
• To end the phone call, push the PHONE HANG UP button on the steering wheel.
Media Player
• With the BLUE&ME™ media player you can play, via the car sound system, the
digital audio files stored on a USB device by simply connecting it to the USB port
located on the center console of the car.
• The MEDIA PLAYER menu enables the following:
– Display tracks stored on your USB stick/iPod®.
– Play audio files stored on your USB stick/iPod® (BLUE&ME™ recognizes .wma,
.mp3 and .wav, .aac formats for audio files and .wpl and .m3u for playlists).
ELECTRONICS
47
Page 51 of 108

iPod®/USB/MP3 CONTROL
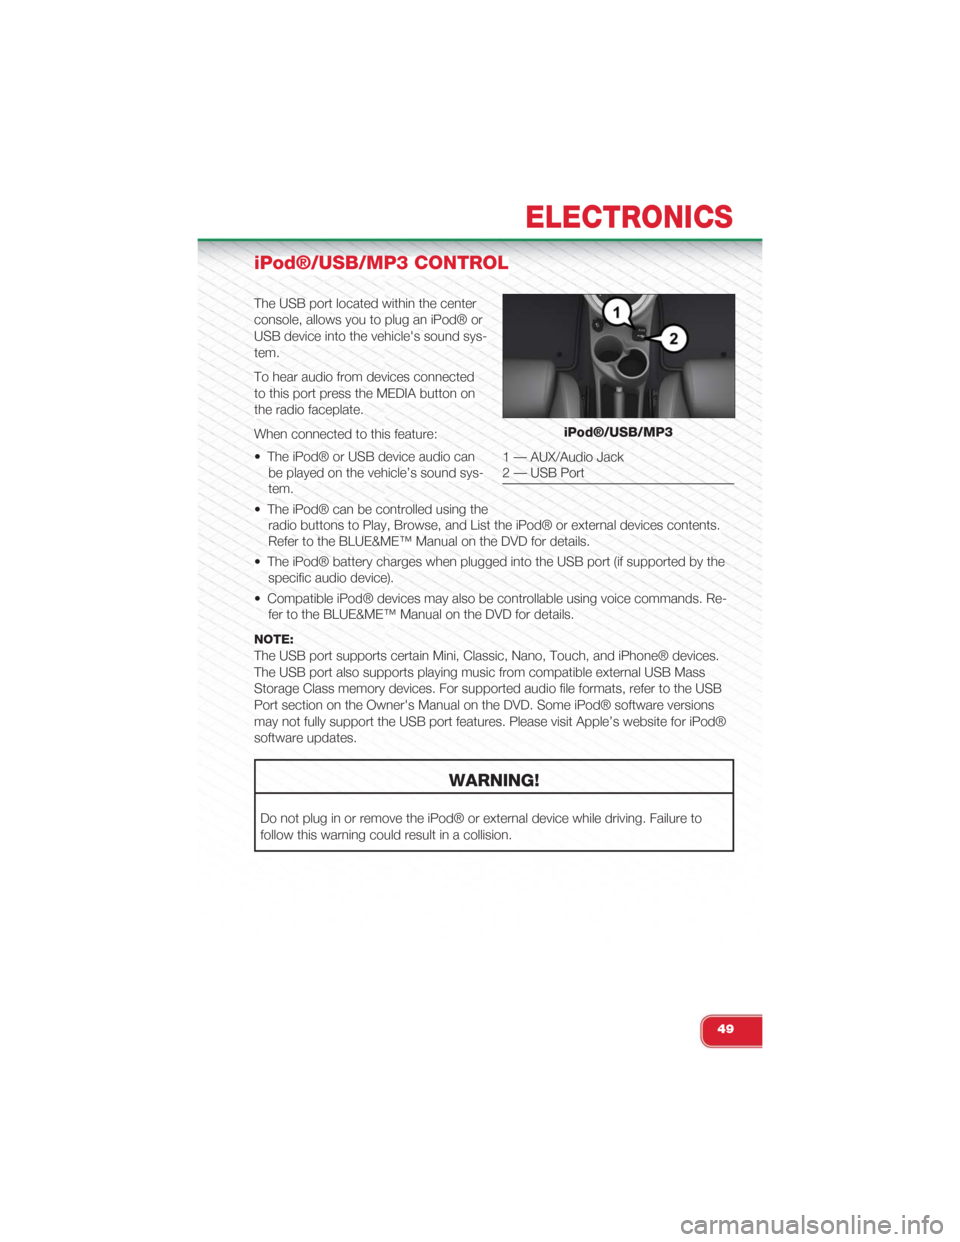
The USB port located within the center
console, allows you to plug an iPod® or
USB device into the vehicle's sound sys-
tem.
To hear audio from devices connected
to this port press the MEDIA button on
the radio faceplate.
When connected to this feature:
• The iPod® or USB device audio can
be played on the vehicle’s sound sys-
tem.
• The iPod® can be controlled using the
radio buttons to Play, Browse, and List the iPod® or external devices contents.
Refer to the BLUE&ME™ Manual on the DVD for details.
• The iPod® battery charges when plugged into the USB port (if supported by the
specific audio device).
• Compatible iPod® devices may also be controllable using voice commands. Re-
fer to the BLUE&ME™ Manual on the DVD for details.
NOTE:
The USB port supports certain Mini, Classic, Nano, Touch, and iPhone® devices.
The USB port also supports playing music from compatible external USB Mass
Storage Class memory devices. For supported audio file formats, refer to the USB
Port section on the Owner's Manual on the DVD. Some iPod® software versions
may not fully support the USB port features. Please visit Apple’s website for iPod®
software updates.
WARNING!
Do not plug in or remove the iPod® or external device while driving. Failure to
follow this warning could result in a collision.
iPod®/USB/MP3
1 — AUX/Audio Jack2 — USB Port
ELECTRONICS
49