2015 DODGE VIPER warning
[x] Cancel search: warningPage 16 of 148

Supplemental Side Air Bags
•ThisvehicleisequippedwithSupplementalDoor-IntegratedSideAirBagInflatable
Curtains (SABICs). The SABICs are located in the door trim below the side windows.
The trim covering the SABICs is labeled SRS AIRBAG.
•TheSABICsmayhelpreducetheriskofpartialorcompleteejectionofvehicle
occupants through side windows in certain side impact events.
•SABICsaredesignedtoactivateincertainsideimpacts.TheOccupantRestraint
Controller (“ORC”) determines whether the deployment of the SABIC in a particular
impact event is appropriate, based on the severity and type of collision. Vehicle damage
by itself is not a good indicator of whether or not SABICs should have deployed.
WARNING!
•RelyingontheSABICsalonecouldleadtomoresevereinjuriesinacollision.The
SABICs work with your seat belt to restrain you properly. In some collisions, SABICs
won’t deploy at all. Always wear your seat belt even though you have SABICs.
•SABICsneedroomtoinflate.Donotleanagainstthedoororwindow.Situprightin
the center of the seat.
•BeingtooclosetotheSABICsduringdeploymentcouldcauseyoutobeseverely
injured or killed.
•YourvehicleisequippedwithleftandrightSupplementalDoor-IntegratedSideAir
Bag Inflatable Curtains (SABICs). Do not stack luggage or other cargo up high
enough to block the deployment of the SABICs. The door trim below the side
windows where the SABIC and its deployment path are located, should remain free
from any obstructions.
CHILD RESTRAINTS
Children 12 years or younger should ride properly buckled up in a rear seat, if available.
According to crash statistics, children are safer when properly restrained in the rear seats
rather than in the front.
Every state in the United States and all Canadian provinces require that small children
ride in proper restraint systems. This is the law, and you can be prosecuted for ignoring it.
NOTE:
•Foradditionalinformation,refertowww.Seatcheck.orgorcall1-866-SEATCHECK.
•CanadianresidentsshouldrefertoTransportCanada’swebsiteforadditionalinforma-
tion: http://www.tc.gc.ca/eng/motorvehiclesafety/safedrivers-childsafety-index-53.htm
GETTING STARTED
14
Page 19 of 148

WARNING!
•Inacollision,anunrestrainedchild,evenatinybaby,canbecomeaprojectile
inside the vehicle. The force required to hold even an infant on your lap could
become so great that you could not hold the child, no matter how strong you are.
The child and others could be severely injured or killed. Any child riding in your
vehicle should be in a proper restraint for the child's size.
•Rearward-facingchildseatsmustneverbeusedinthefrontseatofavehiclewith
afrontpassengerairbag.Anairbagdeploymentcouldcausesevereinjuryordeath
to infants in this position.
•Onlyusearearward-facingchildrestraintinavehiclewitharearseat.
•ImproperinstallationofachildrestrainttotheLATCHanchoragescanleadto
failure of an infant or child restraint. The child could be severely injured or killed.
Follow the manufacturer’s directions exactly when installing an infant or child
restraint.
•Anincorrectlyanchoredtetherstrapcouldleadtoincreasedheadmotionand
possible injury to the child. Use only the anchor positions directly behind the child
seat to secure a child restraint top tether strap.
•Ifyourvehicleisequippedwithasplitrearseat,makesurethetetherstrapdoesnot
slip into the opening between the seatbacks as you remove slack in the strap.
NON-ADJUSTABLE HEAD RESTRAINTS
The non-adjustable head restraints are form fitted into the upper structure of the seatback
and are designed to reduce the risk of injury by restricting head movement in the event of
arearimpact.Theseatbackshouldbeproperlyadjustedtoanuprightpositionwherethe
head restraint is positioned as close as possible to the back of your head.
WARNING!
Be certain that the seatback is locked securely into position. Otherwise, the seat will
not provide the proper stability for passengers. An improperly latched seatback could
cause serious injury.
GETTING STARTED
17
Page 21 of 148

CAUTION!
Do not place any article under a power seat or impede its ability to move as it may cause
damage to the seat controls. Seat travel may become limited if movement is stopped
by an obstruction in the seat's path.
WARNING!
•Adjusting a seat while the vehicle is moving is dangerous. The sudden movement of
the seat could cause you to lose control. The seat belt might not be properly adjusted,
and you could be severely injured or killed. Only adjust a seat while the vehicle is
parked.
•Donotridewiththeseatbackreclinedsothattheseatbeltisnolongerresting
against your chest. In a collision, you could slide under the seat belt and be severely
injured or killed. Use the recliner only when the vehicle is parked.
ADJUSTABLE PEDALS
•Theadjustablepedalscanbemovedinanypositionoftheenginestart/stopbutton
(OFF/ACC/RUN).
•Theadjustablepedalswitchislocatedtotheleftsideofthesteeringcolumn.
•Pushtheswitchforwardtomovethe
pedals forward (toward the front of the
vehicle).
•Pushtheswitchrearwardtomovethe
pedals rearward (toward the driver).
CAUTION!
Do not place any article under the adjustable pedals or impede its ability to move, as
it may cause damage to the pedal controls. Pedal travel may become limited if
movement is stopped by an obstruction in the adjustable pedal's path.
WARNING!
Do not adjust the pedals while the vehicle is moving. You could lose control and have
acollision.Alwaysadjustthepedalswhilethevehicleisparked.
Adjustable Pedal Switch
GETTING STARTED
19
Page 22 of 148

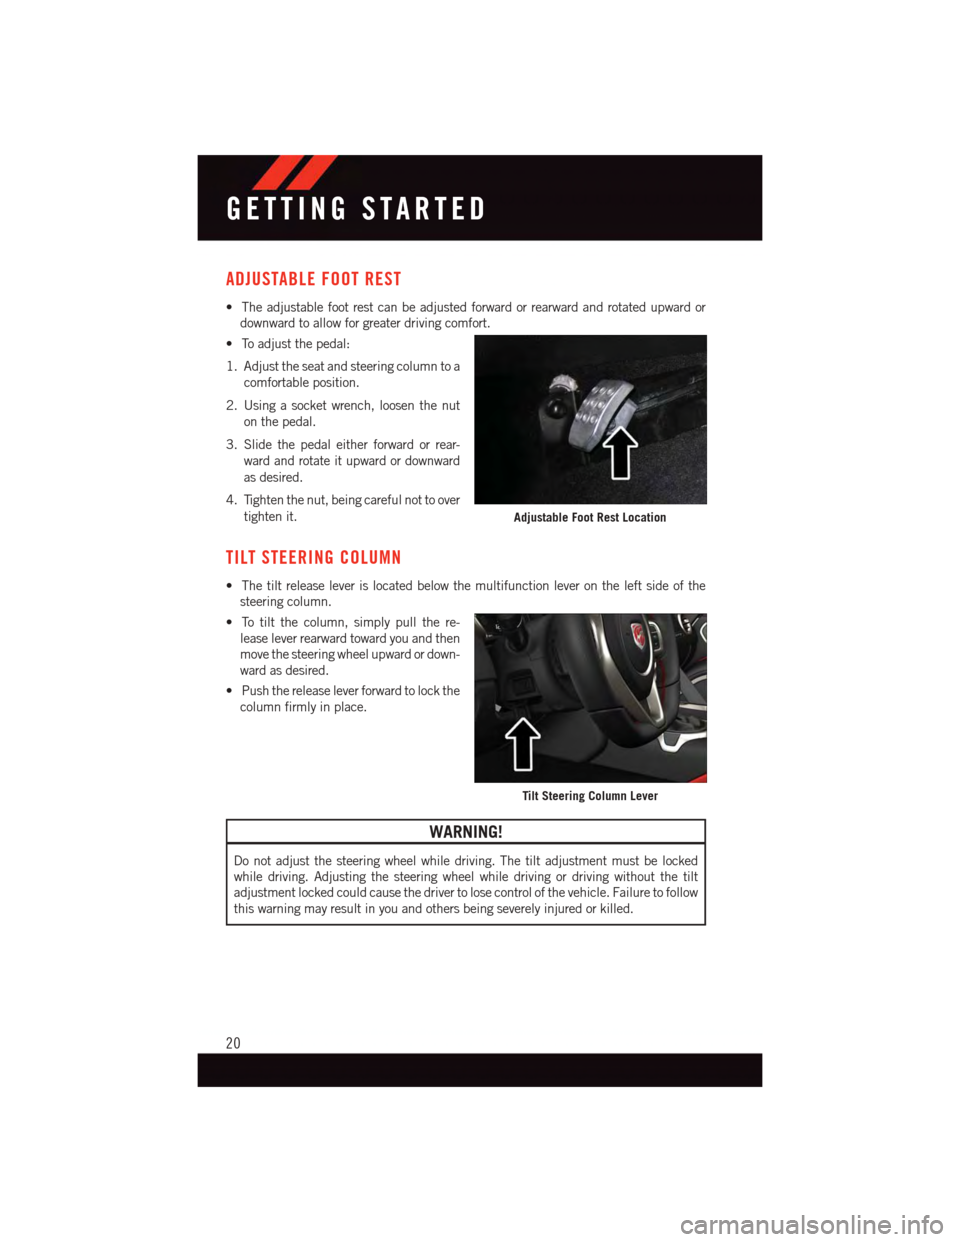
ADJUSTABLE FOOT REST
•Theadjustablefootrestcanbeadjustedforwardorrearwardandrotatedupwardor
downward to allow for greater driving comfort.
•Toadjustthepedal:
1. Adjust the seat and steering column to a
comfortable position.
2. Using a socket wrench, loosen the nut
on the pedal.
3. Slide the pedal either forward or rear-
ward and rotate it upward or downward
as desired.
4. Tighten the nut, being careful not to over
tighten it.
TILT STEERING COLUMN
•Thetiltreleaseleverislocatedbelowthemultifunctionleverontheleftsideofthe
steering column.
•Totiltthecolumn,simplypullthere-
lease lever rearward toward you and then
move the steering wheel upward or down-
ward as desired.
•Pushthereleaseleverforwardtolockthe
column firmly in place.
WARNING!
Do not adjust the steering wheel while driving. The tilt adjustment must be locked
while driving. Adjusting the steering wheel while driving or driving without the tilt
adjustment locked could cause the driver to lose control of the vehicle. Failure to follow
this warning may result in you and others being severely injured or killed.
Adjustable Foot Rest Location
Tilt Steering Column Lever
GETTING STARTED
20
Page 27 of 148

To Decrease Speed
When the Electronic Speed Control is set, you can decrease speed by pushing the SET-
button.
The drivers preferred units can be selected through the instrument panel settings if
equipped. The speed decrement shown is dependant on the chosen speed unit of U.S.
(MPH) or Metric (km/h):
U.S. Speed (MPH)
•PushingtheSET-button once will result in a 1 MPH decrease in set speed. Each
subsequent tap of the button results in a decrease of 1 MPH.
•Ifthebuttoniscontinuallypushed,thesetspeedwillcontinuetodecreaseuntilthe
button is released, then the new set speed will be established.
Metric Speed (km/h)
•PushingtheSET-button once will result in a 1 km/h decrease in set speed. Each
subsequent tap of the button results in a decrease of 1 km/h.
•Ifthebuttoniscontinuallypushed,thesetspeedwillcontinuetodecreaseuntilthe
button is released, then the new set speed will be established.
Resume
To r e s u m e a p r e v i o u s l y s e l e c t e d s e t s p e e d i n m e m o r y, p u s h t h e R E S + b u t t o n a n d r e l e a s e .
Cancel
Push the CANCEL button, or apply the brakes to cancel the set speed and maintain the set
speed memory.
Push the ON/OFF button to turn the system off and erase the set speed memory.
WARNING!
•LeavingtheElectronicSpeedControlsystemonwhennotinuseisdangerous.You
could accidentally set the system or cause it to go faster than you want. You could
lose control and have a collision. Always leave the Electronic Speed Control system
off when you are not using it.
•ElectronicSpeedControlcanbedangerouswherethesystemcannotmaintaina
constant speed. Your vehicle could go too fast for the conditions, and you could lose
control. A collision could be the result. Do not use Electronic Speed Control in
heavy traffic or on roads that are winding, icy, snow-covered or slippery.
OPERATING YOUR VEHICLE
25
Page 28 of 148

LAUNCH MODE
This system maximizes acceleration traction for straight line racing.
1. Bring the vehicle to complete stop on a level track surface with the engine running.
2. Set the steering wheel for straight ahead driving.
3. Fully depress the clutch and select the first gear position.
4. Push and release the “LAUNCH” button (located on the steering wheel controls).
5. Rapidly press the accelerator pedal to
the floor within one second.
NOTE:
If the cluster launch DID message indicates
all conditions are correct for launch and the
throttle is pressed to the floor quickly
(within approximately 1/2 second) the sys-
tem will hold the engine speed to a preset
speed (below the engine rev limiter speed).
6. Release the clutch aggressively. Do not
ride the clutch.
Release the accelerator pedal to deactivate
launch control. Pushing the launch control
button or actuating the brakes will also
deactivate launch control.
NOTE:
•LaunchModebringstheenginetooptimumlaunchRPMandwaitsforthedriverto
release the clutch. Launch Mode then uses engine throttle only to achieve controlled
wheelslip for maximum acceleration through first gear.
•LaunchModecanbeusedinanyoftheElectronicStabilityControl(ESC)Modes.
•Launchmodeshouldnotbeusedwithinthefirst500milesofenginebreak-in.
WARNING!
Launch Mode is intended for off-highway or off-road use only and should not be used
on any public roadways. It is recommended that this feature be used in a controlled
environment, and within the limits of the law. The capabilities of the vehicle as
measured by the performance pages must never be exploited in a reckless or dangerous
manner, which can jeopardize the user’s safety or the safety of others. Only a safe,
attentive, and skillful driver can prevent accidents.
LAUNCH Button
OPERATING YOUR VEHICLE
26
Page 31 of 148

Rain Mode
•Rainmodeoffersincreasedtractioncontrolandstabilitycontrolforlowtraction
conditions such as wet roads, dry roads during cold temperatures, or when the driver
wants enhanced stability due to lack of familiarity or experience with the vehicle’s
response. To enter the “Rain Mode” mode, push the “ESC” switch three times. The
“ESC RAIN” light will illuminate, and the “ESC RAIN” message will display in the
vehicle cluster (left of the odometer).
NOTE:
Some models may not offer “Sport” or “Track” Mode.
WARNING!
The Electronic Stability Control System (ESC) cannot prevent the natural laws of physics
from acting on the vehicle, nor can it increase the traction afforded by prevailing road
conditions. ESC cannot prevent all accidents, including those resulting from excessive
speed in turns, driving on very slippery surfaces, or hydroplaning. ESC also cannot
prevent accidents resulting from loss of vehicle control due to inappropriate driver input
for the conditions. Only a safe, attentive, and skillful driver can prevent accidents. The
capabilities of an ESC equipped vehicle must never be exploited in a reckless or
dangerous manner which could jeopardize the user’s safety or the safety of others.
MANUAL TRANSMISSION 1 TO 4 SKIP SHIFT
•SkipShiftisenabledwhenvehiclespeedisgreaterthan16MPH
(26 km/h) but less than 18 MPH (29 km/h) and the accelerator is
at 20% or less.
•Foroptimalfueleconomy,underlowaccelerationconditions,your
vehicle will only allow you to shift from first gear to fourth gear.
Additionally, the skip shift message will appear in the tachometer.
•RefertoyourOwner'sManualontheDVDforfurtherinformation.
Skip
Shift
133
22
55RR
6
OPERATING YOUR VEHICLE
29
Page 32 of 148

ADDING FUEL
1. Press the fuel filler door release switch (located in the driver's door map pocket).
2. Open the fuel filler door.
3. There is no fuel filler cap. A flapper door inside the pipe seals the system.
4. Insert the fuel nozzle fully into the filler pipe – the nozzle opens and holds the flapper
door while refueling.
NOTE:
Only the correct size nozzle opens the latches allowing the flapper door to open.
5. Fill the vehicle with fuel – when the fuel nozzle “clicks” or shuts off the fuel tank is full.
6. Remove the fuel nozzle and close the fuel door.
NOTE:
Afunnelisprovided(locatedinthetrunkinthesparetirearea)toopentheflapper
door to allow for emergency refueling with a gas can.
CAUTION!
To a v o i d f u e l s p i l l a g e a n d o v e r f i l l i n g , d o n o t “ t o p o f f ” t h e f u e l t a n k a f t e r f i l l i n g .
WARNING!
•Neverhaveanysmokingmaterialslitinornearthevehiclewhenthefueldooris
open or the tank is being filled.
•Neveraddfuelwhentheengineisrunning.Thisisinviolationofmoststateand
federal fire regulations and may cause the “Malfunction Indicator Light” to turn on.
•Afiremayresultiffuelispumpedintoaportablecontainerthatisinsideofavehicle.
Yo u c o u l d b e b u r n e d . A l w a y s p l a c e f u e l c o n t a i n e r s o n t h e g r o u n d w h i l e f i l l i n g .
OPERATING YOUR VEHICLE
30