2015 DODGE JOURNEY center console
[x] Cancel search: center consolePage 67 of 140

PLAYING iPod®/USB/MP3 DEVICES
•TherearemanywaystoplaymusicfromiPod®/MP3 players or USB devices through
your vehicles sound system.
Audio Jack (AUX)
•TheAudioJack,locatedinthecenterconsole,allowsaportabledevice,suchasan
MP3 player or an iPod®,tobepluggedintotheradioandutilizethevehiclessound
system, using a 3.5 mm audio cable, to amplify the source and play through the vehicle
speakers.
•Pressingthe“Player”buttononthetouchscreenthenchooseAUXsourcewillchange
the mode to auxiliary device if the Audio Jack is connected, allowing the music from
your portable device to be heard through the vehicles speakers.
•Thefunctionsoftheportabledevicearecontrolledusingthedevicebuttons.The
volume may be controlled using the radio or portable device.
•Toroutetheaudiocableoutofthecenterconsole,usetheaccesscutoutinthefront
of the console.
USB Port
•ConnectyouriPod®or compatible device using a USB cable into the USB Port. The
USB Port is contained within the center console. USB Memory sticks with audio files
can also be used. Then, audio from the device can be played on the vehicles sound
system while providing metadata (artist, track title, album, etc.) information on the
radio display.
•Whenconnected,theiPod®/compatible USB device can be controlled using the radio
or Steering Wheel Audio Controls to play, skip to the next or previous track, browse, and
list the contents.
•TheiPod®battery charges when plugged into the USB port (if supported by the specific
device).
•ToroutetheUSB/iPod®cable out of the center console, use the access cut out in the
front of the console.
NOTE:
•WhenconnectingyouriPod®device for the first time, the system may take several
minutes to read your music, depending on the number of files. For example, the system
will take approximately five minutes for every 1000 songs loaded on the device. Also
during the reading process, the Shuffle and Browse functions will be disabled. This
process is needed to ensure the full use of your iPod®features and only happens the
first time it is connected. After the first time, the reading process of your iPod®will take
considerably less time unless changes are made or new songs are added to the playlist.
•TheUSBportsupportscertainMini,Classic,Nano,Touch,andiPhone®devices. The
USB port also supports playing music from compatible external USB Mass Storage
Class memory devices. Some iPod®software versions may not fully support the USB
port features. Please visit Apple’s website for iPod®software updates.
ELECTRONICS
65
Page 77 of 140

WARNING!
Any voice commanded system should be used only in safe driving conditions following
applicable laws regarding phone use. Your attention should be focused on safely
operating the vehicle. Failure to do so may result in a collision causing you and others
to be severely injured or killed.
VIDEO ENTERTAINMENT SYSTEM (VES™)
System Operation
•Thescreenislocatedontheheadlinerbehindthefrontseat.Tolowerthescreen,press
the release button located in the rear of the overhead console.
•Thesystemmaybecontrolledbythefrontseatoccupantsusingthetouchscreenradio,
or by the rear seat occupants using the remote control.
•Thevideoscreendisplaysinformationinasplit-screenformat.Theleftsideofthe
screen is referred to as Channel 1 and the right side of the screen is referred to as
Channel 2. All modes except video modes are displayed in a split-screen format.
•Tousetheheadphones,pressthepowerbuttonlocatedontherightearcup.Selectthe
channel on the headphones (1 or 2) that corresponds to the channel selected on the
VES™ screen.
Operation Of The Remote
The remote control operates similarly to any DVD remote you have used before and allows
the rear seat passengers to change stations, tracks, discs and audio/video modes and is
designed to control either channel by using the selector switch located on the right side of
the remote.
•Selectanaudiochannel(Rear1fordriver'ssiderearscreenandRear2forpassenger's
side rear screen), then press the “source” button and using the up and down arrows,
highlight disc from the menu and press the “OK” button.
•Pressthepopup/menubuttontonavigatethediscmenuandoptions.
Pressing the MODE button causes the Mode Selection menu to appear on the VES™
screen. Use the remote control arrow buttons to scroll through the available modes, then
press ENTER to select the desired mode.
Pressing the power button will turn the VES™ system ON/OFF.
Auxiliary Audio/Video Input Jacks
•TheAuxjacksarelocatedontherearofthecenterconsole.
•ConnectthevideogameorotherexternalmediadevicestotheAUXjacksfollowingthe
color coding for VES™ jacks.
•Usingeitherthetouchscreenradioorremotecontrol,selectAUXfromtheRearVES™
Control or Mode Selection screen.
•Refertoyourvehicle'sOwnersManualontheDVDforfurtherdetails.
ELECTRONICS
75
Page 80 of 140

Uconnect® 8.4 Customer Programmable Features
•TheUconnect®8.4 system allows you to access Customer Programmable feature
settings such as Display, Clock, Safety/Assistance, Lights, Doors & Locks, Heated
Seats, Engine Off Operation, Compass Settings, Audio, Phone/Bluetooth®and SIRIUS
Setup through buttons on the touchscreen.
•Pressthe“More”buttononthebottomofthetouchscreen,thenpressthe“Settings”
button on the faceplate to access the Settings screen. When making a selection, scroll
up or down until the preferred setting is highlighted, then press and release the
preferred setting until a check-mark appears next to the setting, showing that setting
has been selected. The following feature settings are available:
•Display•AutoOnComfort&RemoteStart
•Clock•EngineOffOptions
•Safety/Assistance•Audio
•Lights•Phone/Bluetooth®
•Doors&Locks•SIRIUSSetup
UNIVERSAL GARAGE DOOR OPENER (HomeLink®)
•HomeLink®replaces up to three hand-held transmitters that operate devices such as
garage door openers, motorized gates, lighting or home security systems. The
HomeLink®unit is powered by your vehicles 12 Volt battery.
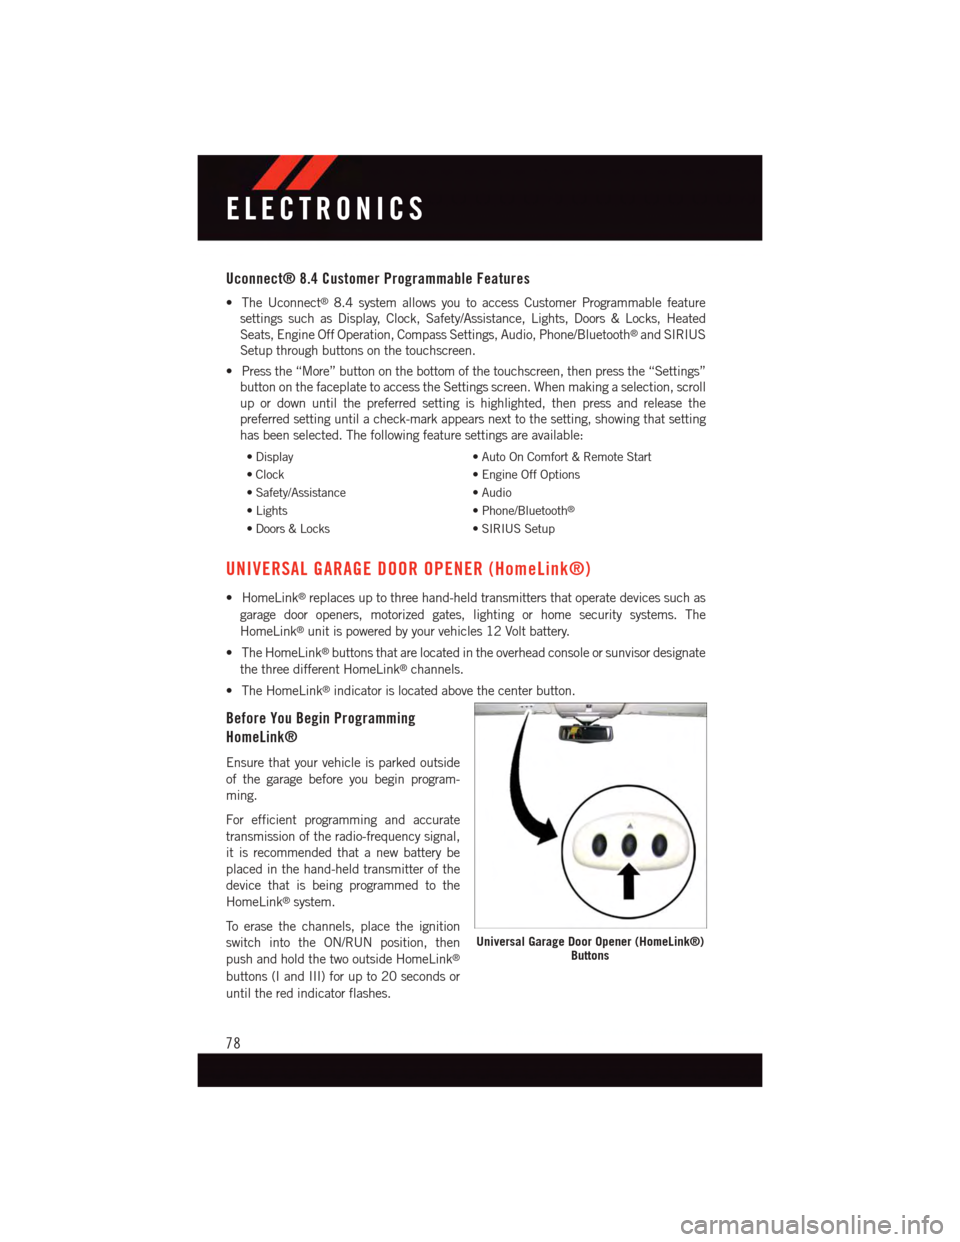
•TheHomeLink®buttons that are located in the overhead console or sunvisor designate
the three different HomeLink®channels.
•TheHomeLink®indicator is located above the center button.
Before You Begin Programming
HomeLink®
Ensure that your vehicle is parked outside
of the garage before you begin program-
ming.
For efficient programming and accurate
transmission of the radio-frequency signal,
it is recommended that a new battery be
placed in the hand-held transmitter of the
device that is being programmed to the
HomeLink®system.
To e r a s e t h e c h a n n e l s , p l a c e t h e i g n i t i o n
switch into the ON/RUN position, then
push and hold the two outside HomeLink®
buttons (I and III) for up to 20 seconds or
until the red indicator flashes.
Universal Garage Door Opener (HomeLink®)Buttons
ELECTRONICS
78
Page 83 of 140

POWER INVERTER
•Thereisa115Volt,150Wattpower
inverter outlet located on the back of the
center console. This outlet can power
cellular phones, electronics and other
low power devices requiring power up to
150 Watts.
Uconnect® 4.3 System
•PushtheMOREbuttononthefaceplate
(located next to the Uconnect®screen).
•Pressthe“Outlet”buttononthetouch-
screen to turn the power inverter On or
Off.
Uconnect® 8.4 System
•Pressthe“Controls”buttononthe
touchscreen (located at the bottom of the
Uconnect®screen).
•Pressthe“Outlet”buttononthetouchscreentoturnthepowerinverterOnorOff.
NOTE:
The power inverter is designed with built-in overload protection. If the power rating of
150 Watts is exceeded, the power inverter will automatically shut down. Once the
electrical device has been removed from the outlet, the inverter should automatically
reset. If the power rating exceeds approximately 170 Watts, the power inverter may have
to be reset manually. To reset the inverter manually, unplug the device and plug it in again.
To a v o i d o v e r l o a d i n g t h e c i r c u i t , c h e c k t h e p o w e r r a t i n g s o n e l e c t r i c a l d e v i c e s p r i o r t o
using the inverter.
WARNING!
•ToAvoidSeriousInjuryorDeathDONOT:
•useathree-prongadaptor
•insertanyobjectsintothereceptacles
•touchwithwethands
Close the lid when not in use. If this outlet is mishandled, it may cause an electric
shock and failure.
Power Inverter
ELECTRONICS
81
Page 84 of 140

POWER OUTLETS
•Thereisa12Voltpoweroutletlocatedin
the front storage bin below the radio.
This outlet has power available when the
ignition switch is in the ON position.
•Asecond12Voltpoweroutletislocated
inside the center console. This outlet has
power available when the ignition switch
is in the LOCK, ON, or ACC position.
•Athird12Voltpoweroutletislocatedon
the back of the center console. This out-
let has power available when the ignition
switch is in the LOCK, ON or ACC posi-
tion.
•Afourthfused12Voltpoweroutletis
located on the left quarter trim panel in
the cargo area. This outlet has power
available when the ignition switch is in the ON or ACC position.
Front Power Outlet
ELECTRONICS
82
Page 106 of 140

SHIFT LEVER OVERRIDE
•IfamalfunctionoccursandtheshiftlevercannotbemovedoutofthePARKposition,
you can use the following procedure to temporarily move the shift lever:
1.To a c c e s s t h e s h i f t l e v e r o v e r r i d e , r e m o v e t h e c u b b y b i n l i n e r l o c a t e d i n t h e c e n t e r
console behind the shift lever. The override access port is at the front of the cubby bin.
2. Firmly set the parking brake.
3. Turn the ignition switch to the ACC or ON position without starting the engine.
4. Press and maintain firm pressure on the brake pedal.
5. Using a screwdriver or similar tool, press and hold the override tab through the
access port on the center console.
6. Move the shift lever into the NEUTRAL position.
7. The vehicle may then be started in NEUTRAL.
8. Reinstall the override cover.
WHAT TO DO IN EMERGENCIES
104