2015 DODGE JOURNEY AUX
[x] Cancel search: AUXPage 3 of 140

INTRODUCTION/WELCOME
WELCOME FROM CHRYSLERGROUP LLC..................2
CONTROLS AT A GLANCE
DRIVER COCKPIT...............4INSTRUMENT CLUSTER...........6
GETTING STARTED
KEY FOB . . . . . . . . . . . . . . . . . . . . . 8REMOTE START . . . . . . . . . . . . . . . . 9KEYLESS ENTER-N-GO™.........10VEHICLE SECURITY ALARM........14SEAT BELT SYSTEMS............15SUPPLEMENTAL RESTRAINT SYSTEM(SRS) — AIR BAGS.............16CHILD RESTRAINTS............19HEAD RESTRAINTS.............25FRONT SEATS................27REAR SEATS.................30HEATED SEATS . . . . . . . . . . . . . . . 32HEATED STEERING WHEEL........33TILT/TELESCOPING STEERINGCOLUMN...................34
OPERATING YOUR VEHICLE
ENGINE BREAK-INRECOMMENDATIONS............35TURN SIGNAL/WIPER/WASHER/HIGHBEAM LEVER.................36HEADLIGHT SWITCH............37ELECTRONIC SPEED CONTROL......38CLIMATE CONTROL.............40PA R K V I E W®REAR BACK-UP CAMERA . . 43POWER SUNROOF..............44WIND BUFFETING..............45
ELECTRONICS
YOUR VEHICLE'S SOUND SYSTEM....46IDENTIFYING YOUR RADIO.........48Uconnect®4.3 & 4.3S AT A GLANCE . . . 49Uconnect®8.4 & 8.4N AT A GLANCE . . . 51RADIO.....................53SiriusXM SATELLITE RADIO.........55iPod®/CD/AUX CONTROLS..........57GARMIN®NAVIGATION...........59SiriusXM TRAVEL LINK...........64PLAYING iPod®/USB/MP3 DEVICES....65Uconnect®PHONE..............66Uconnect®VOICE COMMAND(8.4 & 8.4N ONLY)..............72VIDEO ENTERTAINMENTSYSTEM (VES™)...............75STEERING WHEEL AUDIO CONTROLS . . 76ELECTRONIC VEHICLE INFORMATIONCENTER (EVIC)................76PROGRAMMABLE FEATURES.......77
UNIVERSAL GARAGE DOOR OPENER(HomeLink®).................78POWER INVERTER.............81POWER OUTLETS..............82
UTILITY
TRAILER TOWING WEIGHTS (MAXIMUMTRAILER WEIGHT RATINGS)........84RECREATIONAL TOWING (BEHINDMOTORHOME, ETC.)............85
WHAT TO DO IN EMERGENCIES
ROADSIDE ASSISTANCE..........86INSTRUMENT CLUSTER WARNINGLIGHTS....................86INSTRUMENT CLUSTER INDICATORLIGHTS....................91IF YOUR ENGINE OVERHEATS.......92JACKING AND TIRE CHANGING......93JUMP-STARTING..............101SHIFT LEVER OVERRIDE.........104TOWING A DISABLED VEHICLE.....105FREEING A STUCK VEHICLE.......105EVENT DATA RECORDER (EDR).....106
MAINTAINING YOUR VEHICLE
OPENING THE HOOD...........107ENGINE COMPARTMENT.........108FLUID CAPACITIES............112FLUIDS, LUBRICANTS AND GENUINEPA RT S . . . . . . . . . . . . . . . . . . . . 1 1 2MAINTENANCE PROCEDURES......114MAINTENANCE SCHEDULE........114MAINTENANCE RECORD.........118FUSES....................119TIRE PRESSURES.............121SPARE TIRES — IF EQUIPPED......122WHEEL AND WHEEL TRIM CARE....124REPLACEMENT BULBS..........124
CONSUMER ASSISTANCE
CHRYSLER GROUP LLC CUSTOMERCENTER...................126CHRYSLER CANADA INC. CUSTOMERCENTER...................126ASSISTANCE FOR THE HEARINGIMPAIRED..................126PUBLICATIONS ORDERING........126REPORTING SAFETY DEFECTS IN THEUNITED STATES..............127
MOPAR® ACCESSORIES
AUTHENTIC ACCESSORIES BYMOPAR®...................128
FREQUENTLY ASKED QUESTIONS
FREQUENTLY ASKED QUESTIONS....129
INDEX.....................130
TABLE OF CONTENTS
Page 51 of 140

Uconnect® 4.3 & 4.3S AT A GLANCE
Displaying The Time
•IfthetimeisnotcurrentlydisplayedatthetopofthescreenwheninRadiomode,push
the SETTINGS button, then press “Clock.” Select “Show Time,” then press “On.”
Setting The Time
•PushtheSETTINGSbuttononthefaceplate,thenpressthe“Clock”buttononthe
touchscreen.
•Pressthe“Time”buttononthetouchscreen.
•Pressthe“UporDown”buttonsonthetouchscreentoadjustthehours,minutesor
AM/PM.
NOTE:
12hr format and 24hr format can also be set.
•Oncethetimeissetpressthe“Done”buttononthetouchscreentoexitthetime
screen.
Uconnect® 4.3 & 4.3S
1—Radio:AM/FM/SIRIUSSatelliteRadio(IfEquipped)2—STATUSBAR3—Settings:Clock,Display,etc.4—ScreenOFF/ON5—MORE:Uconnect®Phone, Compass, etc.6—Player:CD,iPod®,USBDeviceorAUXDevice
ELECTRONICS
49
Page 59 of 140

Replay
•Letsyoureplayupto44minutesofthecontentofthecurrentSiriusXMSatelliteRadio
channel.
ReplayOptionOption Description
Play/Pause Press to Pause content playback. Press “Pause/Play” again to resumeplayback.
Rewind/RW Rewinds the channel content in steps of five seconds. Press and hold torewind continuously, then release to begin playing content at that point.
FastForward/FWForwards the content, and works similarly to Rewind/RW. However, FastForward/FW can only be used when content has been previously rewound.
Replay Time Displays the amount of time in the upper center of the screen by which yourcontent lags the Live channel.
Live Resumes playback of Live content at any time while replaying rewoundcontent.
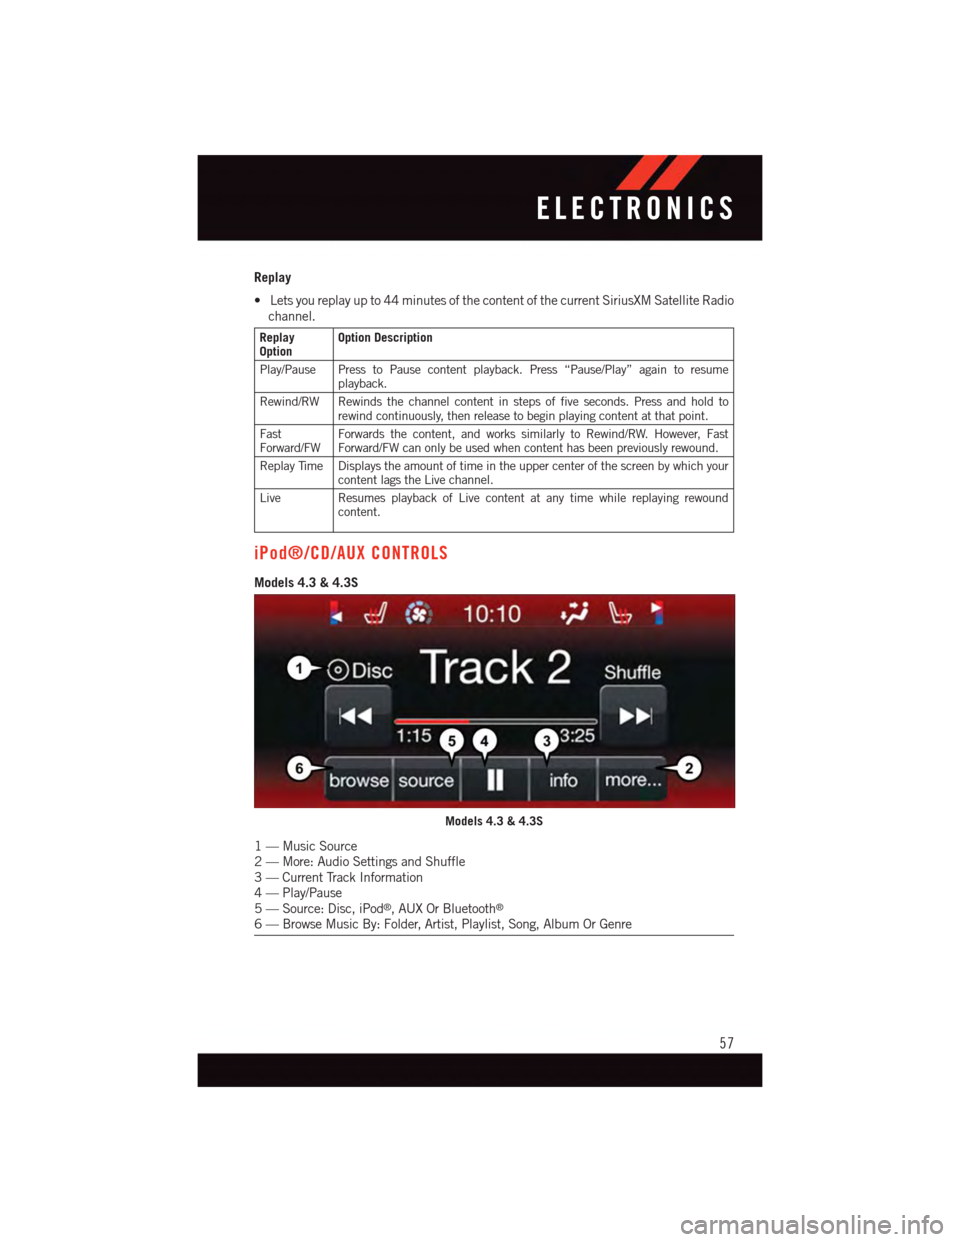
iPod®/CD/AUX CONTROLS
Models 4.3 & 4.3S
Models 4.3 & 4.3S
1—MusicSource2—More:AudioSettingsandShuffle3—CurrentTrackInformation4—Play/Pause5—Source:Disc,iPod®,AUXOrBluetooth®
6—BrowseMusicBy:Folder,Artist,Playlist,Song,AlbumOrGenre
ELECTRONICS
57
Page 60 of 140

•TheiPod®/CD/AUX controls are accessed by pushing the PLAYER button on the
faceplate to enter the Player main screen, then press the “Source” button on the
touchscreen and choose between Disc, AUX, iPod®or Bluetooth®.
NOTE:
Uconnect®will usually automatically
switch to the appropriate mode when some-
thing is first connected or inserted into the
system.
Models 8.4 & 8.4N
Source 4.3 & 4.3S
Models 8.4 & 8.4N
1—MusicSource:Disc,iPod®,SDCard,AUXOrBluetooth®
2—RepeatTrack3—ShuffleMusicTracks4—MusicTrackInformation5—SongsInQueue6—BrowseMusicBy:Folder,Artist,Playlist,Song,AlbumOrGenre
ELECTRONICS
58
Page 61 of 140

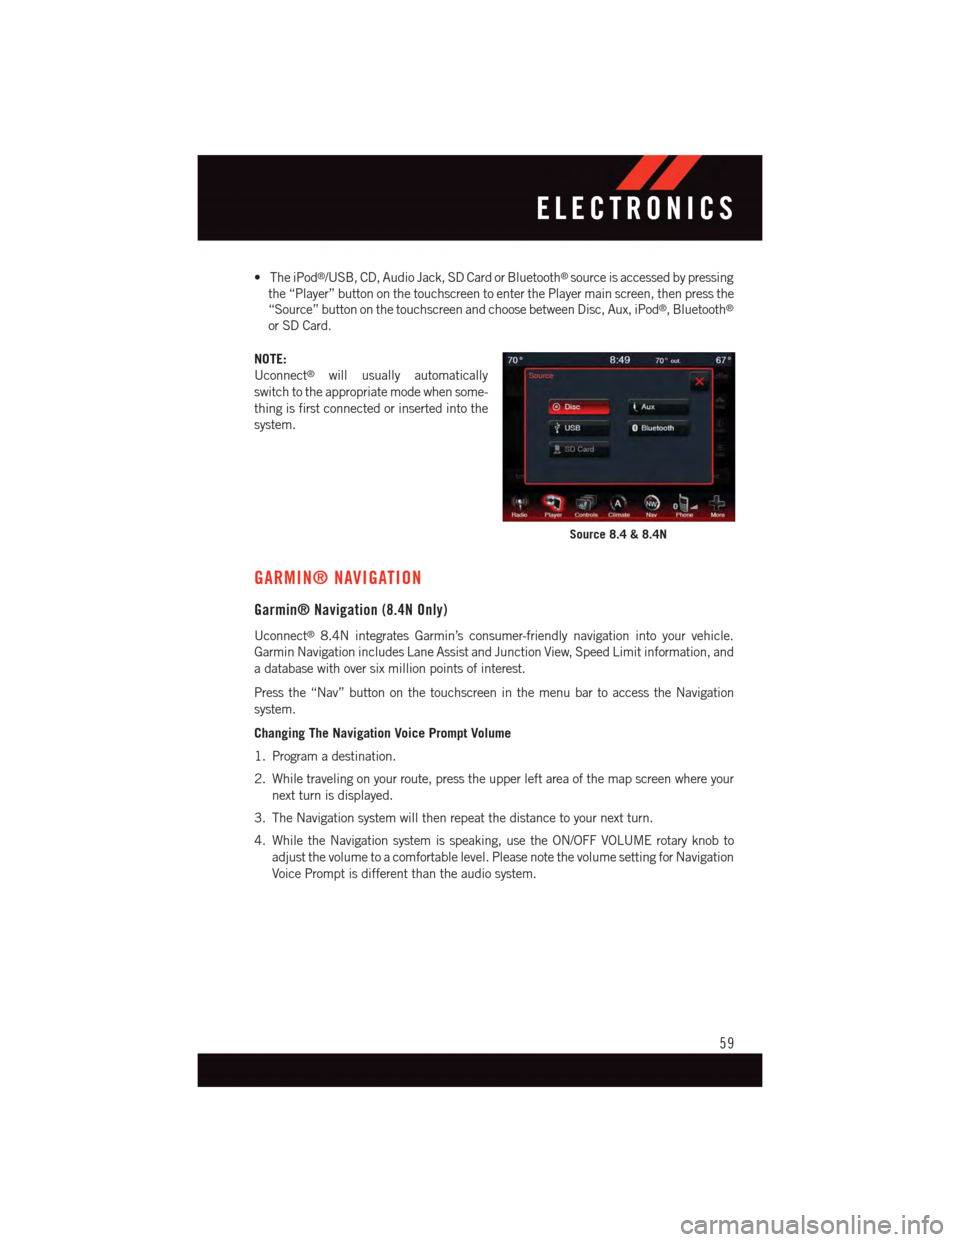
•TheiPod®/USB, CD, Audio Jack, SD Card or Bluetooth®source is accessed by pressing
the “Player” button on the touchscreen to enter the Player main screen, then press the
“Source” button on the touchscreen and choose between Disc, Aux, iPod®,Bluetooth®
or SD Card.
NOTE:
Uconnect®will usually automatically
switch to the appropriate mode when some-
thing is first connected or inserted into the
system.
GARMIN® NAVIGATION
Garmin® Navigation (8.4N Only)
Uconnect®8.4N integrates Garmin’s consumer-friendly navigation into your vehicle.
Garmin Navigation includes Lane Assist and Junction View, Speed Limit information, and
adatabasewithoversixmillionpointsofinterest.
Press the “Nav” button on the touchscreen in the menu bar to access the Navigation
system.
Changing The Navigation Voice Prompt Volume
1. Program a destination.
2. While traveling on your route, press the upper left area of the map screen where your
next turn is displayed.
3. The Navigation system will then repeat the distance to your next turn.
4. While the Navigation system is speaking, use the ON/OFF VOLUME rotary knob to
adjust the volume to a comfortable level. Please note the volume setting for Navigation
Voice Prompt is different than the audio system.
Source 8.4 & 8.4N
ELECTRONICS
59
Page 67 of 140

PLAYING iPod®/USB/MP3 DEVICES
•TherearemanywaystoplaymusicfromiPod®/MP3 players or USB devices through
your vehicles sound system.
Audio Jack (AUX)
•TheAudioJack,locatedinthecenterconsole,allowsaportabledevice,suchasan
MP3 player or an iPod®,tobepluggedintotheradioandutilizethevehiclessound
system, using a 3.5 mm audio cable, to amplify the source and play through the vehicle
speakers.
•Pressingthe“Player”buttononthetouchscreenthenchooseAUXsourcewillchange
the mode to auxiliary device if the Audio Jack is connected, allowing the music from
your portable device to be heard through the vehicles speakers.
•Thefunctionsoftheportabledevicearecontrolledusingthedevicebuttons.The
volume may be controlled using the radio or portable device.
•Toroutetheaudiocableoutofthecenterconsole,usetheaccesscutoutinthefront
of the console.
USB Port
•ConnectyouriPod®or compatible device using a USB cable into the USB Port. The
USB Port is contained within the center console. USB Memory sticks with audio files
can also be used. Then, audio from the device can be played on the vehicles sound
system while providing metadata (artist, track title, album, etc.) information on the
radio display.
•Whenconnected,theiPod®/compatible USB device can be controlled using the radio
or Steering Wheel Audio Controls to play, skip to the next or previous track, browse, and
list the contents.
•TheiPod®battery charges when plugged into the USB port (if supported by the specific
device).
•ToroutetheUSB/iPod®cable out of the center console, use the access cut out in the
front of the console.
NOTE:
•WhenconnectingyouriPod®device for the first time, the system may take several
minutes to read your music, depending on the number of files. For example, the system
will take approximately five minutes for every 1000 songs loaded on the device. Also
during the reading process, the Shuffle and Browse functions will be disabled. This
process is needed to ensure the full use of your iPod®features and only happens the
first time it is connected. After the first time, the reading process of your iPod®will take
considerably less time unless changes are made or new songs are added to the playlist.
•TheUSBportsupportscertainMini,Classic,Nano,Touch,andiPhone®devices. The
USB port also supports playing music from compatible external USB Mass Storage
Class memory devices. Some iPod®software versions may not fully support the USB
port features. Please visit Apple’s website for iPod®software updates.
ELECTRONICS
65
Page 77 of 140

WARNING!
Any voice commanded system should be used only in safe driving conditions following
applicable laws regarding phone use. Your attention should be focused on safely
operating the vehicle. Failure to do so may result in a collision causing you and others
to be severely injured or killed.
VIDEO ENTERTAINMENT SYSTEM (VES™)
System Operation
•Thescreenislocatedontheheadlinerbehindthefrontseat.Tolowerthescreen,press
the release button located in the rear of the overhead console.
•Thesystemmaybecontrolledbythefrontseatoccupantsusingthetouchscreenradio,
or by the rear seat occupants using the remote control.
•Thevideoscreendisplaysinformationinasplit-screenformat.Theleftsideofthe
screen is referred to as Channel 1 and the right side of the screen is referred to as
Channel 2. All modes except video modes are displayed in a split-screen format.
•Tousetheheadphones,pressthepowerbuttonlocatedontherightearcup.Selectthe
channel on the headphones (1 or 2) that corresponds to the channel selected on the
VES™ screen.
Operation Of The Remote
The remote control operates similarly to any DVD remote you have used before and allows
the rear seat passengers to change stations, tracks, discs and audio/video modes and is
designed to control either channel by using the selector switch located on the right side of
the remote.
•Selectanaudiochannel(Rear1fordriver'ssiderearscreenandRear2forpassenger's
side rear screen), then press the “source” button and using the up and down arrows,
highlight disc from the menu and press the “OK” button.
•Pressthepopup/menubuttontonavigatethediscmenuandoptions.
Pressing the MODE button causes the Mode Selection menu to appear on the VES™
screen. Use the remote control arrow buttons to scroll through the available modes, then
press ENTER to select the desired mode.
Pressing the power button will turn the VES™ system ON/OFF.
Auxiliary Audio/Video Input Jacks
•TheAuxjacksarelocatedontherearofthecenterconsole.
•ConnectthevideogameorotherexternalmediadevicestotheAUXjacksfollowingthe
color coding for VES™ jacks.
•Usingeitherthetouchscreenradioorremotecontrol,selectAUXfromtheRearVES™
Control or Mode Selection screen.
•Refertoyourvehicle'sOwnersManualontheDVDforfurtherdetails.
ELECTRONICS
75
Page 131 of 140

FREQUENTLY ASKED QUESTIONS
GETTING STARTED
•HowdoIinstallmyLATCHEquippedChildSeat?pg.21
•HowdoImovemyrearseats?pg.30
ELECTRONICS
•HowdoIknowwhichradioIhave?
•Uconnect®4.3 & 4.3S pg. 49
•Uconnect®8.4 & 8.4N pg. 51
•HowdoIselecttheAUXmusicsource?pg.65
•HowdoIsettheclockonmyradio?
•Uconnect®4.3 & 4.3S pg. 49
•Uconnect®8.4 & 8.4N pg. 51
•HowdoIusetheNavigationfeature?pg.59
•HowdoIpairmycellphoneviaBluetooth®with the Uconnect®Hands-Free Voice
Activation System? pg. 66
•HowdoIheartheaudiofrommyiPod®through the USB port using the radio?
•Uconnect®4.3 & 4.3S pg. 65
•Uconnect®8.4, 8.4N pg. 65
•HowdoIconfiguremyUniversalGarageDoorOpener(HomeLink®)? pg. 78
UTILITY
•HowdoIknowhowmuchIcantowwithmyDodgeJourney?pg.84
WHAT TO DO IN EMERGENCIES
•WhatdoIdoifmyTPMSwarninglightisblinking?pg.87
•HowdoIchangeaflattire?pg.93
•HowdoIJump-Startmyvehicle?pg.101
MAINTAINING YOUR VEHICLE
•WhereismyFuseBlocklocated?
•InteriorFusespg.119
•UnderhoodFusespg.120
•WhattypeofoildoIuse?pg.112
•HowoftenshouldIchangemyengine’soil?pg.114
•Whatshouldmytirepressurebesetat?pg.121
FREQUENTLY ASKED QUESTIONS
129