Page 42 of 140
CLIMATE CONTROL
Uconnect® 4.3 Manual Climate Controls
Uconnect® 4.3 Manual Climate Controls
1—TemperatureControlButton 6—RearDefrostButton2—MAXA/CButton 7—ModeControlButton3—A/CButton 8—ClimateOffButton4—AirRecirculationButton 9—ClimateControlButton5—FrontDefrostButton
OPERATING YOUR VEHICLE
40
Page 43 of 140
Uconnect® 8.4 Automatic Climate Controls
Uconnect® 8.4 Automatic Climate Controls
1—A/CButton8—SYNCButton2—AirRecirculationButton9—IncreaseBlowerSpeedButton3—AUTOButton10 — Mode Control Buttons4—FrontDefrostButton11 — Decrease Blower Speed Button5—RearDefrostButton12 — OFF Button6—REARCLIMATEButton13 — Driver Temperature Control7—PassengerTemperatureControl 14—MAXA/CButton
OPERATING YOUR VEHICLE
41
Page 44 of 140
Climate Control Knobs
•Foryourconveniencetheclimatecontrolscanbeoperatedbyusingthebuttonsonthe
touchscreen located or the climate control knobs below the Uconnect®display.
Automatic Operation — If Equipped
•PushtheAUTObuttonorpressthe“AUTO”buttononthetouchscreen.
•SelectthedesiredtemperaturebypressingtheTemperatureControlsforthedriveror
passenger.
The system will maintain the set temperature automatically.
SYNC Temperature Button — If Equipped
Press the SYNC button on the touchscreen once to control driver and passenger
temperatures simultaneously.
Press the SYNC button on the touchscreen a second time to control the temperatures
individually.
Climate Control Knobs
1—A/CButton6—RotateBlowerControlKnob2—AirRecirculationButton7—AUTOButton3—FrontDefrostButton8—DriverTemperatureControl4—RearDefrostButton9—OFFButton5—PassengerTemperatureControl
OPERATING YOUR VEHICLE
42
Page 48 of 140
YOUR VEHICLE'S SOUND SYSTEM
1. Uconnect®Voice Command Button pg. 72
2. Uconnect®Phone Button pg. 66
3. Steering Wheel Audio control (Left) pg. 76
4. Steering Wheel Audio control (Right) pg. 76
5. Volume Knob/Audio Mute Button
6. Uconnect®Radio pg. 48
ELECTRONICS
46
Page 50 of 140
IDENTIFYING YOUR RADIO
Uconnect® 4.3 & 4.3S
•Models4.3and4.3Shavea4.3inch
touchscreen with buttons on the face-
plate on each side of it.
•Model4.3ShasallModel4.3features,
plus SiriusXM Satellite Radio (1 year trial
subscription included).
•Model4.3Sisidentifiedbythepresence
of SAT on the band button, indicating the
presence of satellite radio.
Uconnect® 8.4 & 8.4N
•Models8.4and8.4Nhavean8.4inch
touchscreen.
•Model8.4NhasallModel8.4features,
plus Garmin®Navigation and SiriusXM
Tr a v e l L i n k ( 1 - y e a r t r i a l s u b s c r i p t i o n i n -
cluded).
•Model8.4Nisidentifiedbytheunique
Nav button on the main screen menu bar,
located at the bottom of the screen, and
the presence of SiriusXM Travel Link
within the More menu.
Uconnect® 4.3 & 4.3S
Uconnect® 8.4 & 8.4N
ELECTRONICS
48
Page 51 of 140
Uconnect® 4.3 & 4.3S AT A GLANCE
Displaying The Time
•IfthetimeisnotcurrentlydisplayedatthetopofthescreenwheninRadiomode,push
the SETTINGS button, then press “Clock.” Select “Show Time,” then press “On.”
Setting The Time
•PushtheSETTINGSbuttononthefaceplate,thenpressthe“Clock”buttononthe
touchscreen.
•Pressthe“Time”buttononthetouchscreen.
•Pressthe“UporDown”buttonsonthetouchscreentoadjustthehours,minutesor
AM/PM.
NOTE:
12hr format and 24hr format can also be set.
•Oncethetimeissetpressthe“Done”buttononthetouchscreentoexitthetime
screen.
Uconnect® 4.3 & 4.3S
1—Radio:AM/FM/SIRIUSSatelliteRadio(IfEquipped)2—STATUSBAR3—Settings:Clock,Display,etc.4—ScreenOFF/ON5—MORE:Uconnect®Phone, Compass, etc.6—Player:CD,iPod®,USBDeviceorAUXDevice
ELECTRONICS
49
Page 53 of 140
Uconnect® 8.4 & 8.4N AT A GLANCE
Displaying The Time
•Ifthetimeisnotcurrentlydisplayedontheradioorplayermainpage,pressthe“More”
button on the touchscreen and then press the “Settings” button on the touchscreen. In
the Settings list, press the “Clock” button on the touchscreen, then press the check box
next to Show Time in Status Bar.
Uconnect® 8.4N
1—STATUSBAR2—SmallNavigationMap(8.4N)3—MoreSettingsButton4—Uconnect®Phone Button5—GarminNavigationButton(8.4N)
6—ClimateControlButton7—ControlsButton8—PlayerButton9—RadioButton
ELECTRONICS
51
Page 56 of 140

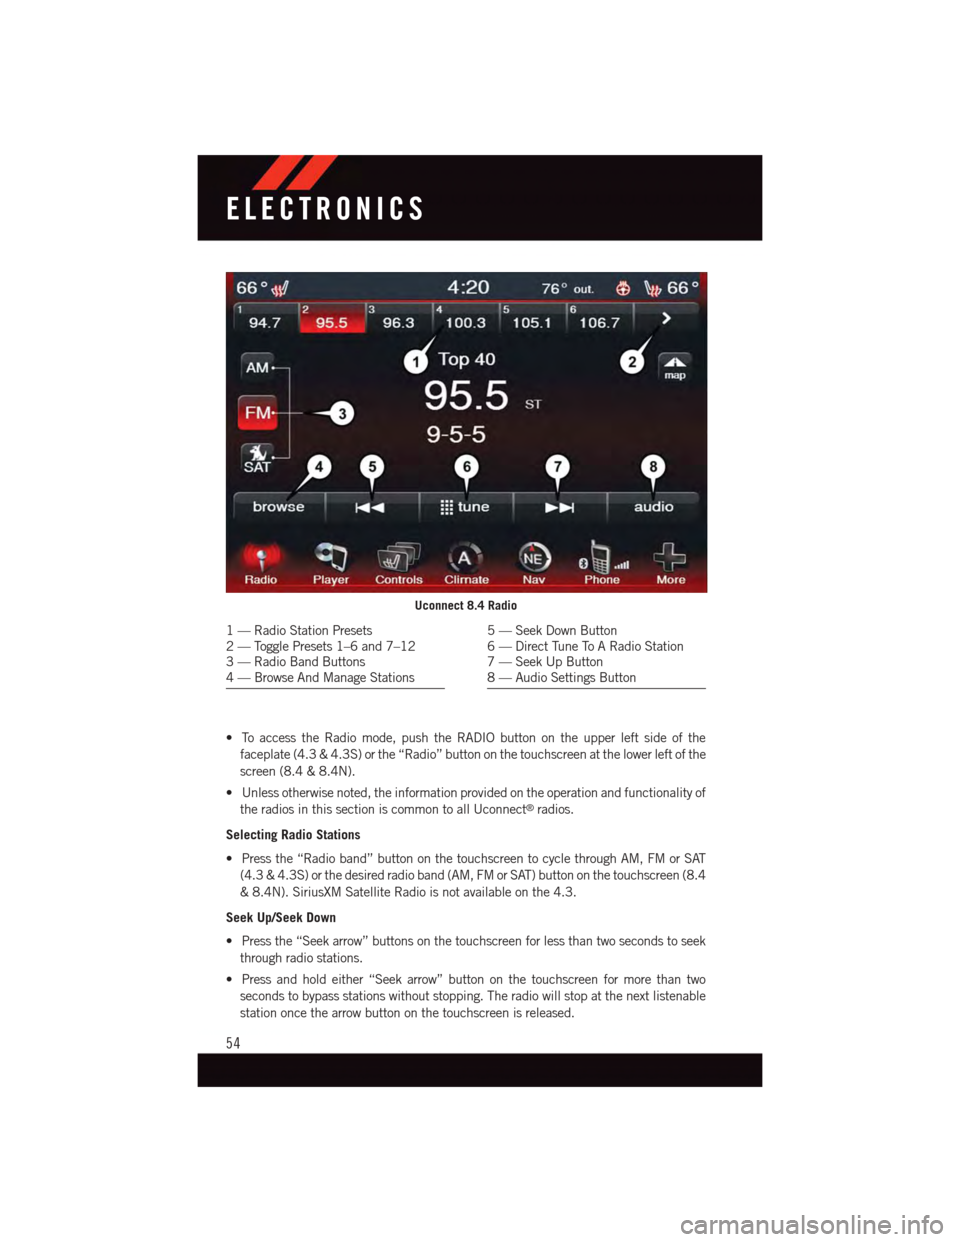
•ToaccesstheRadiomode,pushtheRADIObuttonontheupperleftsideofthe
faceplate (4.3 & 4.3S) or the “Radio” button on the touchscreen at the lower left of the
screen (8.4 & 8.4N).
•Unlessotherwisenoted,theinformationprovidedontheoperationandfunctionalityof
the radios in this section is common to all Uconnect®radios.
Selecting Radio Stations
•Pressthe“Radioband”buttononthetouchscreentocyclethroughAM,FMorSAT
(4.3 & 4.3S) or the desired radio band (AM, FM or SAT) button on the touchscreen (8.4
&8.4N).SiriusXMSatelliteRadioisnotavailableonthe4.3.
Seek Up/Seek Down
•Pressthe“Seekarrow”buttonsonthetouchscreenforlessthantwosecondstoseek
through radio stations.
•Pressandholdeither“Seekarrow”buttononthetouchscreenformorethantwo
seconds to bypass stations without stopping. The radio will stop at the next listenable
station once the arrow button on the touchscreen is released.
Uconnect 8.4 Radio
1—RadioStationPresets2—TogglePresets1–6and7–123—RadioBandButtons4—BrowseAndManageStations
5—SeekDownButton6—DirectTuneToARadioStation7—SeekUpButton8—AudioSettingsButton
ELECTRONICS
54