2015 DODGE GRAND CARAVAN set clock
[x] Cancel search: set clockPage 60 of 164

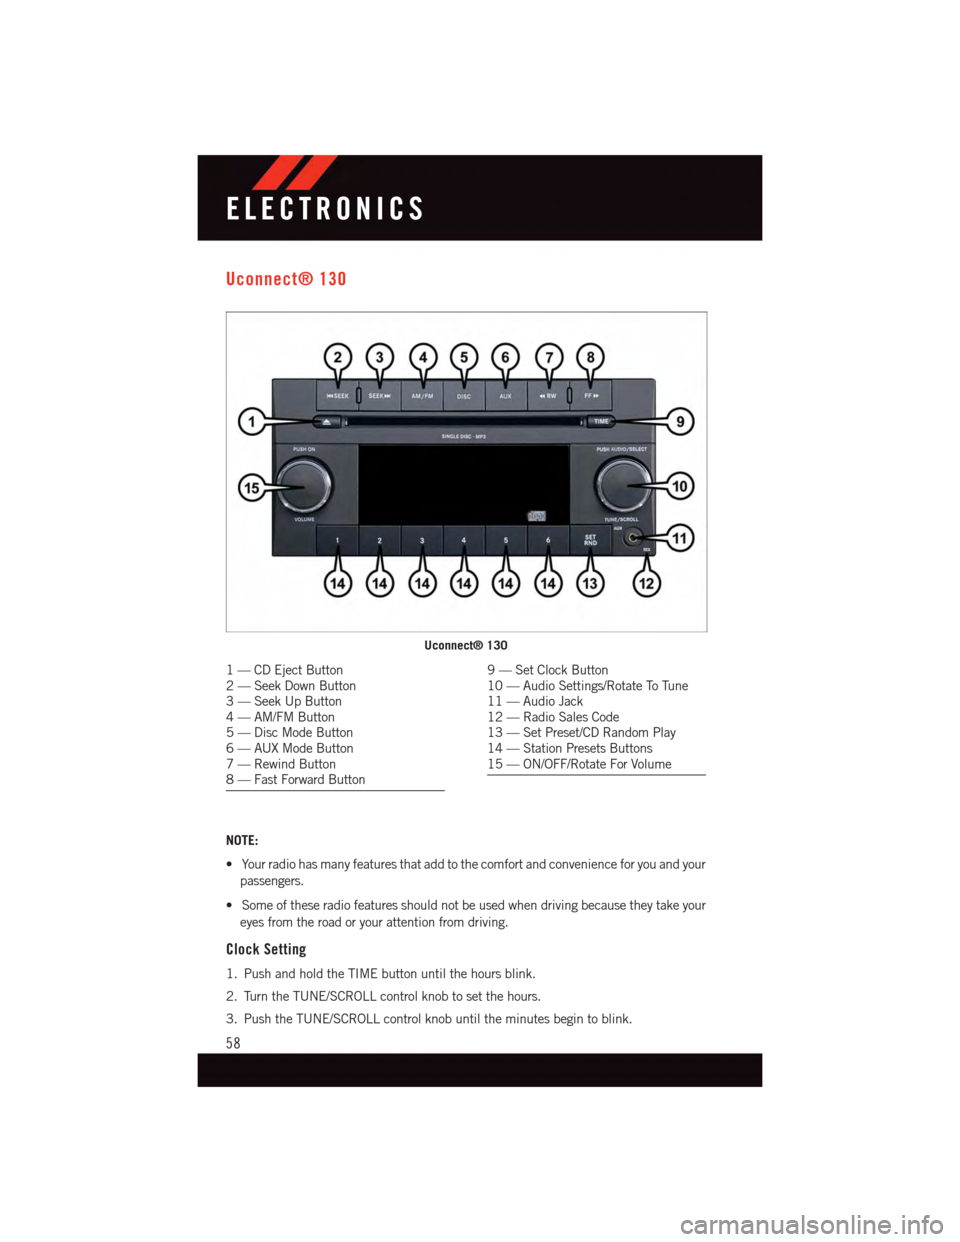
Uconnect® 130
NOTE:
•Yourradiohasmanyfeaturesthataddtothecomfortandconvenienceforyouandyour
passengers.
•Someoftheseradiofeaturesshouldnotbeusedwhendrivingbecausetheytakeyour
eyes from the road or your attention from driving.
Clock Setting
1. Push and hold the TIME button until the hours blink.
2. Turn the TUNE/SCROLL control knob to set the hours.
3. Push the TUNE/SCROLL control knob until the minutes begin to blink.
Uconnect® 130
1—CDEjectButton2—SeekDownButton3—SeekUpButton4—AM/FMButton5—DiscModeButton6—AUXModeButton7—RewindButton8—FastForwardButton
9—SetClockButton10 — Audio Settings/Rotate To Tune11 — Audio Jack12 — Radio Sales Code13 — Set Preset/CD Random Play14 — Station Presets Buttons15 — ON/OFF/Rotate For Volume
ELECTRONICS
58
Page 62 of 164

Uconnect® 130 WITH SiriusXM SATELLITE RADIO
NOTE:
•YourradiomaynotbeequippedwiththeUconnect®Voice Command and Uconnect®
Phone features. To determine if your radio has these features, push the Voice Command
button on the radio. You will hear a voice prompt if you have the feature, or see a
message on the radio stating “Uconnect Phone not available” if you do not.
•Yourradiohasmanyfeaturesthataddtothecomfortandconvenienceofyouandyour
passengers. Some of these radio features should not be used when driving because they
take your eyes from the road or your attention from driving.
Uconnect® 130 With SiriusXM Satellite Radio
1—CDEjectButton2—SeekDownButton3—SeekUpButton4—VoiceCommandButton5—Uconnect®Phone Button6—StationInfoButton7—RewindButton8—FastForwardButton9—SetClockButton10 — Audio Settings/Rotate To Tune11 — Audio Jack
12 — Radio Sales Code13 — Set Preset/CD Random Play14 — Station Preset Buttons15 — ON/OFF/Rotate For Volume16 — AM/FM Mode Button17 — List Folders On A CD18 — Satellite Radio Button19 — Music Type Button20 — Disc Mode Button21 — Set Up Function Button
ELECTRONICS
60
Page 63 of 164

Clock Setting
1. Push and hold the TIME button until the hours blink.
2. Turn the TUNE/SCROLL control knob to set the hours.
3. Push the TUNE/SCROLL control knob until the minutes begin to blink.
4. Turn the TUNE/SCROLL control knob to set the minutes.
5. Push the TUNE/SCROLL control knob to save the changes.
6. Push any button/knob or wait five seconds to exit.
Equalizer, Balance And Fade
1. Push the TUNE/SCROLL control knob and “BASS” will display.
2. Rotate the TUNE/SCROLL control knob to select the desired setting.
3. Continue pushing the TUNE/SCROLL control knob to display and set “MID RANGE,”
“TREBLE,” “BALANCE” and “FADE.”
Radio Operation
Seek Up/Down Buttons
•PushtoseekthroughradiostationsinAM,FM,orSATbands.
•Holdeitherbuttontobypassstationswithoutstopping.
Store Radio Presets
•PushtheSET/RNDorSET(dependingontheradio)buttononceandSET1willshow
in the display. Then select a preset button (1–6).
•Asecondstationmaybeaddedtoeachpushbutton.PushtheSET/RNDorSET
(depending on the radio) button twice and SET 2 will show in the display. Then select
apresetbutton(1–6).
Music Type
NOTE:
The Music Type function only operates when in FM mode.
•PushtheMUSICTYPEbuttontoactivatethismode.PushtheMUSICTYPEbutton
again or turn the TUNE/SCROLL control knob to select the desired music type (Adult
Hits, Country, Jazz, Oldies, Rock, etc.).
•WhenamusictypeischosenandtheMusictypeisdisplayed,PusheitherSEEKbutton
and the radio will only search for stations with the selected music type.
SETUP Button
•PushingtheSETUPbuttonallowsyoutoselectbetweenitemsthatareavailableinthat
particular mode.
•TurntheTUNE/SCROLLcontrolknobtoscrollthroughtheentries.PushtheAUDIO/
SELECT button to select an entry and make changes.
ELECTRONICS
61
Page 66 of 164

Clock Setting
1. Turn the radio on, then press the screen where the time is displayed.
2. Press the “User Clock” button on the touchscreen or the time display (Navigation radio
only).
3. To adjust the hours, press either the “Hour Forward” or “Hour Backward” button on the
touchscreen.
4. To adjust the minutes, press either the “Minute Forward” or “Minute Backward”
button on the touchscreen.
5. To save the new time setting, press the screen where the word “Save” is displayed.
Menu
•PushtheMENUbuttononthefaceplatetoaccesstheSystemSetupmenuandtheMy
Files menu.
•PushtheMENUbuttononthefaceplateinanactivemode(SAT,CD,AUX,etc.)to
change mode specific settings.
Equalizer, Balance And Fade
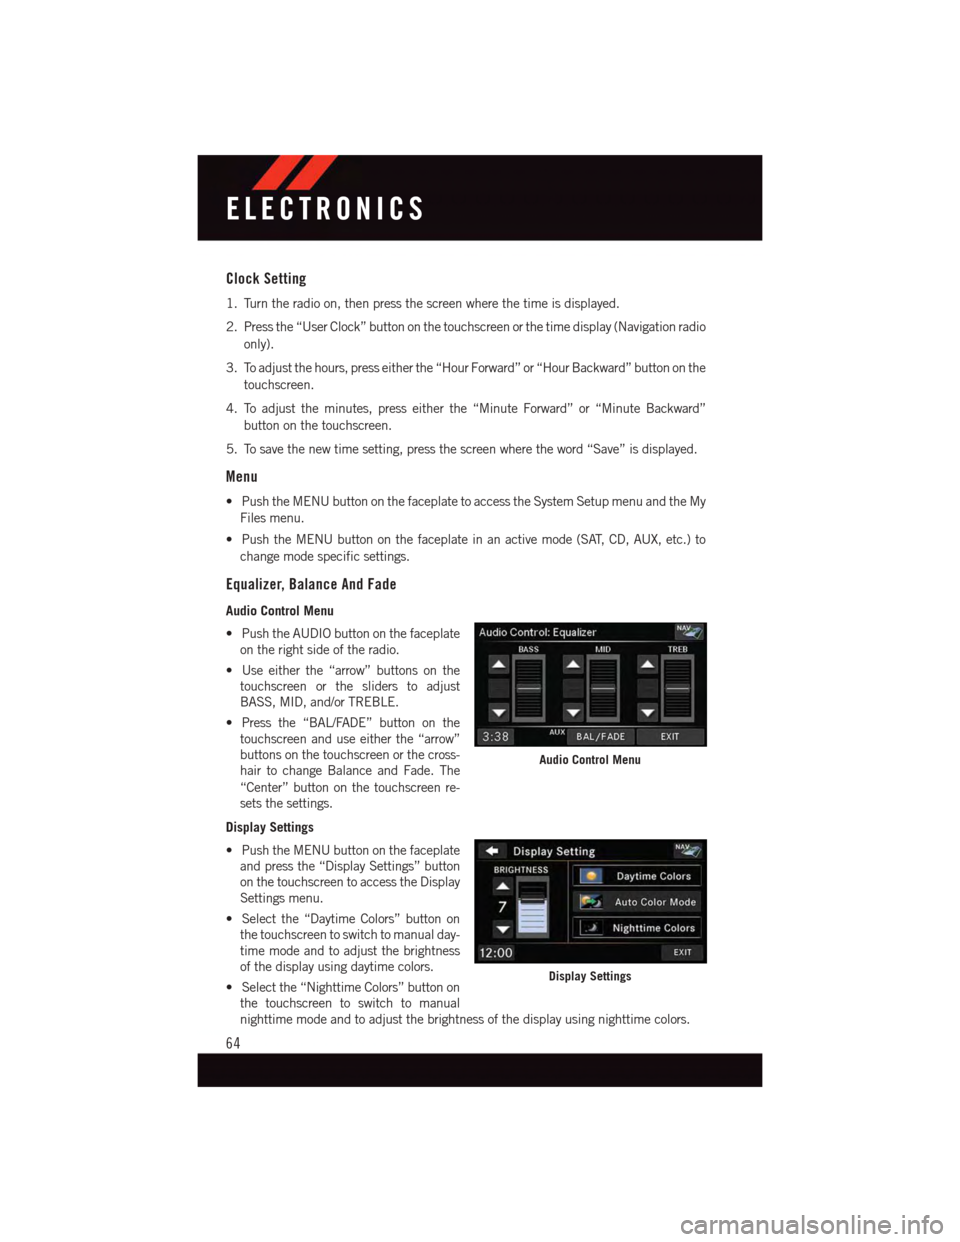
Audio Control Menu
•PushtheAUDIObuttononthefaceplate
on the right side of the radio.
•Useeitherthe“arrow”buttonsonthe
touchscreen or the sliders to adjust
BASS, MID, and/or TREBLE.
•Pressthe“BAL/FADE”buttononthe
touchscreen and use either the “arrow”
buttons on the touchscreen or the cross-
hair to change Balance and Fade. The
“Center” button on the touchscreen re-
sets the settings.
Display Settings
•PushtheMENUbuttononthefaceplate
and press the “Display Settings” button
on the touchscreen to access the Display
Settings menu.
•Selectthe“DaytimeColors”buttonon
the touchscreen to switch to manual day-
time mode and to adjust the brightness
of the display using daytime colors.
•Selectthe“NighttimeColors”buttonon
the touchscreen to switch to manual
nighttime mode and to adjust the brightness of the display using nighttime colors.
Audio Control Menu
Display Settings
ELECTRONICS
64
Page 122 of 164

Vehicles Without Wheel Covers
1. Mount the road tire on the axle.
2. Install the remaining lug nuts with the cone shaped end of the nut toward the wheel.
Lightly tighten the lug nuts.
3. Lower the vehicle to the ground by turning the jack handle counterclockwise.
4. Finish tightening the lug nuts. Push down on the wrench while at the end of the handle
for increased leverage. Tighten the lug nuts in a star pattern until each nut has been
tightened twice. The correct tightness of each lug nut is 100 ft/lbs (135 N·m). If in
doubt about the correct tightness, have them checked with a torque wrench by your
authorized dealer or service station.
5. After 25 miles (40 km) check the lug nut torque with a torque wrench to ensure that
all lug nuts are properly seated against the wheel.
CAUTION!
•ThewinchmechanismisdesignedforusewiththewinchT-handleonly.Useofair
wrench or other power tools is not recommended and can damage the winch.
•Donotattempttoraisethevehiclebyjackingonlocationsotherthanthose
indicated in the Jacking Instructions for this vehicle.
•Besuretomountthesparetirewiththevalvestemfacingoutward.Thevehicle
could be damaged if the spare tire is mounted incorrectly.
•Thecompactsparetire/coverassemblymustbeusedwhenthecompactsparetire
is stored. Failure to use this cover could drastically reduce the life of the compact
spare tire.
•Thewinchmechanismisdesignedspecificallytostowacompactsparetireonly.Do
not attempt to use the winch to stow the full size flat tire, or any other full-size tire.
Vehicle damage may result.
WHAT TO DO IN EMERGENCIES
120
Page 152 of 164

FREQUENTLY ASKED QUESTIONS
GETTING STARTED
•HowdoIinstallmyLATCHEquippedChildSeat?pg.23
•HowdoIprogrammyFrontSeatMemory?pg.30
OPERATING YOUR VEHICLE
•HowdoestheElectronicRangeSelect(ERS)operate?pg.45
ELECTRONICS
Which radio is in my vehicle?
•Uconnect®130 pg. 58
•Uconnect®130 WITH SiriusXM pg. 60
•Uconnect®430/430N pg. 63
How do I activate the Audio Jack?
•Uconnect®130 pg. 62
•Uconnect®130 WITH SiriusXM pg. 62
•Uconnect®430/430N pg. 67
How do I set the clock on my radio?
•Uconnect®130 pg. 61
•Uconnect®130 WITH SiriusXM pg. 61
•Uconnect®430/430N pg. 64
•HowdoIusetheNavigationfeature?
•Uconnect®430/430N pg. 70
•HowdoIpairmycellphoneviaBluetooth®with the Uconnect®Hands-Free Voice
Activation System? pg. 79
•HowdoIusemyUSBporttolistentoaudiothroughmytouch-screenradio?pg.77
•HowdoIconfiguremyUniversalGarageDoorOpener(HomeLink®)?pg.89
UTILITY
•HowdoIknowhowmuchIcantowwithmyDodgeGrandCaravan?pg.95
FREQUENTLY ASKED QUESTIONS
150
Page 154 of 164

Adding Engine Coolant (Antifreeze) . .132
Adding Washer Fluid..........132
Air Bag
Advance Front Air Bag.......18
Air Bags . . . . . . . . . . . . . . .18
Air Bag Warning Light . . . . . . . .18
Front Air Bag . . . . . . . . . . . .18
Rollover . . . . . . . . . . . . . . .18
Side Impacts.............18
Air bag Light . . . . . . . . . . . . . . .97
Air Cleaner, Engine (Engine AirCleaner Filter)............132Air Conditioner Maintenance.....132Air Conditioning Refrigerant......132Air Conditioning System........132AlarmArm The System...........16Disarm The System.........16Vehicle Security Alarm.......16Alarm (Security Alarm)......16,101Antifreeze (Engine Coolant) . . .130, 132Disposal . . . . . . . . . . . . . .132Anti-Lock Warning Light.........97Appearance Care............132Assistance Towing............97Audio Jack...........59,62,67Audio Settings............59,61Audio Systems (Radio).........58Automatic Headlights..........42Automatic High Beams.........42
Automatic Temperature Control (ATC)..50Automatic TransmissionFluid Type . . . . . . . . . . . . .131Auxiliary Audio/Video Input Jacks....85
Back-Up Camera............52Battery.................132Blind Spot Monitoring..........52Body Mechanism Lubrication.....132Brake Fluid . . . . . . . . . . . . . . .131Brakes . . . . . . . . . . . . . . . . .132Brake System.............132Master Cylinder..........132Warning Light . . . . . . . . . . . .99Break-In Recommendations, NewVehicle . . . . . . . . . . . . . . . .39Bulbs, Light . . . . . . . . . . . . . .146
Calibration, Compass..........86
Capacities, Fluid............130
Caps, Filler
Oil (Engine)............132
Cargo Compartment
Luggage Carrier...........94
Car Washes . . . . . . . . . . . . . . .132
CD (Compact Disc) Player.....59,62
Change Oil Indicator..........101
Changing A Flat Tire..........110
Charging System Light.........97Child Restraint..............21CleaningWheels...............132Windshield Wiper Blades.....132Clock Setting..........58,61,64Cluster Warning/Indicator LightsAnti-Lock Brake (ABS) Light....97Brake Warning Light . . . . . . . . .99Charging System Light.......97Electronic Speed Control ONIndicator . . . . . . . . . . . . . .101Electronic Speed Control SETIndicator . . . . . . . . . . . . . .101Electronic Throttle Control (ETC)Indicator Light . . . . . . . . . . .97Front Fog Light Indicator . . . . .101High Beam Indicator.......101Malfunction Indicator Light(MIL) . . . . . . . . . . . . . . . .100Oil Pressure Warning Light . . . . .97Ti r e P r e s s u r e M o n i t o r i n g S y s t e m(TPMS) Light............98Tu r n S i g n a l I n d i c a t o r.......101Vehicle Security Light.......101Clutch . . . . . . . . . . . . . . . . .132Clutch Fluid . . . . . . . . . . . . . .132Compact Spare Tire..........142Compass Calibration...........86Cooling System . . . . . . . . . . . . .132Adding Coolant (Antifreeze)....132Coolant Capacity.........130Coolant Level...........132Disposal of Used Coolant.....132Drain, Flush, and Refill......132Inspection . . . . . . . . . . . . .132Points to Remember.......132Pressure Cap . . . . . . . . . . .132
INDEX
152