2015 DODGE GRAND CARAVAN audio
[x] Cancel search: audioPage 63 of 164

Clock Setting
1. Push and hold the TIME button until the hours blink.
2. Turn the TUNE/SCROLL control knob to set the hours.
3. Push the TUNE/SCROLL control knob until the minutes begin to blink.
4. Turn the TUNE/SCROLL control knob to set the minutes.
5. Push the TUNE/SCROLL control knob to save the changes.
6. Push any button/knob or wait five seconds to exit.
Equalizer, Balance And Fade
1. Push the TUNE/SCROLL control knob and “BASS” will display.
2. Rotate the TUNE/SCROLL control knob to select the desired setting.
3. Continue pushing the TUNE/SCROLL control knob to display and set “MID RANGE,”
“TREBLE,” “BALANCE” and “FADE.”
Radio Operation
Seek Up/Down Buttons
•PushtoseekthroughradiostationsinAM,FM,orSATbands.
•Holdeitherbuttontobypassstationswithoutstopping.
Store Radio Presets
•PushtheSET/RNDorSET(dependingontheradio)buttononceandSET1willshow
in the display. Then select a preset button (1–6).
•Asecondstationmaybeaddedtoeachpushbutton.PushtheSET/RNDorSET
(depending on the radio) button twice and SET 2 will show in the display. Then select
apresetbutton(1–6).
Music Type
NOTE:
The Music Type function only operates when in FM mode.
•PushtheMUSICTYPEbuttontoactivatethismode.PushtheMUSICTYPEbutton
again or turn the TUNE/SCROLL control knob to select the desired music type (Adult
Hits, Country, Jazz, Oldies, Rock, etc.).
•WhenamusictypeischosenandtheMusictypeisdisplayed,PusheitherSEEKbutton
and the radio will only search for stations with the selected music type.
SETUP Button
•PushingtheSETUPbuttonallowsyoutoselectbetweenitemsthatareavailableinthat
particular mode.
•TurntheTUNE/SCROLLcontrolknobtoscrollthroughtheentries.PushtheAUDIO/
SELECT button to select an entry and make changes.
ELECTRONICS
61
Page 64 of 164

SiriusXM Satellite Radio
SiriusXM services require subscriptions, sold separately after the 12-month trial included
with the new vehicle purchase.If you decide to continue your service at the end of your
trial subscription, the plan you choose will automatically renew and bill at then-current
rates until you call SiriusXM at 1-866-635-2349 to cancel.See SiriusXM Customer
Agreement for complete terms at www.siriusxm.com. All fees and programming subject to
change. Our satellite service is available only to those at least 18 and older in the 48
contiguous USA and D.C. Our Sirius satellite service is also available in PR (with coverage
limitations). Our Internet radio service is available throughout our satellite service area
and in AK and HI. ©2014 Sirius XM Radio Inc. Sirius, XM and all related marks and logos
are trademarks of Sirius XM Radio Inc.
SiriusXM Satellite Radio gives you over 130 channels, including 100% commercial-free music
from nearly every genre, plus all your favorite sports, news, talk and entertainment channels –
all with crystal clear, coast-to-coast coverage, all in one place and all at your fingertips.
•ToaccessSiriusXMSatelliteRadio,pushtheSATbuttononthefaceplate.
CD/DISC Operation
Seek Up/Down Buttons
•PushtoseekthroughCDtracks.
•Holdeitherbuttontobypasstrackswithoutstopping.
SET/RND or RND (Depending On Radio) Button (Random Play)
•PushthisbuttonwhiletheCDisplayingtoactivateRandomPlay.
•ThisfeatureplaystheselectionsontheCDinrandomordertoprovideaninteresting
change of pace.
LIST Button
•PushtheLISTbuttontobringupalistofallfoldersontheCD.Scrollupordownthe
list by turning the TUNE/SCROLL control knob.
•Toselectafolderfromthelist,pushtheTUNE/SCROLLcontrolknobandtheradiowill
begin playing the files contained in that folder.
Audio Jack Operation
The AUX/Audio Jack provides a means to connect a portable audio device, such as an
MP3 player or an iPod®,tothevehicle’ssoundsystem.Thisrequirestheuseofa3.5mm
stereo audio patch cable.
•PushingtheAUXbuttonwillchangethemodetoauxiliarydeviceiftheAudioJackis
connected, allowing the music from your portable device to play through the vehicle's
speakers.
The functions of the portable device are controlled using the device buttons, not the buttons
on the radio. However, the volume may be controlled using the radio or portable device.
ELECTRONICS
62
Page 65 of 164

Uconnect® 430/430N
NOTE:
•YourradiomaynotbeequippedwiththeUconnect®Voice Command and Uconnect®
Phone features. To determine if your radio has these features, push the Voice Command
button on the radio. You will hear a voice prompt if you have the feature, or see a
message on the radio stating “Uconnect Phone not available” if you do not.
•Yourradiohasmanyfeaturesthataddtothecomfortandconvenienceofyouandyour
passengers. Some of these radio features should not be used when driving because they
take your eyes from the road or your attention from driving.
Uconnect® 430/430N
1—VoiceCommandButton2—Open/CloseDisplay3—MenuButton4—AudioSettingsButton5—InternalHardDriveButton6—USBPort
7—AudioJack8—RadioSalesCode9—ON/OFF/RotateForVolume10 — Select Media Mode Button11 — Radio Mode Button12 — Uconnect®Phone Button
ELECTRONICS
63
Page 66 of 164
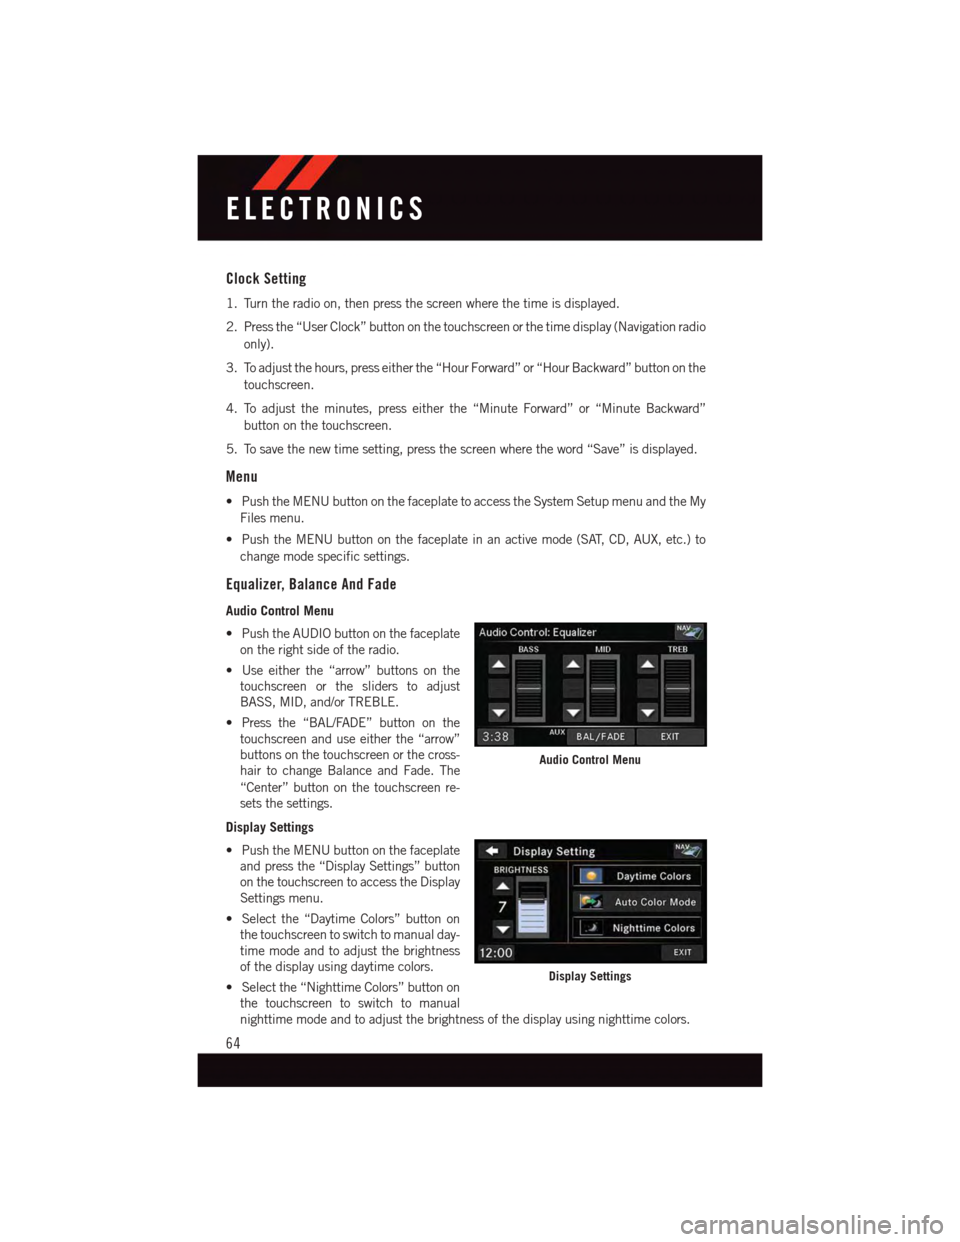
Clock Setting
1. Turn the radio on, then press the screen where the time is displayed.
2. Press the “User Clock” button on the touchscreen or the time display (Navigation radio
only).
3. To adjust the hours, press either the “Hour Forward” or “Hour Backward” button on the
touchscreen.
4. To adjust the minutes, press either the “Minute Forward” or “Minute Backward”
button on the touchscreen.
5. To save the new time setting, press the screen where the word “Save” is displayed.
Menu
•PushtheMENUbuttononthefaceplatetoaccesstheSystemSetupmenuandtheMy
Files menu.
•PushtheMENUbuttononthefaceplateinanactivemode(SAT,CD,AUX,etc.)to
change mode specific settings.
Equalizer, Balance And Fade
Audio Control Menu
•PushtheAUDIObuttononthefaceplate
on the right side of the radio.
•Useeitherthe“arrow”buttonsonthe
touchscreen or the sliders to adjust
BASS, MID, and/or TREBLE.
•Pressthe“BAL/FADE”buttononthe
touchscreen and use either the “arrow”
buttons on the touchscreen or the cross-
hair to change Balance and Fade. The
“Center” button on the touchscreen re-
sets the settings.
Display Settings
•PushtheMENUbuttononthefaceplate
and press the “Display Settings” button
on the touchscreen to access the Display
Settings menu.
•Selectthe“DaytimeColors”buttonon
the touchscreen to switch to manual day-
time mode and to adjust the brightness
of the display using daytime colors.
•Selectthe“NighttimeColors”buttonon
the touchscreen to switch to manual
nighttime mode and to adjust the brightness of the display using nighttime colors.
Audio Control Menu
Display Settings
ELECTRONICS
64
Page 69 of 164
Insert A CD/DVD Disc
•Toinsertadisc,pushtheLOADbuttononthefaceplate.
•Withtheprintedsideupwards,insertthediscintothediscslotoftheradio.Theradio
pulls the disc in automatically and closes the flip screen. The radio selects the
appropriate mode after the disc is recognized, and starts playing the first track. The
display shows “Reading...” during this process.
Seek Up/Seek Down
•PushtheSEEKUPorSEEKDOWNbuttonsonthefaceplatetoseekthroughtracksin
Disc Mode. Holding the SEEK UP button on the touchscreen will fast forward through
the track until the beginning of the track is reached; if still held it will fast-forward
through the next sequential track(s) (if random play node is not active) until released.
Holding the SEEK DOWN button on the touchscreen will fast-reverse through the track
until the beginning of the track is reached; if still held it will fast-reverse through the
next sequential track(s) (if random play node is not active) until released.
Audio Jack Operation
The AUX/Audio Jack provides a means to connect a portable audio device, such as an
MP3 player or an iPod®,tothevehicle’ssoundsystem.Thisrequirestheuseofa3.5mm
stereo audio patch cable.
•PushtheMEDIAbuttononthefaceplatethenthe“AUX”buttononthetouchscreento
change the mode to auxiliary device if the Audio Jack is connected, allowing the music
from your portable device to play through the vehicle's speakers.
NOTE:
The functions of the portable device are controlled using the device itself, not the buttons
on the radio. However, the volume may be controlled using the radio or portable device.
Hard Disk Drive (HDD) Operation
•TheHardDiskDrive(HDD)modegivesyouaccesstotheaudiofilesontheinternalhard
disk drive. It functions similar to a CD player, with the exception that the internal HDD
can hold more tracks.
•Itisalsopossibletoimportdisplaypicturestotheinternalharddiskdrive.Thepictures
can be displayed on the right half of the radio screen.
•BeforeusingtheHDDmode,youwillneedtocopysongsandpicturestotheinternal
hard drive. Songs and pictures can be added to the hard drive by using a CD or USB
device (e.g. thumb drive or memory stick).
NOTE:
•HDDsupportsonly.jpg/JPEGformatsforphotos.
•WMA/MP3FilesandSelectiveSongsfromaCDcanalsobeaddedtotheHDD.Seethe
Uconnect®430/430N User's Manual for more information.
ELECTRONICS
67
Page 72 of 164
Cleaning Your Touchscreen Radio
•Donotsprayanyliquidorcausticchemicalsdirectlyonthescreen.Useacleananddry
micro fiber lens cleaning cloth to clean the touchscreen.
•Ifnecessary,usealint-freeclothdampenedwithacleaningsolutionsuchasisopropyl
alcohol or an isopropyl alcohol and water solution ratio of 50:50. Always follow the
solvent manufacturer's precautions and directions.
Garmin® Navigation
•Uconnect®430N integrates Garmin’s consumer-friendly navigation into your vehicle.
Garmin®Navigation includes a database with over six million points of interest.
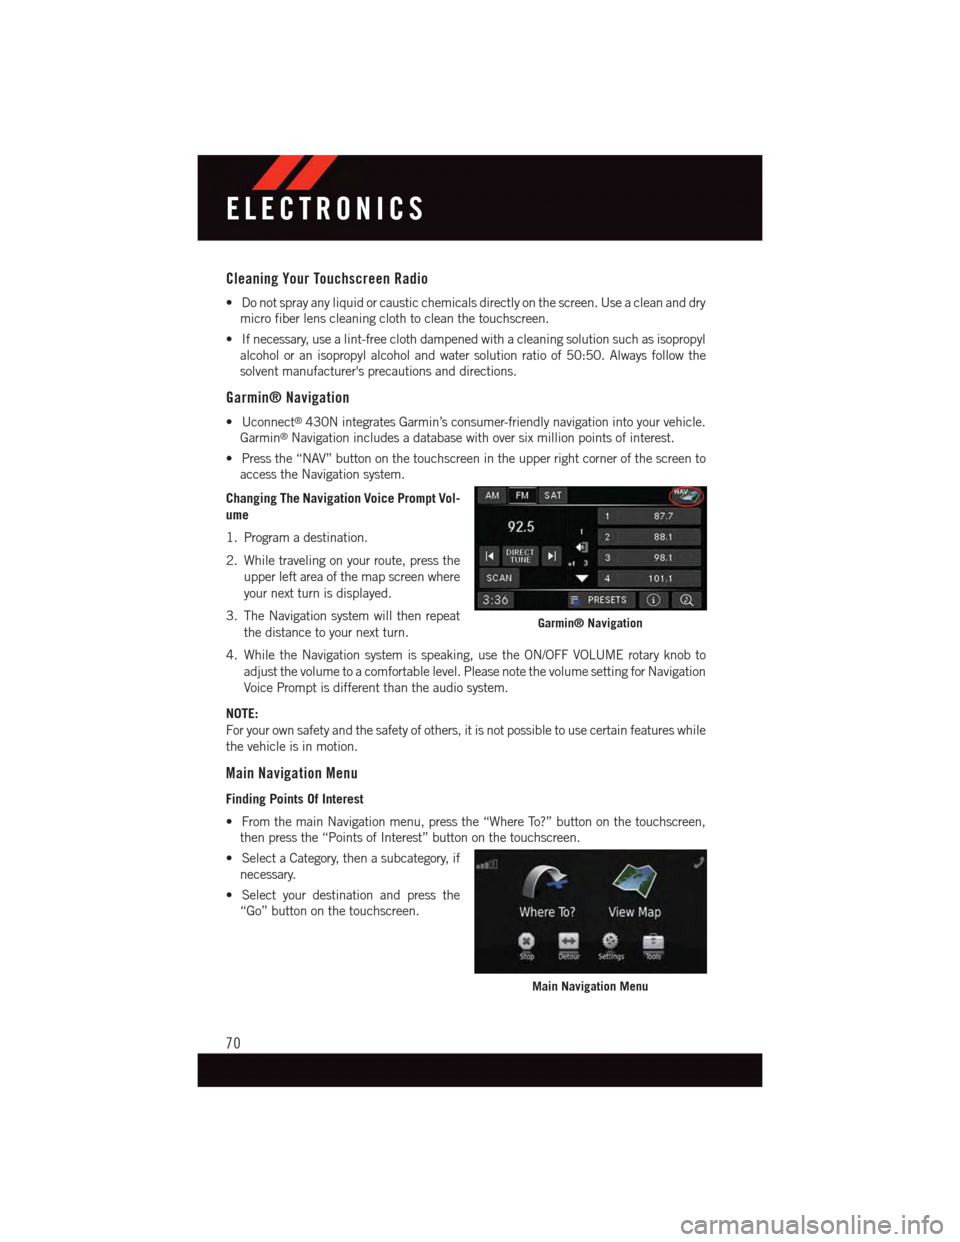
•Pressthe“NAV”buttononthetouchscreenintheupperrightcornerofthescreento
access the Navigation system.
Changing The Navigation Voice Prompt Vol-
ume
1. Program a destination.
2. While traveling on your route, press the
upper left area of the map screen where
your next turn is displayed.
3. The Navigation system will then repeat
the distance to your next turn.
4. While the Navigation system is speaking, use the ON/OFF VOLUME rotary knob to
adjust the volume to a comfortable level. Please note the volume setting for Navigation
Voice Prompt is different than the audio system.
NOTE:
For your own safety and the safety of others, it is not possible to use certain features while
the vehicle is in motion.
Main Navigation Menu
Finding Points Of Interest
•FromthemainNavigationmenu,pressthe“WhereTo?”buttononthetouchscreen,
then press the “Points of Interest” button on the touchscreen.
•SelectaCategory,thenasubcategory,if
necessary.
•Selectyourdestinationandpressthe
“Go” button on the touchscreen.
Garmin® Navigation
Main Navigation Menu
ELECTRONICS
70
Page 77 of 164
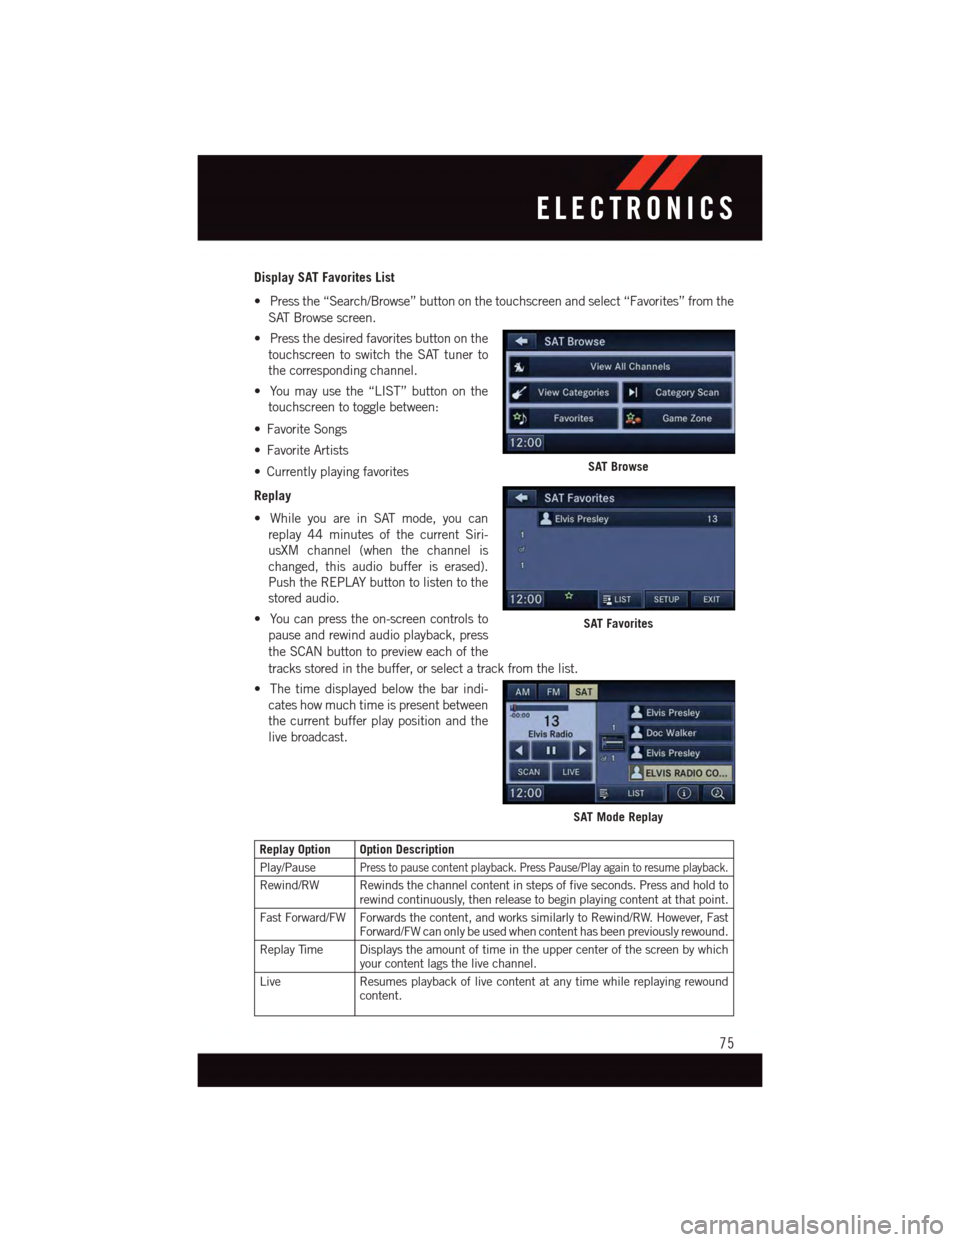
Display SAT Favorites List
•Pressthe“Search/Browse”buttononthetouchscreenandselect“Favorites”fromthe
SAT Browse screen.
•Pressthedesiredfavoritesbuttononthe
touchscreen to switch the SAT tuner to
the corresponding channel.
•Youmayusethe“LIST”buttononthe
touchscreen to toggle between:
•FavoriteSongs
•FavoriteArtists
•Currentlyplayingfavorites
Replay
•WhileyouareinSATmode,youcan
replay 44 minutes of the current Siri-
usXM channel (when the channel is
changed, this audio buffer is erased).
Push the REPLAY button to listen to the
stored audio.
•Youcanpresstheon-screencontrolsto
pause and rewind audio playback, press
the SCAN button to preview each of the
tracks stored in the buffer, or select a track from the list.
•Thetimedisplayedbelowthebarindi-
cates how much time is present between
the current buffer play position and the
live broadcast.
Replay Option Option Description
Play/PausePress to pause content playback. Press Pause/Play again to resume playback.
Rewind/RW Rewinds the channel content in steps of five seconds. Press and hold torewind continuously, then release to begin playing content at that point.
Fast Forward/FW Forwards the content, and works similarly to Rewind/RW. However, FastForward/FW can only be used when content has been previously rewound.
Replay Time Displays the amount of time in the upper center of the screen by whichyour content lags the live channel.
Live Resumes playback of live content at any time while replaying rewoundcontent.
SAT Browse
SAT Favorites
SAT Mode Replay
ELECTRONICS
75
Page 79 of 164
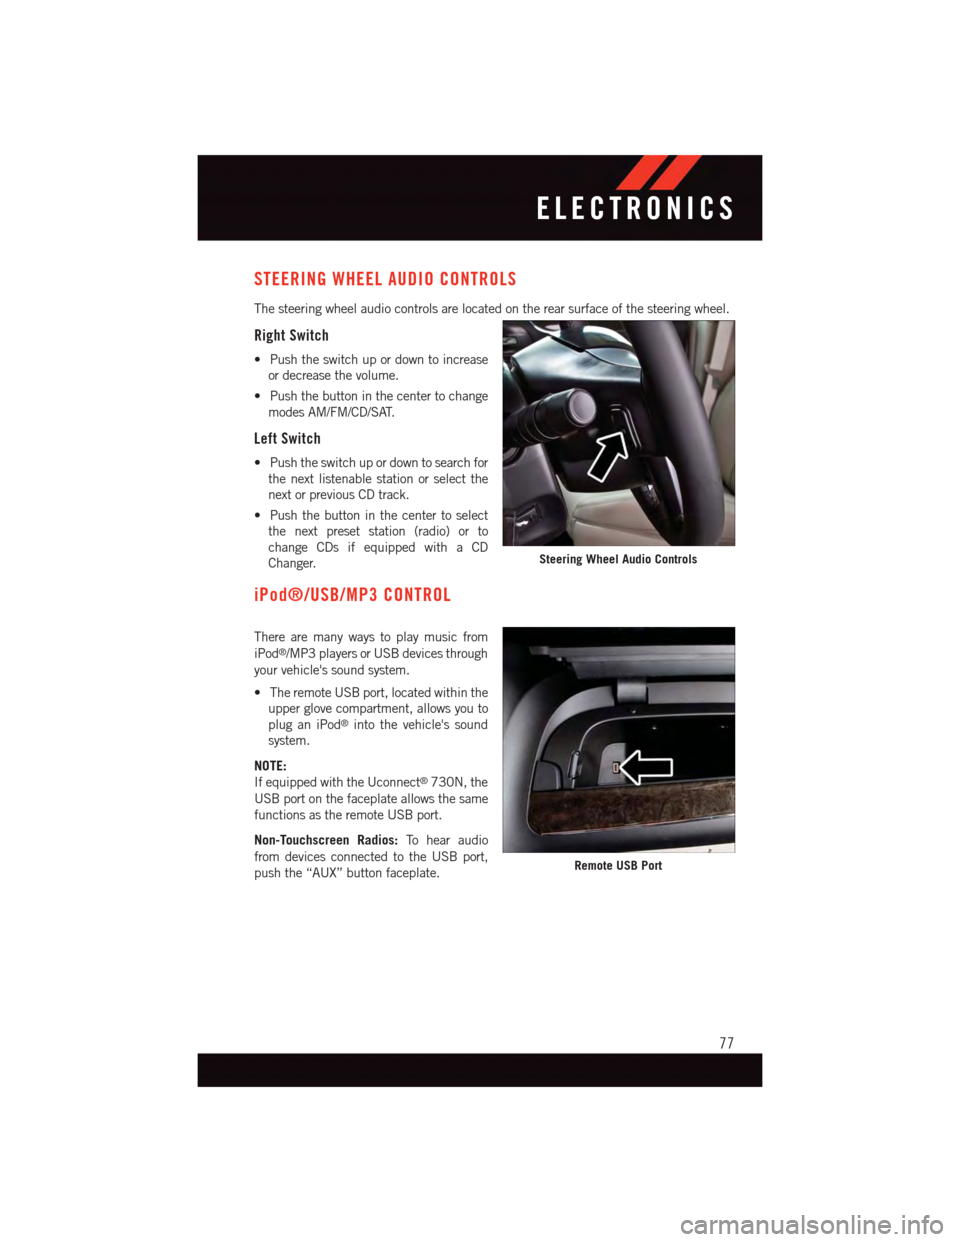
STEERING WHEEL AUDIO CONTROLS
The steering wheel audio controls are located on the rear surface of the steering wheel.
Right Switch
•Pushtheswitchupordowntoincrease
or decrease the volume.
•Pushthebuttoninthecentertochange
modes AM/FM/CD/SAT.
Left Switch
•Pushtheswitchupordowntosearchfor
the next listenable station or select the
next or previous CD track.
•Pushthebuttoninthecentertoselect
the next preset station (radio) or to
change CDs if equipped with a CD
Changer.
iPod®/USB/MP3 CONTROL
There are many ways to play music from
iPod®/MP3 players or USB devices through
your vehicle's sound system.
•TheremoteUSBport,locatedwithinthe
upper glove compartment, allows you to
plug an iPod®into the vehicle's sound
system.
NOTE:
If equipped with the Uconnect®730N, the
USB port on the faceplate allows the same
functions as the remote USB port.
Non-Touchscreen Radios:To h e a r a u d i o
from devices connected to the USB port,
push the “AUX” button faceplate.
Steering Wheel Audio Controls
Remote USB Port
ELECTRONICS
77