2015 DODGE GRAND CARAVAN ECU
[x] Cancel search: ECUPage 29 of 164

WARNING!
•DonotplaceitemsoverthetopoftheActiveHeadRestraint,suchascoats,seat
covers or portable DVD players. These items may interfere with the operation of the
Active Head Restraint in the event of a collision and could result in serious injury or
death.
•ActiveHeadRestraintsmaybedeployediftheyarestruckbyanobjectsuchasa
hand, foot or loose cargo. To avoid accidental deployment of the Active Head
Restraint ensure that all cargo is secured, as loose cargo could contact the Active
Head Restraint during sudden stops. Failure to follow this warning could cause
personal injury if the Active Head Restraint is deployed.
Head Restraints — Second Row Quad Seats
To r a i s e t h e h e a d r e s t r a i n t , p u l l u p w a r d o n t h e h e a d r e s t r a i n t . To l o w e r t h e h e a d r e s t r a i n t ,
press the push button, located at the base of the head restraint, and push downward on
the head restraint.
Head Restraints — Second Row Bench
If your vehicle is equipped with a second row bench seat, the head restraints are not
adjustable.
Head Restraints — Third Row
The head restraint in the center position can be raised and lowered for tether routing.
Refer to “Occupant Restraints” in your Owner’s Manual on the DVD for further informa-
tion.
GETTING STARTED
27
Page 56 of 164

POWER SUNROOF
The power sunroof switch is located on the overhead console.
Opening Sunroof
Express Open
Press the switch rearward and release it
within one-half second. The sunroof will
fully open and stop automatically.
Manual Open
Press and hold the switch rearward to open
the sunroof. Any release of the switch will
stop the movement, and the sunroof will
remain in a partially open position until the
switch is pressed again.
Venting Sunroof
Press and release the button and the sun-
roof will open to the vent position.
This is called “Express Vent” and will occur
regardless of sunroof position. During Ex-
press Vent operation, any movement of the
switch will stop the sunroof.
Closing Sunroof
Express Closing
Press the switch forward and release it within one-half second. The sunroof will fully close
automatically from any position.
Manual Closing
Press and hold the switch forward to close the sunroof. Any release of the switch will stop
the movement, and the sunroof will remain in a partially closed position until the switch
is pressed again.
Pinch Protection Feature
•ThisfeaturewilldetectanobstructionintheopeningofthesunroofduringExpress
Close operation. If an obstruction in the path of the sunroof is detected, the sunroof will
automatically retract. Remove the obstruction if this occurs. Next, press the switch
forward and release to Express Close.
NOTE:
If three consecutive sunroof close attempts result in Pinch Protect reversals, the fourth
close attempt will be a Manual Close movement with Pinch Protect disabled.
Power Sunroof Switch
1—OpeningSunroof2—VentingSunroof3—ClosingSunroof
OPERATING YOUR VEHICLE
54
Page 57 of 164

WARNING!
•Neverleavechildrenunattendedinavehicle,anddonotleavetheKeyFobinor
near the vehicle, and do not leave a vehicle equipped with Keyless Enter-N-Go™ in
the ACC or ON/RUN mode. Occupants, particularly unattended children, can
become entrapped by the power sunroof while operating the power sunroof switch.
Such entrapment may result in serious injury or death.
•Inacollision,thereisagreaterriskofbeingthrownfromavehiclewithanopen
sunroof. You could also be severely injured or killed. Always fasten your seat belt
properly and make sure all passengers are properly secured.
•Donotallowsmallchildrentooperatethesunroof.Neverallowyourfingers,other
body parts, or any object to project through the sunroof opening. Injury may result.
WIND BUFFETING
Wind buffeting can be described as a helicopter-type percussion sound. If buffeting
occurs with the rear windows open, adjust the front and rear windows together.
If buffeting occurs with the sunroof open, adjust the sunroof opening, or adjust any
window. This will minimize buffeting.
OPERATING YOUR VEHICLE
55
Page 70 of 164

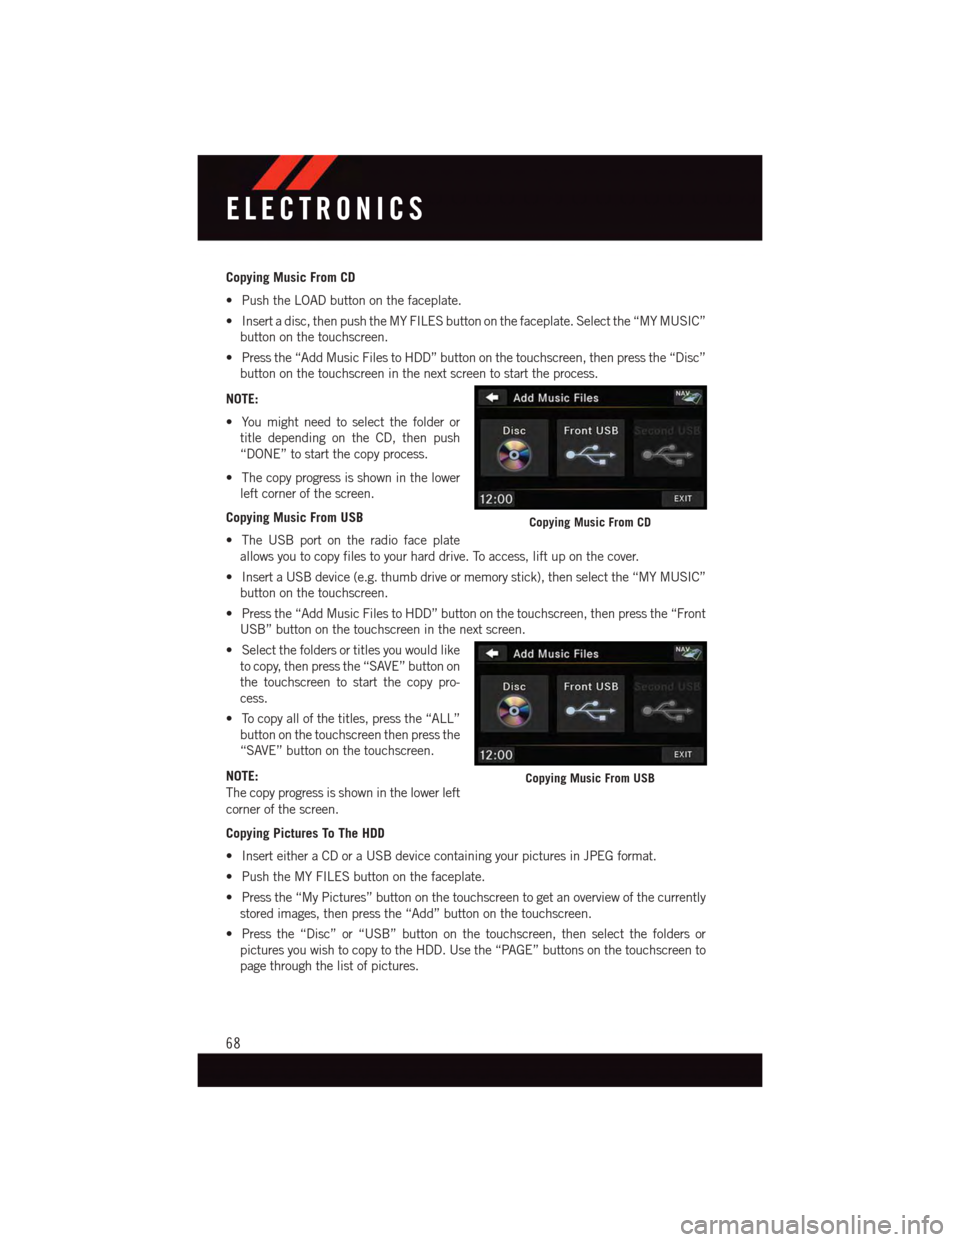
Copying Music From CD
•PushtheLOADbuttononthefaceplate.
•Insertadisc,thenpushtheMYFILESbuttononthefaceplate.Selectthe“MYMUSIC”
button on the touchscreen.
•Pressthe“AddMusicFilestoHDD”buttononthetouchscreen,thenpressthe“Disc”
button on the touchscreen in the next screen to start the process.
NOTE:
•Youmightneedtoselectthefolderor
title depending on the CD, then push
“DONE” to start the copy process.
•Thecopyprogressisshowninthelower
left corner of the screen.
Copying Music From USB
•TheUSBportontheradiofaceplate
allows you to copy files to your hard drive. To access, lift up on the cover.
•InsertaUSBdevice(e.g.thumbdriveormemorystick),thenselectthe“MYMUSIC”
button on the touchscreen.
•Pressthe“AddMusicFilestoHDD”buttononthetouchscreen,thenpressthe“Front
USB” button on the touchscreen in the next screen.
•Selectthefoldersortitlesyouwouldlike
to copy, then press the “SAVE” button on
the touchscreen to start the copy pro-
cess.
•Tocopyallofthetitles,pressthe“ALL”
button on the touchscreen then press the
“SAVE” button on the touchscreen.
NOTE:
The copy progress is shown in the lower left
corner of the screen.
Copying Pictures To The HDD
•InserteitheraCDoraUSBdevicecontainingyourpicturesinJPEGformat.
•PushtheMYFILESbuttononthefaceplate.
•Pressthe“MyPictures”buttononthetouchscreentogetanoverviewofthecurrently
stored images, then press the “Add” button on the touchscreen.
•Pressthe“Disc”or“USB”buttononthetouchscreen,thenselectthefoldersor
pictures you wish to copy to the HDD. Use the “PAGE” buttons on the touchscreen to
page through the list of pictures.
Copying Music From CD
Copying Music From USB
ELECTRONICS
68
Page 71 of 164

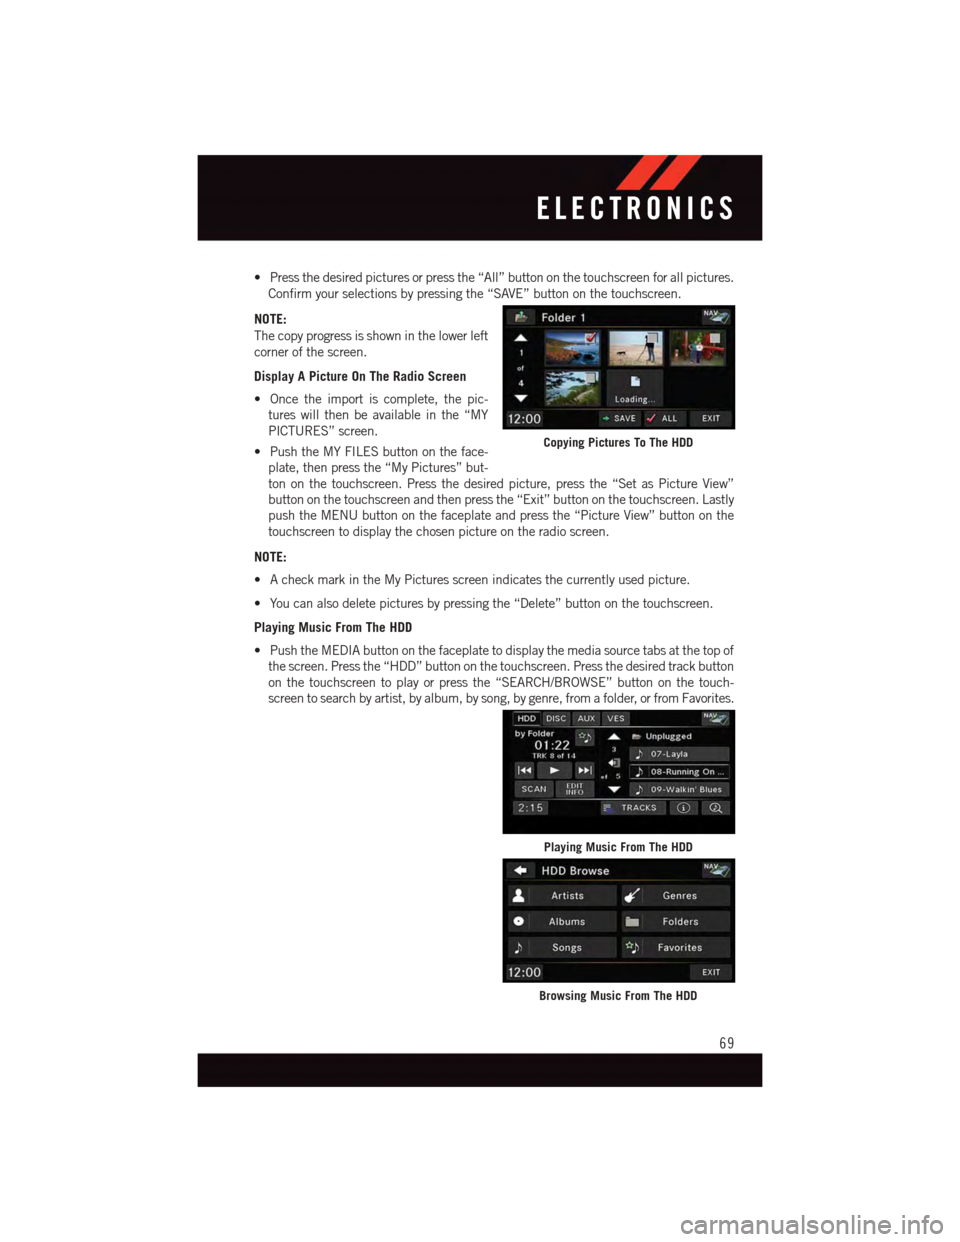
•Pressthedesiredpicturesorpressthe“All”buttononthetouchscreenforallpictures.
Confirm your selections by pressing the “SAVE” button on the touchscreen.
NOTE:
The copy progress is shown in the lower left
corner of the screen.
Display A Picture On The Radio Screen
•Oncetheimportiscomplete,thepic-
tures will then be available in the “MY
PICTURES” screen.
•PushtheMYFILESbuttonontheface-
plate, then press the “My Pictures” but-
ton on the touchscreen. Press the desired picture, press the “Set as Picture View”
button on the touchscreen and then press the “Exit” button on the touchscreen. Lastly
push the MENU button on the faceplate and press the “Picture View” button on the
touchscreen to display the chosen picture on the radio screen.
NOTE:
•AcheckmarkintheMyPicturesscreenindicatesthecurrentlyusedpicture.
•Youcanalsodeletepicturesbypressingthe“Delete”buttononthetouchscreen.
Playing Music From The HDD
•PushtheMEDIAbuttononthefaceplatetodisplaythemediasourcetabsatthetopof
the screen. Press the “HDD” button on the touchscreen. Press the desired track button
on the touchscreen to play or press the “SEARCH/BROWSE” button on the touch-
screen to search by artist, by album, by song, by genre, from a folder, or from Favorites.
Copying Pictures To The HDD
Playing Music From The HDD
Browsing Music From The HDD
ELECTRONICS
69
Page 75 of 164

Taking A Detour
To t a k e a d e t o u r y o u m u s t b e n a v i g a t i n g a r o u t e .
•Pressthe“backarrow”iconbuttononthetouchscreenmultipletimestoreturntothe
Main Navigation menu.
•Pressthe“Detour”buttononthetouchscreen.
NOTE:
If the route you are currently taking is the only reasonable option, the device might not
calculate a detour.
Acquiring Satellites
The GPS Satellite strength bars indicate the strength of your satellite reception.
•Acquiringsatellitesignalscantakeafewminutes.Whenatleastoneofthebarsis
green, your device has acquired satellite signals.
•Youmayexperiencedelaysreceivingsatellitesignalswheninareaswithanobstructed
view to the sky, such as garages, tunnels, or large cities with tall buildings.
SiriusXM SATELLITE RADIO/TRAVEL LINK
•SiriusXMTravelLinkrequiresasubscription,soldseparatelyafterthe1yeartrial
subscription included with your vehicle purchase.
•SiriusXMTravelLinkisonlyavailableintheUnitedStates.
•ThefollowingdescribesfeaturesthatareavailablewheninSiriusXMSatelliteRadio
mode.
•ToaccessSiriusXMSatelliteRadio,pushtheRADIO/MEDIAorRADIObuttononthe
faceplate, then press the “SAT” button on the touchscreen.
Info
•Pressthe“i”buttononthetouchscreentoviewdetailedinformationaboutthecurrent
Sirius XM Satellite channel.
SiriusXM Parental Controls
•SiriusXM offers the option to permanently block selected channels. Call
1-888-539-7474 and request the Family Package.
•Uconnect® 430/430N and 730N:Push the “MENU” button on the faceplate while in
SiriusXM™ Satellite Radio Mode, then press the “Channel Lock” to enable and/or
disable desired channels. The SEEK and SCAN function will then only display channels
without Channel lock.
ELECTRONICS
73
Page 82 of 164

Phonebook
Phonebook Download — Automatic Phonebook Transfer From Mobile Phone
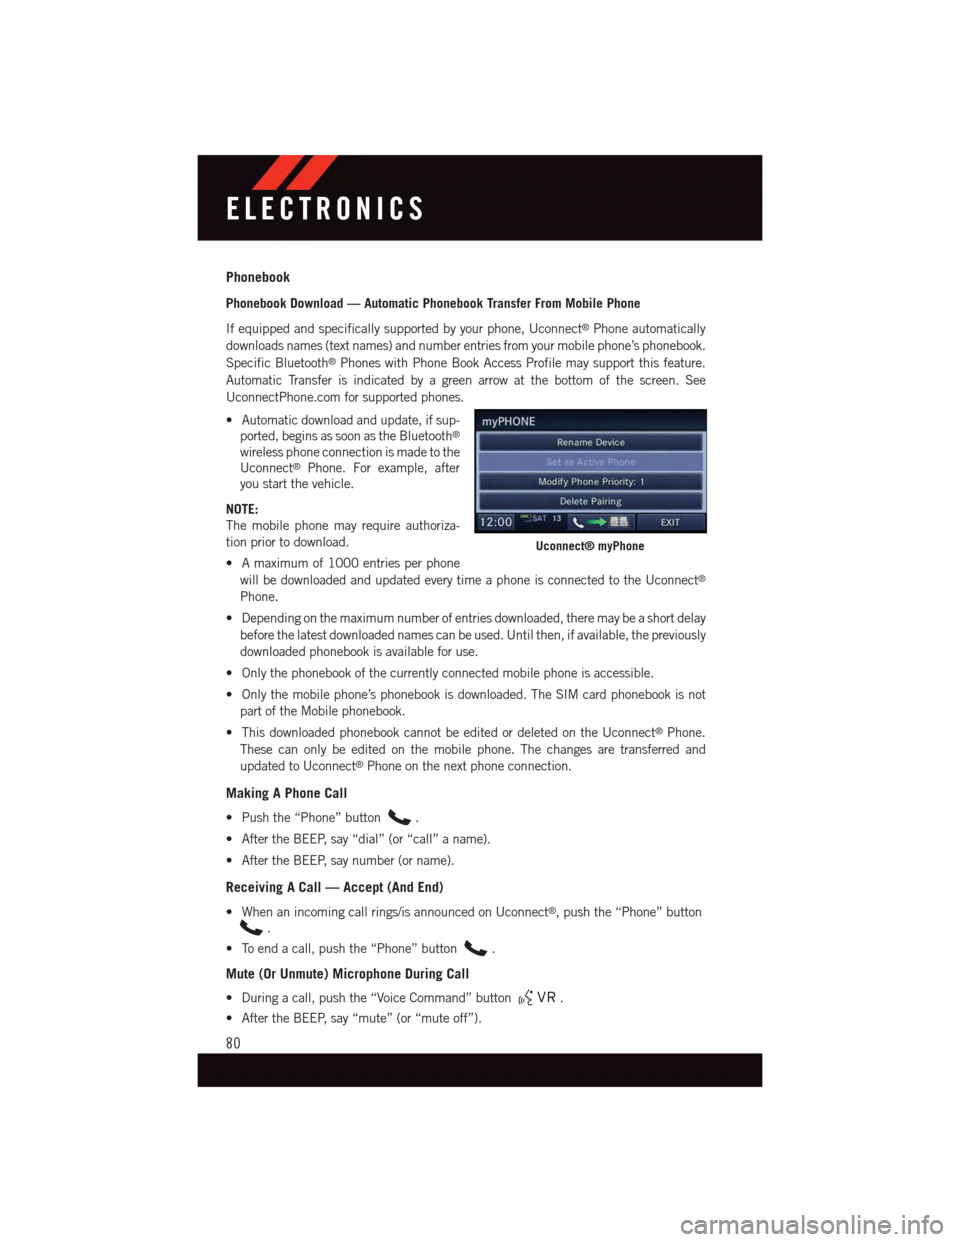
If equipped and specifically supported by your phone, Uconnect®Phone automatically
downloads names (text names) and number entries from your mobile phone’s phonebook.
Specific Bluetooth®Phones with Phone Book Access Profile may support this feature.
Automatic Transfer is indicated by a green arrow at the bottom of the screen. See
UconnectPhone.com for supported phones.
•Automaticdownloadandupdate,ifsup-
ported, begins as soon as the Bluetooth®
wireless phone connection is made to the
Uconnect®Phone. For example, after
you start the vehicle.
NOTE:
The mobile phone may require authoriza-
tion prior to download.
•Amaximumof1000entriesperphone
will be downloaded and updated every time a phone is connected to the Uconnect®
Phone.
•Dependingonthemaximumnumberofentriesdownloaded,theremaybeashortdelay
before the latest downloaded names can be used. Until then, if available, the previously
downloaded phonebook is available for use.
•Onlythephonebookofthecurrentlyconnectedmobilephoneisaccessible.
•Onlythemobilephone’sphonebookisdownloaded.TheSIMcardphonebookisnot
part of the Mobile phonebook.
•ThisdownloadedphonebookcannotbeeditedordeletedontheUconnect®Phone.
These can only be edited on the mobile phone. The changes are transferred and
updated to Uconnect®Phone on the next phone connection.
Making A Phone Call
•Pushthe“Phone”button.
•AftertheBEEP,say“dial”(or“call”aname).
•AftertheBEEP,saynumber(orname).
Receiving A Call — Accept (And End)
•Whenanincomingcallrings/isannouncedonUconnect®,pushthe“Phone”button
.
•Toendacall,pushthe“Phone”button.
Mute (Or Unmute) Microphone During Call
•Duringacall,pushthe“VoiceCommand”button.
•AftertheBEEP,say“mute”(or“muteoff”).
Uconnect® myPhone
ELECTRONICS
80
Page 89 of 164

PROGRAMMABLE FEATURES
Electronic Vehicle Information Center (EVIC) — If Equipped
Personal Settings allows you to set and recall features when the transmission is in PARK.
If the transmission is out of PARK or the vehicle begins moving, a warning message
SYSTEM SETUP NOT AVAILABLE VEHICLE NOT IN PARK displays when you try to select
“System Setup” from the main menu.
The EVIC can be used to program the following Personal Settings. Push the RIGHT arrow
buttonuntil Personal Settings displays, then push the DOWN buttonto scroll
through the settings. Push the RIGHT arrow buttonto change the setting.
•SelectLanguage•Key-OffPowerDelay
•Nav-TurnByTurn•IlluminatedApproach
•AutoLockDoors•HillStartAssist
•AutoUnlockDoors•FlasherswithSlidingDoor
•RemoteUnlockSequence•CalibrateCompass
•RemoteStartComfortSys.•CompassVariance
•HornwithRemoteLock•ParkAssist-IfEquipped
•FlashLampsWithLock•AutomaticHighBeams-IfEquipped
•HeadlampOffDelay•KeylessEnter-N-Go-IfEquipped
•HeadlampsWithWipers•RKELinkedToMemory-IfEquipped
Key Fob Programmable Features
The following features may also be programmed by using the Key Fob transmitter or the
ignition switch and driver's door lock switch.
NOTE:
Pushing the LOCK button while you are inside the vehicle will activate the Vehicle Security
Alarm. Opening a door with the Vehicle Security Alarm activated will cause the alarm to
sound. Push the UNLOCK button to deactivate the Vehicle Security Alarm.
Unlock On First Press
To u n l o c k e i t h e r t h e d r i v e r ' s s i d e , o r a l l d o o r s , o n t h e f i r s t p u s h o f t h e U N L O C K b u t t o n :
•PushandholdtheLOCKbuttonforatleastfourseconds,butnolongerthan10
seconds. Then, push and hold the UNLOCK button while still holding the LOCK button.
•Releasebothbuttonsatthesametime.
ELECTRONICS
87