Page 315 of 703

CHAngE OIL..............OilChange Required
LoCOOL.......................LowCoolant
NOTE:Some of the above warnings will be displayed in
the Electronic Vehicle Information Center Display Area
located in the instrument cluster.
Refer to ”Electronic Vehicle Information Center (EVIC) —
If Equipped” in this section for further information.
LoW tirE
When the appropriate condition exists, the odometer
display will toggle between LoW and tirE for three
cycles.
gASCAP
If the vehicle diagnostic system determines that the fuel
filler cap is loose, improperly installed, or damaged, a
“gASCAP” message will display in the odometer display
area. Tighten the fuel filler cap properly and push the
STEP button on the steering wheel to turn off the
message. If the problem continues, the message will
appear the next time the vehicle is started.
noFUSE
If the vehicle diagnostic system determines that the
Ignition Off Draw (IOD) fuse is improperly installed, or
damaged, a “noFUSE” message will display in the odom-
eter display area. For further information on fuses and
fuse locations refer to “Fuses” in “Maintaining Your
Vehicle”.
CHAngE OIL
Your vehicle is equipped with an engine oil change
indicator system. TheCHAngE OILmessage will flash in
the instrument cluster odometer for approximately 12
seconds, after a single chime has sounded, to indicate the
next scheduled oil change interval. The engine oil change
4
UNDERSTANDING YOUR INSTRUMENT PANEL 313
Page 432 of 703

STEERING WHEEL AUDIO CONTROLS — IF
EQUIPPED
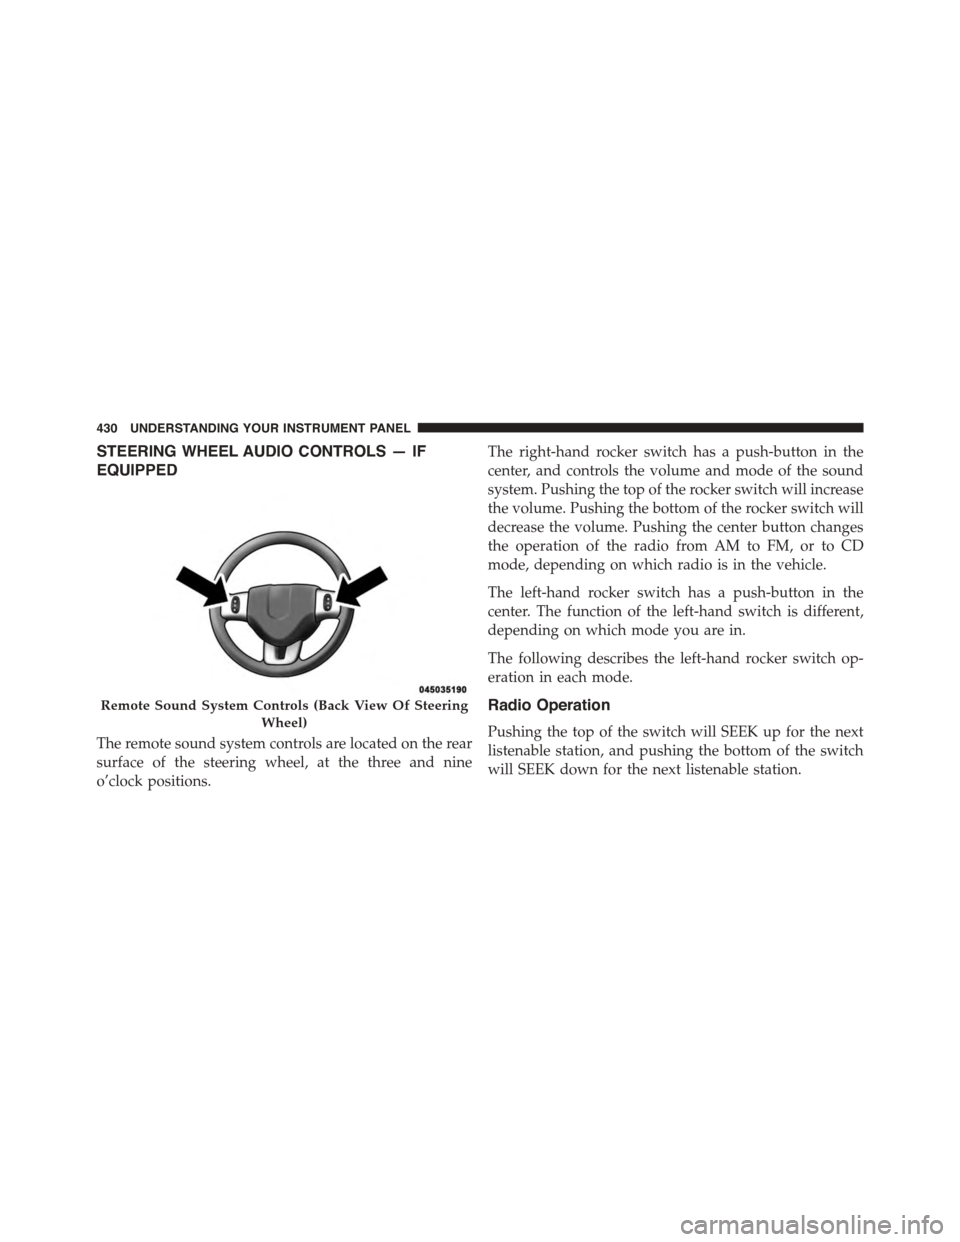
The remote sound system controls are located on the rear
surface of the steering wheel, at the three and nine
o’clock positions.
The right-hand rocker switch has a push-button in the
center, and controls the volume and mode of the sound
system. Pushing the top of the rocker switch will increase
the volume. Pushing the bottom of the rocker switch will
decrease the volume. Pushing the center button changes
the operation of the radio from AM to FM, or to CD
mode, depending on which radio is in the vehicle.
The left-hand rocker switch has a push-button in the
center. The function of the left-hand switch is different,
depending on which mode you are in.
The following describes the left-hand rocker switch op-
eration in each mode.
Radio Operation
Pushing the top of the switch will SEEK up for the next
listenable station, and pushing the bottom of the switch
will SEEK down for the next listenable station.
Remote Sound System Controls (Back View Of Steering
Wheel)
430 UNDERSTANDING YOUR INSTRUMENT PANEL
Page 475 of 703

Electronic Range Select (ERS) Operation
The Electronic Range Select (ERS) shift control allows the
driver to limit the highest available gear when the
transmission is in DRIVE. For example, if you shift the
transmission into 4 (fourth gear), the transmission will
not shift above fourth gear (except to prevent engine
overspeed), but will shift through the lower gears nor-
mally.
You can switch between DRIVE and ERS mode at any
vehicle speed. When the shift lever is in the DRIVE
position, the transmission will operate automatically,
shifting between all available gears. Tapping the shift
lever to the left (-) will activate ERS mode, display the
current gear in the instrument cluster, and maintain that
gear as the top available gear. Once in ERS mode, tapping
the shift lever to the left (-) or right (+) will change the top
available gear.
To exit ERS mode, simply hold the shift lever to the right
(+) until “D” is once again displayed in the instrument
cluster.
WARNING!
Do not downshift for additional engine braking on a
slippery surface. The drive wheels could lose their
grip and the vehicle could skid, causing a collision or
personal injury.5
STARTING AND OPERATING 473
Page 521 of 703

It is recommended you contact your authorized tire
dealer or original equipment dealer with any questions
you may have on tire specifications or capability. Failure
to use equivalent replacement tires may adversely affect
the safety, handling, and ride of your vehicle.
WARNING!
•Do not use a tire, wheel size or rating other than
that specified for your vehicle. Some combinations
of unapproved tires and wheels may change sus-
pension dimensions and performance characteris-
tics, resulting in changes to steering, handling, and
braking of your vehicle. This can cause unpredict-
able handling and stress to steering and suspen-
sion components. You could lose control and have
a collision resulting in serious injury or death. Use
only the tire and wheel sizes with load ratings
approved for your vehicle.
(Continued)
WARNING!(Continued)
•Never use a tire with a smaller load index or
capacity, other than what was originally equipped
on your vehicle. Using a tire with a smaller load
index could result in tire overloading and failure.
You could lose control and have a collision.
•Failure to equip your vehicle with tires having
adequate speed capability can result in sudden tire
failure and loss of vehicle control.
CAUTION!
Replacing original tires with tires of a different size
may result in false speedometer and odometer read-
ings.
5
STARTING AND OPERATING 519
Page 527 of 703

•Seasonal temperature changes will affect tire pressure,
and the TPMS will monitor the actual tire pressure in
the tire.
Base System
The TPMS uses wireless technology with wheel rim
mounted electronic sensors to monitor tire pressure lev-
els. Sensors, mounted to each wheel as part of the valve
stem, transmit tire pressure readings to the Receiver
Module.
NOTE:It is particularly important for you to check the
tire pressure in all of your tires regularly and to maintain
the proper pressure.
The Basic TPMS consists of the following components:
•Receiver Module
•Four Tire Pressure Monitoring Sensors
•TPMS Telltale Warning Light
Tire Pressure Monitoring Low Tire Pressure
Warnings
The “Tire Pressure Monitoring Telltale Light”
will illuminate in the instrument cluster, a
“LOW TIRE PRESSURE” message will display
in the instrument cluster, and an audible chime
will be activated when one or more of the four active
road tire pressures are low. Should this occur, you should
stop as soon as possible, check the inflation pressure of
each tire on your vehicle, and inflate each tire to the
vehicle’s recommended cold tire placard pressure value
(located on the placard label on the driver’s-side B-Pillar).
NOTE:When filling warm tires, the tire pressure may
need to be increased up to an additional 4 psi (30 kPa)
above the recommended cold placard pressure in order
to turn the Tire Pressure Monitoring Telltale Light off.
5
STARTING AND OPERATING 525
Page 569 of 703

WARNING!(Continued)
•Keep Tire Service Kit away from open flames or
heat source.
•A loose Tire Service Kit thrown forward in a
collision or hard stop could endanger the occupants
of the vehicle. Always stow the Tire Service Kit in
the place provided. Failure to follow these warn-
ings can result in injuries that are serious or fatal to
you, your passengers, and others around you.
•Take care not to allow the contents of Tire Service
Kit to come in contact with hair, eyes, or clothing.
Tire Service Kit is harmful if inhaled, swallowed,
or absorbed through the skin. It causes skin, eye,
and respiratory irritation. Flush immediately with
plenty of water if there is any contact with eyes or
skin. Change clothing as soon as possible, if there
is any contact with clothing.
(Continued)
WARNING!(Continued)
•Tire Service Kit Sealant solution contains latex. In
case of an allergic reaction or rash, consult a phy-
sician immediately. Keep Tire Service Kit out of
reach of children. If swallowed, rinse mouth imme-
diately with plenty of water and drink plenty of
water. Do not induce vomiting! Consult a physician
immediately.
Sealing A Tire With Tire Service Kit
(A) Whenever You Stop To Use Tire Service Kit:
1. Pull over to a safe location and turn on the vehicle’s
Hazard Warning flashers.
2. Verify that the valve stem (on the wheel with the
deflated tire) is in a position that is near to the ground.
This will allow the Tire Service Kit Hoses (6) and (7) to
reach the valve stem and keep the Tire Service Kit flat
6
WHAT TO DO IN EMERGENCIES 567
Page 577 of 703

WARNING!
To avoid the risk of forcing the vehicle off the jack,
do not tighten the lug nuts fully until the vehicle has
been lowered. Failure to follow this warning may
result in personal injury.
JACKING AND TIRE CHANGING — IF EQUIPPED
WARNING!
•Do not attempt to change a tire on the side of the
vehicle close to moving traffic. Pull far enough off
the road to avoid the danger of being hit when
operating the jack or changing the wheel.
(Continued)
WARNING!(Continued)
•Being under a jacked-up vehicle is dangerous. The
vehicle could slip off the jack and fall on you. You
could be crushed. Never put any part of your body
under a vehicle that is on a jack. If you need to get
under a raised vehicle, take it to a service center
where it can be raised on a lift.
•Never start or run the engine while the vehicle is
on a jack.
•The jack is designed to be used as a tool for
changing tires only. The jack should not be used to
lift the vehicle for service purposes. The vehicle
should be jacked on a firm level surface only.
Avoid ice or slippery areas.
6
WHAT TO DO IN EMERGENCIES 575
Page 584 of 703
4. Stand the tire/cover assembly upright and remove the
wheel spacer by squeezing the winch retaining tabs
together. Push the retainer through the spare tire to
release it from the wheel.
Preparations For Jacking
1. Park the vehicle on a firm, level surface. Avoid ice or
slippery areas.
WARNING!
Do not attempt to change a tire on the side of the
vehicle close to moving traffic, pull far enough off
the road to avoid being hit when operating the jack
or changing the wheel.
2. Turn on the Hazard Warning flasher.
3. Set the parking brake.
4. Place the shift lever into PARK.
5. Turn OFF the ignition.Removing Wheel Spacer
582 WHAT TO DO IN EMERGENCIES