2015 DODGE DURANGO center console
[x] Cancel search: center consolePage 37 of 236

Rear Heated Seats
On some models, the two outboard seats are equipped with heated seats. The heated seat
switches for these seats are located on the rear of the center console. There are two heated
seat switchesthat allow the rear passengers to operate the seats independently.
Yo u c a n c h o o s e f r o m H I , L O o r O F F h e a t s e t t i n g s . T h e i n d i c a t o r l i g h t s i n e a c h s w i t c h
indicate the level of heat in use. Two indicator lights will illuminate for HI, one for LO and
none for OFF.
•Pushtheheatedseatbuttononce to select HI-level heating.
•PushtheheatedseatbuttonasecondtimetoselectLO-levelheating.
•PushtheheatedseatbuttonathirdtimetoturntheheatingelementsOFF.
NOTE:
•Onceaheatsettingisselected,heatwillbefeltwithintwotofiveminutes.
•Theenginemustberunningfortheheatedseatstooperate.
When the HI-level setting is selected, the heater will provide a boosted heat level during
the first four minutes of operation. Then, the heat output will drop to the normal HI-level.
If the HI-level setting is selected, the system will automatically switch to LO-level after
approximately 60 minutes of continuous operation. At that time, the number of illumi-
nated LEDs changes from two to one, indicating the change. The LO-level setting will turn
OFF automatically after approximately 45 minutes.
Front Ventilated Seats
Located in the seat cushion and seat back are small fans that draw the air from the
passenger compartment and move air through fine perforations in the seat cover to help
keep the driver and front passenger cooler in higher ambient temperatures. The fans
operate at two speeds, HI and LO.
The front ventilated seats control buttons are located within the Uconnect®system. You
can gain access to the control buttons through the climate screen or the controls screen.
•Presstheventilatedseatbuttononce to choose HI.
•PresstheventilatedseatbuttonasecondtimetochooseLO.
•PresstheventilatedseatbuttonathirdtimetoturntheventilatedseatOFF.
NOTE:
The engine must be running for the ventilated seats to operate.
Vehicles Equipped With Remote Start
On models that are equipped with remote start, the ventilated seats can be programed to
come on during a remote start.
This feature can be programmed through the Uconnect®system. Refer to “Uconnect®
Settings” in “Understanding Your Instrument Panel” in the Owner's Manual on the DVD.
GETTING STARTED
35
Page 53 of 236

AUTOMATIC DIMMING MIRRORS
The rearview and driver side exterior mirror automatically adjusts for headlight glare from
vehicles behind you.
Yo u c a n t u r n t h e f e a t u r e o n o r o f f w h e n t h e A u t o m a t i c D i m m i n g M i r r o r f e a t u r e i s s e l e c t e d
through the programmable features in the Uconnect®system. Refer to “Uconnect®
Settings” in “Understanding Your Instrument Panel” in the Owner's Manual on the DVD
for further details.
ELECTRONIC SHIFTER
Yo u r v e h i c l e i s e q u i p p e d w i t h a f u e l e f f i c i e n t e i g h t - s p e e d t r a n s m i s s i o n . T h e E l e c t r o n i c
gear selector is located on the center console. The transmission gear (PRND) is displayed
both above the shifter control and in the Driver Information Display (DID).
•Toselectagearrange,simplyrotatethe
shifter control.
NOTE:
Yo u m u s t p r e s s t h e b r a k e p e d a l t o s h i f t t h e
transmission out of PARK or from NEU-
TRAL into DRIVE or REVERSE.
•Toshiftpastmultiplegearrangesatonce
(such as PARK to DRIVE), simply rotate
the switch to the appropriate detent.
•SelecttheDRIVErangefornormal
driving.
Electronic Gear Selector
OPERATING YOUR VEHICLE
51
Page 67 of 236

8. Emergency 911 Button pg. 74
9. Uconnect®System pg. 84
10. Uconnect®Radio Screen Off Button
11. Uconnect®Radio Back Button
12. Tune/Scroll Knob/Browse/Enter Button
13. Media Hub: AUX Audio Jack, USB Port, and SD Card Slot pg. 103
14. CD Player Inside Center Console pg. 86
ELECTRONICS
65
Page 105 of 236
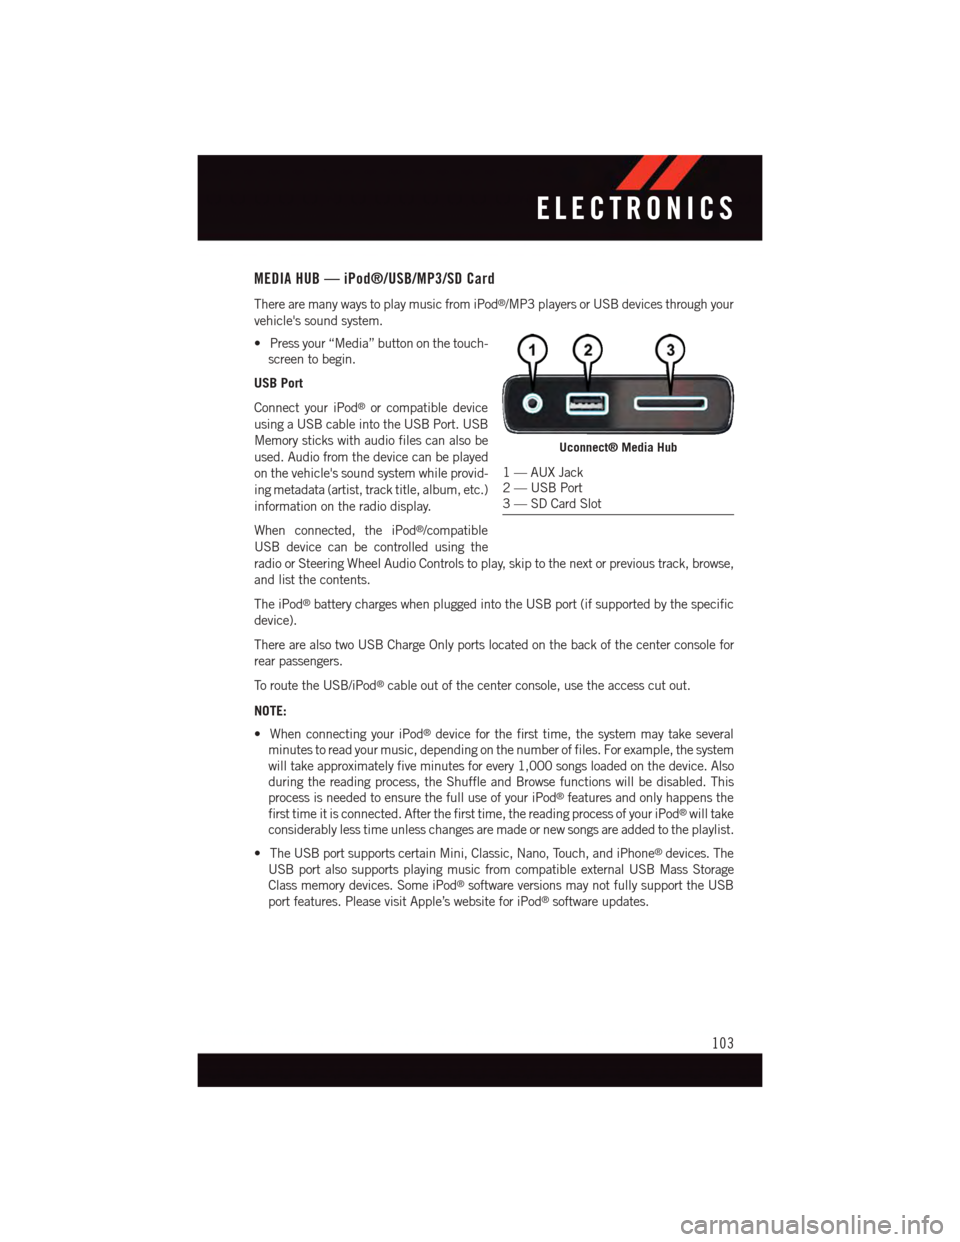
MEDIA HUB — iPod®/USB/MP3/SD Card
There are many ways to play music from iPod®/MP3 players or USB devices through your
vehicle's sound system.
•Pressyour“Media”buttononthetouch-
screen to begin.
USB Port
Connect your iPod®or compatible device
using a USB cable into the USB Port. USB
Memory sticks with audio files can also be
used. Audio from the device can be played
on the vehicle's sound system while provid-
ing metadata (artist, track title, album, etc.)
information on the radio display.
When connected, the iPod®/compatible
USB device can be controlled using the
radio or Steering Wheel Audio Controls to play, skip to the next or previous track, browse,
and list the contents.
The iPod®battery charges when plugged into the USB port (if supported by the specific
device).
There are also two USB Charge Only ports located on the back of the center console for
rear passengers.
To r o u t e t h e U S B / i P o d®cable out of the center console, use the access cut out.
NOTE:
•WhenconnectingyouriPod®device for the first time, the system may take several
minutes to read your music, depending on the number of files. For example, the system
will take approximately five minutes for every 1,000 songs loaded on the device. Also
during the reading process, the Shuffle and Browse functions will be disabled. This
process is needed to ensure the full use of your iPod®features and only happens the
first time it is connected. After the first time, the reading process of your iPod®will take
considerably less time unless changes are made or new songs are added to the playlist.
•TheUSBportsupportscertainMini,Classic,Nano,Touch,andiPhone®devices. The
USB port also supports playing music from compatible external USB Mass Storage
Class memory devices. Some iPod®software versions may not fully support the USB
port features. Please visit Apple’s website for iPod®software updates.
Uconnect® Media Hub
1—AUXJack2—USBPort3—SDCardSlot
ELECTRONICS
103
Page 106 of 236
Audio Jack (AUX)
The AUX allows a portable device, such as an MP3 player or an iPod®,tobepluggedinto
the radio and utilize the vehicle’s sound system, using a 3.5 mm stereo audio cable, to
amplify the source and play through the vehicle speakers.
•Pressingthe“AUX”buttononthetouchscreenwillchangethemodetoauxiliarydevice
if the audio jack is connected, allowing the music from your portable device to be heard
through the vehicle's speakers. To activate the AUX, plug in the audio jack.
•Thefunctionsoftheportabledevicearecontrolledusingthedevicebuttons.The
volume may be controlled using the radio or portable device.
•Toroutetheaudiocableoutofthecenterconsole,usetheaccesscutoutinthefront
of the console.
Bluetooth® Streaming Audio
If using a Bluetooth®-equippeddevice,youmayalsobeabletostreammusictoyour
vehicle's sound system. Your connected device must be Bluetooth-compatible, and paired
with your system (see Uconnect®Phone for pairing instructions).
•YoucanaccessthemusicfromyourconnectedBluetooth®device by pressing the
“Bluetooth®”button on the touchscreen while in Media mode.
SD Card
SD Card Mode allows you to play music that has been saved to your SD Card through your
vehicle’s sound system.
•YoucanenterSDCardModeisbyeitherinsertingaSDCardintotheSDCardslotor
by pressing the “SD Card” button on the left side of the display while media mode.
For further information refer to your Radio Supplement.
ELECTRONICS
104
Page 133 of 236
MEDIA HUB — iPod®/USB/MP3/SD Card
There are many ways to play music from iPod®/MP3 players, SD card, or USB devices
through your vehicle's sound system.
•Pressyour“Media”buttononthetouchscreentobegin.
USB Port
Connect your iPod®or compatible device using a USB cable into the USB Port. USB
Memory sticks with audio files can also be used. Audio from the device can be played on
the vehicle's sound system while providing metadata (artist, track title, album, etc.)
information on the radio display.
When connected, the iPod®/compatible USB device can be controlled using the radio or
Steering Wheel Audio Controls to play, skip to the next or previous track, browse, and list
the contents.
The iPod®battery charges when plugged into the USB port (if supported by the specific
device.)
To r o u t e t h e U S B / i P o d®cable out of the center console, use the access cut out.
NOTE:
•WhenconnectingyouriPod®device for the first time, the system may take several
minutes to read your music, depending on the number of files. For example, the system
will take approximately five minutes for every 1,000 songs loaded on the device. Also
during the reading process, the Shuffle and Browse functions will be disabled. This
process is needed to ensure the full use of your iPod®features and only happens the
first time it is connected. After the first time, the reading process of your iPod®will take
considerably less time unless changes are made or new songs are added to the playlist.
•TheUSBportsupportscertainMini,Classic,Nano,Touch,andiPhone®devices. The
USB port also supports playing music from compatible external USB Mass Storage
Class memory devices. Some iPod®software versions may not fully support the USB
port features. Please visit Apple’s website for iPod®software updates.
Audio Jack (AUX)
The AUX allows a portable device, such as an MP3 player or an iPod®,tobepluggedinto
the radio and utilize the vehicle’s sound system, using a 3.5 mm audio cable, to amplify
the source and play through the vehicle speakers.
•Pressingthe“AUX”buttononthetouchscreenwillchangethemodetoauxiliarydevice
if the audio jack is connected, allowing the music from your portable device to be heard
through the vehicle's speakers. In order to activate the AUX, plug in the audio jack.
•Thefunctionsoftheportabledevicearecontrolledusingthedevicebuttons.The
volume may be controlled using the radio or portable device.
•Toroutetheaudiocableoutofthecenterconsole,usetheaccesscutoutinthefront
of the console.
ELECTRONICS
131
Page 154 of 236
UNIVERSAL GARAGE DOOR OPENER (HomeLink®)
•HomeLink®replaces up to three hand-held transmitters that operate devices such as
garage door openers, motorized gates, lighting or home security systems. The HomeLink®
unit is powered by your vehicles 12 Volt battery.
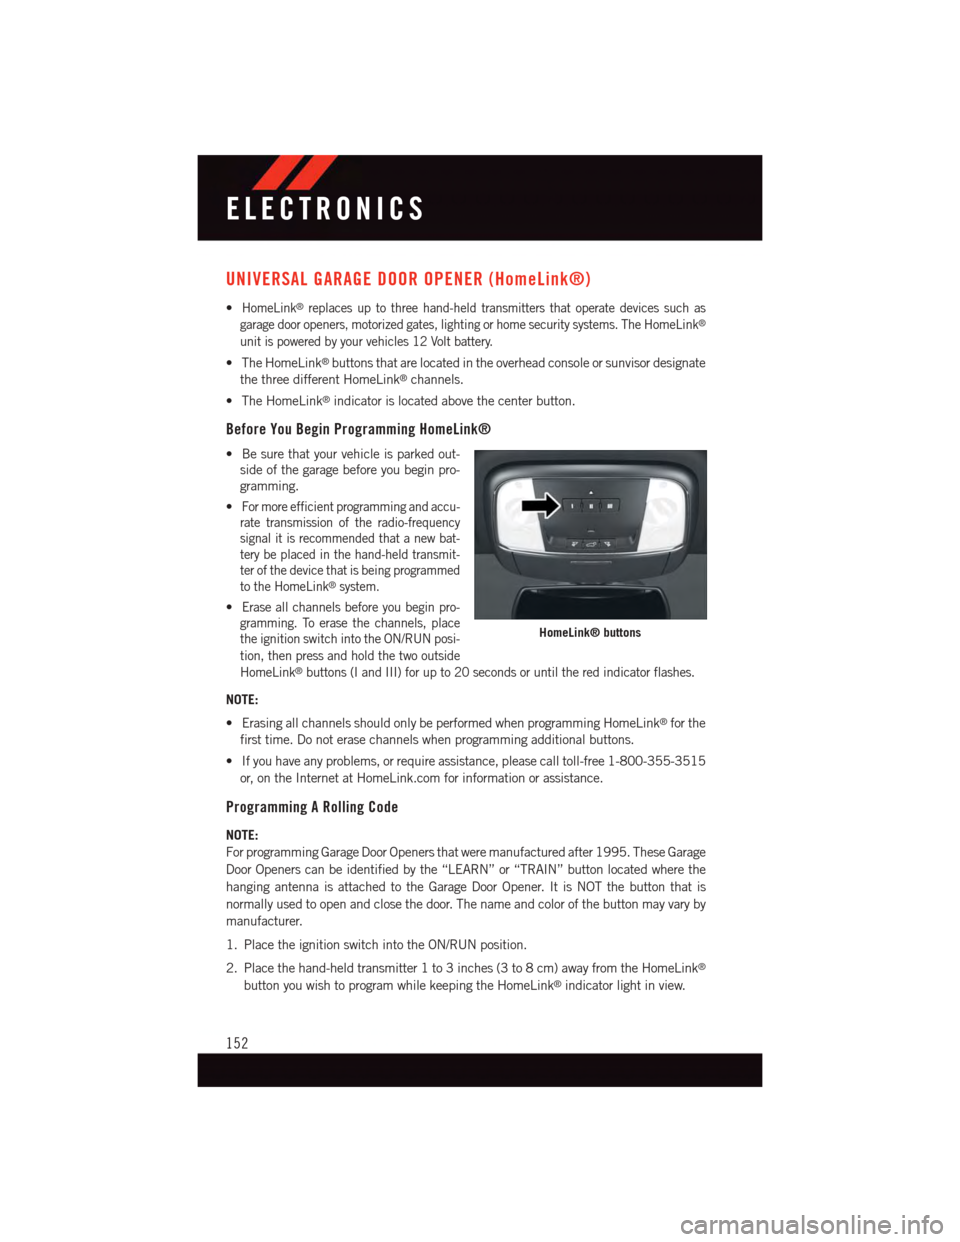
•TheHomeLink®buttons that are located in the overhead console or sunvisor designate
the three different HomeLink®channels.
•TheHomeLink®indicator is located above the center button.
Before You Begin Programming HomeLink®
•Besurethatyourvehicleisparkedout-
side of the garage before you begin pro-
gramming.
•For more efficient programming and accu-
rate transmission of the radio-frequency
signal it is recommended that a new bat-
tery be placed in the hand-held transmit-
ter of the device that is being programmed
to the HomeLink®system.
•Erase all channels before you begin pro-
gramming. To erase the channels, place
the ignition switch into the ON/RUN posi-
tion, then press and hold the two outside
HomeLink®buttons (I and III) for up to 20 seconds or until the red indicator flashes.
NOTE:
•ErasingallchannelsshouldonlybeperformedwhenprogrammingHomeLink®for the
first time. Do not erase channels when programming additional buttons.
•Ifyouhaveanyproblems,orrequireassistance,pleasecalltoll-free1-800-355-3515
or, on the Internet at HomeLink.com for information or assistance.
Programming A Rolling Code
NOTE:
For programming Garage Door Openers that were manufactured after 1995. These Garage
Door Openers can be identified by the “LEARN” or “TRAIN” button located where the
hanging antenna is attached to the Garage Door Opener. It is NOT the button that is
normally used to open and close the door. The name and color of the button may vary by
manufacturer.
1. Place the ignition switch into the ON/RUN position.
2. Place the hand-held transmitter 1 to 3 inches (3 to 8 cm) away from the HomeLink®
button you wish to program while keeping the HomeLink®indicator light in view.
HomeLink® buttons
ELECTRONICS
152
Page 156 of 236
Using HomeLink®
To o p e r a t e , p u s h a n d r e l e a s e t h e p r o g r a m m e d H o m e L i n k®button. Activation will now
occur for the programmed device (e.g., garage door opener, gate operator, security system,
entry door lock, home/office lighting, etc.). The hand-held transmitter of the device may
also be used at any time.
WARNING!
•Yourmotorizeddoororgatewillopenandclosewhileyouareprogrammingthe
universal transceiver. Do not program the transceiver if people or pets are in the
path of the door or gate.
•Donotrunyourvehicleinaclosedgarageorconfinedareawhileprogrammingthe
transceiver. Exhaust gas from your vehicle contains Carbon Monoxide (CO) which is
odorless and colorless. Carbon Monoxide is poisonous when inhaled and can cause
you and others to be severely injured or killed.
POWER INVERTER
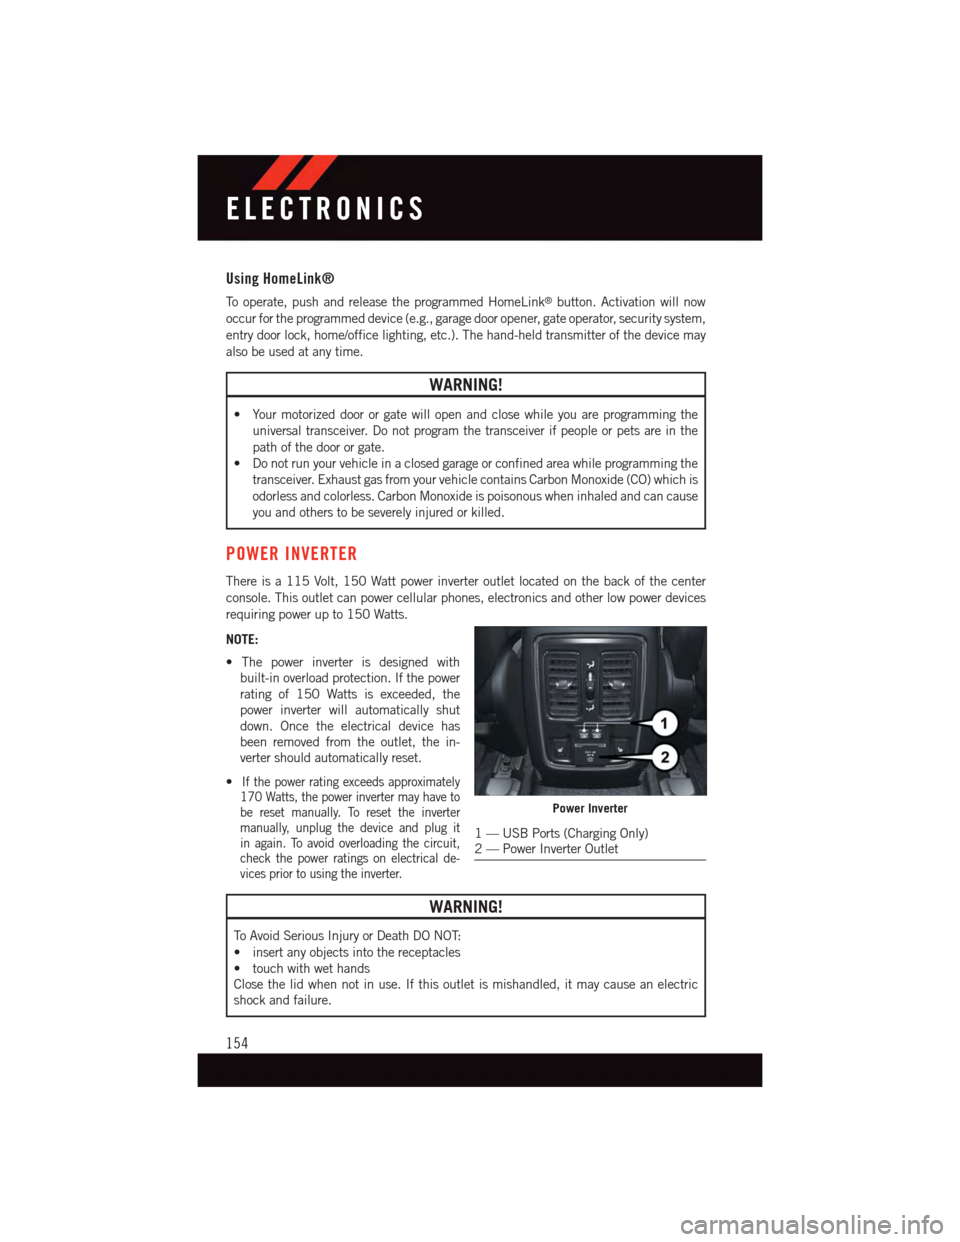
There is a 115 Volt, 150 Watt power inverter outlet located on the back of the center
console. This outlet can power cellular phones, electronics and other low power devices
requiring power up to 150 Watts.
NOTE:
•Thepowerinverterisdesignedwith
built-in overload protection. If the power
rating of 150 Watts is exceeded, the
power inverter will automatically shut
down. Once the electrical device has
been removed from the outlet, the in-
verter should automatically reset.
•If the power rating exceeds approximately170 Watts, the power inverter may have tobe reset manually. To reset the invertermanually, unplug the device and plug itin again. To avoid overloading the circuit,check the power ratings on electrical de-vices prior to using the inverter.
WARNING!
To A v o i d S e r i o u s I n j u r y o r D e a t h D O N O T:
•insertanyobjectsintothereceptacles
•touchwithwethands
Close the lid when not in use. If this outlet is mishandled, it may cause an electric
shock and failure.
Power Inverter
1—USBPorts(ChargingOnly)2—PowerInverterOutlet
ELECTRONICS
154