2015 DODGE DART audio
[x] Cancel search: audioPage 61 of 164

Receiving A Call — Accept (And End)
•Whenanincomingcallrings/isannouncedonUconnect®,pushthe“Phone”
button.
•Toendacall,pushthe“Phone”button.
Mute (Or Unmute) Microphone During Call
•Duringacall,pushthe“VoiceCommand”button.
•AftertheBEEP,say“mute”(or“muteoff”).
Transfer Ongoing Call Between Handset And Vehicle
•Duringacall,pushthe“VoiceCommand”button.
•AftertheBEEP,say“transfercall”.
Changing The Volume
•Startadialoguebypushingthe“Phone”button,thenadjustthevolumeduring
anormalcall.
•UsetheradioON/OFFVOLUMErotaryknobtoadjustthevolumetoacomfortablelevel
while the Uconnect®system is speaking. Please note the volume setting for Uconnect®
is different than the audio system.
Uconnect® Voice Command
The Uconnect®Voice Command system allows you to control your AM, FM radio, satellite
radio, disc player, Uconnect®Phone and supported portable media devices.
When you push the “Voice Command” buttonlocated on the steering wheel, you
will hear a beep. The beep is your signal to give a command. If you do not say a command
within a few seconds, the system will present you with a list of options. If you ever wish to
interrupt the system while it lists options, push the “Voice Command” button,
listen for the BEEP, and say your command.
Voice Command Operation
Start a dialogue by pushing the “Voice Command” button,youwillhearabeep.
The beep is your signal to give a command. Below are a list of voice commands for each
of the different modes.
ELECTRONICS
59
Page 66 of 164

Setting The Time
Model 8.4N synchronizes time automatically via GPS, so should not require any time
adjustment. If you do need to set the time manually, follow the instructions below for
Model 8.4.
For Model 8.4, turn the unit on, then press the “Time Display” at the top of the screen.
Press “Yes.”
If the time is not displayed at the top of the screen, press the “More” button on the
touchscreen and then the “Settings” button on the touchscreen. In the Settings screen,
press the “Clock” button on the touchscreen, then check or uncheck this option.
Press “+” or “–” next to Set Time Hours and Set Time Minutes to adjust the time.
If these features are not available, uncheck the Sync with GPS box.
Press “X” to save your settings and exit out of the Clock Setting screen.
Audio Settings
Press the “Audio” button on the touchscreen to activate the Audio settings screen to
adjust Balance\Fade, Equalizer and Speed Adjusted Volume.
Yo u c a n r e t u r n t o t h e R a d i o s c r e e n b y t o u c h i n g t h e “ X ” l o c a t e d a t t h e t o p r i g h t .
Balance/Fade
Press the “Balance/Fade” button on the touchscreen to Balance audio between the front
speakers or fade the audio between the rear and front speakers.
To u c h i n g t h e “ F r o n t , ” “ R e a r, ” “ L e f t ” o r “ R i g h t ” b u t t o n s o n t h e t o u c h s c r e e n o r p r e s s a n d
drag the red Speaker Icon to adjust the Balance/Fade.
Equalizer
Press the “Equalizer” button on the touchscreen to activate the Equalizer screen.
Press the “+” or “–” buttons on the touchscreen, or by touching and dragging over the
level bar for each of the equalizer bands. The level value, which spans between ±9, is
displayed at the bottom of each of the Bands.
Speed Adjusted Volume
Press the “Speed Adjusted Volume” button on the touchscreen to activate the Speed
Adjusted Volume screen. The Speed Adjusted Volume is adjusted by touching the “+” and
“–” buttons or by touching and dragging over the level bar. This alters the automatic
adjustment of the audio volume with variation to vehicle speed.
ELECTRONICS
64
Page 67 of 164

Remote CD/Disc Player — If Equipped
The CD/Disc Player is located inside the
center console.
With the printed side facing the rear of the
car, insert the disc into the disc slot inside
the center console. The radio pulls the disc
in automatically. The radio selects the ap-
propriate mode after the disc is recognized,
and starts playing the first track.
Remote CD/Disc Player
1—USBPort2—PowerOutlet3—Audio/AUXJack4—CD/DiscSlot
ELECTRONICS
65
Page 68 of 164

Radio Operation
To a c c e s s t h e R a d i o m o d e , p r e s s t h e “ R a d i o ” b u t t o n a t t h e l o w e r l e f t o f t h e t o u c h s c r e e n .
Selecting Radio Stations
Press the desired radio band (AM, FM or SAT) button on the touchscreen.
Seek Up/Seek Down
Press the “Seek” arrow buttons on the touchscreen for less than two seconds to seek
through radio stations.
Press and hold either “arrow” button on the touchscreen for more than two seconds to
bypass stations without stopping. Once the “arrow” button on the touchscreen is released,
the radio will stop at the next available frequency.
Direct Tune
Tu n e d i r e c t l y t o a r a d i o s t a t i o n b y p r e s s i n g t h e “ Tu n e ” b u t t o n o n t h e s c r e e n , a n d e n t e r i n g
the desired station number.
Uconnect 8.4 Radio
1—RadioStationPresets2—TogglePresets1–6and7–123—AudioSettingsButton4—SeekUpButton
5—DirectTuneToARadioStation6—SeekDownButton7—BrowseAndManageStations8—RadioBandButtons
ELECTRONICS
66
Page 71 of 164

Replay Option Option Description
Play/Pause Touch to Pause content playback. Touch Pause/Play again to resumeplayback.
Rewind/RW Rewinds the channel content in steps of five seconds. Touch and hold torewind continuously, then release to begin playing content at that point.
FastForward/FWForwards the content, and works similarly to Rewind/RW. However, FastForward/FW can only be used when content has been previously rewound.
Replay Time Displays the amount of time in the upper center of the screen by whichyour content lags the Live channel.
Live Resumes playback of Live content at any time while replaying rewoundcontent.
MP3 Player/USB/CD/Audio Jack/Bluetooth® Operation
MP3 Player/USB/CD/Audio Jack/Bluetooth® Touchscreen
1—MusicSourceButton4—InfoButton2—RepeatTrackButton5—MusicTrackButton3—ShuffleButton6—BrowseButton
ELECTRONICS
69
Page 72 of 164

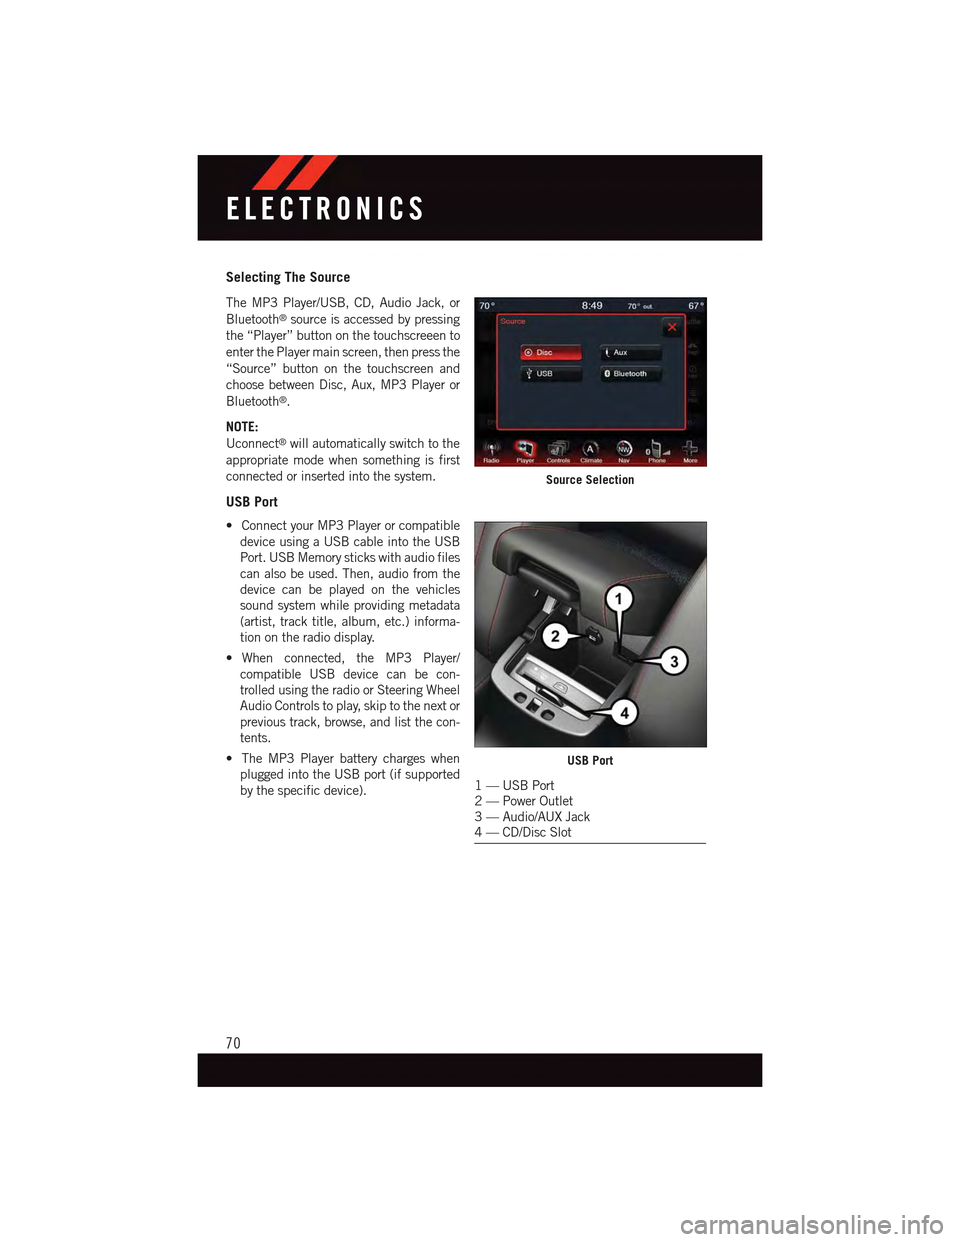
Selecting The Source
The MP3 Player/USB, CD, Audio Jack, or
Bluetooth®source is accessed by pressing
the “Player” button on the touchscreeen to
enter the Player main screen, then press the
“Source” button on the touchscreen and
choose between Disc, Aux, MP3 Player or
Bluetooth®.
NOTE:
Uconnect®will automatically switch to the
appropriate mode when something is first
connected or inserted into the system.
USB Port
•ConnectyourMP3Playerorcompatible
device using a USB cable into the USB
Port. USB Memory sticks with audio files
can also be used. Then, audio from the
device can be played on the vehicles
sound system while providing metadata
(artist, track title, album, etc.) informa-
tion on the radio display.
•When connected, the MP3 Player/
compatible USB device can be con-
trolled using the radio or Steering Wheel
Audio Controls to play, skip to the next or
previous track, browse, and list the con-
tents.
•TheMP3Playerbatterychargeswhen
plugged into the USB port (if supported
by the specific device).
Source Selection
USB Port
1—USBPort2—PowerOutlet3—Audio/AUXJack4—CD/DiscSlot
ELECTRONICS
70
Page 73 of 164

•Toroutetheaudiocableoutofthecenterconsole,usetheaccesscutoutontheright
side of the console.
NOTE:
When connecting your MP3 Player device
for the first time, the system may take
several minutes to read your music, de-
pending on the number of files. For ex-
ample, the system will take approximately
five minutes for every 1000 songs loaded
on the device. Also during the reading pro-
cess, the Shuffle and Browse functions will
be disabled. This process is needed to en-
sure the full use of your MP3 Player fea-
tures and only happens the first time it is
connected. After the first time, the reading
process of your MP3 Player will take con-
siderably less time unless changes are
made or new songs are added to the play-
list.
•TheUSBportsupportscertainMini,Classic,Nano,Touch,andiPhone®devices. The
USB port also supports playing music from compatible external USB Mass Storage
Class memory devices. Some iPod®software versions may not fully support the USB
port features. Please visit Apple’s website for iPod®software updates.
Audio Jack
The Audio Jack allows a portable device, such as an MP3 player or an iPod®to be plugged
into the radio and utilize the vehicle’s sound system, using a standard 3.5 mm audio
cable, to amplify the source and play through the vehicle speakers.
Press the “Player” button on the touchscreen on the then choose AUX source will change
the mode to auxiliary device if the Audio Jack is connected, allowing the music from your
portable device to be heard through the vehicle's speakers.
The functions of the portable device are controlled using the device controls. The volume
may be controlled using the radio or portable device.
To r o u t e t h e a u d i o c a b l e o u t o f t h e c e n t e r c o n s o l e , u s e t h e a c c e s s c u t o u t o n t h e r i g h t s i d e
of the console.
USB/MP3/Audio Cable Access
ELECTRONICS
71
Page 74 of 164

Remote CD/Disc Player — If Equipped
The CD/Disc Player is located inside the center console.
With the printed side facing the rear of the car, lift up the protective door and insert the
disc into the disc slot. The radio pulls the disc in automatically. The radio selects the
appropriate mode after the disc is recognized, and starts playing the first track.
The CD/Disc can also be selected by pressing the “Player” button on the touchscreen,
then press the “Source” button on the touchscreen and then press the “Disc” button on
the touchscreen.
NOTE:
•DependingontheCD/Discbeingused,youwillonlybeabletobrowsebyfolder.
•ThereareVoiceCommandsavailablewhileinthismode.RefertotheUconnect®Voice
Command section in this guide.
Bluetooth® Streaming Audio
•IfequippedwithUconnect®Voice Command, your Bluetooth-equipped MP3 Player
devices, cell phones or other media players, may also be able to stream music to your
vehicle's sound system. Your connected device must be Bluetooth-compatible, and
paired with your Uconnect®system (see Uconnect®Phone section or
www.UconnectPhone.com for pairing instructions). You can access the music from
your connected Bluetooth®device by touching the Source soft-key while in Player
mode.
Garmin® Navigation (8.4N Only)
Uconnect®8.4N integrates Garmin’s consumer-friendly navigation into your vehicle.
Garmin Navigation includes Lane Assist and Junction View, Speed Limit information, and
adatabasewithoversixmillionpointsofinterest.
Press the “Nav” button on the touchscreen in the menu bar to access the Navigation
system.
Changing The Navigation Voice Prompt Volume
1. Program a destination.
2. While traveling on your route, press the upper left area of the map screen where your
next turn is displayed.
3. The Navigation system will then repeat the distance to your next turn.
4. While the Navigation system is speaking, use the ON/OFF VOLUME rotary knob to
adjust the volume to a comfortable level. Please note the volume setting for Navigation
Voice Prompt is different than the audio system.
ELECTRONICS
72