2015 DODGE CHARGER radio
[x] Cancel search: radioPage 321 of 638
NOTE:If your vehicle has experienced any damage in
the area where the sensor is located, even if the fascia is
not damaged, the sensor may have become misaligned.
Take your vehicle to an authorized dealer to verify sensor
alignment. Having a sensor that is misaligned will result
in the BSM not operating to specification.
•ParkView® Backup Camera Active Guidelines
Your vehicle may be equipped with the ParkView® Rear
Back Up Camera Active Guidelines that allows you to see
active guidelines over the ParkView Back up camera
display whenever the shift lever is put into REVERSE.
The image will be displayed on the radio touchscreen
display along with a caution note to “check entire sur-
roundings” across the top of the screen. After five sec-
onds, this note will disappear. To make your selection,
press the “ParkView Backup Camera Active Guidelines”
button on the touchscreen, until a check-mark appears
next to setting, indicating that the setting had been
selected. Press the back arrow button on the touchscreen
to return to the previous menu.
•ParkView® Backup Camera Delay
When the vehicle is shifted out of REVERSE (with camera
delay turned OFF), the rear camera mode is exited and
the navigation or audio screen appears again. When the
vehicle is shifted out of REVERSE (with camera delay
turned ON), the rear view image with dynamic grid lines
will be displayed for up to 10 seconds after shifting out of
“REVERSE” unless the forward vehicle speed exceeds
8 mph (12 km/h), the transmission is shifted into
“PARK” or the ignition is switched to the OFF position.
To set the ParkView® Backup Camera Delay press the
“Controls” button on the touchscreen, the “settings”
button on the touchscreen, then the “Safety & Driving
Assistance” button on the touchscreen. Press the
“Parkview Backup Camera Delay” button on the touch-
screen to turn the ParkView® Delay ON or OFF.
4
UNDERSTANDING YOUR INSTRUMENT PANEL 319
Page 326 of 638
NOTE:If the vehicle is programmed 1st Press Of Key Fob
Unlocks “All Doors,” all doors will unlock no matter
which Passive Entry equipped door handle is grasped. If
1st Press Of Key Fob Unlocks “Driver Door” is pro-
grammed, only the driver ’s door will unlock when the
driver ’s door is grasped. With Passive Entry, if 1st Press
Of Key Fob Unlocks “Driver Door” is programmed,
touching the handle more than once will only result in
the driver ’s door opening. If “Driver Door” is selected,
once the driver door is opened, the interior door lock/
unlock switch can be used to unlock all doors (or use
RKE transmitter).
•Passive Entry
This feature allows you to lock and unlock the vehicles
door(s) without having to push the Remote Keyless Entry
(RKE) transmitter LOCK or UNLOCK buttons. To make
your selection, press the “Passive Entry” button on the
touchscreen, until a check-mark appears next to the
setting, showing that the setting has been selected. Press
the back arrow button on the touchscreen to return to the
previous menu. Refer to “Keyless Enter-N-Go™” in
“Things To Know Before Starting Your Vehicle”.
•Personal Settings Linked to Key Fob On/Off — If
Equipped
This feature provides automatic recall of all settings
stored to a memory location (driver ’s seat, exterior
mirrors, steering column position and radio station pre-
sets) to enhance driver mobility when entering and
exiting the vehicle. To make your selection, press the
“Personal Settings Linked to Key Fob” button on the
touchscreen, until a check-mark appears next to setting,
showing that setting has been selected. Press the back
arrow button on the touchscreen to return to the previous
menu, or push the back button on the faceplate.
324 UNDERSTANDING YOUR INSTRUMENT PANEL
Page 328 of 638
•Engine Off Power Delay
When this feature is selected, the power window
switches, radio, Uconnect® Phone system (if equipped),
DVD video system (if equipped), power sunroof (if
equipped), and power outlets will remain active for up to
10 minutes after the ignition is cycled to OFF. Opening
either front door will cancel this feature. To change the
Engine Off Power Delay setting, press the “+” or “-”
button on the touchscreen to select your desired time
interval, and choose from “0 seconds,” “45 seconds,” “5
minutes” or “10 minutes.” Press the back arrow button
on the touchscreen to return to the previous menu.
•Headlight Off Delay
When this feature is selected, the driver can choose to have
the headlights remain on for 0, 30, 60, or 90 seconds when
exiting the vehicle. To change the Headlight Off Delay
status press the “+” or “–” button on the touchscreen to
select your desired time interval. Press the back arrow
button on the touchscreen to return to the previous menu.
Audio
After pressing the “Audio” button on the touchscreen the
following settings will be available.
•Balance/Fade
This feature allows you to adjust the Balance and Fade
settings. Press and drag the speaker icon, use the arrows
to adjust, or tap the ‘C’ icon to readjust to the center. Press
the back arrow button on the touchscreen to return to the
previous menu.
•Equalizer
This feature allows you to adjust the Bass, Mid and Treble
settings. Adjust the settings with the “+” and “–” setting
buttons on the touchscreen or by selecting any point on
326 UNDERSTANDING YOUR INSTRUMENT PANEL
Page 330 of 638
Phone/Bluetooth®
After pressing the “Phone/Bluetooth®” button on the
touchscreen the following settings will be available:
•Paired Phones
This feature shows which phones are paired to the
Phone/Bluetooth® system. For further information, refer
to the Uconnect® Supplement Manual.
•Paired Audio Sources
This feature shows which audio devices are paired to the
Phone/Bluetooth® system. For further information, refer
to the Uconnect® Supplement Manual.
SiriusXM Setup — If Equipped
After pressing the “SiriusXM Setup” button on the touch-
screen, the following settings will be available:
•Channel Skip
SiriusXM can be programmed to designate a group of
channels that are the most desirable to listen to or to
exclude undesirable channels while scanning. To make
your selection, press the “Channel Skip” button on the
touchscreen, select the channels you would like to skip
followed by pressing the back arrow button on the
touchscreen.
•Subscription Information
New vehicle purchasers or lessees will receive a free
limited time subscription to SiriusXM Satellite Radio
with your radio. Following the expiration of the free
services, it will be necessary to access the information on
the Subscription Information screen to re-subscribe.
328 UNDERSTANDING YOUR INSTRUMENT PANEL
Page 331 of 638
Press the “Subscription Info” button on the touchscreen
to access the Subscription Information screen.
Write down the SIRIUS ID numbers for your receiver. To
reactivate your service, either call the number listed on
the screen or visit the provider online.
NOTE:SiriusXM Travel Link is a separate subscription
and is available for U.S. residents only.
Restore Settings
After pressing the “Restore Settings” button on the
touchscreen the following settings will be available:
•Restore Settings
When this feature is selected it will reset the Display,
Clock, Audio, and Radio Settings to their default settings.
To restore the settings to their default setting, press the
Restore Settings button. A pop-up will appear asking
#Are you sure you want to reset your settings to default?”
select “Yes” to restore, or “Cancel” to exit. Once the
settings are restored, a pop up appears stating#settings
reset to default.#Press the okay button on the touchscreen
to exit.
Clear Personal Data
After pressing the “Clear Personal Data Settings” button
on the touchscreen the following settings will be avail-
able:
•Clear Personal Data
When this feature is selected it will remove personal data
including Bluetooth® devices and presets. To remove
personal information, press the “Clear Personal Data”
button and a pop-up will appear asking#Are you sure
you want to clear all personal data?” select “OK” to
Clear, or “Cancel” to exit. Once the data has been cleared,
a pop up appears stating#Personal data cleared”. Press
the back arrow button on the touchscreen to return to the
previous menu.
4
UNDERSTANDING YOUR INSTRUMENT PANEL 329
Page 341 of 638
•Instantaneous Horsepower/Kilowatts
Shows the instantaneous horsepower.
•Instantaneous Torque
Shows the instantaneous torque.
•Oil Pressure
Shows the actual engine oil pressure.
•Gear (Automatic Transmission Only)
Shows the current (or pending) operating gear of the
vehicle.
Performance Control — If Equipped
Your vehicle is equipped with a Performance Control
feature which allows for coordinating the operation of
various vehicle systems depending upon the type of
driving behavior desired. The Performance Control fea-
ture is controlled through the Uconnect® radio and may
be accessed by performing any of the following:
•Pushing the Super Track Pack button on the instru-
ment panel switch bank.
•Selecting “Performance Control” from the “Apps”
menu.
•Selecting “Performance Control” from within the Per-
formance Pages menu.
You will be able to enable, disable, and customize the
functionality of the Launch Control and Drive Mode
Set-Up features within Performance Control.
Descriptions of these features are provided below. To
access information about the functionality of these fea-
tures through the Uconnect® system, press the “Info”
button on the touchscreen.
4
UNDERSTANDING YOUR INSTRUMENT PANEL 339
Page 350 of 638
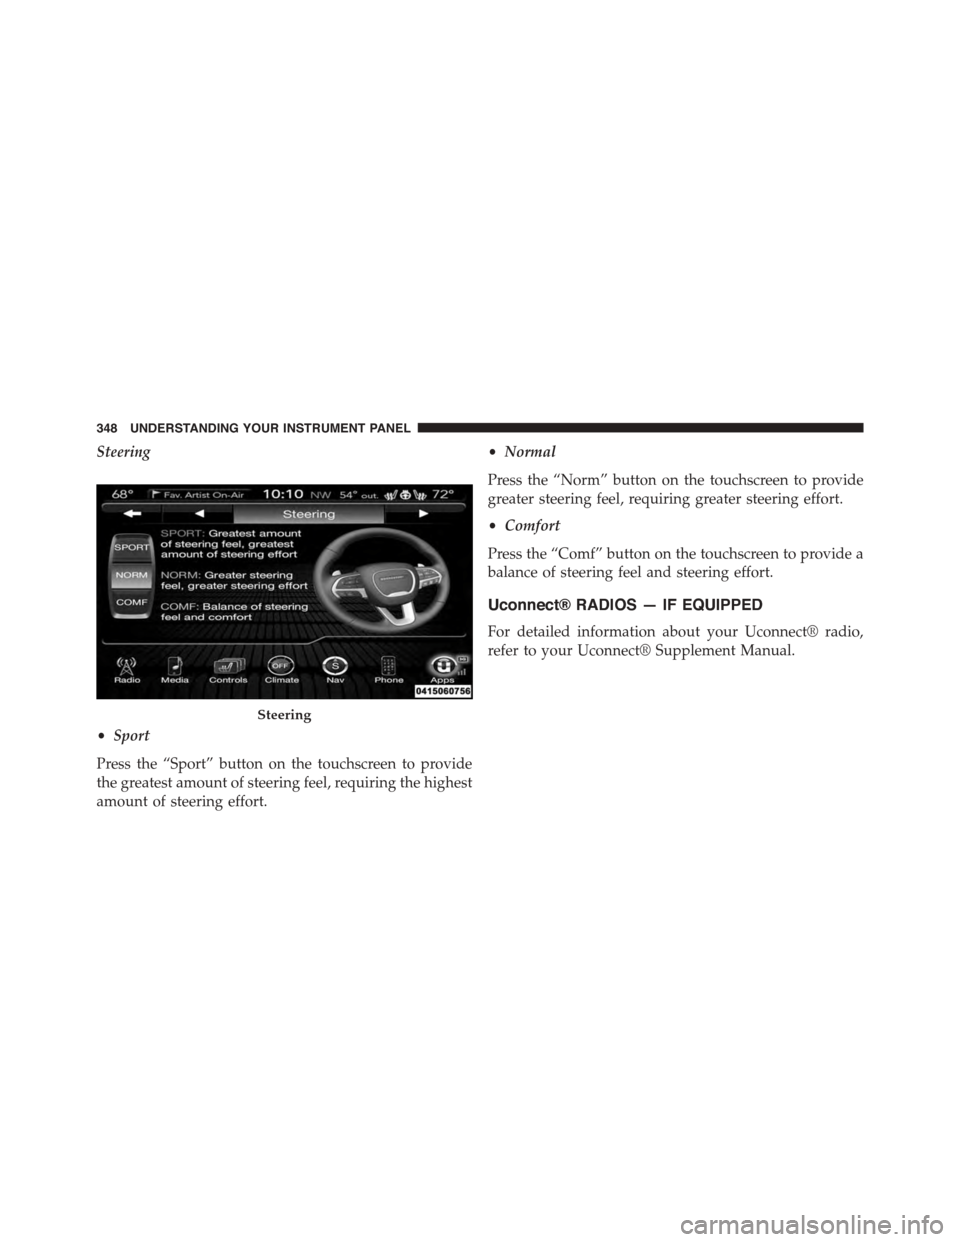
Steering
•Sport
Press the “Sport” button on the touchscreen to provide
the greatest amount of steering feel, requiring the highest
amount of steering effort.
•Normal
Press the “Norm” button on the touchscreen to provide
greater steering feel, requiring greater steering effort.
•Comfort
Press the “Comf” button on the touchscreen to provide a
balance of steering feel and steering effort.
Uconnect® RADIOS — IF EQUIPPED
For detailed information about your Uconnect® radio,
refer to your Uconnect® Supplement Manual.
Steering
348 UNDERSTANDING YOUR INSTRUMENT PANEL
Page 353 of 638
The right-hand control is a rocker-type switch with a
push-button in the center and controls the volume and
mode of the sound system. Pushing the top of the rocker
switch will increase the volume, and pushing the bottom
of the rocker switch will decrease the volume.
Pushing the center button will make the radio switch
between the various modes available (AM/FM/SAT/
AUX, etc.)
The left-hand control is a rocker-type switch with a
push-button in the center. The function of the left-hand
control is different depending on which mode you are in.
The following describes the left-hand control operation in
each mode.
Radio Operation
Pushing the top of the switch will “Seek” up for the next
listenable station and pushing the bottom of the switch
will “Seek” down for the next listenable station.
The button located in the center of the left-hand control
will tune to the next preset station that you have pro-
grammed in the radio preset button.
RADIO OPERATION AND MOBILE PHONES
Under certain conditions, the mobile phone being on in
your vehicle can cause erratic or noisy performance from
your radio. This condition may be lessened or eliminated
by relocating the mobile phone antenna. This condition is
not harmful to the radio. If your radio performance does
not satisfactorily “clear” by the repositioning of the
antenna, it is recommended that the radio volume be
turned down or off during mobile phone operation when
not using Uconnect® (if equipped).
4
UNDERSTANDING YOUR INSTRUMENT PANEL 351