Page 57 of 344

55
C5_en_Chap02_ouverture_ed01-2014
Panoramic sunroof (Saloon)
Sunroof closed
- Press B to first notch: tilting.
- P ress B to second notch: automatic
complete tilting.
-
P
ress A to first notch: sliding towards rear.
-
P
ress A to second notch: automatic total
sliding towards rear.
Sunroof open
- Press B to first notch: closure.
- P ress B to second notch: automatic total
closure.
Operation
Tilted sunroof
- Press A to first notch: closure.
- P ress A to second notch: automatic total
closure.
Your sun roof is fitted with a manually-operated
blind.
Anti-pinch
An anti-pinch device stops the sun roof from
closing, whether sliding or tilting. If it meets an
obstacle, it re-opens.
Reinitialisation
After a battery disconnection or if there has
been a malfunction, you have to re-initialise the
anti-pinch function.
F
m
ove control B until the roof is in the
complete tilting position,
F
k
eep control B pressed down for a
minimum of 1 second.
During these operations, the anti-pinch
function does not operate .
Always remove the ignition key when
leaving the vehicle, even if for a short
time.
In the event of anything being caught by
the sunroof closing, you must reverse
the roof movement.
Do this by reversing the position of the
control switch.
When the driver is operating the
sunroof, they must always make sure
that the passengers are not preventing
it from closing properly.
The driver must ensure that passengers
use the sunroof control correctly.
Pay special attention to where children
are when operating the sun oof.
The fitting of a sunroof as an accessory
is prohibited.
2
Access
Page 58 of 344
56
C5_en_Chap02_ouverture_ed01-2014
Panoramic sunroof (Tourer)
This comprises a tinted glass panoramic
area 1 to improve brightness and vision in the
passenger compartment.
It is fitted with an electric blind 2 to help
maintain a comfortable temperature and
reduce noise.Opening
F Press control A.
Pressing to the 1st notch allows you to open
the blind step by step.
Pressing to the 2nd notch allows you to fully
open the blind.
The blind stops in the closest pre-defined
position (11 positions) as soon as you release
the control.
Closing
F Press control B .
Press to the first notch to close the blind step
by step.
Press to the second notch to close the blind
completely.
The blind stops at the nearest pre-set position
(11 positions) as soon as you release the
control.
Sequential electric blind
access
Page 59 of 344

57
C5_en_Chap02_ouverture_ed01-2014
Anti-pinch
If the blind meets an obstacle whilst closing, it
stops and opens partially again.
You must re-initialise the anti-pinch function
within 5 seconds of the blind stopping:
F
p
ress control B until the blind is fully closed
(closing in steps of a few centimetres).
After a battery disconnection, or if there has
been a malfunction, you have to re-initialise the
anti-pinch function:
F
p
ress control B to the 2nd notch (fully
closed),
F
w
ait until the blind is fully closed,
F
p
ress control B for at least 3 seconds.
If the blind opens randomly during a closing
operation, and straight after the blind stops:
F
P
ress control B until the blind closes fully.
During these operations, the anti-pinch
function does not operate. In the event of anything being caught
when the blind is moving, you must
reverse the movement of the blind.
To do so, reverse the position of the
control.
When the driver is operating the blind,
he or she must always make sure that
the passengers are not preventing it
from closing properly.
The driver must ensure that passengers
use the blind correctly.
Pay particular attention to children
when operating the blind.
2
Access
Page 60 of 344

58
C5_en_Chap03_ergo-et-confort_ed01-2014
Front seats
Manual adjustments
1. Adjustments to the height and angle of the head restraint
T
o raise it, pull upwards.
T
o lower it, press on the release button A
and simultaneously on the head restraint
itself. The adjustment is correct when the
top edge of the head restraint is at the
same height as the top of the head. It is
also tilt adjustable.
T
o remove it, press the release button A ,
then pull it upwards. It may be necessary to
adjust the backrest angle.
2.
A
djustment of the backrest angle
O
perate the control and adjust the position
of the backrest to the front or to the rear.
3.
A
djustment of the seat height
R
aise or lower the control the number
of times required to obtain the desired
position.
4.
L
ongitudinal adjustment of seat
L
ift the control bar and adjust to the desired
position.
5.
A
djustment of lumbar support
T
urn the control and adjust to the desired
position.
6.
H
eated seat controls
T
he heated seats only operate when the
engine is running.
Seat consisting of a seat cushion, seat back and head restraint which can all be adjusted for optimum driving comfort.
For your safety, do not drive with the
head restraints removed; they must be
in place and correctly adjusted.Before moving the seat backwards,
ensure that there is nothing that might
prevent the full travel of the seat, so
as to avoid the risk of of jamming the
seat caused by the presence of objects
on the floor behind the seat or rear
passengers. If the seat jams, stop the
movement immediately.
Ease of use and comfort
Page 61 of 344

59
C5_en_Chap03_ergo-et-confort_ed01-2014
Electric adjustments
To adjust the electric seats, switch on the
ignition or start the engine if the vehicle has
gone into economy mode.
Seat adjustments are also possible for a short
period after opening one of the front doors or
switching off the ignition.
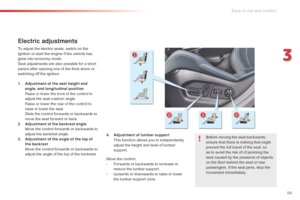
1.
A
djustment of the seat height and
angle, and longitudinal position
R
aise or lower the front of the control to
adjust the seat cushion angle.
R
aise or lower the rear of the control to
raise or lower the seat.
S
lide the control for wards or backwards to
move the seat for ward or back.
2.
A
djustment of the backrest angle
M
ove the control for wards or backwards to
adjust the backrest angle.
3.
A
djustment of the angle of the top of
the backrest
M
ove the control for wards or backwards to
adjust the angle of the top of the backrest. Before moving the seat backwards,
ensure that there is nothing that might
prevent the full travel of the seat, so
as to avoid the risk of of jamming the
seat caused by the presence of objects
on the floor behind the seat or rear
passengers. If the seat jams, stop the
movement immediately.
Move the control:
-
F
or wards or backwards to increase or
reduce the lumbar support.
-
U
pwards or downwards to raise or lower
the lumbar support zone.
4.
A
djustment of lumbar support
T
his function allows you to independently
adjust the height and level of lumbar
support.
3
Ease of use and comfort
Page 62 of 344

60
C5_en_Chap03_ergo-et-confort_ed01-2014
Head restraint height and
angle adjustments on
electric seats
F To adjust the angle of the head restraint, push back or pull for ward section C of the
head restraint until you reach the desired
position.
F
T
o raise it, pull upwards.
F
T
o lower it, press on the control D to unlock
it, and simultaneously on the head restraint
itself.
F
T
o remove it, press on the control D
to
unlock it, then pull it upwards.
Heated seats control
With the engine running, the front seats can
operate separately.
F
U
se the corresponding adjustment dial,
placed on the outer side of each front seat,
to switch on and select the level of heating
required:
0: Off.
1 : Low.
2 : Medium.
3 : High. This function provides the driver with a back
massage. It only operates when the engine is
running.
F
P
ress on button A.
The warning lamp comes on and the massage
function is activated for a period of 1 hour.
During this time, massage is per formed in
cycles of 6
minutes (4 minutes of massage
followed by 2 minutes break). In total, the
system will per form 10 cycles.
After 1 hour, the function is deactivated.
The
warning lamp goes out.
Massage function
Deactivation
You can deactivate the massage function at
any time by pressing on button A.
Ease of use and comfort
Page 63 of 344

61
C5_en_Chap03_ergo-et-confort_ed01-2014
Storing driving positions
System which stores the settings of the driver's
seat. Up to two positions can be stored using
the buttons on the side of the driver's seat.
When storing a driving position, the air
conditioning settings are also memorised.
Storing a position
Using buttons M / 1 / 2
F Switch on the ignition.
F A djust your seat.
F
P
ress button M , then press button 1 or 2
within four seconds.
A
n audible signal confirms that the settings
have been stored.
Storing a new position cancels the previous
position.
Welcome function
The welcome function assists entry and leaving
the vehicle.
After switching off the ignition and opening
the driver’s door, the seat moves back
automatically and then stays in this position,
ready for the next entry to the vehicle.
When switching on the ignition, the seat moves
for ward to the memorised driving position.
When moving the seat, take care that no
person or object hinders the automatic
movement of the seat.
This function is deactivated by default. You may
activate or deactivate this function using the
"Main Menu" on the instrument panel screen.
To do so, select " Vehicle parameters/Comfort /
Driver welcome".
To adjust the air conditioning, refer to
the "Air conditioning" section.For your safety, avoid storing a driving
position while driving.
Recalling a stored position
Ignition on or engine running
F briefly press button 1 or 2 to recall the
corresponding position.
A
n audible signal indicates the end of the
adjustment.
When the ignition is on, after a few consecutive
position recalls, the function will be deactivated
until the engine is started, to prevent
discharging of the battery.
3
Ease of use and comfort
Page 64 of 344
62
C5_en_Chap03_ergo-et-confort_ed01-2014
Steering wheel adjustment
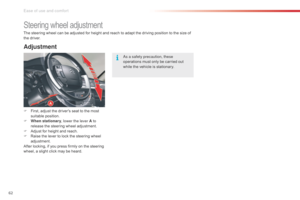
F First, adjust the driver's seat to the most suitable position.
F
W
hen stationary , lower the lever A to
release the steering wheel adjustment.
F
A
djust for height and reach.
F
R
aise the lever to lock the steering wheel
adjustment.
After locking, if you press firmly on the steering
wheel, a slight click may be heard. The steering wheel can be adjusted for height and reach to adapt the driving position to the size of
the driver.
Adjustment
as a safety precaution, these
operations must only be carried out
while the vehicle is stationary.
Ease of use and comfort