Page 451 of 726
NOTE:If you experience difficulty in playing a particular
disc, it may be damaged (i.e., scratched, reflective coating
removed, a hair, moisture or dew on the disc) oversized,
or have protection encoding. Try a known good disc
before considering disc player service.
RADIO OPERATION AND MOBILE PHONES
Under certain conditions, the mobile phone being on in
your vehicle can cause erratic or noisy performance from
your radio. This condition may be lessened or eliminated
by relocating the mobile phone antenna. This condition is
not harmful to the radio. If your radio performance does
not satisfactorily “clear” by the repositioning of the
antenna, it is recommended that the radio volume be
turned down or off during mobile phone operation when
not using Uconnect® (if equipped).
General Information
This device complies with Part 15 of the FCC rules and
RSS 210 of Industry Canada. Operation is subject to the
following conditions:
•Changes or modifications not expressly approved by
the party responsible for compliance could void the
user’s authority to operate the equipment.
•This device may not cause harmful interference.
•This device must accept any interference received,
including interference that may cause undesired op-
eration.
CLIMATE CONTROLS
The Climate Control system allows you to regulate the
temperature, amount, and direction of air circulating
throughout the vehicle. The controls are located on the
instrument panel, below the radio.
4
UNDERSTANDING YOUR INSTRUMENT PANEL 449
Page 452 of 726
Manual Heating And Air Conditioning System —
If Equipped
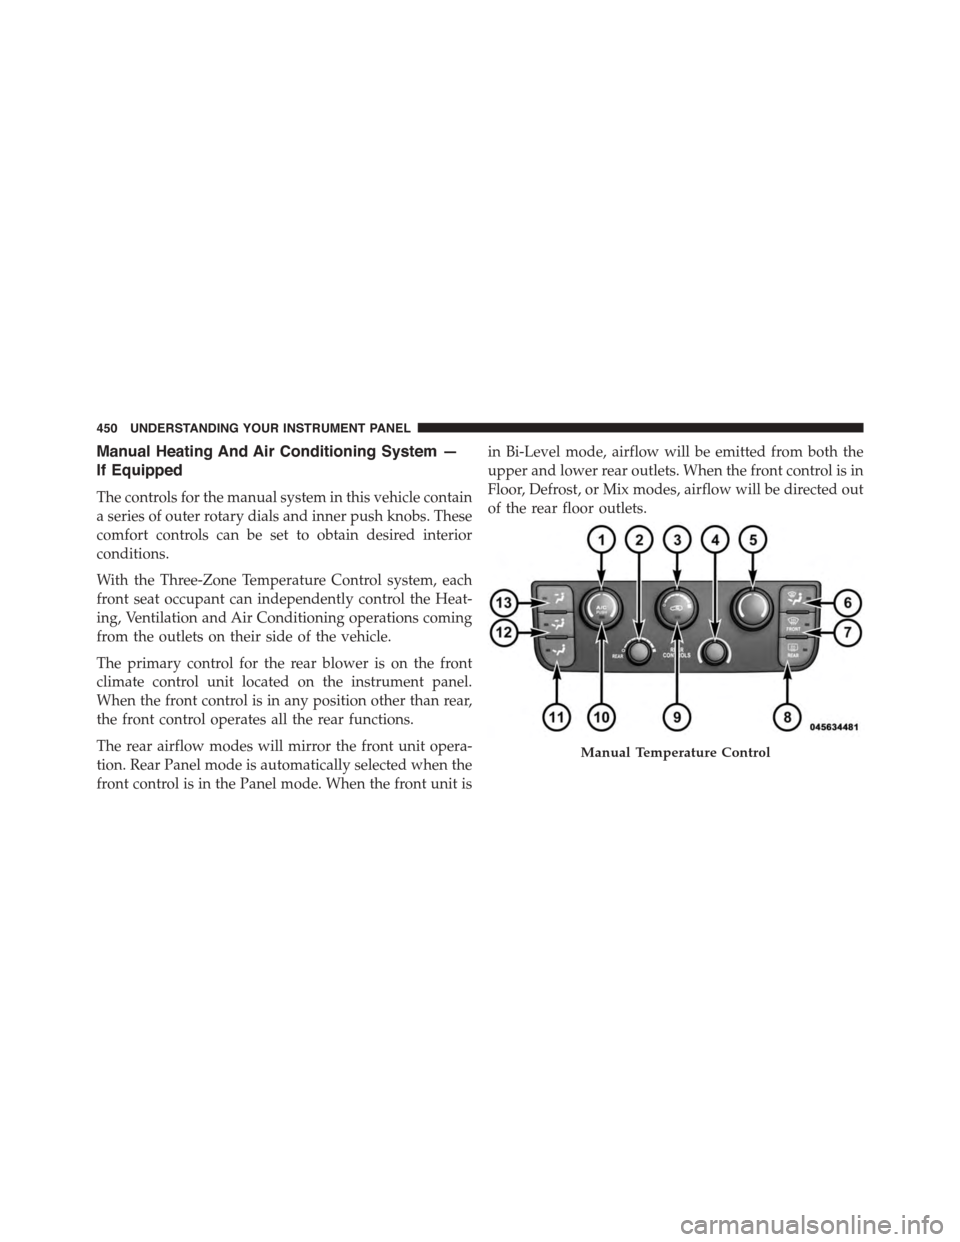
The controls for the manual system in this vehicle contain
a series of outer rotary dials and inner push knobs. These
comfort controls can be set to obtain desired interior
conditions.
With the Three-Zone Temperature Control system, each
front seat occupant can independently control the Heat-
ing, Ventilation and Air Conditioning operations coming
from the outlets on their side of the vehicle.
The primary control for the rear blower is on the front
climate control unit located on the instrument panel.
When the front control is in any position other than rear,
the front control operates all the rear functions.
The rear airflow modes will mirror the front unit opera-
tion. Rear Panel mode is automatically selected when the
front control is in the Panel mode. When the front unit is
in Bi-Level mode, airflow will be emitted from both the
upper and lower rear outlets. When the front control is in
Floor, Defrost, or Mix modes, airflow will be directed out
of the rear floor outlets.
Manual Temperature Control
450 UNDERSTANDING YOUR INSTRUMENT PANEL
Page 457 of 726
Economy Mode
If ECONOMY mode is desired, push the A/C button to
turn off the indicator light and the A/C compressor.
Rotate the temperature control knob to the desired tem-
perature. Also, make sure to select only Panel, Bi-Level or
Floor modes.
Max A/C
For maximum cooling use the A/C and Recirculation
mode buttons at the same time.
Rear Manual Climate Control — If Equipped
The Rear Manual Climate Control system has floor air
outlets at the rear of the right side sliding door, and
overhead outlets at each outboard rear seating position.
The unit provides warm or cool air through the floor and
upper outlets.
The rear blower and temperature controls for the rear
seat passengers are located in the headliner, near the
center of the vehicle.
Rear Manual Climate Controls
1—RearBlower3—RearMode2 — Rear Temperature4 — Rear Climate Control Lock
4
UNDERSTANDING YOUR INSTRUMENT PANEL 455
Page 461 of 726
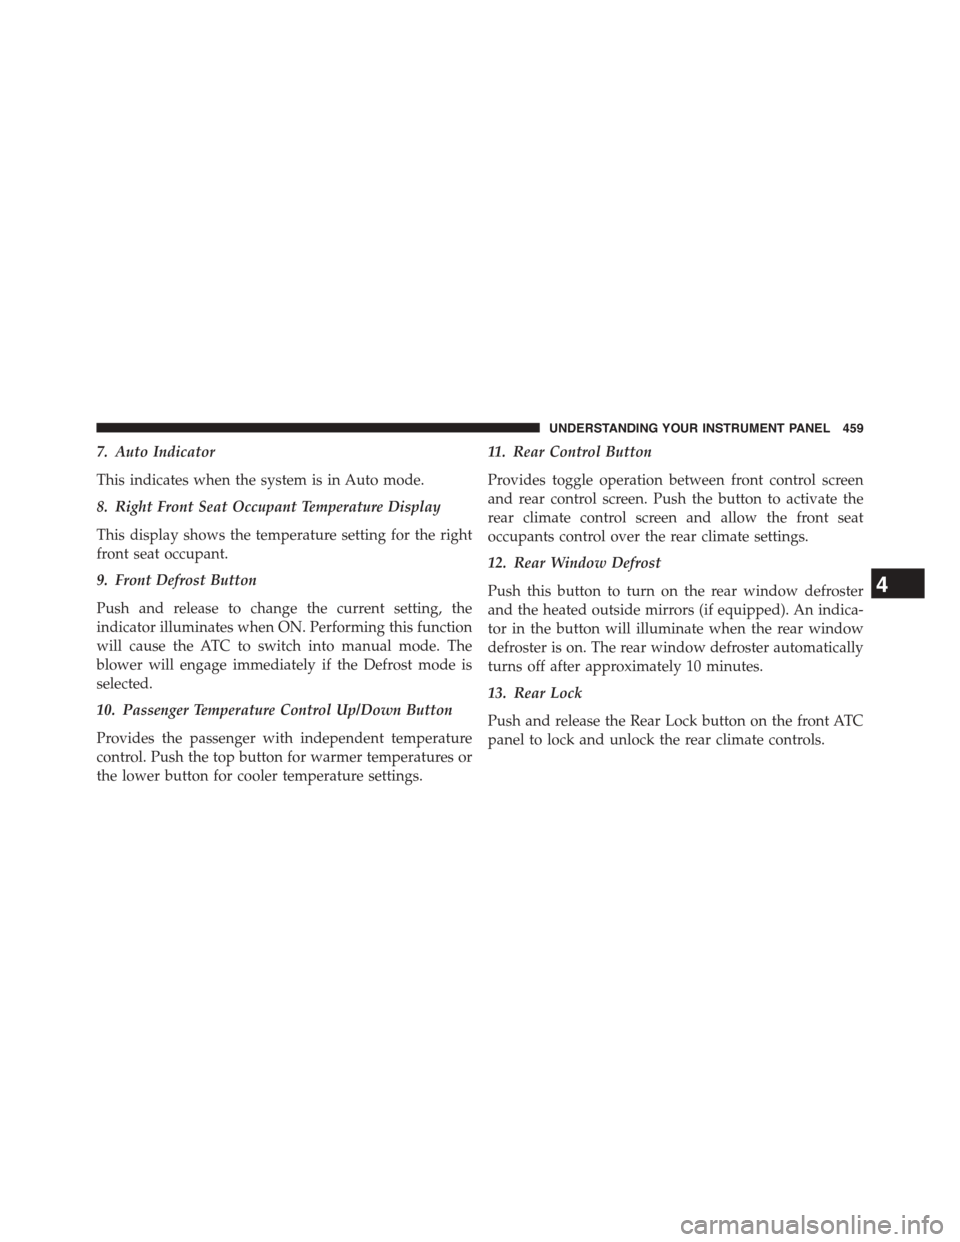
7. Auto Indicator
This indicates when the system is in Auto mode.
8. Right Front Seat Occupant Temperature Display
This display shows the temperature setting for the right
front seat occupant.
9. Front Defrost Button
Push and release to change the current setting, the
indicator illuminates when ON. Performing this function
will cause the ATC to switch into manual mode. The
blower will engage immediately if the Defrost mode is
selected.
10. Passenger Temperature Control Up/Down Button
Provides the passenger with independent temperature
control. Push the top button for warmer temperatures or
the lower button for cooler temperature settings.
11. Rear Control Button
Provides toggle operation between front control screen
and rear control screen. Push the button to activate the
rear climate control screen and allow the front seat
occupants control over the rear climate settings.
12. Rear Window Defrost
Push this button to turn on the rear window defroster
and the heated outside mirrors (if equipped). An indica-
tor in the button will illuminate when the rear window
defroster is on. The rear window defroster automatically
turns off after approximately 10 minutes.
13. Rear Lock
Push and release the Rear Lock button on the front ATC
panel to lock and unlock the rear climate controls.
4
UNDERSTANDING YOUR INSTRUMENT PANEL 459
Page 462 of 726
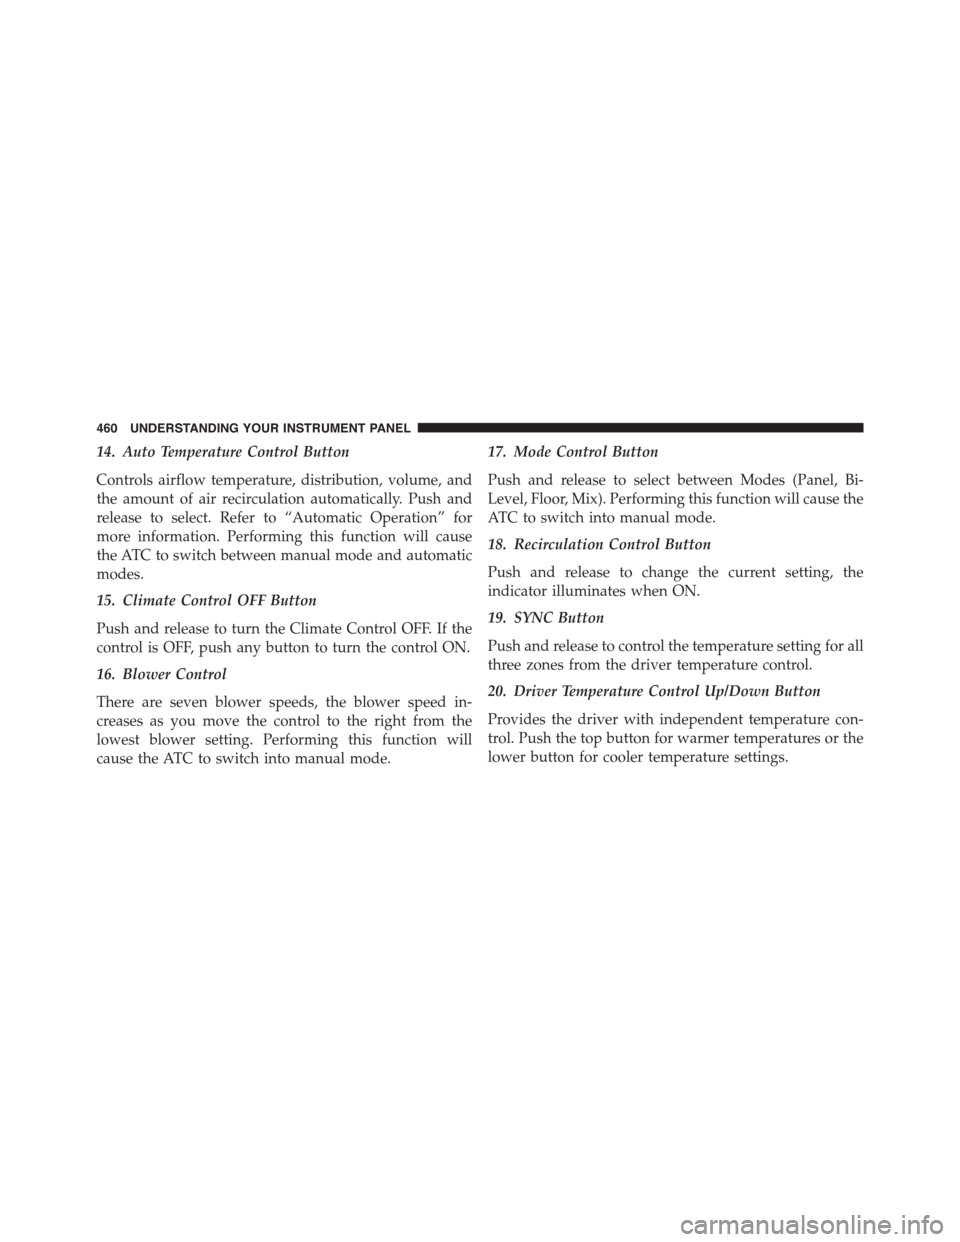
14. Auto Temperature Control Button
Controls airflow temperature, distribution, volume, and
the amount of air recirculation automatically. Push and
release to select. Refer to “Automatic Operation” for
more information. Performing this function will cause
the ATC to switch between manual mode and automatic
modes.
15. Climate Control OFF Button
Push and release to turn the Climate Control OFF. If the
control is OFF, push any button to turn the control ON.
16. Blower Control
There are seven blower speeds, the blower speed in-
creases as you move the control to the right from the
lowest blower setting. Performing this function will
cause the ATC to switch into manual mode.
17. Mode Control Button
Push and release to select between Modes (Panel, Bi-
Level, Floor, Mix). Performing this function will cause the
ATC to switch into manual mode.
18. Recirculation Control Button
Push and release to change the current setting, the
indicator illuminates when ON.
19. SYNC Button
Push and release to control the temperature setting for all
three zones from the driver temperature control.
20. Driver Temperature Control Up/Down Button
Provides the driver with independent temperature con-
trol. Push the top button for warmer temperatures or the
lower button for cooler temperature settings.
460 UNDERSTANDING YOUR INSTRUMENT PANEL
Page 465 of 726
NOTE:
•It is not necessary to move the temperature settings.
The system automatically adjusts the temperature,
mode and fan speed to provide comfort as quickly as
possible.
•The temperature can be displayed in English or Metric
units by selecting the “Display Units of Measure in”
customer-programmable feature. Refer to the “Elec-
tronic Vehicle Information Center (EVIC) — Customer-
Programmable Features” in this Section.
To provide you with maximum comfort in the automatic
mode, during cold start-ups, the blower fan will remain
on low until the engine warms up. The fan will engage
immediately if the Defrost mode is selected, or by chang-
ing the front blower knob setting.
Manual Operation Override
This system offers a full complement of manual override
features. The AUTO symbol in the front ATC display will
be turned off when the system is being used in the
manual mode.
Controlling The Rear Climate Controls From The
Front ATC Panel
The Three-Zone ATC system allows for adjustment of the
rear climate controls from the front ATC panel.
To change the rear system settings:
•Push#REAR#button to change control to rear control
mode, Rear display (below) will appear. Control func-
tions now operate rear system.
4
UNDERSTANDING YOUR INSTRUMENT PANEL 463
Page 472 of 726
Vacation/Storage
Before you store your vehicle, or keep it out of service
(i.e., vacation) for two weeks or more, run the air
conditioning system at idle for about five minutes, in
fresh air with the blower setting on high. This will ensure
adequate system lubrication to minimize the possibility
of compressor damage when the system is started again.
Window Fogging
Vehicle windows tend to fog on the inside in mild, rainy
and/or humid weather. To clear the windows, select
Defrost or Mix mode and increase the front blower speed.
Do not use the Recirculation mode without A/C for long
periods, as fogging may occur.
Outside Air Intake
Make sure the air intake, located directly in front of the
windshield, is free of obstructions such as leaves. Leaves
collected in the air intake may reduce airflow, and if they
enter the plenum, they could plug the water drains. In
Winter months, make sure the air intake is clear of ice,
slush, and snow.
A/C Air Filter
The climate control system filters out dust and pollen
from the air. Refer to “Air Conditioning” in “Maintaining
Your Vehicle” for filter replacement instructions.
470 UNDERSTANDING YOUR INSTRUMENT PANEL
Page 517 of 726
7. Press the “ESC Off” switch (located in the lower
switch bank below the climate controls) four times
within 20 seconds. The “ESC Activation/Malfunction
Indicator Light” should turn on and turn off two
times.
8. Rotate the steering wheel back to center and then an
additional half-turn to the right.
9. Turn the ignition switch to the OFF position and then
back to the ON position. If the sequence was com-
pleted properly, the “ESC Activation/Malfunction In-
dicator Light” will blink several times to confirm HSA
is disabled.
10. Repeat these steps if you want to return this feature
to it’s previous setting.
Towing With HSA
HSA will provide assistance when starting on a grade
when pulling a trailer.
WARNING!
•If you use a trailer brake controller with your
trailer, your trailer brakes may be activated and
deactivated with the brake switch. If so, when the
brake pedal is released, there may not be enough
brake pressure to hold the vehicle and trailer on a
hill and this could cause a collision with another
vehicle or object behind you. In order to avoid
rolling down the hill while resuming acceleration,
manually activate the trailer brake prior to releas-
ing the brake pedal. Always remember the driver is
responsible for braking the vehicle.
(Continued)
5
STARTING AND OPERATING 515