2015 CHEVROLET CRUZE parking brake
[x] Cancel search: parking brakePage 288 of 417
Black plate (29,1)Chevrolet Cruze Owner Manual (GMNA-Localizing-U.S./Canada-7707493) -
2015 - crc - 11/24/14
Vehicle Care 10-29
Vehicle Storage
{Warning
Batteries have acid that can burn
you and gas that can explode.
You can be badly hurt if you are
not careful. SeeJump Starting on
page 10-82 for tips on working
around a battery without
getting hurt.
Infrequent Usage: Remove the
black, negative (−) cable from the
battery to keep the battery from
running down.
Extended Storage: Remove the
black, negative (−) cable from the
battery or use a battery trickle
charger.
Starter Switch Check
{Warning
When you are doing this
inspection, the vehicle could
move suddenly. If the vehicle
moves, you or others could be
injured.
1. Before starting this check, be sure there is enough room
around the vehicle.
2. Apply both the parking brake and the regular brake.
Do not use the accelerator
pedal, and be ready to turn off
the engine immediately if it
starts. 3. For automatic transmission
vehicles, try to start the engine
in each gear. The vehicle should
start only in P (Park) or
N (Neutral). If the vehicle starts
in any other position, contact
your dealer for service.
For manual transmission
vehicles, put the shift lever in
Neutral, push the clutch pedal
down halfway, and try to start
the engine. The vehicle should
start only when the clutch pedal
is pushed down all the way to
the floor. If the vehicle starts
when the clutch pedal is not
pushed all the way down,
contact your dealer for service.
Page 289 of 417
Black plate (30,1)Chevrolet Cruze Owner Manual (GMNA-Localizing-U.S./Canada-7707493) -
2015 - crc - 11/24/14
10-30 Vehicle Care
Automatic Transmission
Shift Lock Control
Function Check
{Warning
When you are doing this
inspection, the vehicle could
move suddenly. If the vehicle
moves, you or others could be
injured.
1. Before starting this check, be sure there is enough room
around the vehicle. It should be
parked on a level surface.
2. Apply the parking brake. Be ready to apply the regular brake
immediately if the vehicle begins
to move.
3. With the engine off, turn the ignition on, but do not start the
engine. Without applying the
regular brake, try to move the
shift lever out of P (Park) with normal effort. If the shift lever
moves out of P (Park), contact
your dealer for service.
Ignition Transmission
Lock Check
If equipped with a key type ignition,
while parked and with the parking
brake set, try to turn the ignition to
LOCK/OFF in each shift lever
position.
.The ignition should turn to
LOCK/OFF only when the shift
lever is in P (Park).
.The ignition key should come
out only in LOCK/OFF.
Contact your dealer if service is
required.
Park Brake and P (Park)
Mechanism Check
{Warning
When you are doing this check,
the vehicle could begin to move.
You or others could be injured
and property could be damaged.
Make sure there is room in front
of the vehicle in case it begins to
roll. Be ready to apply the regular
brake at once should the vehicle
begin to move.
Park on a fairly steep hill, with the
vehicle facing downhill. Keeping
your foot on the regular brake, set
the parking brake.
.To check the parking brake's
holding ability: With the engine
running and the transmission in
N (Neutral), slowly remove foot
pressure from the regular brake
pedal. Do this until the vehicle is
held by the parking brake only.
Page 290 of 417
Black plate (31,1)Chevrolet Cruze Owner Manual (GMNA-Localizing-U.S./Canada-7707493) -
2015 - crc - 11/24/14
Vehicle Care 10-31
.To check the P (Park)
mechanism's holding ability:
With the engine running, shift to
P (Park). Then release the
parking brake followed by the
regular brake.
Contact your dealer if service is
required.
Wiper Blade Replacement
Windshield wiper blades should be
inspected for wear or cracking. See
Maintenance Schedule on
page 11-2 for more information.
Replacement blades come in
different types and are removed in
different ways. For proper
windshield wiper blade length and
type, see Maintenance
Replacement Parts on page 11-13.
{Caution
Allowing the wiper arm to touch
the windshield when no wiper
blade is installed could damage
the windshield. Any damage that
occurs would not be covered by
the vehicle warranty. Do not allow
the wiper arm to touch the
windshield.
To replace the windshield wiper
blade:
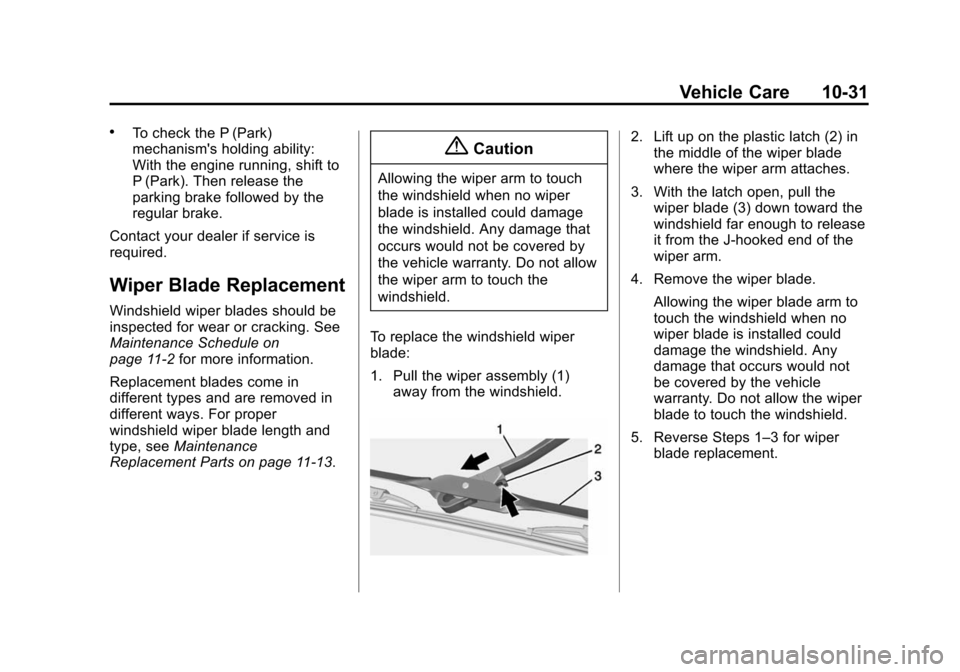
1. Pull the wiper assembly (1) away from the windshield.
2. Lift up on the plastic latch (2) inthe middle of the wiper blade
where the wiper arm attaches.
3. With the latch open, pull the wiper blade (3) down toward the
windshield far enough to release
it from the J-hooked end of the
wiper arm.
4. Remove the wiper blade.
Allowing the wiper blade arm to
touch the windshield when no
wiper blade is installed could
damage the windshield. Any
damage that occurs would not
be covered by the vehicle
warranty. Do not allow the wiper
blade to touch the windshield.
5. Reverse Steps 1–3 for wiper blade replacement.
Page 315 of 417
Black plate (56,1)Chevrolet Cruze Owner Manual (GMNA-Localizing-U.S./Canada-7707493) -
2015 - crc - 11/24/14
10-56 Vehicle Care
relearn tool, in the following order:
driver side front tire, passenger side
front tire, passenger side rear tire,
and driver side rear. See your
dealer for service or to purchase a
relearn tool. A TPMS relearn tool
can also be purchased. See Tire
Pressure Monitor Sensor Activation
Tool at
www.gmtoolsandequipment.com or
call 1-800-GM TOOLS
(1-800-468-6657).
There are two minutes to match the
first tire/wheel position, and
five minutes overall to match all four
tire/wheel positions. If it takes
longer, the matching process stops
and must be restarted.
The TPMS sensor matching
process is:
1. Set the parking brake.
2. Turn the ignition to ON/RUN withthe engine off. 3. Use the MENU button to select
the Vehicle Information menu in
the Driver Information
Center (DIC).
4. Use the thumbwheel to scroll to the Tire Pressure Menu item
screen.
5. Press the SET/CLR button to begin the sensor matching
process.
A message requesting
acceptance of the process
should display.
6. Press the SET/CLR button again to confirm the selection.
The horn sounds twice to signal
the receiver is in relearn mode
and the TIRE LEARNING
ACTIVE message displays on
the DIC screen.
7. Start with the driver side front tire.
8. Place the relearn tool against the tire sidewall, near the valve
stem. Then press the button to
activate the TPMS sensor. A horn chirp confirms that the
sensor identification code has
been matched to this tire and
wheel position.
9. Proceed to the passenger side front tire, and repeat the
procedure in Step 8.
10. Proceed to the passenger side rear tire, and repeat the
procedure in Step 8.
11. Proceed to the driver side rear tire, and repeat the procedure
in Step 8. The horn sounds two
times to indicate the sensor
identification code has been
matched to the driver side rear
tire, and the TPMS sensor
matching process is no longer
active. The TIRE LEARNING
ACTIVE message on the DIC
display screen goes off.
12. Turn the ignition to LOCK/OFF.
13. Set all four tires to the recommended air pressure
level as indicated on the Tire
and Loading Information label.
Page 318 of 417
Black plate (59,1)Chevrolet Cruze Owner Manual (GMNA-Localizing-U.S./Canada-7707493) -
2015 - crc - 11/24/14
Vehicle Care 10-59
equipped, be replaced after six
years, regardless of tread wear. The
tire manufacture date is the last four
digits of the DOT Tire Identification
Number (TIN) which is molded into
one side of the tire sidewall. The
first two digits represent the week
(01–52) and the last two digits, the
year. For example, the third week of
the year 2010 would have a
four-digit DOT date of 0310.
Vehicle Storage
Tires age when stored normally
mounted on a parked vehicle. Park
a vehicle that will be stored for at
least a month in a cool, dry, clean
area away from direct sunlight to
slow aging. This area should be free
of grease, gasoline, or other
substances that can deteriorate
rubber.
Parking for an extended period can
cause flat spots on the tires that
may result in vibrations while
driving. When storing a vehicle forat least a month, remove the tires or
raise the vehicle to reduce the
weight from the tires.
Buying New Tires
GM has developed and matched
specific tires for the vehicle. The
original equipment tires installed
were designed to meet General
Motors Tire Performance Criteria
Specification (TPC Spec)
system rating. When
replacement tires are needed,
GM strongly recommends
buying tires with the same TPC
Spec rating.
GM's exclusive TPC Spec
system considers over a dozen
critical specifications that impact
the overall performance of the
vehicle, including brake system
performance, ride and handling,
traction control, and tire
pressure monitoring
performance. GM's TPC Spec
number is molded onto the tire's
sidewall near the tire size. If the
tires have an all-season tread
design, the TPC Spec number
will be followed by MS for mud
and snow. See
Tire Sidewall
Labeling on page 10-45.
GM recommends replacing worn
tires in complete sets of four.
Uniform tread depth on all tires
will help to maintain the
performance of the vehicle.
Braking and handling
performance may be adversely
affected if all the tires are not
replaced at the same time.
If proper rotation and
maintenance have been done,
all four tires should wear out at
about the same time. See Tire
Rotation on page 10-57.
However, if it is necessary to
replace only one axle set of
worn tires, place the new tires
on the rear axle.
Page 324 of 417

Black plate (65,1)Chevrolet Cruze Owner Manual (GMNA-Localizing-U.S./Canada-7707493) -
2015 - crc - 11/24/14
Vehicle Care 10-65
Warning (Continued)
changing a flat tire. If it is used for
anything else, you or others could
be badly injured or killed if the
vehicle slips off the jack. If a jack
is provided with the vehicle, only
use it for changing a flat tire.
If a tire goes flat, avoid further tire
and wheel damage by driving slowly
to a level place, well off the road,
if possible. Turn on the hazard
warning flashers. See Hazard
Warning Flashers on page 6-3.
{Warning
Changing a tire can be
dangerous. The vehicle can slip
off the jack and roll over or fall
causing injury or death. Find a
level place to change the tire. To
help prevent the vehicle from
moving:
(Continued)
Warning (Continued)
1. Set the parking brake firmly.
2. Put an automatictransmission in P (Park) or a
manual transmission in
1 (First) or R (Reverse).
3. Turn off the engine and do not restart while the vehicle
is raised.
4. Do not allow passengers to remain in the vehicle.
5. Place wheel blocks, if equipped, on both sides of
the tire at the opposite
corner of the tire being
changed.
This vehicle may come with a jack,
spare tire, and wheel block(s) or a
tire sealant and compressor kit. To
use the jacking equipment to
change a spare tire safely, follow
the instructions below. Then see
Tire Changing on page 10-74. To use the tire sealant and
compressor kit, see
Tire Sealant
and Compressor Kit on page 10-66.
To use the wheel blocks,
if equipped, lift the wheel block and
lock it into place.
When the vehicle has a flat tire (2),
use the following example as a
guide to assist in the placement of
the wheel blocks (1), if equipped.
Page 342 of 417
Black plate (83,1)Chevrolet Cruze Owner Manual (GMNA-Localizing-U.S./Canada-7707493) -
2015 - crc - 11/24/14
Vehicle Care 10-83
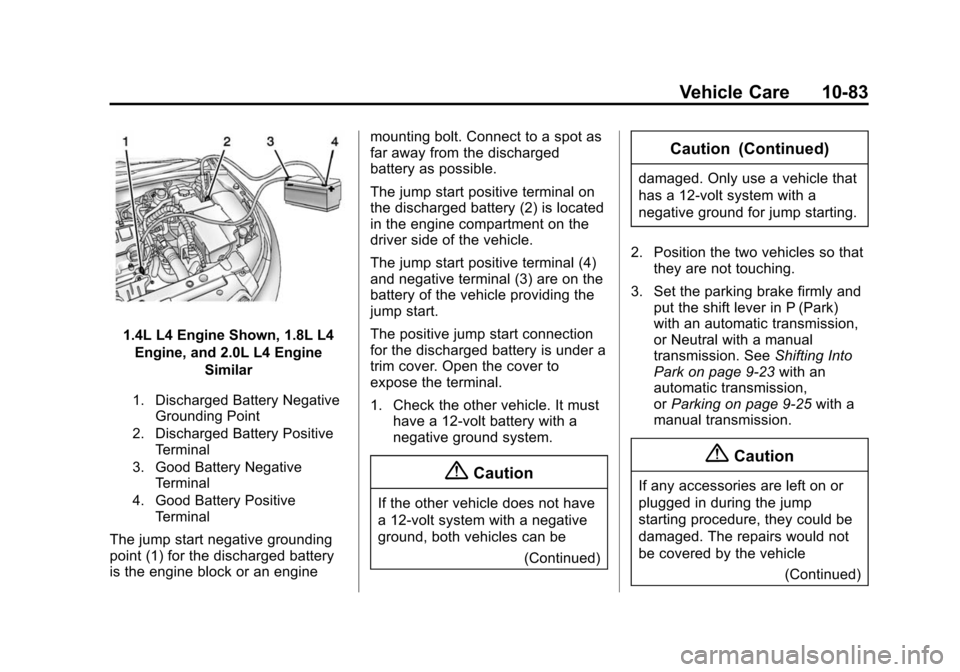
1.4L L4 Engine Shown, 1.8L L4Engine, and 2.0L L4 Engine Similar
1. Discharged Battery NegativeGrounding Point
2. Discharged Battery Positive Terminal
3. Good Battery Negative Terminal
4. Good Battery Positive Terminal
The jump start negative grounding
point (1) for the discharged battery
is the engine block or an engine mounting bolt. Connect to a spot as
far away from the discharged
battery as possible.
The jump start positive terminal on
the discharged battery (2) is located
in the engine compartment on the
driver side of the vehicle.
The jump start positive terminal (4)
and negative terminal (3) are on the
battery of the vehicle providing the
jump start.
The positive jump start connection
for the discharged battery is under a
trim cover. Open the cover to
expose the terminal.
1. Check the other vehicle. It must
have a 12-volt battery with a
negative ground system.
{Caution
If the other vehicle does not have
a 12-volt system with a negative
ground, both vehicles can be
(Continued)
Caution (Continued)
damaged. Only use a vehicle that
has a 12-volt system with a
negative ground for jump starting.
2. Position the two vehicles so that they are not touching.
3. Set the parking brake firmly and put the shift lever in P (Park)
with an automatic transmission,
or Neutral with a manual
transmission. See Shifting Into
Park on page 9-23 with an
automatic transmission,
or Parking on page 9-25 with a
manual transmission.
{Caution
If any accessories are left on or
plugged in during the jump
starting procedure, they could be
damaged. The repairs would not
be covered by the vehicle
(Continued)
Page 346 of 417
Black plate (87,1)Chevrolet Cruze Owner Manual (GMNA-Localizing-U.S./Canada-7707493) -
2015 - crc - 11/24/14
Vehicle Care 10-87
2. Shift the transmission to Neutral.
3. Turn the ignition to ACC/ACCESSORY.
4. To prevent the battery from draining while the vehicle is
being towed, remove fuse 22,
23, 24, and 25 from the
instrument panel fuse block. See
Instrument Panel Fuse Block on
page 10-41.
Remember to reinstall the fuses
once the destination has been
reached.
{Caution
If 105 km/h (65 mph) is exceeded
while towing the vehicle, it could
be damaged. Never exceed
105 km/h (65 mph) while towing
the vehicle.
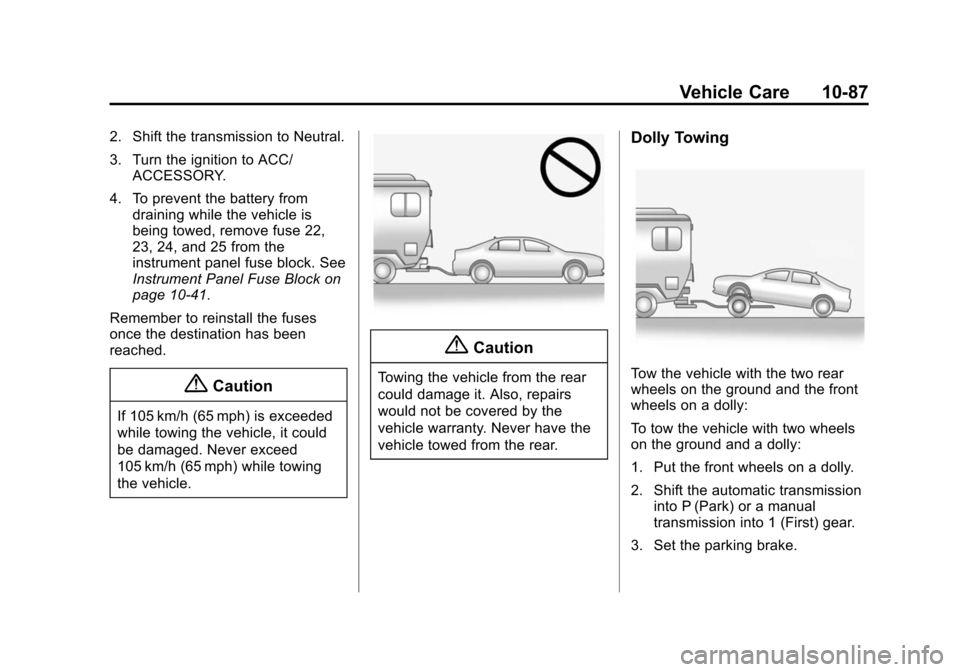
{Caution
Towing the vehicle from the rear
could damage it. Also, repairs
would not be covered by the
vehicle warranty. Never have the
vehicle towed from the rear.
Dolly Towing
Tow the vehicle with the two rear
wheels on the ground and the front
wheels on a dolly:
To tow the vehicle with two wheels
on the ground and a dolly:
1. Put the front wheels on a dolly.
2. Shift the automatic transmission into P (Park) or a manual
transmission into 1 (First) gear.
3. Set the parking brake.