2015 CHEVROLET CORVETTE automatic
[x] Cancel search: automaticPage 275 of 393
Black plate (36,1)Chevrolet Corvette Owner Manual (GMNA-Localizing-U.S./Canada/Mexico-
7576293) - 2015 - crc - 10/31/14
10-36 Vehicle Care
2. Firmly apply both the parkingbrake and the regular brake.
See Electric Parking Brake on
page 9-36.
Do not use the accelerator
pedal, and be ready to turn off
the engine immediately if it
starts.
3. For automatic transmission vehicles, try to start the engine
in each gear. The vehicle should
start only in P (Park) or
N (Neutral). If the vehicle starts
in any other position, contact
your dealer for service.
For manual transmission
vehicles, put the shift lever in
Neutral, push the clutch pedal
down halfway, and try to start
the engine. The vehicle should
start only when the clutch pedal
is pushed down all the way to
the floor. If the vehicle starts
when the clutch pedal is not
pushed all the way down,
contact your dealer for service.Automatic Transmission
Shift Lock Control
Function Check
{Warning
When you are doing this
inspection, the vehicle could
move suddenly. If the vehicle
moves, you or others could be
injured.
1. Before starting this check, be sure there is enough room
around the vehicle. It should be
parked on a level surface.
2. Apply the parking brake. See Electric Parking Brake on
page 9-36.
Be ready to apply the regular
brake immediately if the vehicle
begins to move.
3. With the engine off, turn the ignition on, but do not start the
engine. Without applying the
regular brake, try to move the shift lever out of P (Park) with
normal effort. If the shift lever
moves out of P (Park), contact
your dealer for service.
Park Brake and P (Park)
Mechanism Check
{Warning
When you are doing this check,
the vehicle could begin to move.
You or others could be injured
and property could be damaged.
Make sure there is room in front
of the vehicle in case it begins to
roll. Be ready to apply the regular
brake at once should the vehicle
begin to move.
Park on a fairly steep hill, with the
vehicle facing downhill. Keeping
your foot on the regular brake, set
the parking brake.
.To check the parking brake's
holding ability: With the engine
running and the transmission in
Page 282 of 393
Black plate (43,1)Chevrolet Corvette Owner Manual (GMNA-Localizing-U.S./Canada/Mexico-
7576293) - 2015 - crc - 10/31/14
Vehicle Care 10-43
Micro
Fuses 2-pin Usage
31 Fuel Pump Power Module
32 Exhaust Valve 1
33 Horn
34 Headlamp Washer
35 Air Conditioning Compressor Clutch
36 Engine Outside Position
37 Real Time Damping
38 Intercooler
39 Left Headlamp
40 Right Headlpamp
41 Headlamp Washer Pump
42 Exhaust Valve 2
43 Reverse Lockout Micro
Fuses 2-pin Usage
44 Electric Rear Differential Module
45 Rear Transmission Cooler Fan
46 Transmission Control Module
47 Canister Vent
Micro
Fuses 3-pin Usage
48 Integrated Chassis Control Module/
Automatic
Occupant Sensing
49 Theft/Vehicle Interface Module
50 Engine/ Transmission
51 Instrument Cluster
52 Headlamp High Beam Micro
Fuses 3-pin Usage
53 Transmission Control Module/
Engine Control
Module
Micro
Relays Usage
54 Starter
55 Front Wiper Low/High
56 Run/Crank
57 Front Wiper Motor
58 Headlamp Washer
59 Air Conditioning Control
60 Logistics 1
61 Headlamp Low
Page 285 of 393
Black plate (46,1)Chevrolet Corvette Owner Manual (GMNA-Localizing-U.S./Canada/Mexico-
7576293) - 2015 - crc - 10/31/14
10-46 Vehicle Care
You can remove fuses using the
fuse puller.
The vehicle may not be equipped
with all of the fuses, relays, and
features shown.Fuses Usage
1 Window
2 Driver Power Seat
3 PEPS 2
4 PEPS 1
5 Engine Control
Module
6 Heated Mirrors
7 Body Control
Module 4
8 Rear Window
Defogger
9 GBS
10 Body Control
Module 2
11 Steering Wheel Fuses
Usage
12 Passenger
Power Seat
13 Not Used
14 Outside Rearview
Mirror
15 Body Control
Module 1
16 Body Control
Module 3
17 Sensing Diagnostic
Module/Automatic
Occupant Sensing
18 Logistics 2
19 Body Control
Module 8
20 Integrated Chassis
Control Module
21 Amplifier
22 Rear Accessory
Power Outlet
23 Rear Closure Fuses
Usage
24 Memory Seat
Module/
Convertible Top
25 Theft-Deterrent
PSM
26 Pressure Vent
(Coupe Only)
27 OnStar (If
Equipped)
28 Not Used
29 Not Used
30 Fuel Pump Power
Module
31 Not Used
32 Battery Regulated
Voltage Control
33 Not Used
34 Convertible Top
Solenoid
35 Not Used
Page 293 of 393
Black plate (54,1)Chevrolet Corvette Owner Manual (GMNA-Localizing-U.S./Canada/Mexico-
7576293) - 2015 - crc - 10/31/14
10-54 Vehicle Care
(5) Rim Diameter:Diameter of
the wheel in inches.
(6) Service Description
:These
characters represent the load
index and speed rating of the
tire. The load index represents
the load carrying capacity a tire
is certified to carry. The speed
rating is the maximum speed a
tire is certified to carry a load.
Tire Terminology and
Definitions
Air Pressure:The amount of
air inside the tire pressing
outward on each square inch of
the tire. Air pressure is
expressed in kPa (kilopascal)
or psi (pounds per square inch).
Accessory Weight
:The
combined weight of optional
accessories. Some examples of
optional accessories are automatic transmission, power
windows, power seats, and air
conditioning.
Aspect Ratio
:The relationship
of a tire's height to its width.
Belt
:A rubber coated layer of
cords between the plies and the
tread. Cords may be made from
steel or other reinforcing
materials.
Bead
:The tire bead contains
steel wires wrapped by steel
cords that hold the tire onto
the rim.
Bias Ply Tire
:A pneumatic tire
in which the plies are laid at
alternate angles less than
90 degrees to the centerline of
the tread.
Cold Tire Pressure
:The
amount of air pressure in a tire,
measured in kPa (kilopascal)
or psi (pounds per square inch) before a tire has built up heat
from driving. See
Tire Pressure
on page 10-57.
Curb Weight
:The weight of a
motor vehicle with standard and
optional equipment including the
maximum capacity of fuel, oil,
and coolant, but without
passengers and cargo.
DOT Markings
:A code molded
into the sidewall of a tire
signifying that the tire is in
compliance with the U.S.
Department of Transportation
(DOT) Motor Vehicle Safety
Standards. The DOT code
includes the Tire Identification
Number (TIN), an alphanumeric
designator which can also
identify the tire manufacturer,
production plant, brand, and
date of production.
GVWR
:Gross Vehicle Weight
Rating. See Vehicle Load Limits
on page 9-15.
Page 310 of 393

Black plate (71,1)Chevrolet Corvette Owner Manual (GMNA-Localizing-U.S./Canada/Mexico-
7576293) - 2015 - crc - 10/31/14
Vehicle Care 10-71
The vehicle has no spare tire, no
tire changing equipment, and no
place to store a tire.
If the vehicle has run-flat tires, there
is no need to stop on the side of the
road to change a flat tire. See
Run-Flat Tires on page 10-49.
{Warning
Special tools and procedures are
required to service a run-flat tire.
If these special tools and
procedures are not used, injury or
vehicle damage may occur.
Always be sure the proper tools
and procedures, as described in
the service manual, are used.
If this vehicle does not have run-flat
tires and a tire goes flat, avoid
further tire and wheel damage by
driving slowly to a level place, well
off the road, if possible. Turn on the
hazard warning flashers. See
Hazard Warning Flashers on
page 6-4. 1. Turn on the hazard warning
flashers.
2. Set the parking brake firmly.
3. Put an automatic transmission in P (Park) or a manual
transmission in 1 (First) or
R (Reverse).
4. Turn off the ignition.
5. Inspect the flat tire.
{Warning
Driving on a flat tire will cause
permanent damage to the tire.
Re-inflating a tire after it has been
driven on while severely
underinflated or flat may cause a
blowout and a serious crash.
Never attempt to re-inflate a tire
that has been driven on while
severely underinflated or flat.
Have your dealer or an authorized
tire service center repair or
replace the flat tire as soon as
possible. If this vehicle has a tire sealant kit
and the tire has been separated
from the wheel, has damaged
sidewalls, or has a puncture larger
than 6 mm (0.25 in), the tire is too
severely damaged for the tire
sealant and compressor kit to be
effective. If the tire has a puncture
less than 6 mm (0.25 in) in the tread
area of the tire, see
Tire Sealant
and Compressor Kit on page 10-71.
Tire Sealant and
Compressor Kit
{Warning
Idling a vehicle in an enclosed
area with poor ventilation is
dangerous. Engine exhaust may
enter the vehicle. Engine exhaust
contains carbon monoxide (CO)
which cannot be seen or smelled.
It can cause unconsciousness
and even death. Never run the
engine in an enclosed area that
(Continued)
Page 320 of 393
Black plate (81,1)Chevrolet Corvette Owner Manual (GMNA-Localizing-U.S./Canada/Mexico-
7576293) - 2015 - crc - 10/31/14
Vehicle Care 10-81
The battery is under a battery cover
in the hatch/trunk area on the
passenger side under the carpet.
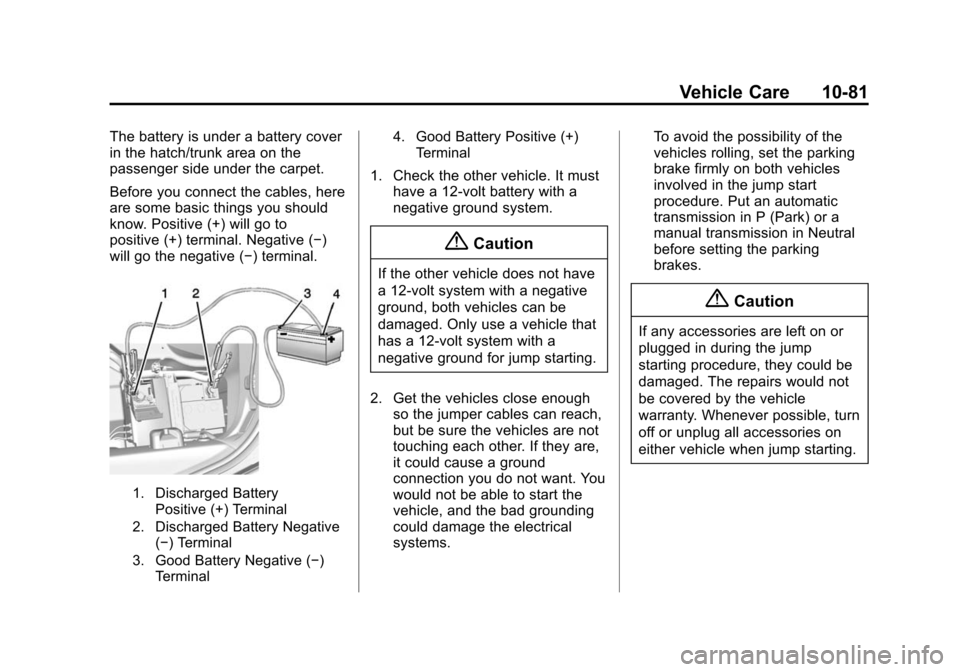
Before you connect the cables, here
are some basic things you should
know. Positive (+) will go to
positive (+) terminal. Negative (−)
will go the negative (−) terminal.
1. Discharged BatteryPositive (+) Terminal
2. Discharged Battery Negative (−) Terminal
3. Good Battery Negative (−) Terminal 4. Good Battery Positive (+)
Terminal
1. Check the other vehicle. It musthave a 12-volt battery with a
negative ground system.
{Caution
If the other vehicle does not have
a 12-volt system with a negative
ground, both vehicles can be
damaged. Only use a vehicle that
has a 12-volt system with a
negative ground for jump starting.
2. Get the vehicles close enough so the jumper cables can reach,
but be sure the vehicles are not
touching each other. If they are,
it could cause a ground
connection you do not want. You
would not be able to start the
vehicle, and the bad grounding
could damage the electrical
systems. To avoid the possibility of the
vehicles rolling, set the parking
brake firmly on both vehicles
involved in the jump start
procedure. Put an automatic
transmission in P (Park) or a
manual transmission in Neutral
before setting the parking
brakes.
{Caution
If any accessories are left on or
plugged in during the jump
starting procedure, they could be
damaged. The repairs would not
be covered by the vehicle
warranty. Whenever possible, turn
off or unplug all accessories on
either vehicle when jump starting.
Page 323 of 393
Black plate (84,1)Chevrolet Corvette Owner Manual (GMNA-Localizing-U.S./Canada/Mexico-
7576293) - 2015 - crc - 10/31/14
10-84 Vehicle Care
Appearance Care
Exterior Care
Locks
Locks are lubricated at the factory.
Use a de-icing agent only when
absolutely necessary, and have the
locks greased after using. See
Recommended Fluids and
Lubricants on page 11-12.
Washing the Vehicle
To preserve the vehicle's finish,
wash it often and out of direct
sunlight.
{Caution
Do not use petroleum-based,
acidic, or abrasive cleaning
agents as they can damage the
vehicle's paint, metal, or plastic
parts. If damage occurs, it would
not be covered by the vehicle
warranty. Approved cleaning(Continued)
Caution (Continued)
products can be obtained from
your dealer. Follow all
manufacturer directions regarding
correct product usage, necessary
safety precautions, and
appropriate disposal of any
vehicle care product.
{Caution
Avoid using high-pressure
washes closer than 30 cm (12 in)
to the surface of the vehicle. Use
of power washers exceeding
8,274 kPa (1,200 psi) can result
in damage or removal of paint
and decals.
The
esymbol is on any
underhood compartment electrical
center that should not be power washed. This could cause damage
that would not be covered by the
vehicle warranty.
If using an automatic car wash,
comply with the car wash
instructions. The windshield wiper
must be off. Remove any
accessories that may be damaged
or interfere with the car wash
equipment.
Rinse the vehicle well, before
washing and after, to remove all
cleaning agents completely. If they
are allowed to dry on the surface,
they could stain.
Dry the finish with a soft, clean
chamois or an all-cotton towel to
avoid surface scratches and water
spotting.
Finish Care
Application of aftermarket clearcoat
sealant/wax materials is not
recommended. If painted surfaces
are damaged, see your dealer to
have the damage assessed and
repaired. Foreign materials such as
Page 325 of 393
Black plate (86,1)Chevrolet Corvette Owner Manual (GMNA-Localizing-U.S./Canada/Mexico-
7576293) - 2015 - crc - 10/31/14
10-86 Vehicle Care
Convertible Top Care
Frequently hand wash convertible
tops with mild car wash soap. Never
use a stiff brush, steam, bleach,
or aggressive cleaners.
If necessary, a soft brush can be
used to remove dirt. When finished
cleaning, thoroughly rinse the fabric.
Avoid automatic car washes with
overhead brushes or very
high-pressure sprays as they can
cause damage and leaking.
Only lower the top when it is
completely dry and avoid leaving
the top lowered for extended
periods of time to prevent excessive
interior weathering.
Avoid leaving large amounts of
snow on the top for extended
periods of time as damage may also
occur.
Carbon Fiber Care
Carbon fiber parts can be washed
and waxed like any other parts. Use
a clear or black pigmented wax. See
Carbon Fiber on page 9-20.
Cleaning Exterior Lamps/
Lenses, Emblems, Decals and
Stripes
Use only lukewarm or cold water, a
soft cloth, and a car washing soap
to clean exterior lamps, lenses,
emblems, decals and stripes. Follow
instructions under "Washing the
Vehicle" previously in this section.
Lamp covers are made of plastic,
and some have a UV protective
coating. Do not clean or wipe them
while they are dry.
Do not use any of the following on
lamp covers:
.Abrasive or caustic agents.
.Washer fluids and other cleaning
agents in higher concentrations
than suggested by the
manufacturer.
.Solvents, alcohols, fuels,
or other harsh cleaners.
.Ice scrapers or other hard items.
.Aftermarket appearance caps or
covers while the lamps are
illuminated, due to excessive
heat generated.
{Caution
Failure to clean lamps properly
can cause damage to the lamp
cover that would not be covered
by the vehicle warranty.
{Caution
Using wax on low gloss black
finish stripes can increase the
gloss level and create a
non-uniform finish. Clean low
gloss stripes with soap and
water only.
Air Intakes
Clear debris from the air intakes,
between the hood and windshield,
when washing the vehicle.