2015 CHEVROLET CAPTIVA SPORT radio
[x] Cancel search: radioPage 201 of 373

Black plate (18,1)Chevrolet Captiva Sport Owner Manual (GMNA-Localizing-U.S./Mexico-
7576028) - 2015 - First Edition - 3/21/14
9-18 Driving and Operating
The radio will function until the
driver door is opened.
Shifting Into Park
To shift into P (Park):
1. Hold the brake pedal down andset the parking brake. See
Parking Brake on page 9-26 for
more information.
2. Move the shift lever into P (Park) by holding in the button on the
shift lever and pushing the lever
all the way toward the front of
the vehicle.
3. Turn the ignition key to LOCK/OFF.
Leaving the Vehicle With the
Engine Running
{Warning
It can be dangerous to leave the
vehicle with the engine running.
It could overheat and catch fire.
(Continued)
Warning (Continued)
It is dangerous to get out of the
vehicle if the shift lever is not fully
in P (Park) with the parking brake
firmly set. The vehicle can roll.
Do not leave the vehicle when the
engine is running. If you have left
the engine running, the vehicle
can move suddenly. You or others
could be injured. To be sure the
vehicle will not move, even when
you are on fairly level ground,
always set the parking brake and
move the shift lever to P (Park).
SeeShifting Into Park on
page 9-18. If you are towing a
trailer, see Driving Characteristics
and Towing Tips on page 9-40.
If you have to leave an automatic
transmission vehicle with the engine
running, be sure the vehicle is in
P (Park) and the parking brake is
firmly set before you leave it. After
you have moved the shift lever into P (Park), hold the brake pedal down.
Then, see if you can move the shift
lever away from P (Park) without
first pushing the button. If you can, it
means that the shift lever was not
fully locked into P (Park).
Torque Lock
If you are parking on a hill and you
do not shift into P (Park) properly,
the weight of the vehicle may put
too much force on the parking pawl
in the transmission. You may find it
difficult to pull the shift lever out of
P (Park). This is called
“torque lock.”
To prevent torque lock, set the
parking brake and then shift into
P (Park) properly before you leave
the driver seat. To find out how, see
Shifting Into Park on page 9-18.
Move the shift lever out of P (Park)
before you release the parking
brake.
If torque lock does occur, you may
need to have another vehicle push
yours a little uphill to take some of
Page 267 of 373
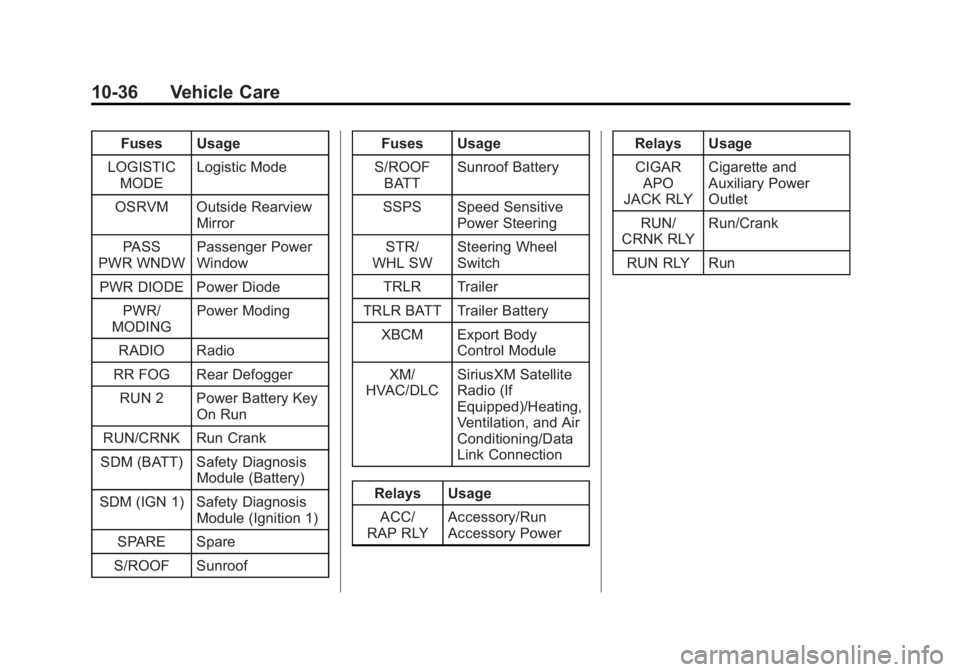
Black plate (36,1)Chevrolet Captiva Sport Owner Manual (GMNA-Localizing-U.S./Mexico-
7576028) - 2015 - First Edition - 3/21/14
10-36 Vehicle Care
Fuses Usage
LOGISTIC MODE Logistic Mode
OSRVM Outside Rearview Mirror
PASS
PWR WNDW Passenger Power
Window
PWR DIODE Power Diode PWR/
MODING Power Moding
RADIO Radio
RR FOG Rear Defogger RUN 2 Power Battery Key On Run
RUN/CRNK Run Crank
SDM (BATT) Safety Diagnosis Module (Battery)
SDM (IGN 1) Safety Diagnosis Module (Ignition 1)
SPARE Spare
S/ROOF Sunroof Fuses Usage
S/ROOF BATT Sunroof Battery
SSPS Speed Sensitive Power Steering
STR/
WHL SW Steering Wheel
Switch
TRLR Trailer
TRLR BATT Trailer Battery XBCM Export Body Control Module
XM/
HVAC/DLC SiriusXM Satellite
Radio (If
Equipped)/Heating,
Ventilation, and Air
Conditioning/Data
Link Connection
Relays Usage ACC/
RAP RLY Accessory/Run
Accessory Power Relays Usage
CIGAR APO
JACK RLY Cigarette and
Auxiliary Power
Outlet
RUN/
CRNK RLY Run/Crank
RUN RLY Run
Page 277 of 373

Black plate (46,1)Chevrolet Captiva Sport Owner Manual (GMNA-Localizing-U.S./Mexico-
7576028) - 2015 - First Edition - 3/21/14
10-46 Vehicle Care
Warning (Continued)
the tires are rated for high-speed
operation, in excellent condition,
and set to the correct cold tire
inflation pressure for the
vehicle load.
Vehicles with P235/55R18 size tires
require inflation pressure adjustment
when driving the vehicle at speeds
of 160 km/h (100 mph) or higher.
Set the cold inflation pressure to the
maximum inflation pressure shown
on the tire sidewall,
or 262 kPa (38 psi), whichever is
lower. See the example following.
Return the tires to the
recommended cold tire inflation
pressure when high-speed driving
has ended. See Vehicle Load Limits
on page 9-10 andTire Pressure on
page 10-44. Example:
The maximum load and inflation
pressure is molded on the tire
sidewall, in small letters, near the
rim flange. It will read something like
this: Maximum load 690 kg
(1521 lbs) 300 kPa (44 psi) Max.
Press.
For this example, set the inflation
pressure for high‐speed driving at
262 kPa (38 psi).
Tire Pressure Monitor
System
The Tire Pressure Monitor System
(TPMS) uses radio and sensor
technology to check tire pressure
levels. The TPMS sensors monitor
the air pressure in your tires and
transmit tire pressure readings to a
receiver located in the vehicle.
Each tire, including the spare (if
provided), should be checked
monthly when cold and inflated to
the inflation pressure recommended
by the vehicle manufacturer on thevehicle placard or tire inflation
pressure label. (If your vehicle has
tires of a different size than the size
indicated on the vehicle placard or
tire inflation pressure label, you
should determine the proper tire
inflation pressure for those tires.)
As an added safety feature, your
vehicle has been equipped with a
tire pressure monitoring system
(TPMS) that illuminates a low tire
pressure telltale when one or more
of your tires is significantly
under-inflated.
Accordingly, when the low tire
pressure telltale illuminates, you
should stop and check your tires as
soon as possible, and inflate them
to the proper pressure. Driving on a
significantly under-inflated tire
causes the tire to overheat and can
lead to tire failure. Under-inflation
also reduces fuel efficiency and tire
tread life, and may affect the
vehicle's handling and stopping
ability.
Page 278 of 373

Black plate (47,1)Chevrolet Captiva Sport Owner Manual (GMNA-Localizing-U.S./Mexico-
7576028) - 2015 - First Edition - 3/21/14
Vehicle Care 10-47
Please note that the TPMS is not a
substitute for proper tire
maintenance, and it is the driver's
responsibility to maintain correct tire
pressure, even if under-inflation has
not reached the level to trigger
illumination of the TPMS low tire
pressure telltale.
Your vehicle has also been
equipped with a TPMS malfunction
indicator to indicate when the
system is not operating properly.
The TPMS malfunction indicator is
combined with the low tire pressure
telltale. When the system detects a
malfunction, the telltale will flash for
approximately one minute and then
remain continuously illuminated.
This sequence will continue upon
subsequent vehicle start-ups as
long as the malfunction exists.
When the malfunction indicator is
illuminated, the system may not be
able to detect or signal low tire
pressure as intended. TPMS
malfunctions may occur for a variety
of reasons, including the installation
of replacement or alternate tires orwheels on the vehicle that prevent
the TPMS from functioning properly.
Always check the TPMS malfunction
telltale after replacing one or more
tires or wheels on your vehicle to
ensure that the replacement or
alternate tires and wheels allow the
TPMS to continue to function
properly.
See
Tire Pressure Monitor
Operation on page 10-47.
See Radio Frequency Statement on
page 13-12.
Tire Pressure Monitor
Operation
This vehicle may have a Tire
Pressure Monitor System (TPMS).
The TPMS is designed to warn the
driver when a low tire pressure
condition exists. TPMS sensors are
mounted onto each tire and wheel
assembly, excluding the spare tire
and wheel assembly. The TPMS
sensors monitor the air pressure in the tires and transmit the tire
pressure readings to a receiver
located in the vehicle.
When a low tire pressure condition
is detected, the TPMS illuminates
the low tire pressure warning light
on the instrument cluster. If the
warning light comes on, stop as
soon as possible and inflate the
tires to the recommended pressure
shown on the tire loading
information label. See
Vehicle Load
Limits on page 9-10.
The low tire pressure warning light
comes on at each ignition cycle until
the tires are inflated to the correct
inflation pressure.
The low tire pressure warning light
may come on in cool weather when
the vehicle is first started, and then
Page 280 of 373

Black plate (49,1)Chevrolet Captiva Sport Owner Manual (GMNA-Localizing-U.S./Mexico-
7576028) - 2015 - First Edition - 3/21/14
Vehicle Care 10-49
malfunction light should go off
once the TPMS sensor matching
process is performed
successfully. See“TPMS Sensor
Matching Process” later in this
section.
.One or more TPMS sensors are
missing or damaged. The
malfunction light should go off
when the TPMS sensors are
installed and the sensor
matching process is performed
successfully. See your dealer for
service.
.Replacement tires or wheels do
not match the original equipment
tires or wheels. Tires and wheels
other than those recommended
could prevent the TPMS from
functioning properly. See Buying
New Tires on page 10-52.
.Operating electronic devices or
being near facilities using radio
wave frequencies similar to the
TPMS could cause the TPMS
sensors to malfunction.
TPMS Sensor Matching
Process
Each TPMS sensor has a unique
identification code. The identification
code needs to be matched to a new
tire/wheel position after rotating the
vehicle’s tires or replacing one or
more of the TPMS sensors. Also,
the TPMS sensor matching process
should be performed after replacing
a spare tire with a road tire
containing the TPMS sensor. The
malfunction light should go off at the
next ignition cycle. The sensors are
matched to the tire/wheel positions,
using a TPMS relearn tool, in the
following order: driver side front tire,
passenger side front tire, passenger
side rear tire, and driver side rear.
See your dealer for service or to
purchase a relearn tool. A TPMS
relearn tool can also be purchased.
See Tire Pressure Monitor
Sensor Activation Tool at
www.gmtoolsandequipment.com or
call 1-800-GM TOOLS
(1-800-468-6657). There are two minutes to match the
first tire/wheel position, and
five minutes overall to match all four
tire/wheel positions. If it takes
longer, the matching process stops
and must be restarted.
The TPMS matching process is:
1. Set the parking brake.
2. Turn the ignition to ON/RUN with
the engine off.
3. Press and hold the RKE transmitter's
QandKbuttons at
the same time, for about
three seconds. The horn will
sound twice to indicate the
receiver is ready for the sensor
matching process to begin.
4. Start with the driver side front tire. The driver side turn signal
lamp comes on.
5. Place the relearn tool against the tire sidewall, near the valve
stem. Then press the button to
activate the TPMS sensor.
A horn chirp confirms that the
Page 298 of 373

Black plate (67,1)Chevrolet Captiva Sport Owner Manual (GMNA-Localizing-U.S./Mexico-
7576028) - 2015 - First Edition - 3/21/14
Vehicle Care 10-67
{Caution
Ignoring these steps could result
in costly damage to the vehicle
that would not be covered by the
vehicle warranty. Trying to start
the vehicle by pushing or pulling it
will not work, and it could damage
the vehicle.
1. Check the other vehicle. It must have a 12-volt battery with a
negative ground system.
{Caution
If the other vehicle does not have
a 12-volt system with a negative
ground, both vehicles can be
damaged. Only use a vehicle that
has a 12-volt system with a
negative ground for jump starting. 2. Get the vehicles close enough
so the jumper cables can reach,
but be sure the vehicles are not
touching each other. If they are,
it could cause a ground
connection you do not want. You
would not be able to start your
vehicle, and the bad grounding
could damage the electrical
systems.
To avoid the possibility of the
vehicles rolling, set the parking
brake firmly on both vehicles
involved in the jump start
procedure. Put the transmission
in P (Park) before setting the
parking brake.
{Caution
If any accessories are left on or
plugged in during the jump
starting procedure, they could be
damaged. The repairs would not
be covered by the vehicle
(Continued)
Caution (Continued)
warranty. Whenever possible, turn
off or unplug all accessories on
either vehicle when jump starting.
3. Turn off the ignition on both vehicles. Unplug unnecessary
accessories plugged into the
cigarette lighter or the accessory
power outlet. Turn off the radio
and all lamps that are not
needed. This will avoid sparks,
helping save both batteries and
the radio.
4. Open the hood on the other vehicle and locate the
positive (+) and negative (−)
terminal locations on that
vehicle.
Open the hood on your vehicle
and find the remote positive (+)
and remote negative (−) jump
starting terminals.
Page 311 of 373

Black plate (80,1)Chevrolet Captiva Sport Owner Manual (GMNA-Localizing-U.S./Mexico-
7576028) - 2015 - First Edition - 3/21/14
10-80 Vehicle Care
To clean:
1. Saturate a clean lint-freecolorfast cloth with water.
Microfiber cloth is recommended
to prevent lint transfer to the
fabric or carpet.
2. Remove excess moisture by gently wringing until water does
not drip from the cleaning cloth.
3. Start on the outside edge of the soil and gently rub toward the
center. Fold the cleaning cloth to
a clean area frequently to
prevent forcing the soil in to the
fabric.
4. Continue gently rubbing the soiled area until there is no
longer any color transfer from
the soil to the cleaning cloth.
5. If the soil is not completely removed, use a mild soap
solution followed only by plain
water.
If the soil is not completely
removed, it may be necessary to
use a commercial upholstery cleaner or spot lifter. Test a small
hidden area for colorfastness before
using a commercial upholstery
cleaner or spot lifter. If ring
formation occurs, clean the entire
fabric or carpet.
Following the cleaning process, a
paper towel can be used to blot
excess moisture.
Cleaning High Gloss Surfaces
and Vehicle Information and
Radio Displays
For vehicles with high gloss
surfaces or vehicle displays, use a
microfiber cloth to wipe surfaces.
Before wiping the surface with the
microfiber cloth, use a soft bristle
brush to remove dirt that could
scratch the surface. Then use the
microfiber cloth by gently rubbing to
clean. Never use window cleaners
or solvents. Periodically hand wash
the microfiber cloth separately,
using mild soap. Do not use bleach
or fabric softener. Rinse thoroughly
and air dry before next use.
{Caution
Do not attach a device with a
suction cup to the display. This
may cause damage and would
not be covered by the warranty.
Instrument Panel, Leather,
Vinyl, Other Plastic Surfaces,
Low Gloss Paint Surfaces and
Natural Open Pore Wood
Surfaces
Use a soft microfiber cloth
dampened with water to remove
dust and loose dirt. For a more
thorough cleaning, use a soft
microfiber cloth dampened with a
mild soap solution.
{Caution
Soaking or saturating leather,
especially perforated leather, as
well as other interior surfaces,
(Continued)
Page 336 of 373

Black plate (1,1)Chevrolet Captiva Sport Owner Manual (GMNA-Localizing-U.S./Mexico-
7576028) - 2015 - First Edition - 3/21/14
Customer Information 13-1
Customer
Information
Customer Information
Customer SatisfactionProcedure . . . . . . . . . . . . . . . . . . 13-1
Customer Assistance Offices . . . . . . . . . . . . . . . . . . . . . 13-3
Customer Assistance for Text Telephone (TTY) Users . . . . . 13-4
Online Owner Center . . . . . . . . 13-4
GM Mobility Reimbursement Program . . . . . . . . . . . . . . . . . . . . 13-5
Roadside Assistance Program . . . . . . . . . . . . . . . . . . . . 13-5
Scheduling Service Appointments . . . . . . . . . . . . . . 13-7
Courtesy Transportation Program . . . . . . . . . . . . . . . . . . . . 13-7
Collision Damage Repair . . . . 13-8
Service Publications Ordering Information . . . . . . 13-11
Radio Frequency Identification (RFID) . . . . . . . 13-11
Radio Frequency Statement . . . . . . . . . . . . . . . . . 13-12
Reporting Safety Defects
Reporting Safety Defects tothe United States
Government . . . . . . . . . . . . . . . 13-12
Reporting Safety Defects to General Motors . . . . . . . . . . . 13-13
Vehicle Data Recording and
Privacy
Vehicle Data Recording and
Privacy . . . . . . . . . . . . . . . . . . . . 13-13
Event Data Recorders . . . . . . 13-14
OnStar
®. . . . . . . . . . . . . . . . . . . . 13-14
Infotainment System . . . . . . . . 13-15
Customer Information
Customer Satisfaction
Procedure
Your satisfaction and goodwill are
important to your dealer and to
Chevrolet. Normally, any concerns
with the sales transaction or the
operation of the vehicle will be
resolved by your dealer's sales or
service departments. Sometimes,
however, despite the best intentions
of all concerned, misunderstandings
can occur. If your concern has not
been resolved to your satisfaction,
the following steps should be taken:
STEP ONE: Discuss your concern
with a member of dealership
management. Normally, concerns
can be quickly resolved at that level.
If the matter has already been
reviewed with the sales, service,
or parts manager, contact the owner
of your dealership or the general
manager.