2015 BMW X4 Rear
[x] Cancel search: RearPage 150 of 253
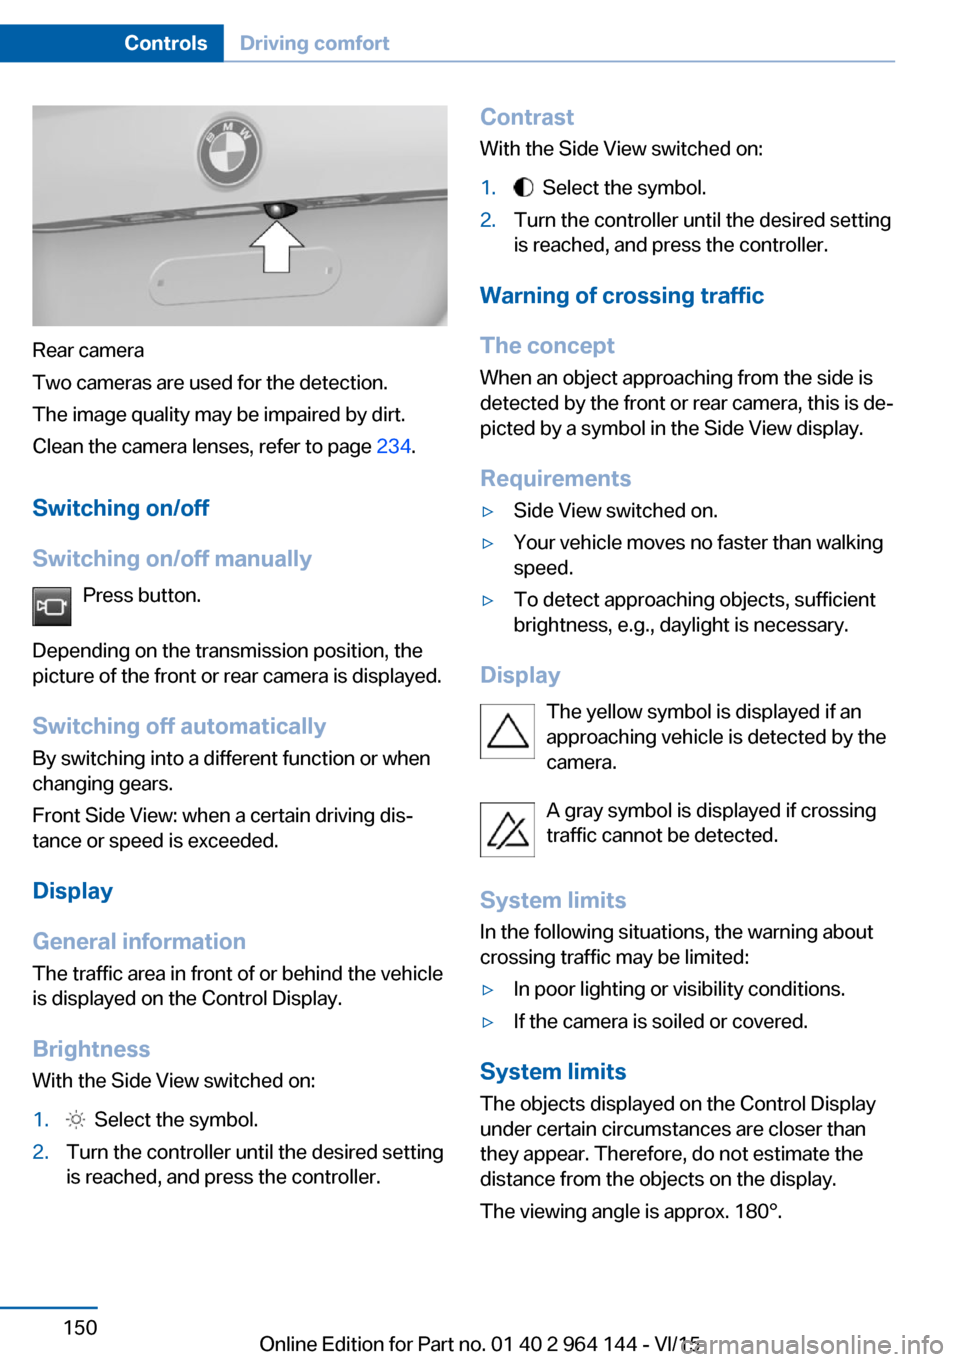
Rear camera
Two cameras are used for the detection.
The image quality may be impaired by dirt.
Clean the camera lenses, refer to page 234.
Switching on/off
Switching on/off manually Press button.
Depending on the transmission position, the
picture of the front or rear camera is displayed.
Switching off automatically By switching into a different function or when
changing gears.
Front Side View: when a certain driving dis‐
tance or speed is exceeded.
Display
General information
The traffic area in front of or behind the vehicle
is displayed on the Control Display.
Brightness With the Side View switched on:
1. Select the symbol.2.Turn the controller until the desired setting
is reached, and press the controller.Contrast
With the Side View switched on:1. Select the symbol.2.Turn the controller until the desired setting
is reached, and press the controller.
Warning of crossing traffic
The concept When an object approaching from the side is
detected by the front or rear camera, this is de‐
picted by a symbol in the Side View display.
Requirements
▷Side View switched on.▷Your vehicle moves no faster than walking
speed.▷To detect approaching objects, sufficient
brightness, e.g., daylight is necessary.
Display
The yellow symbol is displayed if anapproaching vehicle is detected by the
camera.
A gray symbol is displayed if crossing
traffic cannot be detected.
System limits
In the following situations, the warning about
crossing traffic may be limited:
▷In poor lighting or visibility conditions.▷If the camera is soiled or covered.
System limits
The objects displayed on the Control Display
under certain circumstances are closer than
they appear. Therefore, do not estimate the
distance from the objects on the display.
The viewing angle is approx. 180°.
Seite 150ControlsDriving comfort150
Online Edition for Part no. 01 40 2 964 144 - VI/15
Page 151 of 253
Parking assistantThe concept
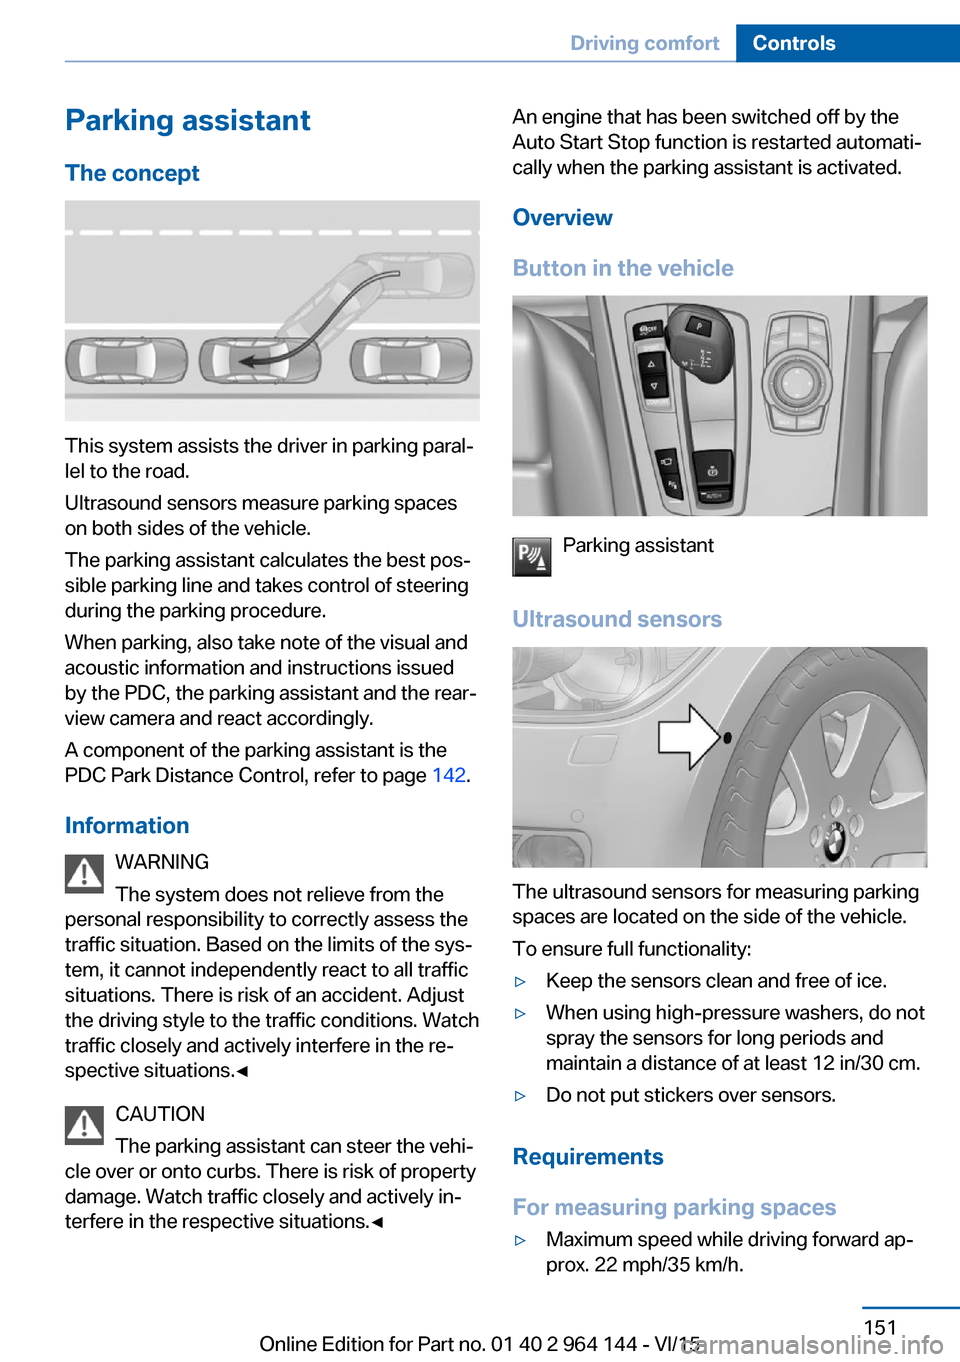
This system assists the driver in parking paral‐
lel to the road.
Ultrasound sensors measure parking spaces
on both sides of the vehicle.
The parking assistant calculates the best pos‐
sible parking line and takes control of steering
during the parking procedure.
When parking, also take note of the visual and
acoustic information and instructions issued
by the PDC, the parking assistant and the rear‐
view camera and react accordingly.
A component of the parking assistant is the
PDC Park Distance Control, refer to page 142.
Information WARNING
The system does not relieve from the
personal responsibility to correctly assess the
traffic situation. Based on the limits of the sys‐
tem, it cannot independently react to all traffic
situations. There is risk of an accident. Adjust
the driving style to the traffic conditions. Watch
traffic closely and actively interfere in the re‐
spective situations.◀
CAUTION
The parking assistant can steer the vehi‐
cle over or onto curbs. There is risk of property
damage. Watch traffic closely and actively in‐
terfere in the respective situations.◀
An engine that has been switched off by the
Auto Start Stop function is restarted automati‐
cally when the parking assistant is activated.
Overview
Button in the vehicle
Parking assistant
Ultrasound sensors
The ultrasound sensors for measuring parking
spaces are located on the side of the vehicle.
To ensure full functionality:
▷Keep the sensors clean and free of ice.▷When using high-pressure washers, do not
spray the sensors for long periods and
maintain a distance of at least 12 in/30 cm.▷Do not put stickers over sensors.
Requirements
For measuring parking spaces
▷Maximum speed while driving forward ap‐
prox. 22 mph/35 km/h.Seite 151Driving comfortControls151
Online Edition for Part no. 01 40 2 964 144 - VI/15
Page 155 of 253
Climate controlVehicle features and options
This chapter describes all standard, country-
specific and optional features offered with the
series. It also describes features that are not
necessarily available in your car, e. g., due tothe selected options or country versions. This
also applies to safety-related functions and
systems. The respectively applicable country
provisions must be observed when using the
respective features and systems.
Automatic climate control
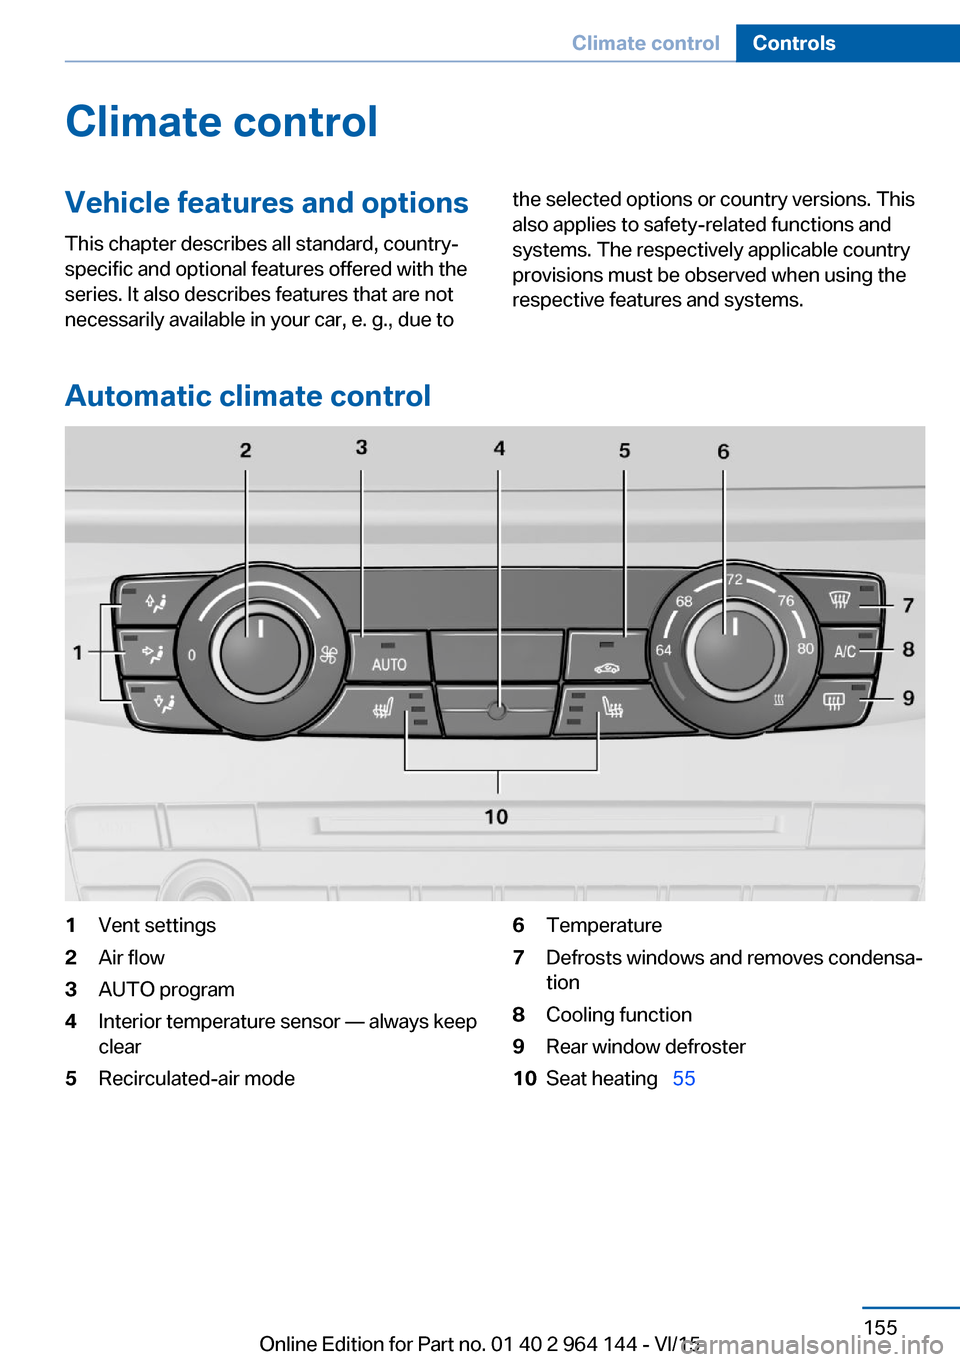
1Vent settings2Air flow3AUTO program4Interior temperature sensor — always keep
clear5Recirculated-air mode6Temperature7Defrosts windows and removes condensa‐
tion8Cooling function9Rear window defroster10Seat heating 55Seite 155Climate controlControls155
Online Edition for Part no. 01 40 2 964 144 - VI/15
Page 157 of 253
Air flow, manualTurn the ring to set the desired
air volume.
The higher the rate, the more ef‐
fective the heating or cooling
will be.
The air flow of the automatic climate control
may be reduced automatically to save battery
power.
Manual air distribution
Press buttons repeatedly to select a program:▷Windows.▷Upper body region.▷Footwell.
You may combine these programs as needed.
Defrosts windows and removes
condensation
Press button.
Ice and condensation are quickly re‐
moved from the windshield and the front side
windows.
Adjust air flow with the program active.
If the windows are fogged over, you can also
switch on the cooling function to dehumidify
the air.
Rear window defroster Press button.
The rear window defroster switches
off automatically after a certain period of time.
Microfilter
In external and recirculated air mode the mi‐
crofilter filters dust and pollen from the air.
This filter should be replaced during scheduled
maintenance, refer to page 215, of your vehi‐
cle.Seite 157Climate controlControls157
Online Edition for Part no. 01 40 2 964 144 - VI/15
Page 158 of 253
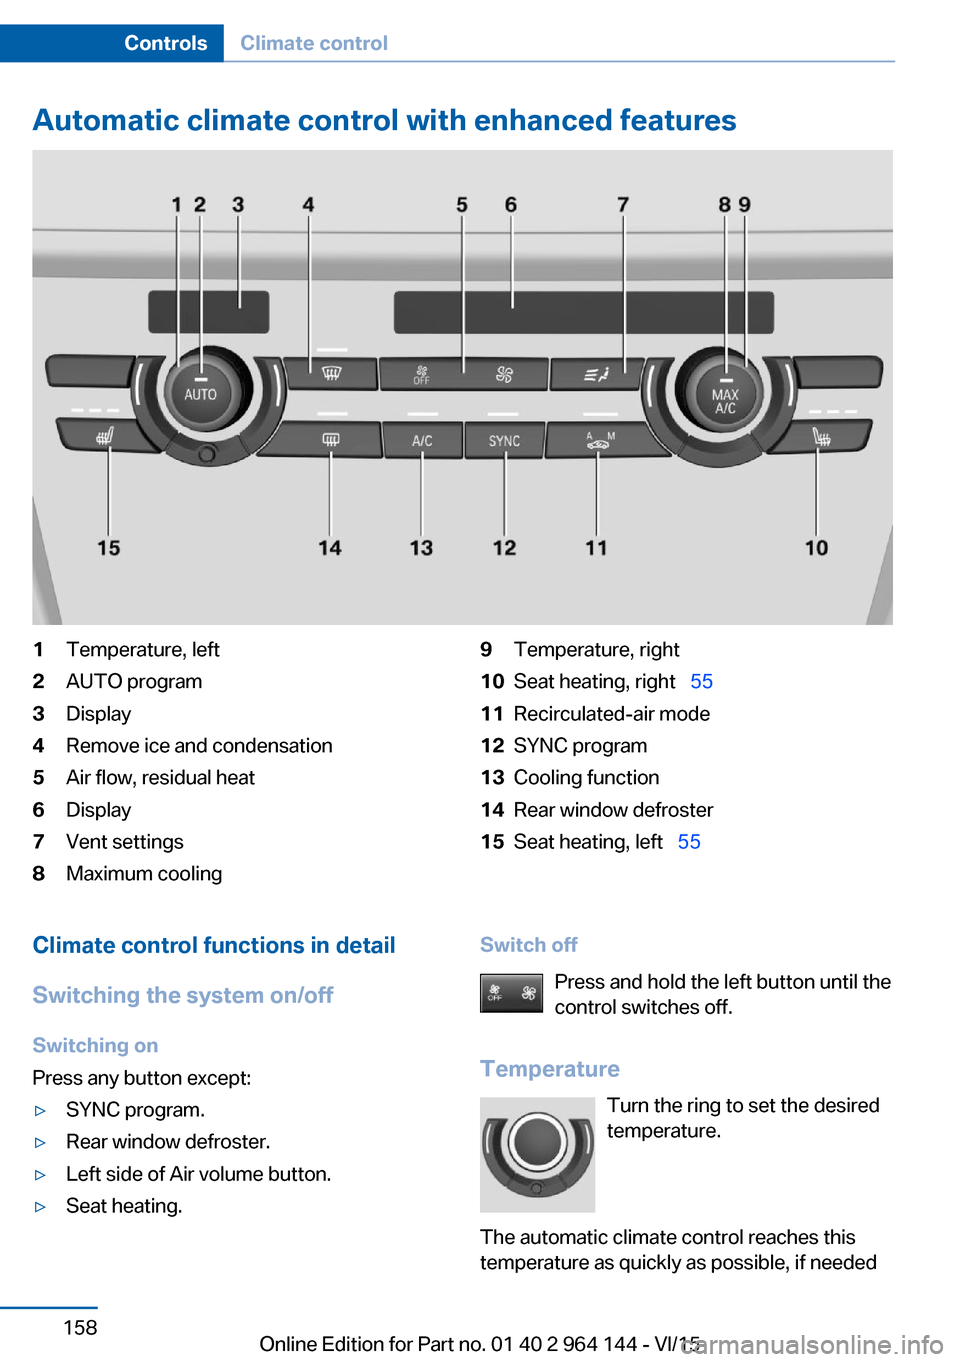
Automatic climate control with enhanced features1Temperature, left2AUTO program3Display4Remove ice and condensation5Air flow, residual heat6Display7Vent settings8Maximum cooling9Temperature, right10Seat heating, right 5511Recirculated-air mode12SYNC program13Cooling function14Rear window defroster15Seat heating, left 55Climate control functions in detail
Switching the system on/off
Switching on
Press any button except:▷SYNC program.▷Rear window defroster.▷Left side of Air volume button.▷Seat heating.Switch off
Press and hold the left button until the
control switches off.
Temperature Turn the ring to set the desired
temperature.
The automatic climate control reaches this
temperature as quickly as possible, if neededSeite 158ControlsClimate control158
Online Edition for Part no. 01 40 2 964 144 - VI/15
Page 160 of 253

With constant recirculated-air mode, the air
quality in the car's interior deteriorates and the
fogging of the windows increases.
If the windows are fogged over, switch off the
recirculated-air mode and press the AUTO
button to utilize the condensation sensor.
Make sure that air can flow to the windshield.
Air flow, manual To manually adjust air flow turn off AUTO pro‐
gram first.
Press the left or right side of the but‐
ton: decrease or increase air flow.
The selected air flow is shown on the display of
the automatic climate control.
The air flow of the automatic climate control
may be reduced automatically to save battery
power.
Manual air distribution Press button repeatedly to select a
program:▷Upper body region.▷Upper body region and footwell.▷Footwell.▷Windows and footwell.▷Windows, upper body region, and footwell.▷Windows: driver's side only.▷Windows and upper body region.
If the windows are fogged over, press the
AUTO button to utilize the condensation sen‐
sor.
SYNC program Press button.
The current setting of the temperature
on the driver's side is transferred to the front
passenger side.
The program is switched off if the setting on
the front passenger side is changed.
Defrosts windows and removes
condensation
Press button.
Ice and condensation are quickly re‐
moved from the windshield and the front side
windows.
For this purpose, point the side vents onto the
side windows as needed.
Adjust air flow with the program active.
If the windows are fogged over, you can also
switch on the cooling function or press the AUTO button to utilize the condensation sen‐
sor.
Rear window defroster Press button.
The rear window defroster switches
off automatically after a certain period of time.
Microfilter/activated-charcoal filter
In external and recirculated air mode the mi‐
crofilter/activated charcoal filter filters dust,
pollen, and gaseous pollutants out of the air.
This filter should be replaced during scheduled
maintenance, refer to page 215, of your vehi‐
cle.Seite 160ControlsClimate control160
Online Edition for Part no. 01 40 2 964 144 - VI/15
Page 161 of 253
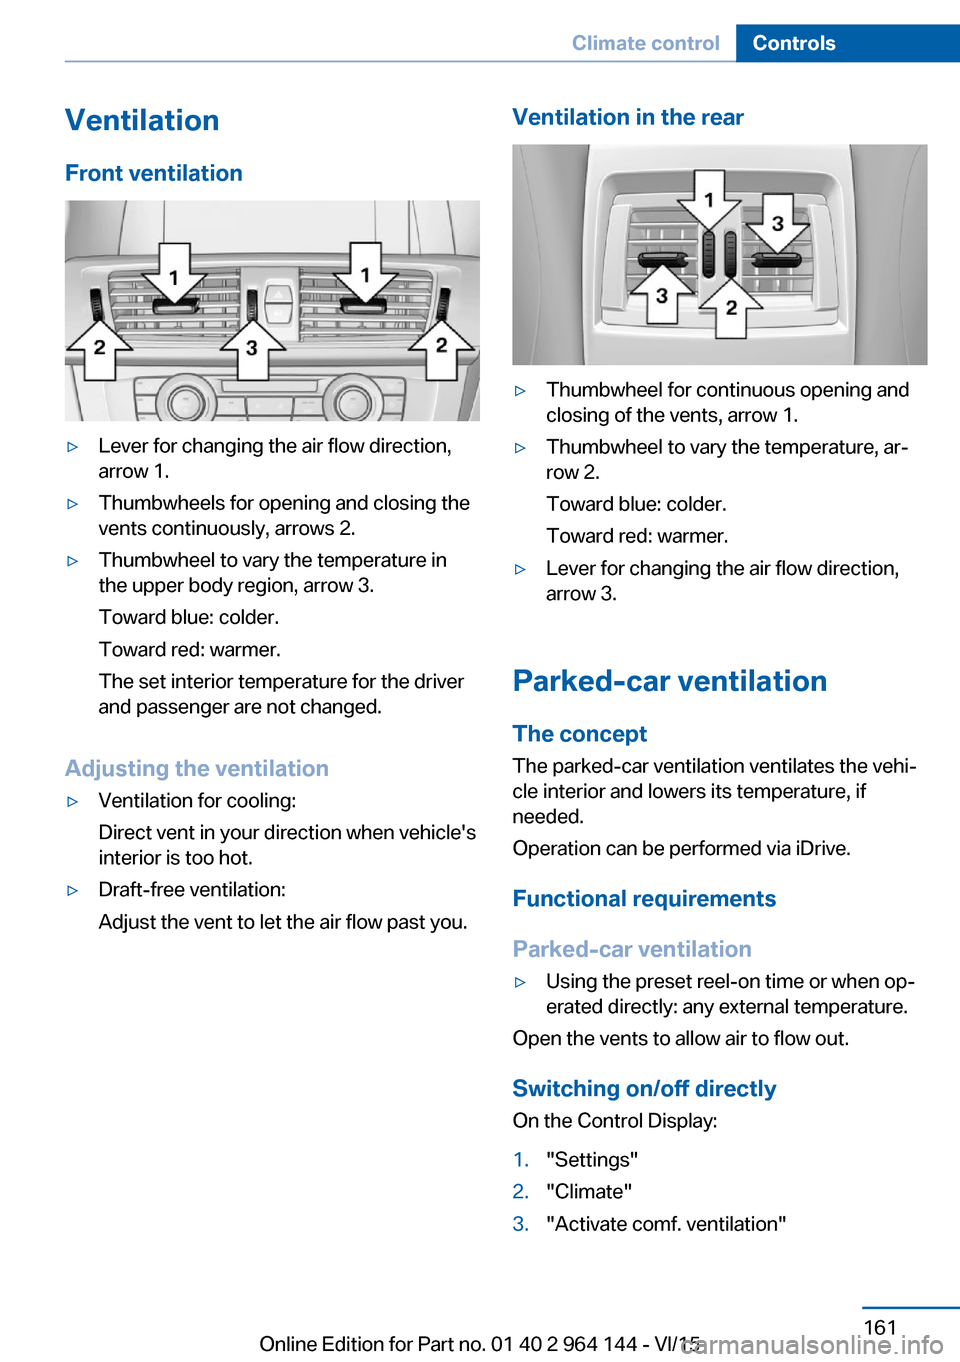
VentilationFront ventilation▷Lever for changing the air flow direction,
arrow 1.▷Thumbwheels for opening and closing the
vents continuously, arrows 2.▷Thumbwheel to vary the temperature in
the upper body region, arrow 3.
Toward blue: colder.
Toward red: warmer.
The set interior temperature for the driver
and passenger are not changed.
Adjusting the ventilation
▷Ventilation for cooling:
Direct vent in your direction when vehicle's
interior is too hot.▷Draft-free ventilation:
Adjust the vent to let the air flow past you.Ventilation in the rear▷Thumbwheel for continuous opening and
closing of the vents, arrow 1.▷Thumbwheel to vary the temperature, ar‐
row 2.
Toward blue: colder.
Toward red: warmer.▷Lever for changing the air flow direction,
arrow 3.
Parked-car ventilation
The concept The parked-car ventilation ventilates the vehi‐
cle interior and lowers its temperature, if
needed.
Operation can be performed via iDrive.
Functional requirements
Parked-car ventilation
▷Using the preset reel-on time or when op‐
erated directly: any external temperature.
Open the vents to allow air to flow out.
Switching on/off directly
On the Control Display:
1."Settings"2."Climate"3."Activate comf. ventilation"Seite 161Climate controlControls161
Online Edition for Part no. 01 40 2 964 144 - VI/15
Page 163 of 253
Interior equipmentVehicle features and optionsThis chapter describes all standard, country-
specific and optional features offered with the
series. It also describes features that are not
necessarily available in your car, e. g., due to
the selected options or country versions. This
also applies to safety-related functions and
systems. The respectively applicable country
provisions must be observed when using the
respective features and systems.
Universal Integrated Remote Control
The concept The universal garage door opener can operate
up to 3 functions of remote-controlled sys‐
tems such as garage door drives or lighting
systems. The universal garage door opener re‐
places up to 3 different hand-held transmitters.
To operate the remote control, the buttons on
the interior rearview mirror must be program‐
med with the desired functions. The hand-held
transmitter for the particular system is required
in order to program the remote control.
Before selling the vehicle, delete the stored
functions for the sake of security.
Information WARNING
Body parts can be jammed when operat‐
ing remote-controlled systems, e.g. the garage
door, using the universal garage door opener.
There is risk of injuries or risk of property dam‐
age. Make sure that the area of movement of
the respective system is clear during program‐
ming and operation. Also follow the safety in‐
structions of the hand-held transmitter.◀Compatibility
If this symbol is printed on the packag‐
ing or in the instructions of the system
to be controlled, the system is gener‐
ally compatible with the universal garage door opener.
If you have any questions, please contact:▷A dealer’s service center or another quali‐
fied service center or repair shop.▷www.homelink.com on the Internet.
HomeLink is a registered trademark of Gentex
Corporation.
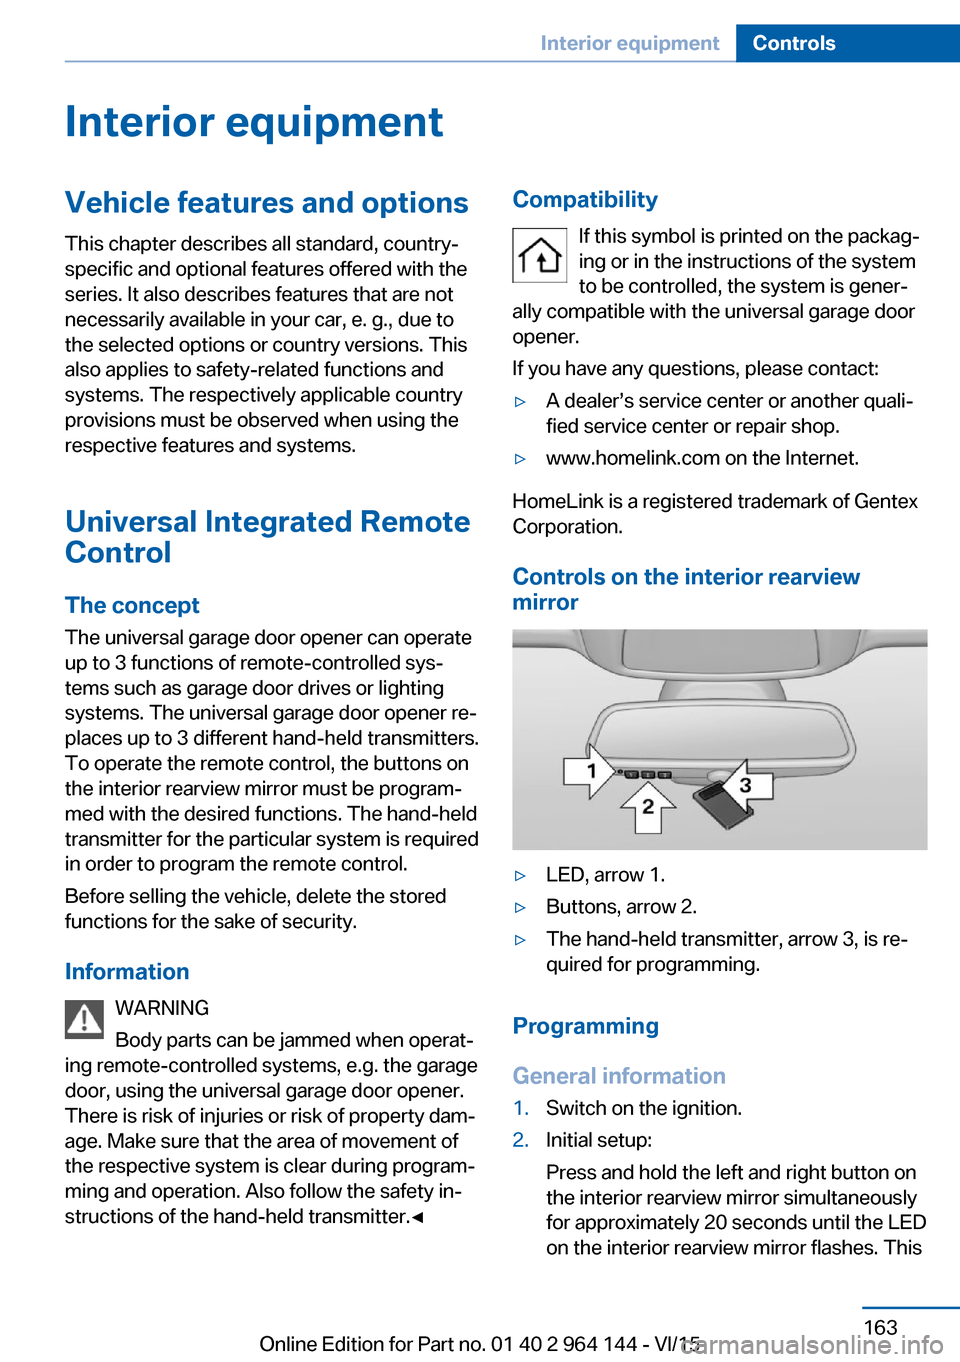
Controls on the interior rearview
mirror
▷LED, arrow 1.▷Buttons, arrow 2.▷The hand-held transmitter, arrow 3, is re‐
quired for programming.
Programming
General information
1.Switch on the ignition.2.Initial setup:
Press and hold the left and right button on
the interior rearview mirror simultaneously
for approximately 20 seconds until the LED
on the interior rearview mirror flashes. ThisSeite 163Interior equipmentControls163
Online Edition for Part no. 01 40 2 964 144 - VI/15