2015 AUDI TT ROADSTER airbag
[x] Cancel search: airbagPage 4 of 244

2 Table of contents Vehicle literature .. .. .. .. .. ... .
About this Owner's Manual ...
Controls and equipment .. ... .
Cockpit ................ .... .. . .
General illus tration .... ... .. .. ... .
Instruments and warning/
indicator lights ........ .. .. .. . .
Ins truments . .. .. ..... ... .. .. ... .
War ning/ indi cator lights ... .. ... .. .
Driver information system .. .
Introduct ion . .. .. ..... ... .. .. ... .
Trip computer .. .. ..... ... .. .. ... .
M enu display . ........... .... ... .
Efficiency program ........ .. .. .. . .
Service interval d isp lay ..... ... .. . .
Lap timer .. .......... ........ .. .
On- Board Diagnostic system (OBD) .. .
Opening and closing .. .. .. .. . .
Keys ........................ .. .
P owe r locking system ............ .
R ear lid/ trun k li d ................ .
Ant i- t heft ala rm system ... .. .. .. . .
P owe r win dows .. ..... ... .. .. ... .
Convertible top .............. .
Convertible top ....... ... .. .. ... .
W ind Deflector . .. ..... ... .. .. ... .
Conve rtible top eme rgency o peration .
Clear vision .. .. ..... ... .. .. ... .
Lights ...... .. .. ..... ... .. .. ... .
Inter ior lights .. . ...... ... .. .. ... .
V1s1on . .. ................. .. ... .
W iper and washer system .. .. .. ... .
D ig ita l compass ........... .... .. .
Seats and storage ....... .. .. . .
Ge neral recommendat ions ........ .
Ad just ing front seats manually .. ... .
5
6
8
8
8
1 0
1 0
12
2 2
22
23
24
27
28
28
30
32
32
34
37
3 8
39
4 1
41
44
4 4
4 8
48
51
52
54
58
59 59
60
P owe r seats . . . . . . . . . . . . . . . . . . . . . 6 1
H ead res traints . . . . . . . . . . . . . . . . . . 6 2
L uggage compartmen t . . . . . . . . . . . . 6 2
Cup holder . . . . . . . . . . . . . . . . . . . . . . 63 Asht
ray ... .... .. ... .. ..... .... . .
Cigarette lighter/socket . ..... ... .. .
Storage ... .. .. .. .. ... .. .. .. .. .. .
Warm and cold ... .. ..... .... . .
Climate controls .. .. .... .... ... .. . 63
64
65
67
67
On the road
. . . . . . . . . . . . . . . . . . . 72
Stee ring . ..... .. ... .. ..... ... .. .
Ignition lock and ignition sw itch .. .. .
Starting and stopping the engine ... .
Parking brake ................... .
Speed warning system ............ .
Cru ise cont ro l .. .. ............... .
Audi magnet ic r ide ... ... .... ... .. .
Spo rt m ode .................. .. .
A coustic parking sys tem
Transmission .. .. ........... .. .
S t ronic transmission ........... .. .
72
72
73
74
75
77
79
79
79
81
81
Homelink . . . . . . . . . . . . . . . . . . . . . 88
U nivers al remote control ...... .. .. .
Safety first ................... .
Driving Safely .... .......... .. .
Gener al notes .. .. ............. .. .
P roper occ upan t seating positions . . .
Drive r and passenger side footwe ll .. .
Pedal a rea ..... .. .. ... ..... ... .. .
Stow ing luggage . ............. .. .
Reporting Safety Defects ........ .. .
88
9 1
91
91
92
95
96
96
98
Safety belts . . . . . . . . . . . . . . . . . . . 100
General notes . . . . . . . . . . . . . . . . . . . . 100
Why safety belts? . . . . . . . . . . . . . . . . 101
Safety be lts . . . . . . . . . . . . . . . . . . . . . 103
Safety belt pretensioners . . . . . . . . . . 106
Airbag system . . . . . . . . . . . . . . . . . 108
Important th ings to know . . . . . . . . . . 108
Front air bags .. .. ... .. ....... ... . 112
Moni to ring the Advanced Ai rbag
S ystem . . . . . . . . . . . . . . . . . . . . . . . . .
118
Page 5 of 244

Knee airbags . . . . . . . . . . . . . . . . . . . . . 123
Side airbags . . . . . . . . . . . . . . . . . . . . . 125
Child Safety . . . . . . . . . . . . . . . . . . . 129
Important things to know ......... .
Child safety seats ................ .
Instal ling a chi ld safety seat .. .. .. . .
Additional Information ........... .
Vehicle operation ............ .
Intelligent technology .. .. .. . .
Notice about data recorded by vehicle
control modules .............. ... .
Electronic Stabilization Control (ESC) .
Rear spoiler ................ ... . .
Braking ........................ .
E lect ro-me chan ical power assis t ... . .
D riving w ith your quattro ......... .
Energy management ............. .
Driving and environment .....
The first 1,000 miles (1,500 km) and
afterwards .............. .. .. .. . .
Avoid damaging the vehicle ........ .
Driving through water on roads ... . .
Catalytic converter ............... .
Shutting down vehicle ............ .
Operate your vehicle economically and
minimize pollution ............... . 129
134
137
140
141
141
141
14 1
143
144
145
1 46
146
1 4 9
149
150
150 150
151
15 1
Tra iler towing . . . . . . . . . . . . . . . . . . . . 153
Vehicle care . . . . . . . . . . . . . . . . . . . 154
Vehicle care and cleaning . . . . . 154
General information . . . . . . . . . . . . . . 154
Car washes . . . . . . . . . . . . . . . . . . . . . . 154
Cleaning and care information . . . . . . 155
Fuel supply and filling your
fuel tank . . . . . . . . . . . . . . . . . . . . . . .
160
Gasoline . . . . . . . . . . . . . . . . . . . . . . . . 160
Fuel tank. . . . . . . . . . . . . . . . . . . . . . . . 161
Checking and filling . . . . . . . . . . . 164
Engine hood . . . . . . . . . . . . . . . . . . . . . 164
Eng ine oil . . . . . . . . . . . . . . . . . . . . . . . 166
Eng ine cooling system ............. 171
Brake fluid ...................... 174
Table of contents 3
Battery . . . . . . . . . . . . . . . . . . . . . . . . . 175
Windshield/headlight washer
container . . . . . . . . . . . . . . . . . . . . . . . 179
Tires and wheels ........... .. .
Tires ..... .. .... .. . .. .......... .
Tire pressure monitoring system ... .
Run-flat tire s .. .. ............... .
Do-it-yourself service ........ .
What do I do now? ........... .
Trunk escape handle ............. .
Vehicle tool kit .... .............. .
T ire repai r .... ... .. ............. .
What should I be aware of when
h . t
' 7 c angmg a ire .................. .
Fuses and bulbs .. .. .. ..... ... .
El ectr ical fuses . .. .. ............. .
Bulbs .......................... .
Emergency situations ........ .
General ........................ .
Starting by pushing or towing ...... .
Starting with jumper cables ....... .
U se of jump er cables ............. .
Emergency towing with commercia l
tow truck ...................... .
Lifting vehicle .. .. ............... . 180
180
198
201
204
204
204
204
205
208
212
212
215
2 16
216
216
216
217
218
221
Technical data . . . . . . . . . . . . . . . . . 222
Technical Data . . . . . . . . . . . . . . . . . 222
Vehicle identification . . . . . . . . . . . . . . 222
Weights . . . . . . . . . . . . . . . . . . . . . . . . 222
Dimensions . . . . . . . . . . . . . . . . . . . . . . 223
Capacities . . . . . . . . . . . . . . . . . . . . . . . 223
Gasoline engines . . . . . . . . . . . . . . . . . 224
Consumer Information . . . . . . . 225
Warranty coverages . . . . . . . . . . . . . . . 225
Operating your vehicle outside the
U.S. A. or Canada . . . . . . . . . . . . . . . . . 225
Audi Service Repair Manuals and
Literature . . . . . . . . . . . . . . . . . . . . . . . 225
Maintenance. . . . . . . . . . . . . . . . . . . . . 225
Additional accessories, modifications
and parts rep lacement . . . . . . . . . . . . 227
•
•
Page 15 of 244

Instrument s and warnin g/indic ator ligh ts 13
road, stop the engine, and turn on the
emergency flasher¢
page 51.
-The engine com partment of any motor
vehicle is a potentially hazardous area.
Before you check anything in the engine
compartment, stop the engine and let it
cool down. Always exercise extreme cau
t ion when wor king under the hood
¢ page 164, Working in the engine
compartment
@ Tips
Ma lfunctions or faults w ill be identified e i
ther with a red symbo l (pr iority 1 -Dan
ge r!) o r with a ye llow symbol (pr iority 2 -
Warn ing).
Overview
Some ind icator lights turn on briefly to check
the function of that system when yo u switch
the ignition on. These systems are marked
with a./ in the following tab les. If one of
these ind icator lights does not turn on, there
is a malfunction in that system.
R ed indicator lights
Red symbols indicate a priority malfu nction -
Danger!
- P ull off the road.
- Stop t he vehicle.
- T urn off the engine .
- Check the ma lfunction ing system. Contact
you r authorized Aud i dealer o r a qualified
workshop for assistance .
USA models: Malfunction in the
brake system ¢
page 14
Canada models: Malfunction in
the b rake system ¢
page 14
USA model s: Airbag system ./
¢page 15
Canada models: Airbag system ./
¢page 15
Safety belt
¢page 16
Battery ./
¢page 16
Engine oil pressure too low
¢page 16
Engine coolant leve l too low/
engine coolant temperature too
h igh
¢ page 17
Elect ro-mechanical power assis t
¢page 17
Clutch is overheat ing
¢ page86
Yellow indicator lights
Ye llow symbo ls indicate a prior ity 2 malfunc
tion -Wa rning!
~ .,.,
OFF
ABS
(8)
"O~ I I ~ ,,
(D
TPMS
EPC
~
CHECK
Conver tible top
¢ page 17
Electro ni c Stabiliza tion Control
( E S C) ./ ¢
page 17
Elect ron ic Stabilization Control
( E SC) ./ ¢
page 17
USA models: anti-lock brake sys
t em (ABS) ./ defective
¢page 18
Canada models : anti-lock brake
system (ABS) ./ defective
¢page 18
Worn brake pads
¢page 19
Tire pressure too low
¢page 199
Tire pressure monitoring system
¢page 199
Electro ni c power control./
¢page 19
USA models : Malfunction Indica
to r Lamp (MIL)
¢page 19
Canada models : Malfunction Indi
cator Lamp (MIL)
¢ page 19
Engine speed limitat ion *
¢page 19
Check engine oi l level
¢page 19
Page 37 of 244
accidentally press the power locking
switch.
- Do not leave children inside the vehicle
unsupervised. In an emergency it would
be impossible to open the doors from
the outside without the key.
@ Tips
- In the event of a crash with airbag de
ployment a ll locked doors will be auto
matically unlocked to g ive access to the
vehicle occupants from the outside.
- If the power locking system should mal
function, you can lock each door individ
ually using the vehicle key .
- If the power locking system should fail,
you can still open the fue l tank flap in an
emergency
c>page 163.
- You are well advised not to keep valua
bles inside an unattended vehicle, visible
or not . Even a properly locked vehicle
cannot provide the security of a safe!
Unlocking and locking the vehicle w ith
the remote control
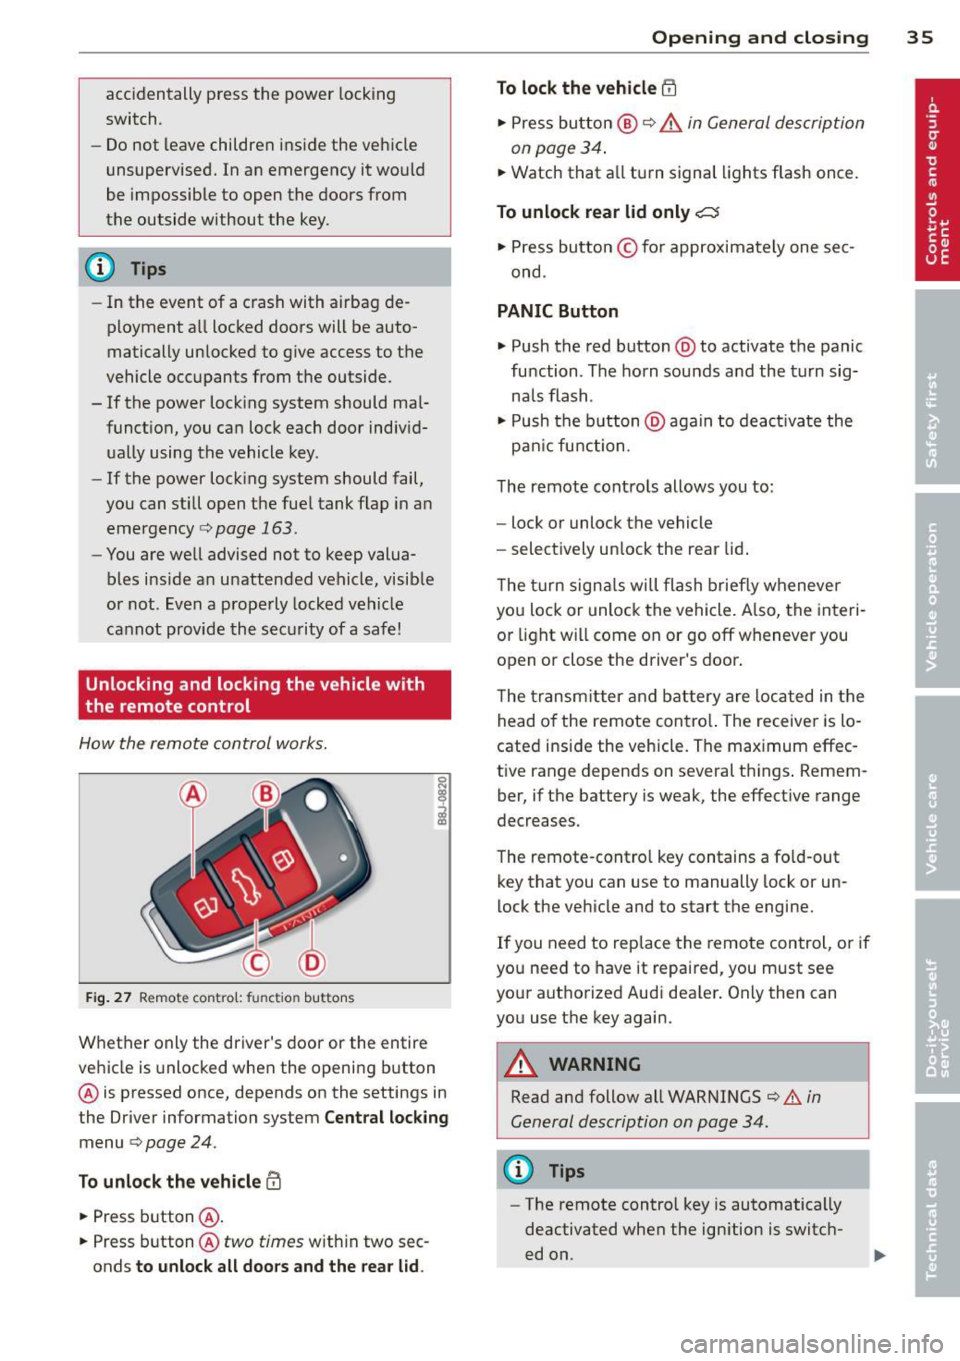
How the remote control works.
Fig . 27 Remote contro l: fu nctio n buttons
0
I
Whether only the driver's door or the entire
vehicle is unlocked when the opening b utton
@ is pressed once, depends on the settings in
the Driver information system
Central locking
menu c> page 24.
To unlock the vehicle !Ii
.,. Press button @.
.,. Press button @
two times with in two sec
onds
to unlock all doors and the rear lid.
Opening and closing 35
To lock the vehicle efl
.,. Press button @ c> &. in General description
on page 34 .
.,. Watch that a ll turn signal lights flash once.
To unlock rear lid only~
.,. Press button © for approximately one sec
ond .
PANIC Button
.,. Push the red button @to activate the panic
function . The horn sounds and the turn sig
na ls flash .
.,. Push the button @aga in to deact ivate the
pan ic function .
The remote controls allows you to:
- lock or unlock the vehicle
- select ively unlock the rear lid.
The turn signals will flash briefly whenever
you lock or unlock the vehicle. Also, the interi
or light will come on or go off whenever you
open or close the driver's door .
The transm itter and battery are located in the
head o f the remote contro l. The receiver is lo
cated ins ide the vehicle. The max imum effec
tive range depends on several th ings . Remem
ber, if the battery is weak, the effective range
decreases.
The remote-control key contains a fo ld-out
key that you can use to manually lock or un
lock the vehicle and to start the engine.
If you need to replace the remote control, or if
you need to have it repaired, you must see
your authorized Aud i dealer. Only then can
you use the key again.
A WARNING
Read and follow all WARNINGS c> .&. in
General description on page 34.
(0 Tips
- The remote contro l key is automatically
deactivated when the ignition is switch
ed on.
-
Page 38 of 244
36 Opening and closing
-The operation of the remote control key
can be temporarily disrupted by interfer
ence from transmitters in the vicinity of
the vehicle working in the same frequen
cy range (e.g. a cell phone, radio equip
ment) .
- In order to make sure the locking func
tion is working, you should always keep
your eye on the vehicle to make sure it is
properly locked .
- Do not use the remote control if you are
inside the car, otherwise you may unin
tentionally lock the vehicle, and then you
would set off the anti-theft alarm when
you try to start the engine or open a
door. In case this happens anyhow, push
the unlock button
CD .
- Use the panic function only if you are in
an emergency situation.
Resetting the remote control
The remote control must be reset if the vehi
cle does not unlock .
.,,. Press the unlock button CD on the remote
control.
.,,. Manually unlock the driver's door lock with
the mechanical key within 30 seconds.
.,,. Press either the lock-1'.D or the unlock
CD but
ton to complete th e reset sequence.
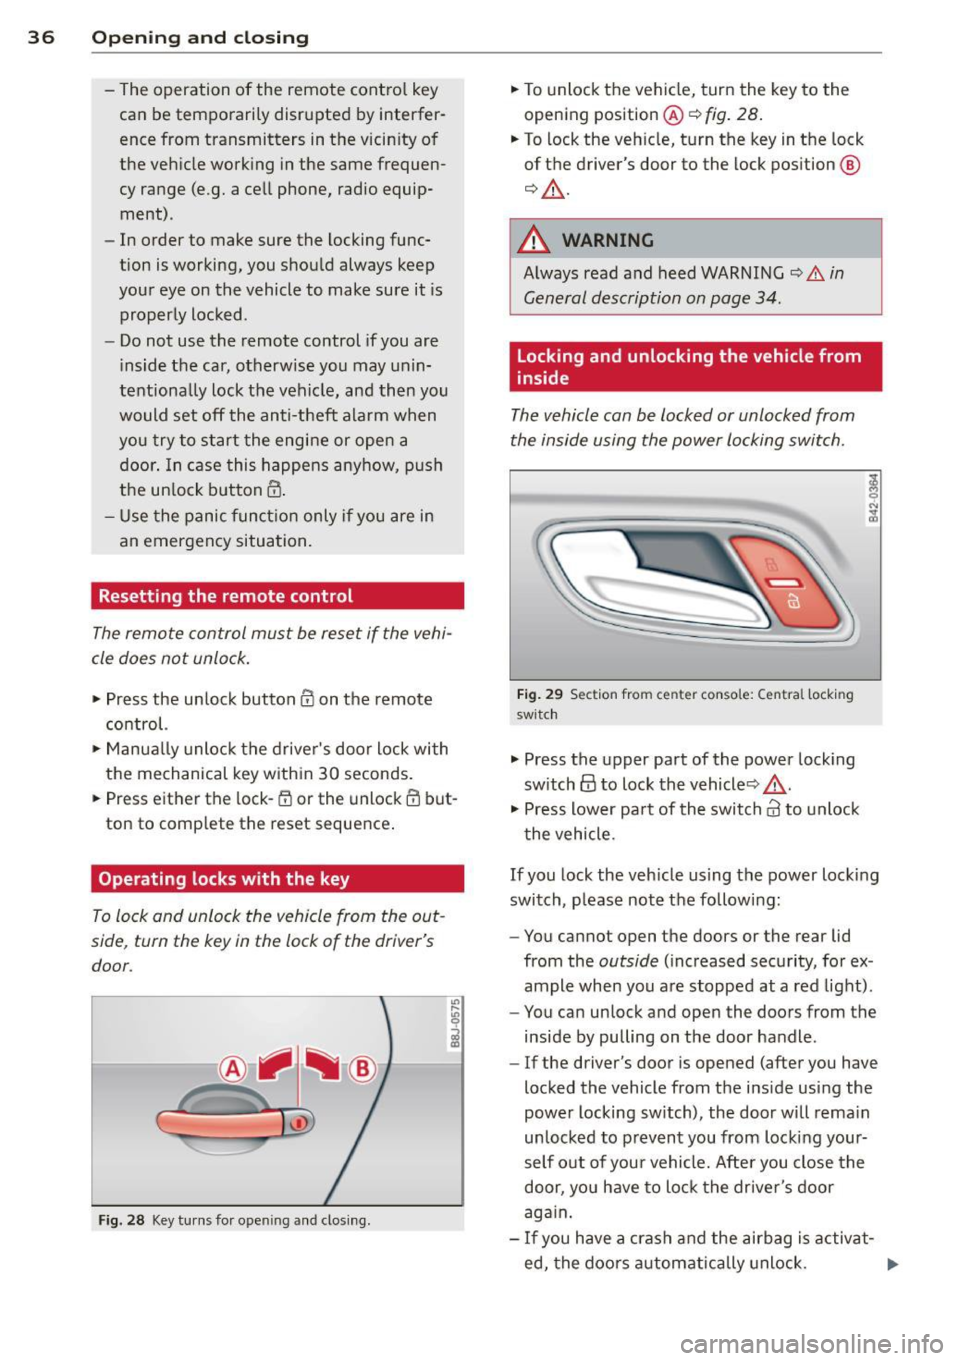
Operating locks with the key
To lock and unlock the vehicle from the out
side , turn the key in the lock of the driver's
door .
Fig. 28 Key turns for ope ning and clo sing.
.,,. To unlock the vehicle, turn the key to the
opening position@¢
fig. 28.
.,,. To lock the vehicle, turn the key in the lock
of the driver's door to the lock position
@
¢ &_ .
A WARNING
Always read and heed WARNING¢.&. in
General description on page 34.
Locking and unlocking the vehicle from
inside
The vehicle can be locked or unlocked from
the inside using the power locking switch .
Fig. 29 Sec tion from center conso le: Ce ntra l locking
switch
.,,. Press the upper part of the power locking
switch
@ to lock the vehicle ¢&_ .
.,,. Press lower pa rt of the switch
crl to unlock
the vehicle .
If you lock the vehicle using the power locking
switch , please note the following:
- You cannot open the doors or the rear lid
from the
outside (increased security, for ex
ample when you are stopped at a red light).
- You can unlock and open the doors from the
inside by pulling on the door handle .
-If the driver's door is opened (after you have
locked the vehicle from the inside using the
power locking switch), the door will remain
unlocked to prevent you from locking your
self out of your vehicle. After you close the
door, you have to lock the driver 's door
again.
- If you have a crash and the airbag is activat-
ed, the doors automatically unlock. ..,.
Page 53 of 244
Emergency flasher
The emergency flasher makes other motorists
a w are that you or your vehicle are in an emer
gency situation.
Fi g. 56 Center console: em ergency flasher sw itch
.. Press the switch ~~ fig. 56, to switch the
emergency flasher on or off.
When the emerge ncy flashe r is on, al l four
turn signals blink at the same time. The t urn
signal indicator lights
mlll in the instru
ment cluster, as well as the light in the emer
gency f lasher switch ~ blink likewise. The
emergency flashers a lso work when the igni
tion is turned off.
The emergency flasher will automatica lly
switch on if you are in an acc ident where the
airbag has deployed.
@ Tips
You should switch on the emergency flash
er when:
- you are the last vehicle sta nding in a traf
fic jam so that any other vehicles coming can see you, or when
- your vehicle has broken down or yo u are
i n an emergency situation, or when
-you r vehicle is being towed by a tow
truck or if you are towing a nothe r vehicle
behind you. Clear vi
sion 51
Interior lights
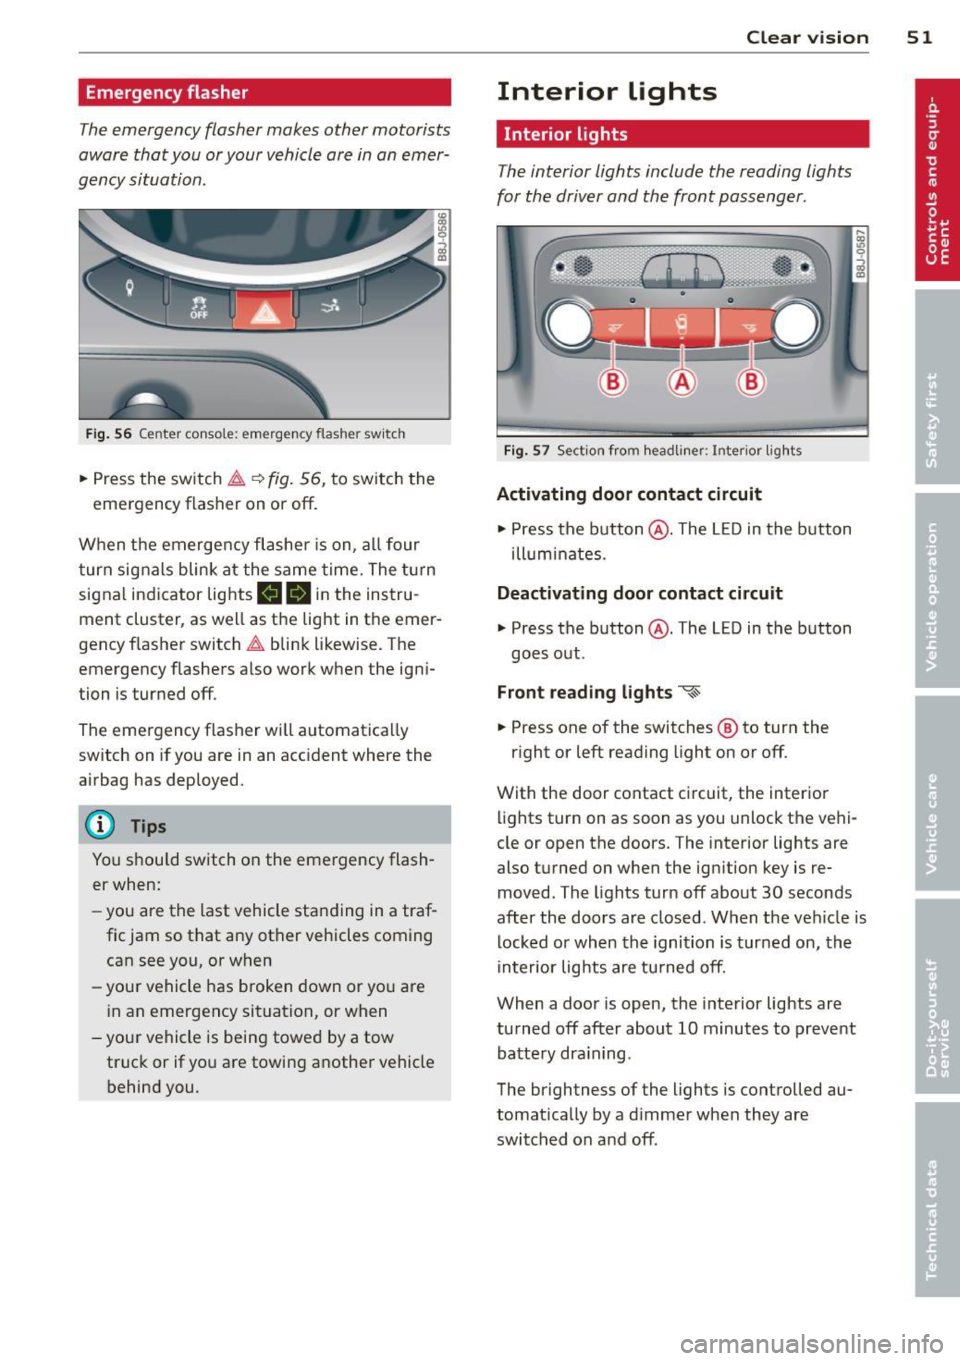
Interior lights
The interior lights include the reading lights
for the driver and the front passenger .
Fig. 57 Section fro m headli ner: Interior light s
Activating door contact circuit
.. Press the button @. The L ED in the button
ill um inates.
Deactivating door contact circuit
.. Press the button @. The LED in the button
goes out .
Front read ing lights ~
.. Press one of the switches ® to turn the
r ight or left reading light on or off.
With the door contact ci rcuit, the inter ior
lights turn on as soon as you unlock the vehi
cle or open the doors. The interior lights are
also turned on when the ignition key is re
moved. The lights turn off about 30 seconds
after the doors are closed . When the veh icle is
locked or when the ignition is turned on, the
in terior lig hts are tu rned off.
When a door is open, the inte rior lights are
tu rned off after about 10 minutes to preve nt
batte ry dra in ing.
The brightness of the lights is controlled au
tomat ica lly by a d immer when they are
switched on and off .
Page 61 of 244
Seats and storage
General recommen
dations
Why is your seat adjustment so important?
The safety belts and the airbag system can
only provide maximum protection if the front
seats are correctly adjusted.
There are various ways of adjusting the front
seats to provide safe and comfortable support
for the driver and the front passenger. Adjust
your seat properly so that :
- you can easily and quick ly reach all the
switches and controls in the instrument
panel
- your body is properly supported thus reduc ing physical stress and fatigue
- the safety belts and airbag system can offe r
maximum protection
¢ page 108.
In the following sections, you will see exactly
how you can best adjust your seats .
There are special regulations and instructions
for installing a child safety seat on the front passenger's seat. Always heed the informa
tion regard ing child safety provided in
¢ page 129, Child Safety.
A WARNING
Incorrect seating position of the driver and
all other passengers can result in serious
personal injury.
- Always keep your feet on the f loor when
the vehicle is in motion -never p ut your
feet on top of the instrument panel, out
of the w indow or on top of the seat cush
ion! This applies espec ially to the passen
gers . If your seating position is incorrect
you increase the r isk of injury in the case
of sudden braking or an acc ident. If the
airbag inflates and the seating position
is incorrect this could result in personal
injury or even death.
- It is important for bo th the driver and
front passenger to keep a distance of a t
Seat s an d sto rage 59
least 10 inches (25 cm) between them
selves and the steering wheel and/or in
strument panel. If you're s itting any
closer than th is, the airbag system can
not protect you properly. In addition to
this, the front seats and head restra ints
must be adjusted to yo ur body height so
that they can give you max imum prote c
tion.
- Always try to keep as much distance as
possible be tween yourself and the s teer
ing wheel o r instrument pane l.
- Do not adjust the driver's or front pas
senger's seat whi le the vehicle is moving.
Your seat may move unexpected ly, caus
ing sudden loss of vehicle control and
personal injury . If you ad just yo ur seat
while the veh icle is moving, you are out
of posit ion.
Driver's seat
The correct seat position is important for safe
and relaxed driving.
We recommend that you adjust the driver's
seat in the fo llowing manner:
.,. Adj ust the seat in fore and aft direction so
t ha t you can easily push the peda ls to the
floor whi le keeping your knee sligh tly bent
c::> A in Why is your seat adjustment so im
portant? on page 59 .
.,. Adjust the seatback so that when you sit
w ith your back against the seatback, you can
still grasp the top of the steering wheel.
.,. Pos it ion the head restrai nt accord ing to the
occupant 's height
c::> page 62 . For maxi
mum protection, the top of the head re
straint shou ld be at least at eye level, pref
erably higher and idea lly level with the top
of the head
¢ page 94, fig. 100 .
A WARNING
Never place any objects in the dr iver's foot
well. An object could get into the pedal
area and interfere with pedal funct ion. In
case of sudden braking or an acc ident, you
would not be able to brake or accelerate!
Page 62 of 244
60 Seats and stor age
Front passenger's seat
Always move the front passenger seat into
the rearmost position .
To avoid contact with the airbag while it is de
p loying, do not sit any closer to the instru
ment panel tha n necessary and always wear
the three-point safety belt provided ad justed
correctly . We recommend that you adjust the
passenger's seat i n the follow ing ma nner:
• Bring the back rest up to an (a lmost) upr ight
pos it ion.
Do not r ide w ith the seat reclined .
• The idea l position fo r the head restra int is
with the upper edge of the rest ra in t l eve l
with the top o f your head
¢ page 62. You
sho uld
not lower the top o f the restra int be
l ow the level of your eyes .
• Place your feet on the floor in front of the
passenger's seat .
Adjusting front seats
manually
Adjustment controls
Applies to vehicles: with manual seat adjustment
Various controls on the manual seats provide
a wide range for individual adjustments.
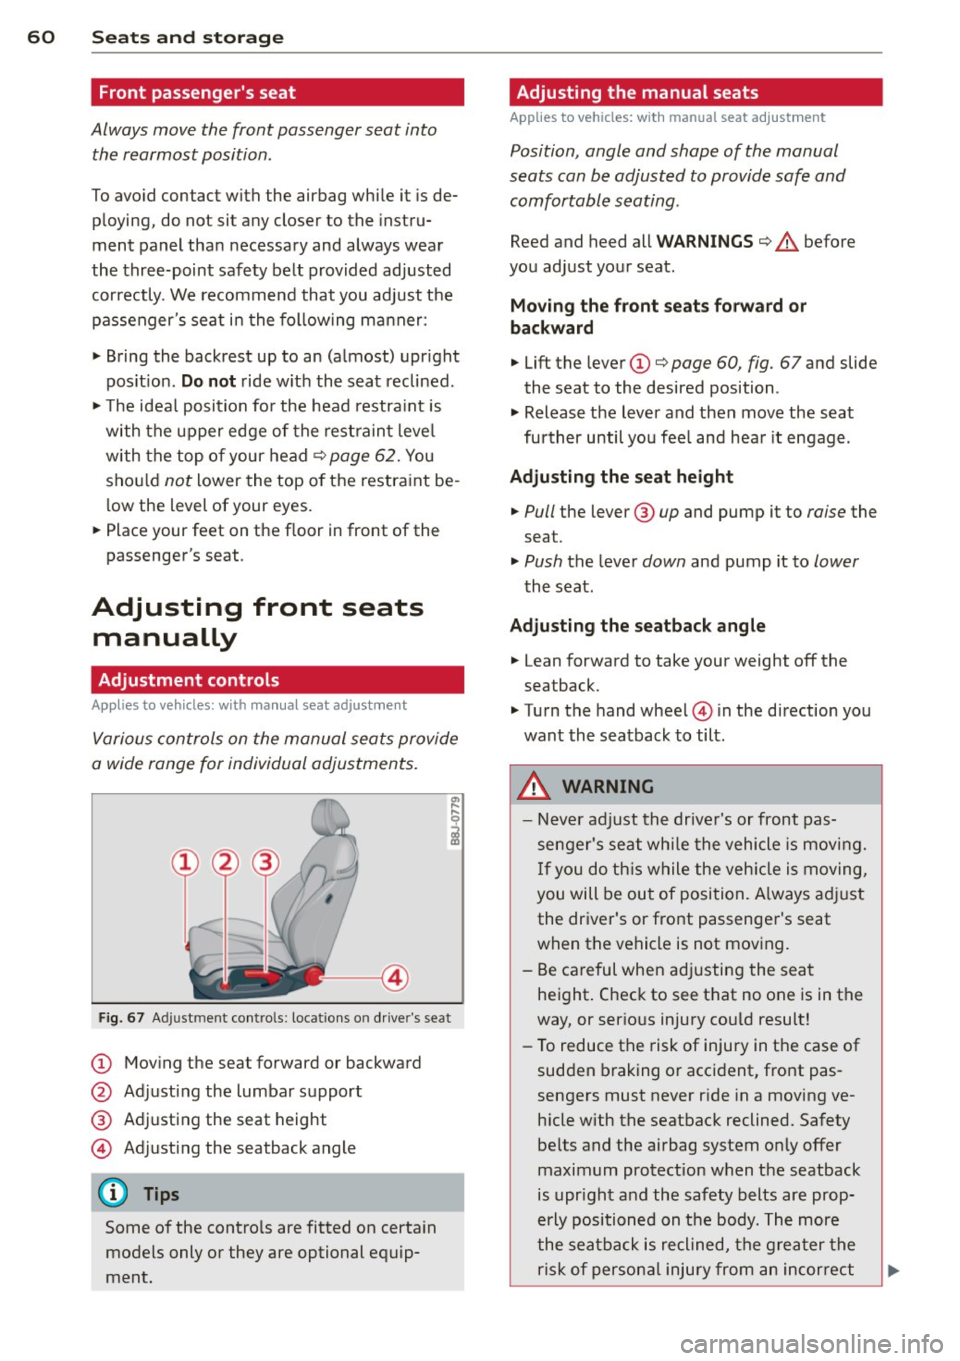
Fig . 67 Adj ust ment contro ls : locat ions o n dr ive r's seat
CD Mov ing the seat forward or backward
@ Ad justing the lumbar support
® Adjusting the seat height
© Adjusting the seatback angle
Some of the contro ls are fitted on certa in
models only or they are optional equip
ment.
Adjusting the manual seats
Applies to vehicles: with manual seat adjustment
Position, angle and shape of the manual
seats can be adjusted to provide safe and
comfortable seating .
Reed and heed all WARNINGS¢.&. before
you adjust your seat.
Moving the front seats forward or
backward
• Lift the leve r CD¢ page 60 , fig. 67 and slide
the seat to the desired position .
• Release the lever and then move the seat
fu rther until you fee l and hea r it engage.
Adjusting the seat height
• Pull the lever ® up and pump it to raise the
seat.
• Push the lever down and pump it to lower
the seat .
Adjusting the seatback angle
• Lean forward to take your weight off the
seatback.
• Turn the hand wheel © in the d irection you
want the seatback to tilt.
,&. WARNING ,--
- Never adjust the drive r's or front pas
senger's seat whi le the vehicle is moving.
If you do th is w hile the veh icle is moving,
you will be out of posi tion. A lways ad just
the dr iver's or front passenger's seat
when the vehicle is not moving.
- Be ca reful when adjustin g the seat
height . Check to see that no one is in the
way, or ser ious injury cou ld result!
- To reduce the risk of injury in the case of
sudden b raking o r accident, front pas
sengers must never r ide in a moving ve
h icle with the seatback reclined. Safety
be lts and the airbag system only offer
maximum protection when the seatback
is upr ight and the safety belts are prop
erly positioned on the body. The more
the sea tba ck is reclined, the gre ater the
risk of person al injury from a n incorrect